background image

45

3

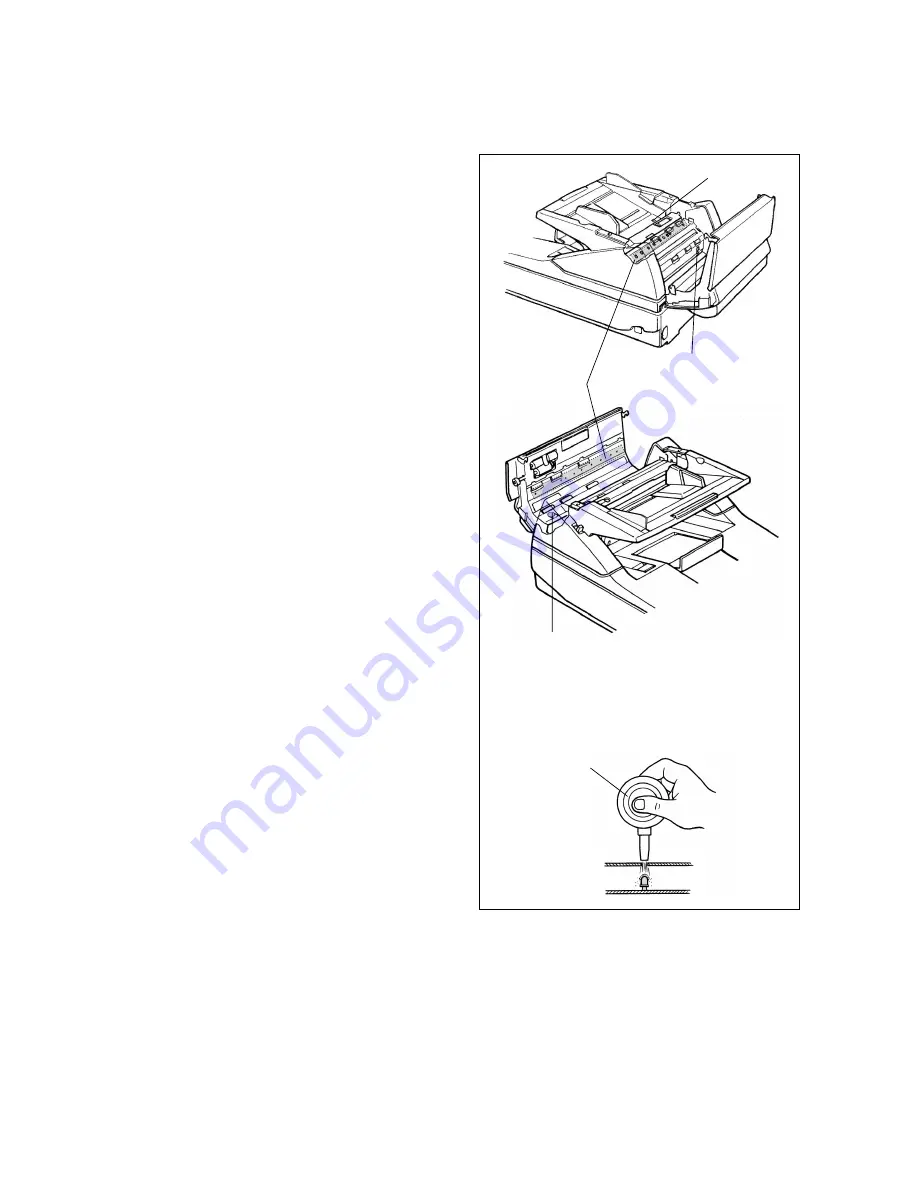
Use the blower brush provided with
the scanner to clean the document
sensors, the double-feed detection
sensors, and paper detection
sensor.

Cleaning the scanner

Paper detection sensor

Double-feed detection sensor

Document sensors

Double-feed detection sensor

To clean the document, double-feed, and paper de-
tection sensors, remove the brush from the blower
and blow out the dirt through the holes

Blower

Summary of Contents for DR-4580U

Page 1: ...Maintenance Guide Please read these instructions carefully before using this product and save them for future reference...

Page 2: ...xperiencing these problems clean the rollers document sensor double feed detection sensor and paper detection sensor If the problem persists after cleaning purchase a Exchange Roller Kit sold separate...

Page 3: ...tion Caution To prevent the rollers from moving out of position you must wipe them clean in the direction recom mended in the illustration The retard roller especially must be wiped in one direction t...

Page 4: ...cover separate Raise the ADF and open it com pletely 6 Soak a clean cloth in a weak solu tion of water and mild detergent then wring the cloth out tightly Use the cloth to wipe the surfaces of the rol...

Page 5: ...on tray to close the ADF Cleaning the scanning path Cleaning the scanning glass the CIS glass the white plate the sensor roller the document sensor the double feed detection sensor and the paper detec...

Page 6: ...ction sensors and paper detection sensor Cleaning the scanner Paper detection sensor Double feed detection sensor Document sensors Double feed detection sensor To clean the document double feed and pa...

Page 7: ...ADF door press down evenly on both sides to ensure that it latches shut correctly 5 Open the ADF Pull out the exit document stop per in the direction of the arrow Below the hopper pull out the Front d...

Page 8: ...during cleaning reattach it after clean ing is completed 49 7 Close the ADF With your hands on both sides of the ADF press down slowly and gently with even pressure on both sides until you hear it loc...

Page 9: ...cover 2 Soak a clean cloth in a weak solu tion of water and mild detergent then wring the cloth out tightly Use the cloth to clean the document glass and the cover sheet 3 Slowly close the document co...

Page 10: ...bushings on both ends of the shaft into the guide grooves matching the flat sides of the bush ings with the flat sides of the of the guide grooves 3 After reattaching the sensor roller press it light...

Page 11: ...cord not plugged in Insert the power cord completely Scanned image has black dots or white patches after scanning from the flatbed Document glass and cover sheet are dirty Clean the document glass and...

Page 12: ...cument was skewed Open the ADF and remove the stopped document 39 U 2 0 S k e w E r r o r Originals are still in the scanner Remove all documents in the ADF Error Message Table Possible Cause Remedy L...

Reviews: