background image

Summary of Contents for ELPH115IS IXUS 132

Page 1: ...s guide will help you learn to use the camera properly o Store this guide safely so that you can use it in the future Click the buttons in the lower right to access other pages _ Next page _ Previous page _ Page before you clicked a link To jump to the beginning of a chapter click the chapter title at right From chapter title pages you can access topics by clicking their titles CANON INC 2013 CDD ...

Page 2: ...ecorded or to be recorded in a way that is machine readable o images recorded by the camera are intended for personal use Refrain from unauthorized recording that infringes on copyright law and note that even for personal use photography may contravene copyright or other legal rights at some performances or exhibitions or in some commercial settings o The camera warranty is valid only in the area ...

Page 3: ... is used when shooting or viewing still images Indicates that the function is used when shooting or viewing movies Screen LCD monitor F_ Playback button Movie button Mode switch AV OUT Audio video output DIGITAL terminal Indicator MENU button _ 1_ Exposure compensation T _ Wi Fi Up button 1_ Exposure compensation Up button _ Macro Left button FUNC SET button _ Flash Right button DISR Display Down ...

Page 4: ... which they resemble o The following camera buttons and controls are represented by icons A Up button on back _ Left button on back _ Right button on back v Down button on back o Shooting modes and on screen icons and text are indicated in brackets o Important information you should know o 8 Notes and tips for expert camera use o _ _i_xx Pages with related information in this example xx represents...

Page 5: ... Range and Focusing 64 Flash 68 Other Settings 69 _ i_ Playback Mode 70 Viewing 7I Browsing and Filtering Images 73 Image Viewing Options 74 Protecting Images 76 Erasing Images 78 Rotating Images 80 Image Categories 81 Editing Still Images 82 Editing Movies 85 _ Wi Fi Functions 87 What You Can Do With Wi Fi 88 Using Wi Fi to Send Images From the Camera 89 Wi Fi Wireless LAN Precautions 89 Security...

Page 6: ...ure Effect Toy Camera Effect Monochrome 51 52 52 Focus on faces 35 49 65 Without using the flash Flash Off 41 include yourself in the shot Self Timer 39 55 Add a date stamp 41 View View images Playback Mode 71 Automatic playback Slideshow 75 On a TV 119 On a computer 19 Browse through images quickly 73 Erase images 78 J_ Shoot View Movies Shoot movies 35 View movies Playback Mode 71 6 ...

Page 7: ...ach of children and infants Strap Putting the strap around a child s neck could result in asphyxiation o Use only recommended power sources o Do not attempt to disassemble alter or apply heat to the product o Avoid dropping or subjecting the product to severe impacts o To avoid the risk of injury do not touch the interior of the product if it has been dropped or otherwise damaged o Stop using the ...

Page 8: ...ful not to bang it subject it to strong impacts or shocks or let it get caught on other objects Be careful not to bump or push strongly on the lens This could lead to injury or damage the camera Be careful not to subject the screen to strong impacts if the screen cracks injury may result from the broken fragments When using the flash be careful not to cover it with your fingers or clothing This co...

Page 9: ...t and distort resulting in fire o Do not place the battery near pets Pets biting the battery could cause leakage overheating or explosion resulting in fire or damage o Do not sit down with the camera in your pocket Doing so may cause malfunctions or damage the screen o When putting the camera in your bag ensure that hard objects do not come into contact with the screen o Do not attach any hard obj...

Page 10: ...ructions from initial preparations to shooting playback and saving on a computer initial Preparations 1t Trying the Camera Out 15 Software PDF Manuals on the included CD ROM 18 Downloadable Software 22 System Map 26 10 ...

Page 11: ...o a power outlet The charging lamp turns orange and charging begins When charging is finished the lamp turns green 3 Remove the battery After unplugging the battery charger remove the battery by pushing it in _ and up 2 To protect the battery and keep it in optimal condition do not charge it continuously for more than 24 hours For battery chargers that use a power cord do not attach the charger or...

Page 12: ...he locked position If you insert the battery facing the wrong way it cannot be locked into the correct position Always confirm that the battery is facing the right way and locks when inserted 4 insert the memory card Insert the memory card facing as shown until it clicks into the locked position Make sure the memory card is facing the right way when you insert it Inserting memory cards facing the ...

Page 13: ...Turn the camera on Press the power button The Date Time screen is displayed 2 Set the date and time Press the _ _ buttons to choose an option Press the A v buttons to specify the date and time When finished press the button 4 Finish the setup process Press the button when finished After a confirmation message the setting screen is no longer displayed To turn off the camera press the power button _...

Page 14: ...ted the Date Time screen will be displayed when you turn the camera on Follow the steps on 13 to set the date and time Disp ay Language Change the display language as needed S J Enter Playback mode Press the F_ button 2 Access the setting screen Press and hold the button and then immediately press the MENU button 3 Set the display language Press the A v _ _ buttons to choose a language and then pr...

Page 15: ...yed in the upper right of the screen Frames displayed around any detected subjects indicate that they are in focus 3 Compose the shot To zoom in and enlarge the subject move the zoom lever toward 1 _3 telephoto and to zoom away from the subject move it toward wide angle I h 4 Shoot Shooting Still Images Focus Press the shutter button lightly halfway down The camera beeps twice after focusing and A...

Page 16: ...movie button Finish shooting Press the movie button again to stop shooting The camera beeps twice as recording stops After shooting images or movies you can view them on the screen as follows Enter Playback mode Press the r_ button Your last shot is displayed 2 Browse through your images To view the previous image press the 4 button To view the next image press the _ button To access Scroll Displa...

Page 17: ...lfway 2 Erase the image Press the button press the A v buttons to choose _ and then press the button again After Erase is displayed press the 4 buttons to choose Erase and then press the button The current image is now erased To cancel erasure press the 4 buttons to choose Cancel and then press the button o You can also erase all images at once 79 Erasing the Images You can choose and erase unneed...

Page 18: ...te Function Using the software you can update to the latest version and download new functions via the Internet some software excluded Be sure to install the software on a computer with an Internet connection so you can use this function _ _ i Internet access is required to use this function and any ISP account charges and access fees must be paid separately PDF Manuals Camera User Guide Refer to ...

Page 19: ...ncludes Silverlight 5 1 max 100 MB Additionally in Windows XP Microsoft NET Framework 3 0 or later max 500 MB must be installed Installation may take some time depending on computer performance Check the Canon website for the latest system requirements including supported OS versions WJ nstal in_ the Software Windows 7 and Mac OS X 10 6 are used here for the sake of illustration Using the software...

Page 20: ... to the latest version and download new functions Installation may take some time depending on computer performance and the Internet connection Click Finish or Restart on the screen after installation and remove the CD ROM when the desktop is displayed Turn the camera off and disconnect the cable o When not connected to the Internet there are the following limitations The screen in step 3 will not...

Page 21: ...ra and then click import Untransferred Images Images are now saved to the Pictures folder on the computer in separate folders named by date After images are saved close CameraWindow press the r_ button to turn the camera off and unplug the cable For instructions on viewing images on a computer refer to the Software Guide _J_ j 18 o In Windows 7 if the screen in step 2 is not displayed click the _ ...

Page 22: ...software some software excluded _ It may not be possible to install the PDF manuals on computers that do not meet the system requirements 19 However you can view the manuals on a computer that supports Adobe Reader by copying the PDF files in the Readme folder on the CD ROM directly to a convenient location on the computer The software available for download from the Canon website is introduced be...

Page 23: ...olution or higher 1 Information on computer models compatible with Mac OS X 10 8 is available on the Apple website 2 Includes Silverlight 5 1 max 100 MB Additionally in Windows XP Microsoft NET Framework 3 0 or later max 500 MB must be installed Installation may take some time depending on computer performance o Check the Canon website for the latest system requirements including supported OS vers...

Page 24: ...ct to the Internet to update to the latest version and download new functions Installation may take some time depending on computer performance and the Internet connection Click Finish or Restart on the screen after installation Turn the camera off and disconnect the cable 9 o Using the software you can update to the latest version and download new functions via the Internet some software excluded...

Page 25: ...s established between the camera and computer For Windows follow the steps introduced below In the screen that displays click the _ link to modify the program Choose Downloads Images From Canon Camera using Canon CameraWindow and then click OK CameraWindow Double click _ 3 Save the images to the computer Click Import Images from Camera and then click import Untransferred Images Images are now save...

Page 26: ... to the computer without using the software the following limitations apply It may take a few minutes after you connect the camera to the computer until camera images are accessible Images shot in vertical orientation may be saved in horizontal orientation Image protection settings may be cleared from images saved to a computer Some problems may occur when saving images or image information depend...

Page 27: ...he malfunction of non genuine Canon accessories e g a leakage and or explosion of a battery pack Please note that this warranty does not apply to repairs arising out of the malfunction of non genuine Canon accessories although you may request such repairs on a chargeable basis Note that availability varies by area and some accessories may no longer be available AC Adapter Kit ACK DC9O System High ...

Page 28: ...cs Practical guide that introduces other camera basics and describes shooting and playback options On Off 29 Shutter Button 30 Shooting Display Options 30 FUNC Menu 31 MENU Menu 32 Indicator Display 33 Clock 33 28 ...

Page 29: ...ivates the screen Display Off and then turns itself off after a specific period of inactivity Power Saving in Shooting Mode The screen is automatically deactivated after about one minute of inactivity In about two more minutes the lens is retracted and the camera turns itself off To activate the screen and prepare for shooting when the screen is off but the lens is still out press the shutter butt...

Page 30: ...tter button halfway o Length of shutter sound playback varies depending on the time required for the shot It may take longer in some shooting scenes and images will be blurry if you move the camera or the subject moves before the shutter sound ends Press the v button to view other information on the screen or to hide the information For details on the information displayed see On Screen Informatio...

Page 31: ...nctions can be specified simply by pressing the or _ button or another screen is displayed for configuring the function 3 Choose an option Press the A v buttons to choose an option Options labeled with a _ icon can be configured by pressing the MENU button To return to the menu items press the 4 button 4 Finish the setup process Press the button The screen before you pressed the button in step I i...

Page 32: ...lly you can switch between tabs by pressing the 4 lb buttons 3 Choose a setting Press the A v buttons to choose a setting To choose settings with options not shown first press the or t_ button to switch screens and then press the _ v buttons to select the setting To return to the previous screen press the MENU button 4 Choose an option Press the _ _ buttons to choose an option Finish the setup pro...

Page 33: ...corrupt images or damage the camera or memory card You can check the current time y Press and hold the button The current time appears If you hold the camera vertically while using the clock function it will switch to vertical display Press the 4 _ buttons to change the display color Press the button again to cancel the clock display o When the camera is off press and hold the button then press th...

Page 34: ...e Convenient mode for easy shots with greater control over shooting Shooting Smart Auto 35 Common Convenient Features 39 Image Customization Features 42 Helpful Shooting Features 44 Customizing Camera Operation 46 34 ...

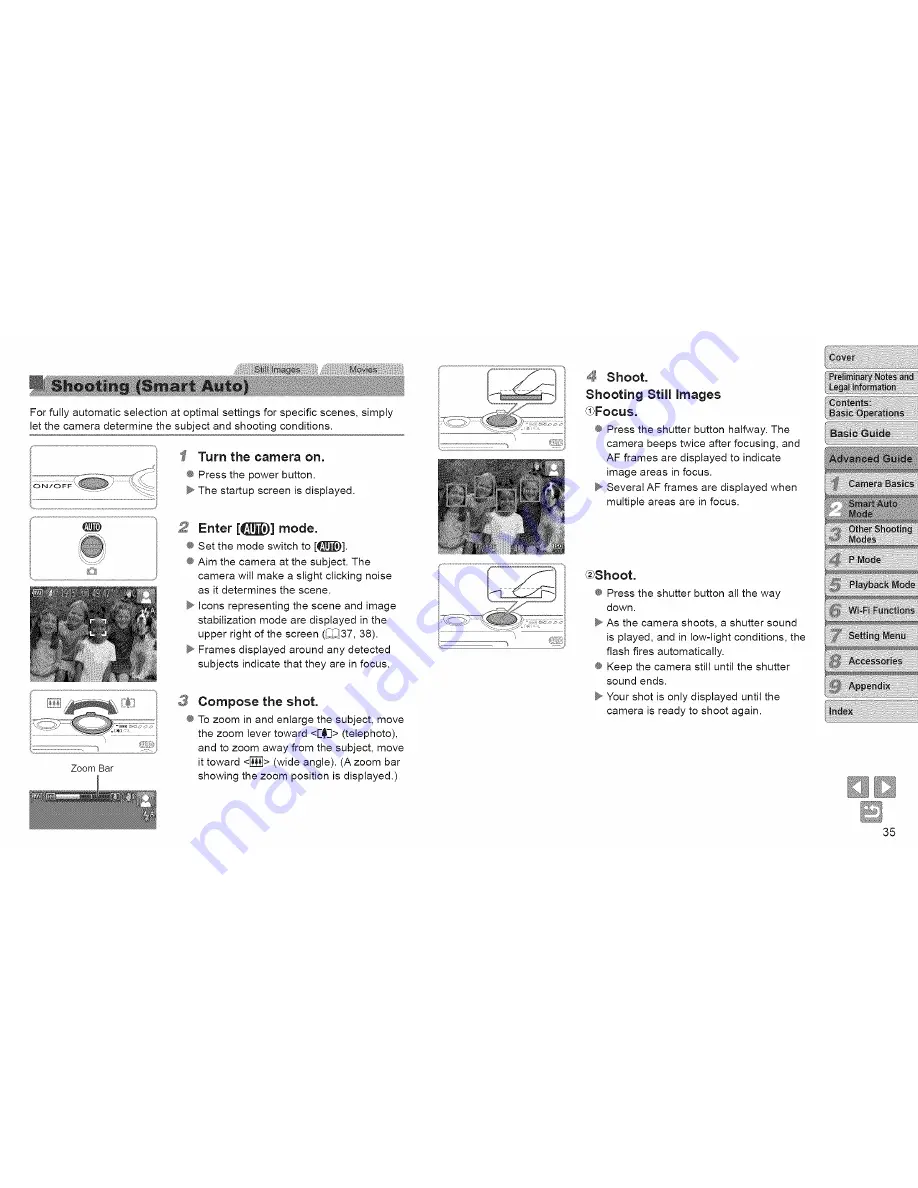
Page 35: ...ed subjects indicate that they are in focus h Zoom Bar 3 Compose the shot To zoom in and enlarge the subject move the zoom lever toward E_t3 telephoto and to zoom away from the subject move it toward _ wide angle A zoom bar showing the zoom position is displayed 4 Shoot Shooting Still Images d Focus Press the shutter button halfway The camera beeps twice after focusing and AF frames are displayed ...

Page 36: ...held down the camera will no longer sound To activate sounds again press the MENU button and choose Mute on the _ T tab and then press the 4 _ buttons to choose Off Still Images ii_ _ Aflashing _ _ icon warns that images are more likely to be blurred by camera shake In this case mount the camera on a tripod or take other measures to keep it still If your shots are dark despite the flash firing mov...

Page 37: ...e sounds made by the camera will be recorded _ Audio recording is monaural _Scene icons In q_ _ mode shooting scenes determined by the camera are indicated by the icon displayed and corresponding settings are automatically selected for optimal focusing subject brightness and color 1 Not displayed for movies 2 Displayed in dark scenes when the camera is held still as when mounted on a tripod Orange...

Page 38: ...ke and horizontal stabilization stops Similarly when you follow subjects moving vertically image stabilization only counteracts horizontal camera shake _ To cancel image stabilization set IS Mode to Offj 69 In this case an IS icon is not displayed A variety of frames are displayed once the camera detects subjects you are aiming the camera at A white frame is displayed around the subject or person ...

Page 39: ... self timer you can include yourself in group photos or other timed shots The camera will shoot about 10 seconds after you press the shutter button Configure the setting Press the button choose _ in the menu and then choose the i_ option _31 Once the setting is complete i_ is displayed _ Moving the zoom lever will display the zoom bar which indicates the zoom position The color of the zoom bar wil...

Page 40: ... Timer You can specify the delay 0 30 seconds and number of shots 1 10 Choose _ _ Following step 1 in Using the Self Timer I C 39 choose _ and press the MENU button 2 Configure the setting Press the A v buttons to choose Delay or Shots Press the 4i _ buttons to choose a value and then press the button Once the setting is complete _ is displayed Follow step 2 in Using the Self Timer i_139 to shoot ...

Page 41: ...annot be edited or removed so confirm beforehand that the date and time are correct __13 Configure the setting Press the MENU button choose Date Stamp _ on the _ tab and then choose the desired option _32 Once the setting is complete _ is displayed _ o If a flashing _ icon is displayed when you press the shutter button halfway in low light conditions mount the camera on a tripod or take other meas...

Page 42: ...e the image aspect ratio ratio of width to height as follows Configure the setting Press the button choose 4 3 in the menu and choose the desired option S _ _ 31 Once the setting is complete the screen aspect ratio will be updated To restore the original setting repeat this process but choose 4 3 16 9 Same aspect ratio as widescreen HDTVs 3 2 Same aspect ratio as 35mm film used for printing images...

Page 43: ...Access the Flash Settings screen Press the MENU button choose Flash Settings on the 0 tab and then press the button _ 32 Guidelines for Choosing Resolution Based on Paper Size for 4 3 images _ 165x234in L1 S Fore mailingimages _M1 x 8 3 in 2 Configure the setting Choose Red Eye Corr and then choose On _32 Once the setting is complete is displayed To restore the original setting repeat this process...

Page 44: ...e _ _ _Displaying Grid Lines Grid lines can be displayed on the screen for vertical and horizontal reference while shooting Configure the setting Press the MENU button choose Grid Lines on the O tab and then choose On _ _32 Once the setting is complete grid lines are displayed on the screen To restore the original setting repeat this process but choose Off 1280 x 720 HD 640 x 480 _or shooting in s...

Page 45: ...restore the original setting choose Off in step 1 _i_ The area in focus will not be magnified when you press the shutter button halfway if a face was not detected if the person is too close to the camera and their face is too large for the screen or if the camera detects subject movement _ The display will not magnify when using the digital zoom 39 or Tracking AF 65 2 Shoot flashes when the camera...

Page 46: ... AF assist Beam on the 0 tab and then choose Off _32 To restore the original setting repeat this process but choose On _Deactivating the Red Eye Reduction Lamp You can deactivate the red eye reduction lamp that lights up to reduce red eye when the flash is used in low light shots Access the Flash Settings screen Press the MENU button choose Flash Settings on the _ _ tab and then press the button C...

Page 47: ... sec _ou can take another shot by pressing the shutter button halfway again Hold Displays images until you press the shutter button halfway Off No image display after shots Changing the Screen Displayed After Shots Set Display Time to 2 sec 4 sec 8 sec or Hold i 47 2 Configure the setting Press the A v buttons to choose Display Info Press the _ _ buttons to choose the desired option _32 To restore...

Page 48: ...Modes Shoot more effectively in various scenes and take shots enhanced with unique image effects or captured using special functions Specific Scenes 49 Applying Special Effects 50 Special Modes for Other Purposes 54 48 ...

Page 49: ...wy backgrounds ii_4i Shoot fireworks Fireworks Vivid shots of fireworks 3 Shoot _ _ Shoot portraits Portrait Take shots of people with a softening effect 9 In _ _ mode mount the camera on a tripod or take other measures to keep it still and prevent camera shake Additionally you should set IS Mode to Off when using a tripod or other means to hold the camera still __69 o _6_ mode resolution is i 230...

Page 50: ... Effect Fish eye Effect Shoot with the distorting effect of a fish eye lens Choose _ Follow steps 1 2 in Specific Scenes _ _49 and choose _ 2 Choose an effect level Press the v button press the _ _ buttons to choose an effect level and then press the _ button A preview is shown of how your shot will look with the effect applied 3 Shoot _i_ I _ Try taking some test shots first to make sure you obta...

Page 51: ...ck speed Press the MENU button and then press the _ 1_ buttons to choose the speed 4 Return to the shooting screen and shoot Press the MENU button to return to the shooting screen and then shoot Playback Speed and Estimated Playback Time for One Minute Clips 5X Approx 12 sec lOx Approx 6 sec 20X Approx 3 sec _ _ _ __ The zoom is not available when shooting movies Be sure to set the zoom before sho...

Page 52: ... and then press the button A preview is shown of how your shot will look with the effect applied 3 Shoot Standard Warm Cool _ _ Try taking some test shots first to make sure you obtain the desired results Shoot images in black and white sepia or blue and white Choose 1_1 Follow steps 1 2 in Specific Scenes _ _49 and choose _ 2 Choose a color tone Press the v button press the _ _ buttons to choose ...

Page 53: ...your specified color choose a large negative value To keep colors similar to your specified color as well choose a large positive value Press the button to return to the shooting screen 5 Shoot _ _ Using the flash in this mode may cause unexpected results In some shooting scenes images may look grainy and colors may not look as expected _ Shooting with Color Swap You can replace one image color wi...

Page 54: ...n The camera shoots automatically after detecting a smile even without you pressing the shutter button Choose _ L_ Follow steps 1 2 in Specific Scenes _ _ j49 and choose _ and then press the v button Press the 4 _ buttons to choose _ _ and then press the button The camera now enters shooting standby mode and Smile Detection on is displayed 2 Aim the camera at a person Each time the camera detects ...

Page 55: ...s inside the frame To cancel shooting after you have triggered the self timer press the MENU button o If the wink is not detected wink again slowly and deliberately Winking may not be detected if eyes are obscured by hair a hat or glasses o Closing and opening both eyes at once will also be detected as a wink o If winking is not detected the camera will shoot about 15 seconds later o To change the...

Page 56: ...conds later To change the number of shots press the A _ buttons after choosing _ in step 1 Blink Detection 45 is only available for the final shot istiJi m _Shooting Long Exposures Long Shutter Specify a shutter speed of 1 15 seconds to shoot long exposures In this case mount the camera on a tripod or take other measures to prevent camera shake Choose S Follow steps 1 2 in Specific Scenes _ _49 an...

Page 57: ... the first shot The first shot will determine the exposure and white balance 3 Take additional shots Compose the second shot so that it partially overlaps the image area of the first shot Minor misalignment of overlapping portions will be corrected automatically when the images are combined You can take up to 26 shots the same way you took the second shot 4 Finish shooting Press the _ button 5 Use...

Page 58: ... set to 0 P Program AE AE Auto Exposure Before using a function introduced in this chapter in modes other than P make sure the function is available in that mode _ _ 138 142 Shooting in Program AE P Mode 59 image Brightness Exposure Compensation 59 Color and Continuous Shooting 6t Shooting Range and Focusing 64 Flash 68 Other Settings 69 58 ...

Page 59: ...46 The standard exposure set by the camera can be adjusted in 1 3 stop increments in a range of 2 to 2 Exposure Compensation Bar Press the A button As you watch the screen press the 4 _ buttons to adjust brightness and then press the A button again when finished The correction level you specified is now displayed When shooting movies shoot with the exposure compensation bar displayed When shooting...

Page 60: ...enter image area calculated by treating brightness in the central area E_ Weighted Avg n the central a S otp _ot AE Point frame center of the screen _ Changing the SO Speed Press the button choose RU_TO in the menu and choose the desired option d _ i 31 The option you configured is now displayed AUTO 100 200 400 8GO 1600 o To view the automatically set ISO speed when the camera is set to _ press t...

Page 61: ...and choose the desired option S_I 31 The option you configured is now displayed _ii_ Under some shooting conditions correction may be inaccurate or may cause images to appear grainy _ You can also correct existing images 84 _B i Auto Day Light Cloudy Tungsten Fluorescent Fluorescent Custom a utomatically sets the optimal white balance for the shooting _onditions or shooting outdoors in fair weathe...

Page 62: ...k and white Press the button choose _FF in the menu and choose the desired option _ _ 31 The option you configured is now displayed _FF My Colors Off _IV Vivid Emphasizes contrast and color saturation making images sharper Z_N Neutral Tones down contrast and color saturation for subdued images _e Sepia Creates sepia tone images _W B W Creates black and white images Combines the effects of Vivid Bl...

Page 63: ... skin tones adjust the value to the left Press the MENU button to complete the setting Hold the shutter button all the way down to shoot continuously For details on the continuous shooting speed see Continuous Shooting Speed _ 146 Configure the setting Press the button choose r q in the menu and then choose DJ_t _ _ 31 Once the setting is complete DJ_t is displayed 2 Shoot Hold the shutter button ...

Page 64: ...ing range see Shooting Range _ 146 Press the 4 button press the 4 _ buttons to choose At_ and then press the button Once the setting is complete _ is displayed _iiiiiiiiiiiiiiiiiii_i iiiii iiiiiiiiiii _ iiiiiiiiiiiiiiiiiiiiiiiiiiiiii iiiiiiiiiiiiiiiiiiiiiiiiiiiiiii _ _D ital Tele Converter The focal length of the lens can be increased by approximately 1 6x or 2 Ox This can reduce camera shake beca...

Page 65: ...alfway up to nine green frames are displayed around faces in focus _ _ If faces are not detected or when only gray frames are displayed without a white frame up to nine green frames are displayed in the areas in focus when you press the shutter button halfway If faces are not detected when Servo AF _ _ 66 is set to On the AF frame is displayed in the center of the screen when you press the shutter...

Page 66: ...er One AF frame is displayed in the center Effective for reliable focusing di_ _ A yellow AF frame is displayed with O if the camera cannot focus when you press the shutter button halfway Note that AF point zooming _ 145 is not possible _ o To reduce the AF frame size press the MENU button and set AF Frame Size on the i_1 tab to Small 32 o The AF frame size is set to Normal when you use the digita...

Page 67: ...bjects it is aimed at even when the shutter button is not pressed Instead you can limit camera focusing to the moment you press the shutter button halfway Press the MENU button choose Continuous AF on the 0 tab and then choose Off _i_ 32 o_Helps avoid missing sudden photo opportunities because the camera n On Iconstantly focuses on subjects until you _tery power because the Off _Shooting with the ...

Page 68: ...g is complete _ is displayed 2 Shoot Even after the flash fires ensure that the main subject does not move until the shutter sound is finished playing _ _ Mount the camera on a tripod or take other measures to keep it still and prevent camera shake Additionally you should set IS Mode to Off when using a tripod or other means to hold the camera still _ _ _ Sh o o t in_ with the FE Lock Just as with...

Page 69: ...o compression ratios as follows _41 Super Fine _ Fine For guidelines on how many shots at each compression ratio can fit on a memory card see Number of 4 3 Shots per Memory Card _ Z_I 145 Configure the setting Press the button choose All in the menu and choose the desired option _ 31 Press the MENU button choose IS Mode on the _J tab and then choose the desired option _32 The setting is changed to...

Page 70: ...o enter Playback mode d _ It may not be possible to play back or edit images that were renamed or already edited on a computer or images from other cameras Viewing 7t Browsing and Filtering images 73 image Viewing Options 74 Protecting Images 76 Erasing images 78 Rotating Images 80 Image Categories 81 Editing Still images 82 Editing Movies 85 7O ...

Page 71: ...iny at this time To return to single image display press the button To browse images grouped by shooting date press the A v buttons in Scroll Display mode Volume Indicator Movies are identified by a L 4J_R_ icon To play movies go to step 3 3 Play movies To start playback press the button press the A v buttons to choose _ and then press the button again 4 Adjust the volume Press the L v buttons to ...

Page 72: ...n in detailed information display _ _72 Histogram Dark _ Bright h Low _iiii ili ii ii_i_iiiiiii ii ili_Jiiiii ililiiliilii_i i_iiiiiiiiiiiiliiliiliil _ The graph in detailed information display L _72 is a histogram showing the distribution of brightness in the image The horizontal axis represents the degree of brightness and the vertical axis how much of the image is at each level of brightness Vi...

Page 73: ... memory card full of images by filtering image display according to your specified conditions You can also protect i _ 76 or delete S_ 78 these images all at once _ _ People Displays images with detected faces _ Shot Date Displays the images shot on a specific date _ Favorites Displays images tagged as favorites 81 a R Still image Movie Displays only still images or movies Choose a search conditio...

Page 74: ..._ images o Approximate Position of Displayed Area Magnify an image Moving the zoom lever toward O will zoom in and magnify the image and _ is displayed You can magnify images up to about 10x by continuing to hold the zoom lever To zoom out move the zoom lever toward _ You can return to single image display by continuing to hold it Move the display position and switch images as needed To move the d...

Page 75: ...g playback by pressing the 4 _ buttons For fast forward or fast rewind hold the 4 _ buttons down In image search mode 73 only images matching search conditions are played Changing Slideshow Settings You can set up slideshows to repeat and you can change the transitions between images and the display duration of each image Access the setting screen Press the MENU button and then choose Slideshow on...

Page 76: ...press the button again Press the MENU button to restore single image display _ i_ _ Only still images shot with this camera are played back using Smart Shuffle Smart Shuffle is not available in the following cases There are less than 50 shots taken with this camera An unsupported image is currently displayed images are shown in filtered display _ 73 Protect important images to prevent accidental e...

Page 77: ...eat this process to specify other images 3 Protect the image Press the MENU button A confirmation message is displayed Press the 4 buttons to choose OK and then press the _ button _ o Images will not be protected if you switch to Shooting mode or turn the camera off before finishing the setup process in step 3 Choose Select Range Following step 2 in Using the Menu _ _ i77 choose Select Range and p...

Page 78: ...e button You can choose and erase unneeded images one by one Be careful when erasing images because they cannot be recovered However protected images S_ I 76 cannot be erased Choose an image to erase Press the _ _ buttons to choose an image 2 Erase the image Press the _ button and then choose in the menu _i_31 After Erase is displayed press the _ _ buttons to choose Erase and then press the button...

Page 79: ...n method and then press the button To return to the menu screen press the MENU button Choosing Images Individually Choose Select Following step 2 in Choosing a Selection Method _i_79 choose Select and press the button 2 Choose an image Once you choose an image following step 2 in Choosing Images Individually S _ 177 _ is displayed To cancel selection press the button again _ is no longer displayed...

Page 80: ...p 2 in Choosing a Selection Method _IZ_I_79 choose Select All Images and press the button 2 Erase the images Press the 4 _ buttons to choose OK and then press the button Change the orientation of images and save them as follows Choose Press the Q button and then choose _E_ in the menu _ _31 2 Rotate the image Press the 4 or _ button depending on the desired direction Each time you press the button...

Page 81: ...will be displayed in the original orientation In Smart Shuffle _ _76 mode even if Auto Rotate is set to Off images shot vertically will be displayed vertically and rotated images will be displayed in the rotated orientation You can organize images by tagging them as favorites By choosing a category in filtered playback you can restrict the following operations to all of those images Viewing _ j71 ...

Page 82: ...Favorite images will have a three star rating _ _ k i_ when transferred p_ to computers running Windows 8 Windows 7 or Windows Vista Does not apply to movies _ _ Image editing _i_82 85 is only available when the memory card has sufficient free space Resizing images Save a copy of images at a lower resolution Choose Resize Press the MENU button and choose Resize on the F_ tab _ _32 2 Choose an imag...

Page 83: ...view of Image After Cropping Resolution After Cropping 3 Adjust the cropping area A frame is displayed around the portion of the image to be cropped The original image is shown in the upper left and a preview of the image as cropped is shown in the lower right To resize the frame move the zoom lever To move the frame press the A v _ b buttons 4 To change the frame orientation press the button Pres...

Page 84: ...ors 62 _cor_c_ti_ng image Bright ess i Cor trast Excessively dark image areas such as faces or backgrounds can be detected and automatically adjusted to the optimal brightness Insufficient overall image contrast is also automatically corrected to make subjects stand out better Choose from four correction levels and then save the image as a separate file d_ For some images correction may be inaccur...

Page 85: ...rite in step 4 In this case the original image will be erased o Protected images cannot be overwritten You can cut movies to remove unneeded portions at the beginning or end Movie Editing Panel Movie Editing Bar Choose _ Following steps 1 5 in Viewing _ _71 choose _ and press the button The movie editing panel and editing bar are now displayed 2 Specify portions to cut Press the A v buttons to cho...

Page 86: ...New File and then press the button The movie is now saved as a new file b To overwrite the original movie with the cut one choose Overwrite in step 4 In this case the original movie will be erased o Overwrite is only available when memory cards lack sufficient free space o Movies may not be saved if the battery runs out while saving is in progress o When editing movies you should use a fully charg...

Page 87: ...i Fi Wireless LAN Precautions 89 Security Precautions 90 Glossary 91 Registering a Camera Nickname First time only 92 Connecting to Web Services _93 Connecting to a Smartphone_95 Connecting to Another Camera 97 Connecting to a Computer 98 Connecting to a Printer 103 Sending Images 105 Sending Images to a Computer via CANON iMAGE GATEWAY 107 Geotagging images on the Camera 107 Editing or Erasing Wi...

Page 88: ... to a computer via CANON iMAGE GATEWAY Connecting to a Smartphone Send images to smartphones and tablet computers that have Wi Fi functions You can also geotag your shots from a connected smartphone or tablet installation of a dedicated application on the smartphone or tablet is required See the Canon website for details For convenience in this manual smartphones tablets and other compatible devic...

Page 89: ...lations visit the Canon website to check where use is allowed Note that Canon cannot be held liable for any problems arising from WLAN use in other countries and regions Doing any of the following may incur legal penalties Altering or modifying the product Removing the certification labels from the product According to foreign exchange and foreign trade law regulations export permission or service...

Page 90: ...ent than when using a LAN cable are required Keep the following points in mind when using Wi Fi o Only use networks you are authorized to use This product searches for Wi Fi networks in the vicinity and displays the results on the screen Networks you are not authorized to use unknown networks may also be displayed However attempting to connect to or using such networks could be regarded as unautho...

Page 91: ...ntify aspecific access point Also called the access point name or network name Encryption key This isakey used toencrypt data for transmission toand from an access point IP address This isan address used toidentify adevice within anetwork MAC address This isaunique address pre assigned toanetwork device Itisalso referred toas a physical address PictBridge USB L_N WIAN The camera can print to PictB...

Page 92: ... smartphone or printer wirelessly o To change the camera s nickname choose Wi Fi Settings on the 71 tab and then choose Change Device Nickname o If the Wi Fi menu is not displayed but only the display information changes when you press the A button first press the v button to switch from detailed information display 72 3 Enter a nickname Press the A v _ _ buttons to choose a character and then pre...

Page 93: ...http canon com cig and visit the CANON iMAGE GATEWAY site for your region Follow the instructions displayed to complete member registration free of charge You must have an account with Web services other than CANON iMAGE GATEWAY if you desire to use them For further details check the websites for each Web service you want to register 2 Connect the camera to a computer with the interface cable 20 O...

Page 94: ... be established When connecting to CANON iMAGE GATEWAY check the CANON iMAGE GATEWAY website for browser Microsoft Internet Explorer etc settings conditions and version information Separate ISP connection and access point fees may be applicable o After logging in to CANON iMAGE GATEWAY the second time in step 5 the screen in step 7 will be displayed To change settings for Web services you use clic...

Page 95: ... the _ buttons and then configure the setting If you prefer not todisplay recent target devices press the MENU button and on the _ tab choose Wi Fi Settings Target History Offj When establishing aWi Fi connection with asmartphone you can either use the camera as anaccess point Camera Access Point mode oruse another access point Follow these instructions when using the camera as anaccess point When...

Page 96: ...hoose the displayed SSID network name from the smartphone s Wi Fi setting menu Enter the encryption key displayed on the camera screen into the password field on the smartphone Start CameraWindow on the smartphone Once the smartphone is recognized on the camera the device connection screen will be displayed on the camera Choose a smartphone to connect to Press the A v buttons to choose the smartph...

Page 97: ...the _ tab choose Wi Fi Settings Target History Offj The image quality level for movies that can be sent may differ depending on the smartphone Refer tothe instruction manual provided with your smartphone for details To add multiple smartphones repeat the above procedures starting from step 1 To change privacy settings for smartphones added to the list choose the smartphone whose settings you want ...

Page 98: ...ist Configure computer settings for the connection add the computer as a connection destination and transfer images to the computer wirelessly using the software CameraWindow as follows o When connected to a computer the camera is used to establish the connection and then the computer software CameraWindow is used to transfer images Preparing_ to Register a Computer Prepare to register a computer ...

Page 99: ...network key The data encryption key used for transmission via Wi Fi Key index sent key The key specified when using WEP for Network certificate 1 data encryption o A router is a device that creates a network LAN structure for connecting multiple computers A router that contains an internal Wi Fi function is called a Wi Fi router o This guide refers to all Wi Fi routers and base stations as access ...

Page 100: ... connection If your access point is not WPS compatible establish a connection as described in Connecting to Access Points in the List _ Ji102 _ WPS makes it easy to complete settings when connecting devices over Wi Fi You can use either Push Button Configuration Method or PIN Method for settings on a WPS supported device Refer to the user guide provided with your access point to check if it suppor...

Page 101: ...have previously connected to the camera will automatically connect to it in step 3 To change access points select Switch Network from the screen that will be displayed when the connection is being established and follow steps 4 5 in Adding a Computer J_ _i 100 o You can connect to computers that you have already connected to by choosing them on the Select a Device screen in step 3 o If you chose P...

Page 102: ...ss point s encryption key refer to the body of the access point or its user manual o Up to 16 access points will be displayed If no access points are detected choose Manual Settings in step 2 to manually set an access point Follow on screen instructions and enter an SSID security settings and an encryption key o When you use an access point that you have already connected to for connecting to anot...

Page 103: ... camera turn off the camera You can also specify to save all images or only selected images to the computer and you can change the destination folder Refer to the Software Guide 18 for details Connect the camera to a printer via Wi Fi to print as follows When establishing a Wi Fi connection with a printer you can either use the camera as an access point Camera Access Point mode or use another acce...

Page 104: ...ns see Printing Images _ _ 121 9 When you are in the vicinity of an access point that you have previously connected to the camera will automatically connect to it in step 3 To change access points select Switch Network from the screen that will be displayed when the connection is being established and follow steps 4 5 in Adding a Computer iJ_i 100 o You can connect to printers that you have alread...

Page 105: ...and send Press the A v 4 _ buttons to choose Select and send and then press the button 2 Choose images Press the A v _ buttons to choose an image to send and then press the button _ is displayed To cancel selection press the button again is no longer displayed S Repeat this process to choose additional images After you finish choosing images press the MENU button Send the images Press the A v 4 _ ...

Page 106: ...ot be resized To send only one ofthe displayed images choose Resize on the screen instep 1 change the size and choose Send this image padding Comme ts Using the camera you can add comments alphanumeric characters and symbols to images that you send to email addresses social networking services etc The number of characters and symbols that can be entered may differ depending on the Web service Choo...

Page 107: ...NON iMAGE GATEWAY server is displayed on the screen 3 Turn on the computer Images are automatically saved to the computer when you turn it on _i _ When sending images you should use a fully charged battery or an _ AC adapte__ ___ _kit sold sepa a ely _1 1 11 __ 8 o Even if images were imported to the computer through a different method any images not sent to the computer via CANON iMAGE GATEWAY wi...

Page 108: ... Choose a device to edit Press the A v _ l_ buttons to choose the icon of the device to edit and then press the button 3 Choose Edit a Device Press the A v buttons to choose Edit a Device and then press the button Change Device Nickname 109 View Settings 96 Erase Connection Info 109 4 Choose a device to edit Press the A v buttons to choose the device to edit and then press the button 5 Choose an o...

Page 109: ...tion will be erased Returning the Wi Fi Settings to Default Return the Wi Fi settings to default if you transfer ownership of the camera to another person or dispose of it Choose Wi Fi Settings Press the MENU button and then choose Wi Fi Settings on the _ T tab _ _32 2 Choose Reset Settings Press the A v buttons to choose Reset Settings and then press the button 3 Restore the default settings Pres...

Page 110: ...7 Setting Menu Customize or adjust basic camera functions for greater convenience Adjusting Basic Camera Functions 11t 110 ...

Page 111: ...utton Adjust volume with the A v buttons as needed theVolme Adjust the volume of individual camera sounds as follows Choose Volume and then press the Q button Choose an item and then press the _ _ buttons to adjust the volume Hiding Hints and Tips Hints and tips are normally shown when you choose FUNC menu _i_ i 31 or Menu _32 items If you prefer you can deactivate this information Choose Hints Ti...

Page 112: ... _ Adjusting the date or time while in _ mode 13 will automatically update your 1_ Home time and date Lens Retraction Timing The lens is normally retracted for safety about one minute after you press the i _ button in Shooting mode _i_ 29 To have the lens retracted immediately after you press the i _l button set the retraction timing to 0 sec Choose Lens Retract and then choose Osec _ _Using Eco M...

Page 113: ...or maximum brightness press and hold the v button for at least one second when the shooting screen is displayed or when in single image display This will override the LCD Brightness setting on the t_ tab To restore the original brightness press and hold the v button again for at least one second or restart the camera Hiding the Start up Screen If you prefer you can deactivate display of the start ...

Page 114: ...ow level formatting in these cases Memory card error is displayed the camera is not working correctly card image reading writing is slower continuous shooting is slower or movie recording suddenly stops Low level formatting erases all data on a memory card Before low level formatting copy images on the memory card to a computer or take other steps to back them up On the screen in step 2 of Formatt...

Page 115: ...he Software Guide 18 22 for information on the card folder structure and image formats Date Based mage Storage Instead of saving images in folders created each month you can have the camera create folders each day you shoot to store shots taken that day Choose Create Folder and then choose Daily Images will now be saved in folders created on the shooting date Metric Non Metric Display Change the u...

Page 116: ...e _I tab o Video System _ 1119 o Wi Fi Settings _ _87 Restoring Defaults If you accidentally change a setting you can restore default camera settings Choose Reset All and then press the button Press the _ _ buttons to choose OK and then press the button Default settings are now restored o The following functions are not restored to default settings Shooting mode 49 Colors chosen in Color Accent j ...

Page 117: ...ccessories Enjoy the camera in more ways with optional Canon accessories and other compatible accessories sold separately Optional Accessories ti 8 Using Optional Accessories t19 Printing images 12t 117 ...

Page 118: ...old power Recommended when using the camera over extended periods or when connecting the camera to a printer or computer Cannot be used to charge the camera battery _ The battery charger and AC adapter kit can be used in areas with 100 240 VAC power 50 60 Hz For power outlets in a different format use a commercially available adapter for the plug Never use an electrical transformer designed for tr...

Page 119: ... a TV with the AV Cable AVC DC400 sold separately enables you to view your shots on the larger screen of the TV as you control the camera For details on connection or how to switch inputs refer to the TV manual _ Some information may not be displayed on the TV 136 Black or white Make sure the camera and TV are off 2 Connect the camera to the TV On the TV insert the cable plugs fully into the video...

Page 120: ... also shoot while previewing shots on the larger screen of the TV To shoot follow the same steps as when using the camera screen However AF Point Zoom 45 and Stitch Assist 57 are not available _ Powering the Camera with Household Power Powering the camera with AC Adapter Kit ACK DC9O sold separately eliminates the need to monitor the remaining battery level Make sure the camera is off 2 Open the c...

Page 121: ...ter On the camera you can specify images to set up batch printing prepare orders for photo development services and prepare orders or print images for photobooks A Canon SELPHY CP series compact photo printer is used here for the sake of illustration Screens displayed and available functions vary by printer Also refer to the printer manual for additional information _ _ Easy Print Easily print you...

Page 122: ...e Printers 119 ii si t_m _sH _Configurin8 Print Settings Access the printing screen Follow steps 1 6 in Easy Print _121 to access the screen at left 2 Configure the settings Press the A v buttons to choose an item and then press the 4 1_ buttons to choose an option Matches current printer settings Prints images with the date added Prints images with the file number added Prints images with both th...

Page 123: ... the frame press the button Press the MENU button press the A v buttons to choose OK and then press the button 3 Print the image Follow step 7 in Easy Print _122 to print _ _ o Cropping may not be possible at small image sizes or at some aspect ratios o Dates may not be printed correctly if you crop images shot with Date Stamp _ selected Choosing Paper Size and Layout Before Printing Choose Paper ...

Page 124: ...rposes ID Photo Dnly available for images with a resolution of L and an aspect ratio of _ 3 Fixed Size Choosethe print size Choosefrom 3 5 x 5 in postcard or wide format prints Printing ID Photos Choose lID Photo Following steps 1 4 in Choosing Paper Size and Layout Before Printing _i_i123 choose ID Photo and press the button 2 Choose the long and short side length Press the A v buttons to choose ...

Page 125: ...e relevant settings such as the number of copies as follows The printing information you prepare this way will conform to DPOF Digital Print Order Format standards Configuring Print Settings Specify the printing format whether to add the date or file number and other settings as follows These settings apply to all images in the print list iiiiiiiiiiiiiiiiiiiiiiiiiiiiiiiiiiiiiiiiiiiiiiiiiiiiiiiiiii...

Page 126: ...n choose Select Images Qty on the r _ tab and then press the button 2 Choose an image Press the 4 _ buttons to choose an image and then press the button You can now specify the number of copies If you specify index printing for the image it is labeled with a _ icon To cancel index printing for the image press the button again _7 is no longer displayed 3 Specify the number of prints Press the A v b...

Page 127: ...27 the screen at left is displayed after you connect the camera to a PictBridge compatible printer Press the A v buttons to choose Print now and then simply press the button to print the images in the print list Any DPOF print job that you temporarily stop will be resumed from the next image lma s to a Photobook Photobooks can be set up on the camera by choosing up to 998 images on a memory card a...

Page 128: ...ress the 4 _ buttons to choose an image and then press the button _j is displayed To remove the image from the photobook press the button again _ is no longer displayed Repeat this process to specify other images When finished press the MENU button to return to the menu screen Adding All Images to a Photobook Following the procedure in Choosing a Selection Method _ _ 128 choose Select All Images a...

Page 129: ...Appendix Helpful information when using the camera Troubleshooting 130 On Screen Messages 133 On Screen information 135 Functions and Menu Tables 138 Handling Precautions t44 Specifications t44 129 ...

Page 130: ... _i_i_30 Strange display on the screen when shooting Note that the following display problems are not recorded in still images but are recorded in movies The screen may darken under bright light The screen may flicker under fluorescent or LED lighting Purplish banding may appear on the screen if you compose a shot that includes a bright light source No date stamp is added to images o Configure the...

Page 131: ...d time shown is incorrect or recording is interrupted Use the camera to format the memory card or switch to a card that supports high speed recording Note that even if the elapsed time display is incorrect the length of movies on the memory card corresponds to the actual recording time 113 146 O is displayed and shooting stops automatically The camera s internal memory buffer filled up as the came...

Page 132: ...ettings 98 99 Do not use the camera near sources of Wi Fi signal interference such as microwave ovens Btuetooth devices or other equipment operating on the 2 4 GHz band Bring the camera closer to the other device you are trying to connect to such as the access point and make sure there are no objects between the devices Cannot send images The destination device has insufficient storage space Incre...

Page 133: ...ges that were renamed or already edited on a computer or images shot with another camera Note that starred functions are not available for movies Magnify 74 Smart Shuffle 76 Rotate 80 Edit 82 85 Print List 125 and Photobook Set up 127 Invalid selection range When specifying a range for image selection 77 80 126 you attempted to choose an initial image that was after the final image or vice versa E...

Page 134: ...ect to and make sure it is ready for connection Cannot determine access point The WPS buttons on numerous access points were pressed simultaneously Try reconnecting again No access points found Check to make sure that the access point is turned on When connecting to an access point manually make sure that you entered the correct SSID Incorrect Wi Fi encryption key incorrect Wi Fi security settings...

Page 135: ...Y to create space Save the images sent via a server 107 on your computer SSL certificate not valid Connect to a computer use the supplied software to reset Check to make sure the date time settings on the camera are correct After confirming that the settings are correct follow the on screen instructions and reset the settings Check network settings Check to make sure your computer can connect to t...

Page 136: ... battery Ob Movies Compression image i__ 35 71 quality f_ 69 _ Resolution _i_43 _ _ 44 MOV GPS information movies display _i_ _ 72 Shooting mode _ _ _ i 138 Images have been ISO speed saved on a computer _ ___60 Playback _ _ i 107 speed _ 51 Battery level Exposure _ _ 136 compensation level Metering method C_ 59 j _ 60 White balance Folder number File _ 61 number _ 115 Histogram _ _i 72 Current im...

Page 137: ...s played Skip Backward To continue skipping backward keep holding down the button _11 Previous Frame For fast rewind keep holding down the button I1_ Next Frame For fast forward keep holding down the button _ _ Skip Forward To continue skipping forward keep holding down the button _ _ Edit 85 Shown when the camera is connected to a PictBridge compatible printer r_h 121 Displays the frame approx 4 ...

Page 138: ...59 FELock 68 2 AFLock _ 67 Focusing Range 64 Tracking AF 65 Screen Display 30 _ o o _ o o __ o o _ o o 0 _o o 1 Not available but switches to _ in some cases 2 FE lock not available in _ flash mode O Available or set automatically Not available 138 ...

Page 139: ...range of 1 5 contrast sharpness color saturation red green blue and skin tone 3 Not available in d _ or _u 4 Cannot be set to 0 seconds in modes without selection of the number of shots 5 One shot cannot be modified in modes without selection of the number of shots 6 Only 4 3 and 1B g are available O Available or set automatically Not available 139 ...

Page 140: ...Resolution 43 M1M2 Compression 69 1 Synchronizes with the aspect ratio setting and is automatically set 51 O Available or set automatically Not available 140 ...

Page 141: ...F PointZoom 45 ServoAF i 66 ContinuousAF 67 AF assist Beam 46 1 Operation when no faces are detected varies by shooting mode 2 Available when the AF frame is set to Center 3 On when subject movement is detected in _ mode O Available or set automatically Not available 141 ...

Page 142: ...lash Settings 43 46 l t p_ _ p _ B _ _ _ _i i i Contrast 61 Review image after shooting 47 Blink Detection 45 Grid Lines 44 ISMode i 69 Date Stamp _ 41 O Available or set automatically Not available 142 ...

Page 143: ... Format 113 114 File Numbering 115 Create Folder 115 115 Units Video System 120 87 Wi Fi Settings Certification Logo Display 115 Language _ 14 Reset All 116 Cropping 83 Resize 82 My Colors 84 Scroll Display 72 Auto Rotate 81 Resume 72 Transition 72 _ Print Menu Print Select Images Qty 126 Select Range 126 Select All Images 127 Clear All Selections 127 Print Settings 125 Rotate 80 Protect 76 Favori...

Page 144: ...ag o If condensation does form on the camera stop using it immediately Continuing to use the camera in this state may damage it Remove the battery and memory card and wait until the moisture has evaporated before resuming use o Before long term battery storage use up the battery s remaining charge remove it from the camera and store it in a plastic bag or similar container Storing a partially char...

Page 145: ... 1 hour 35 minutes Approx 5 hours 1 Time under default camera settings when normal operations are performed such as shooting pausing turning the camera on and off and zooming 2 Time available when shooting the maximum movie length until recording stops automatically repeatedly The number of shots that can be taken is based on measurement guidelines of the Camera Imaging Products Association CIPA o...

Page 146: ...rd and camera settings oRecording will automatically stop when the clip file size reaches 4 GB or when the recording time reaches approximately 10 minutes when shooting in _ or approximately 1 hour when shooting in _ Recording will automatically stop when the clip file size reaches 4 GB or when the recording time reaches approximately 29 minutes and 59 seconds when shooting in _ _ or approximately...

Page 147: ...40 C 32 104 F Dimensions 34 6 x 40 2 x 5 2 mm 1 36 x 1 58 x 0 20 in Weight Approx 13 g approx 0 46 oz Battery Charger CB 2LF CB 2LFE Rated Input 100 240 VAC 50 60 Hz Rated Output 4 2 V DC 0 41 A Charging Time Approx 2 hr when using NB 11L Charge Indicator Charging orange Fully charged green two indicator system Operating Temperatures 5 40 C 41 104 F All data is based on tests by Canon Camera speci...

Page 148: ... 109 Editing 108 Erase 109 Continuous shooting 63 Creative filters shooting mode 50 Cropping 83 Custom white balance 62 D Date time Adding date stamps 41 Changing 13 Date time battery 14 Settings 13 World Clock 112 DC coupler 120 DIGITAL CAMERA Solution Disk 2 Digital tele converter 64 Digital zoom 39 Display language 14 DPOF 125 Drive mode 63 E Eco mode 112 Editing Cropping 83 i Contrast 84 My Co...

Page 149: ... self timer 40 Face self timer shooting mode 55 Wink self timer shooting mode 55 Sending images 105 Maximum number of images that can be sent together 105 Sepia tone images 62 Servo AF 66 Shooting Shooting date time _ Date time Shooting information 135 Slideshow 75 Smartphone Adding target devices 95 Changing privacy settings 97 Privacy settings 96 Smart Shuffle 76 Smart Shutter shooting mode 54 S...

Page 150: ...s device may not cause interference and 2 this device must accept any interference including interference that may cause undesired operation of this device This transmitter must not be co located or operated in conjunction with any other antenna or transmitter Digital Camera Model _ PC1889 _ PC1896 systems Complies with IDA Standards DBO067 This product is installed with the WLAN Module which is c...

Page 151: ...o comply with Class B limits in Subpart B of Part 15 of the FCC rules Do not make any changes or modifications to the equipment unless otherwise specified in the manual If such changes or modifications should be made you could be required to stop operation of the equipment Canon U S A Inc One Canon Park Melville New York 11747 U S A Tel No 1 800 OK CANON 1 800 652 2666 Canadian Radio Interference ...

Reviews: