143
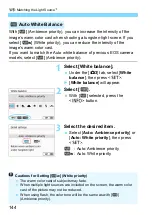
White balance (WB) is for making the white areas look white. Normally,
the Auto [
Q
] (Ambience priority) or [
Q
w
] (White priority) setting will
obtain the correct white balance. If natural-looking colors cannot be
obtained with Auto, you can select the white balance to match the light
source or set it manually by shooting a white object.
In Basic Zone modes, [
Q
] (Ambience priority) is set automatically. (In
the <
P
> mode, [
Q
w
] (White priority) is set.)
1
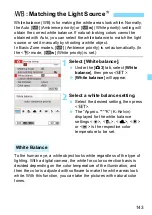
Select [White balance].
Under the [
z
3
] tab, select [
White
balance
], then press <
0
>.
X
[
White balance
] will appear.
2
Select a white balance setting.
Select the desired setting, then press
<
0
>.
The “Approx. ****K” (K: Kelvin)
displayed for the white balance
settings <
W
>, <
E
>, <
R
>, <
Y
>
or <
U
> is the respective color
temperature to be set.
To the human eye, a white object looks white regardless of the type of
lighting. With a digital camera, the white for color correction basis is
decided depending on the color temperature of the illumination, and
then the color is adjusted with software to make the white areas look
white. With this function, you can take the pictures with natural color
tones.
B
: Matching the Light Source
N
White Balance

