background image

133

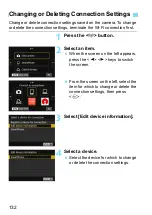
Changing or Deleting Connection Settings

5

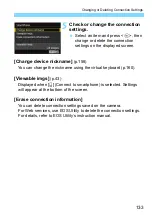
Check or change the connection 
settings.

Select an item and press <

0

>, then 

change or delete the connection 
settings on the displayed screen.

[Change device nickname] 

(p.158)

You can change the nickname using the virtual keyboard (p.160).

[Viewable imgs] 

(p.43)

Displayed when [

q

] (Connect to smartphone) is selected. Settings 

will appear at the bottom of the screen.

[Erase connection information]

You can delete connection settings saved on the camera.
For Web services, use EOS Utility to delete the connection settings. 
For details, refer to EOS Utility’s instruction manual.

Summary of Contents for EOS 77D

Page 1: ...INSTRUCTION MANUAL E Wi Fi Wireless Communication Function Instruction Manual...

Page 2: ...ss Communication Functions CANON iMAGE GATEWAY 6 Send images to a Web service 1 Communicate with a smartphone 5 Print images using a Wi Fi printer 3 Save images to Canon Connect Station 4 Operate remo...

Page 3: ...to connect to it via Wi Fi and save images to it 4 D Operate remotely using EOS Utility p 77 Connect the camera to a computer via Wi Fi and operate the camera remotely using EOS Utility EOS software 5...

Page 4: ...enu with the k button For details see the pages describing how to connect the camera to each device or a Web service via Wi Fi Wi Fi Connection Using the Bluetooth Function Wi Fi Connection Using the...

Page 5: ...ection of the shift or move when the key on the Quick Control Dial is pressed 0 Indicates the Setting button In addition to the above the icons and symbols used on the camera s buttons and displayed o...

Page 6: ...ith the k Button p 55 5 Connecting to Another Camera via Wi Fi p 61 6 Connecting to Connect Station via Wi Fi p 73 7 Connecting to EOS Utility via Wi Fi p 77 8 Connecting to a Printer via Wi Fi p 83 9...

Page 7: ...via Wi Fi 19 Bluetooth Connection 20 Establishing a Bluetooth Connection 21 Establishing a Wi Fi Connection 25 Operating the Camera Using a Smartphone 28 Bluetooth function Screen 31 Removing a Paired...

Page 8: ...the Other Camera 64 Connecting to Connect Station via Wi Fi 73 Saving Images 74 Connecting to EOS Utility via Wi Fi 77 Establishing a Wi Fi Connection 78 Operating the Camera Using EOS Utility 82 Con...

Page 9: ...125 Reconnecting via Wi Fi 126 Connecting to a Bluetooth connected Smartphone via Wi Fi 128 Registering Multiple Connection Settings 130 Checking and Operating Connection Settings 131 Changing or Del...

Page 10: ...ommunication settings Screen 158 Wi Fi settings Screen 159 Virtual Keyboard Operation 160 Setting up the IP Address Manually 161 Wireless Communication Status 163 Specifications 165 Wireless Communica...

Page 11: ...11 1 Getting Started...

Page 12: ...elow to set the Wi Fi settings 1 Press the k button 2 Select Wi Fi settings 3 Select Wi Fi 4 Select Enable Setting Wi Fi Settings You can also set the Wi Fi settings with Wi Fi settings under 51 Wirel...

Page 13: ...enter any characters between 1 to 8 characters in length For instructions on entering characters see page 160 When you finish entering press the M button 6 Exit the setting When the screen on the left...

Page 14: ...e with an interface cable you cannot select 51 Wireless communication settings Disconnect the interface cable before changing any settings Cards The camera cannot be connected via Wi Fi if there is no...

Page 15: ...2 57 For the operating system versions supported by Camera Connect refer to the download site of Camera Connect When an NFC compatible smartphone is touched to the camera before installing Camera Conn...

Page 16: ...iMAGE GATEWAY Web services are not supported in certain countries and areas For information on supported countries and areas refer to the Canon Web site www canon com cig To use CANON iMAGE GATEWAY y...

Page 17: ...ter If you have already installed it proceed to step 2 2 Access Canon Web site from the computer and sign up as a CANON iMAGE GATEWAY member free of charge If you are already a member proceed to step...

Page 18: ...18...

Page 19: ...cture or change camera settings using a smartphone Send images to a smartphone from the camera Install Camera Connect on the smartphone before setting up a connection p 15 For procedures to connect to...

Page 20: ...ected to two or more devices at the same time via Bluetooth If you connect the camera to a smartphone via Wi Fi while the camera is connected to Wireless Remote Control BR E1 sold separately via Bluet...

Page 21: ...teps below Set Wi Fi to Enable on the Wi Fi settings screen in advance p 12 1 Select Wireless communication settings Press the M button select Wireless communication settings under the 51 tab then pre...

Page 22: ...display If Camera Connect is already installed select Do not display and press 0 If Camera Connect is not installed select Android or iOS on the screen on the left scan the displayed QR code with the...

Page 23: ...tion 7 Activate the smartphone s Bluetooth function 8 Start Camera Connect 9 Select the camera to pair with Tap on the nickname of the camera to be paired When the screen on the left appears tap on Pa...

Page 24: ...l be connected to the smartphone via Bluetooth An illustration indicating that a Bluetooth connection has been established will appear on Camera Connect With a Bluetooth connection established you can...

Page 25: ...ngs screen in advance p 12 1 Select a Camera Connect function Select the Camera Connect function you want to use For the Camera Connect functions see page 28 A Wi Fi connection will be established aut...

Page 26: ...Wi Fi function screen select the SSID checked in step 2 For the password enter the password checked in step 2 The password will not be required from the next time you connect the camera to the smartp...

Page 27: ...or how to terminate the Wi Fi connection see Terminating the Wi Fi Connection p 29 Terminating the Wi Fi connection will switch the camera to the Bluetooth connection To reconnect via Wi Fi see Reconn...

Page 28: ...n be viewed Images stored in the camera can be saved on a smartphone Operations such as deletion can be performed on images stored in the camera Remote live view shooting The camera s Live View image...

Page 29: ...operations On the smartphone s Camera Connect screen tap on T On the camera s qWi Fi on screen select Disconnect exit If the qWi Fi on screen is not displayed press the k button Select Disconnect exit...

Page 30: ...ing on the communication status image display or shutter release may be delayed When saving images to a smartphone you cannot take a picture even if you press the camera s shutter button Also the came...

Page 31: ...uetooth function select Disable Pairing Pair the camera with the device selected in Bluetooth function Check clear connection info You can check the name and communication status of the paired device...

Page 32: ...n screen p 21 select Check clear connection info then press 0 2 Press the B button 3 Remove the device registration When the screen on the left appears select OK then press 0 4 Remove the camera regis...

Page 33: ...send images 1 Connect the camera to a smartphone via Bluetooth Android only or Wi Fi p 25 2 Select Wireless communication settings Under the 51 tab select Wireless communication settings then press 0...

Page 34: ...2 Play back the image Press the 3 button to play back images 3 Press the Q button The Quick Control screen will appear 4 Select q If you perform this step with a Bluetooth connection established a me...

Page 35: ...ssing the I button you can switch to the index display and select an image 2 Select Send img shown To select a size at which to send the image select Resize image and press 0 Select Send img shown and...

Page 36: ...ted 3 Select the images to send Turn the 5 dial to select an image to send then press 0 A checkmark X will be displayed on the upper left of the screen By pressing the I button you can select images f...

Page 37: ...ra 4 Select Resize image Set it as necessary On the displayed screen select an image size then press 0 5 Select Send The images will be sent When the transfer is complete the screen for step 1 will re...

Page 38: ...l the images in the range at once 1 Press 0 2 Select Send range 3 Specify the range of images Select the first image then press 0 Select the last image then press 0 The X icon will appear on the selec...

Page 39: ...era 4 Confirm the range Press the Q button 5 Select Resize image Set it as necessary On the displayed screen select an image size then press 0 6 Select Send The images will be sent When the transfer i...

Page 40: ...at once 1 Press 0 2 Select Send all card 3 Select Resize image Set it as necessary On the displayed screen select an image size then press 0 4 Select Send The images will be sent When the transfer is...

Page 41: ...nditions refer to Setting Image Search Conditions in the Camera Instruction Manual 1 Press 0 2 Select Send all found 3 Select Resize image Set it as necessary On the displayed screen select an image s...

Page 42: ...ture cannot be taken even if the camera s shutter button is pressed Even if MOV format movies are displayed in the list they cannot be saved to a smartphone You can cancel the image transfer by select...

Page 43: ...is displayed switch the screen with the Y Z keys If the Wireless communication settings screen is displayed set the Wi Fi settings p 12 3 Select Edit device information 4 Select a smartphone Select t...

Page 44: ...p to nine days ago can be specified Select an item then press 0 When Images shot in past days is selected images shot up to the specified number of days before the current date become viewable When r...

Page 45: ...wable images 1 Press the Y Z keys to select the first image to be set as viewable 2 Press 0 to display the image selection screen Select an image using the Y Z keys or 5 dial By pressing the I button...

Page 46: ...46...

Page 47: ...change camera settings using a smartphone Send images to a smartphone from the camera Install Camera Connect on the smartphone before setting up a connection p 15 For procedures to connect to a Blueto...

Page 48: ...tion manual For the smartphone s NFC setting refer to the smartphone s instruction manual If you do not know whether your smartphone is NFC compatible contact the manufacturer of the smartphone Wi Fi...

Page 49: ...depending on how you touch Check the position of the p mark then touch again When touching the smartphone to the camera do not leave anything between the camera and smartphone In addition when a case...

Page 50: ...hone s instruction manual 1 Enable the NFC function on the camera and smartphone p 12 159 2 Touch a smartphone to the camera If the download site of Camera Connect appears on the smartphone install Ca...

Page 51: ...will not appear again To specify viewable images press the B button See step 6 on page 44 to set them Select OK and press 0 After a message is displayed the qWi Fi on screen will appear qWi Fi on Scre...

Page 52: ...e displayed on the smartphone The Wi Fi connection to a smartphone is now complete Operate the camera using Camera Connect See page 28 For how to terminate the Wi Fi connection see Terminating the Wi...

Page 53: ...ruction manual 1 Play back the image Press the 3 button to play back images 2 Touch a smartphone to the camera Touch the p mark on the smartphone to that on the camera so that they come into contact w...

Page 54: ...ultiple smartphones via Wi Fi at the same time Even if MOV format movies are displayed in the list they cannot be saved to a smartphone You can cancel the image transfer by selecting Cancel during the...

Page 55: ...ra to take a picture or change camera settings using a smartphone Send images to a smartphone from the camera Install Camera Connect on the smartphone before setting up a connection p 15 For procedure...

Page 56: ...the Wi Fi settings screen in advance p 12 1 Press the k button 2 Select q Connect to smartphone If the history p 126 is displayed switch the screen with the Y Z keys If the Wireless communication sett...

Page 57: ...n access Google Play or the App Store and install Camera Connect 5 Check the SSID and password Check the SSID network name and password displayed on the camera s LCD monitor In Wi Fi settings if you s...

Page 58: ...ep 5 For the password enter the password checked in step 5 7 Start Camera Connect When the Waiting to connect screen is displayed on the camera s LCD monitor start Camera Connect on the smartphone 8 S...

Page 59: ...ar again To specify viewable images press the B button See step 6 on page 44 to set them Select OK and press 0 After a message is displayed the qWi Fi on screen will appear qWi Fi on Screen Disconnect...

Page 60: ...amera using Camera Connect See page 28 For how to terminate the Wi Fi connection see Terminating the Wi Fi Connection p 29 To reconnect via Wi Fi see Reconnecting via Wi Fi p 125 With a Wi Fi connecti...

Page 61: ...orting image transfer between cameras Note that the camera cannot be connected to Canon camcorders via Wi Fi even if they have built in Wi Fi functions Still photos can be transferred only if their fi...

Page 62: ...Wireless communication settings screen is displayed set the Wi Fi settings p 12 3 Select Register a device for connection 4 Set up the target camera When the screen on the left is displayed on the cam...

Page 63: ...s not displayed on the camera s playback screen even if GPS information is appended to the received image Shooting locations can be viewed on a virtual map using Map Utility EOS software The connectio...

Page 64: ...size at which to send the image select Resize image and press 0 Select Send img shown and press 0 to send the image displayed When the transfer is complete the screen for step 1 will reappear To send...

Page 65: ...elect an image to send then press 0 A checkmark X will be displayed on the upper left of the screen By pressing the I button you can select images from a three image display To return to the single im...

Page 66: ...an image size then press 0 5 Select Send The images will be sent When the transfer is complete the screen for step 1 will reappear To send other images repeat steps 1 to 5 6 Terminate the Wi Fi conne...

Page 67: ...ect Send range 3 Specify the range of images Select the first image then press 0 Select the last image then press 0 Images will be selected and X will appear To cancel the selection repeat this step T...

Page 68: ...yed screen select an image size then press 0 6 Select Send The images will be sent When the transfer is complete the screen for step 1 will reappear 7 Terminate the Wi Fi connection Press the k button...

Page 69: ...ce 1 Press 0 2 Select Send all card 3 Select Resize image Set it as necessary On the displayed screen select an image size then press 0 4 Select Send The images will be sent When the transfer is compl...

Page 70: ...ct OK then press 0 to terminate the Wi Fi connection Send images that match the search conditions set in Set image search conditions at once For Set image search conditions refer to Setting Image Sear...

Page 71: ...yed screen select an image size then press 0 4 Select Send The images will be sent When the transfer is complete the screen for step 1 will reappear 5 Terminate the Wi Fi connection Press the k button...

Page 72: ...transfer may take longer than usual You can select up to 999 files at a time When you reduce the image size all images to be sent at the same time are resized Note that movies and b size still photos...

Page 73: ...ld separately is a device that allows you to import captured still photos and movies for viewing on your TV set smartphone etc or sharing over a network You can easily save still photos and movies to...

Page 74: ...n then hold the camera s p mark close to the Connect Station s NFC connect point When a message indicating the Wi Fi connection is being established is displayed on the camera s LCD monitor and Connec...

Page 75: ...When holding the camera close to Connect Station do not leave anything between the camera and Connect Station In addition when a case is attached to the camera a Wi Fi connection may not be establishe...

Page 76: ...76...

Page 77: ...omputer via Wi Fi Install EOS Utility on the computer before setting up a Wi Fi connection To connect via Wi Fi using an access point see Advanced Wi Fi Connection p 107 Settings may be disabled when...

Page 78: ...creen with the Y Z keys If the Wireless communication settings screen is displayed set the Wi Fi settings p 12 3 Select Register a device for connection 4 Check the SSID and password Check the SSID ne...

Page 79: ...select the SSID checked in step 4 For the password enter the password checked in step 4 6 Select OK Select OK and press 0 The following message is displayed represents the last six digits of the MAC...

Page 80: ...played select Yes 9 Click Connect Select the camera to connect to then click Connect 10Establish a Wi Fi connection When the camera detects the computer on which you clicked Connect in step 9 the scre...

Page 81: ...Confirm set You can check the settings Error details When a Wi Fi connection error occurs you can check the details of the error The Wi Fi connection to a computer is now complete Operate the camera u...

Page 82: ...ch is set to 1 movie shooting stops When the power switch is set to 1 and the movie mode is set using EOS Utility you cannot shoot by operating the camera With a Wi Fi connection to EOS Utility establ...

Page 83: ...ter via Wi Fi Wi Fi connection is possible with Wi Fi printers supporting PictBridge Wireless LAN To connect via Wi Fi using an access point see Advanced Wi Fi Connection p 107 When in the 8 FG or v A...

Page 84: ...6 is displayed switch the screen with the Y Z keys If the Wireless communication settings screen is displayed set the Wi Fi settings p 12 3 Select Register a device for connection 4 Check the SSID and...

Page 85: ...6 Select the printer to connect to via Wi Fi When a list of detected printers appears select the printer to connect to via Wi Fi then press 0 Some printers may make a beeping sound When 16 or more pr...

Page 86: ...print setting screen will appear 3 Print the image For the print setting procedures see page 89 When Print is selected printing starts When printing is complete the screen for step 1 will reappear To...

Page 87: ...dures refer to Digital Print Order Format DPOF in the Camera Instruction Manual If the print order is complete before establishing a Wi Fi connection proceed to step 4 4 Select Print Print can be sele...

Page 88: ...or on the border RAW images cannot be printed by selecting Print order When printing select Print image and print When you use a battery to power the camera make sure it is fully charged Depending on...

Page 89: ...rint Settings Paper Settings Print setting screen Depending on the printer certain settings such as the date and file number imprinting and cropping may not be selectable Sets the printing effects p 9...

Page 90: ...l reappear Borderless Prints with no borders If your printer cannot print borderless prints the print will have borders Bordered Prints with white borders along the edges xx up Option to print 2 4 8 9...

Page 91: ...rs depending on the printer For details refer to the printer s instruction manual EOn Prints with the printer s standard colors The image s Exif information is used to make automatic corrections EOff...

Page 92: ...number of copies then press 0 Setting the Date File Number Imprinting Setting the Number of Copies The Default setting for printing effects and other options are the printer s own default settings as...

Page 93: ...Frame Size Press the u or I button to change the cropping frame size The smaller the cropping frame the larger the image magnification will be for printing Moving the Cropping Frame Press the W X or...

Page 94: ...truction manual Error Messages If a problem occurs during printing an error message will appear on the camera s LCD monitor Press 0 to stop printing After fixing the problem resume printing For detail...

Page 95: ...95 9 Sending Images to a Web Service You can register various Web services on the camera and send images stored in the camera to them...

Page 96: ...you have registered on page 17 If the history p 126 is displayed switch the screen with the Y Z keys A screen to select a destination may appear depending on the type and settings of the Web service...

Page 97: ...y and select an image 2 Select Send img shown To select a size at which to send the image select Resize image and press 0 Select Send img shown and press 0 to send the image displayed On the screen to...

Page 98: ...ect an image to send then press 0 A checkmark X will be displayed on the upper left of the screen By pressing the I button you can select images from a three image display To return to the single imag...

Page 99: ...lect an image size then press 0 5 Select Send The images will be sent On the screen to complete the process for sending the image select OK to terminate the Wi Fi connection and return to the screen t...

Page 100: ...ct Send range 3 Specify the range of images Select the first image then press 0 Select the last image then press 0 Images will be selected and X will appear To cancel the selection repeat this step To...

Page 101: ...lect Send The images will be sent On the screen to complete the process for sending the image select OK to terminate the Wi Fi connection and return to the screen to select a Web service When the Term...

Page 102: ...Web Service 102 Send all the images on the card at once 1 Press 0 2 Select Send all card 3 Select Resize image Set it as necessary On the displayed screen select an image size then press 0 Sending All...

Page 103: ...nd The images will be sent When the transfer is complete the screen for step 1 will reappear When the Terms of use screen is displayed thoroughly read the message then select I Agree The screen can be...

Page 104: ...ch conditions at once For Set image search conditions refer to Setting Image Search Conditions in the Camera Instruction Manual 1 Press 0 2 Select Send all found 3 Select Resize image Set it as necess...

Page 105: ...complete the process for sending the image select OK to terminate the Wi Fi connection and return to the screen to select a Web service When the Terms of use screen is displayed thoroughly read the m...

Page 106: ...sent and the length of movies will be limited In addition some images may not be sent with Send range Send all card or Send all found When you reduce the image size all images to be sent at the same...

Page 107: ...107 10 Advanced Wi Fi Connection...

Page 108: ...nced Wi Fi Connection q Communicate with smartphone D Remote control EOS Utility l Print from Wi Fi printer w Send images to Web service Set the camera s Wi Fi settings p 12 Install Camera Connect on...

Page 109: ...ted network manually via Wi Fi Perform the operations described on page 118 onwards Access Point Encryption This camera supports the following options for Authentication and Encryption settings Theref...

Page 110: ...onnection Check the position of the WPS button on the access point in advance It may take approx one minute to establish a Wi Fi connection 1 Press the k button 2 Select an item If the history p 126 i...

Page 111: ...ed in step 2 Proceed to step 5 When q Connect to smartphone is selected the screen on the left is displayed If Camera Connect is already installed select Do not display and press 0 4 Select Switch net...

Page 112: ...Fi connection with the access point When a Wi Fi connection with the access point is established the next screen is displayed 8 Select Auto setting Select OK and press 0 to display the setting screen...

Page 113: ...Wi Fi function Communicating with a Smartphone Step 7 on page 58 Operating Remotely Using EOS Utility Step 6 on page 79 Printing Images Using a Wi Fi Printer Step 6 on page 85 Sending Images to a Web...

Page 114: ...g this shared identification number It may take approx one minute to establish a Wi Fi connection 1 Press the k button 2 Select an item If the history p 126 is displayed switch the screen with the Y Z...

Page 115: ...q Connect to smartphone is selected the screen on the left is displayed If Camera Connect is already installed select Do not display and press 0 4 Select Switch network Displayed when q D or l is sel...

Page 116: ...d press 0 to establish a Wi Fi connection with the access point When a Wi Fi connection with the access point is established the next screen is displayed 9 Select Auto setting Select OK and press 0 to...

Page 117: ...Wi Fi function Communicating with a Smartphone Step 7 on page 58 Operating Remotely Using EOS Utility Step 6 on page 79 Printing Images Using a Wi Fi Printer Step 6 on page 85 Sending Images to a Web...

Page 118: ...ngs screen is displayed set the Wi Fi settings p 12 Press the W X or Y Z keys to select an item then press 0 When selecting z Transfer imgs between cameras see Connecting to Another Camera via Wi Fi p...

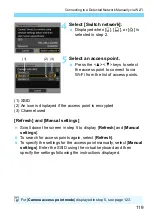
Page 119: ...on is displayed if the access point is encrypted 3 Channel used Refresh and Manual settings Scroll down the screen in step 5 to display Refresh and Manual settings To search for access points again se...

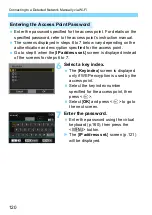
Page 120: ...point Go to step 8 when the IP address set screen is displayed instead of the screens for steps 6 to 7 6 Select a key index The Key index screen is displayed only if WEP encryption is used by the acc...

Page 121: ...ion selected in step 2 If Auto setting results in an error or if you want to specify the settings manually see page 161 Setting the IP Address The IP address can only be set automatically in environme...

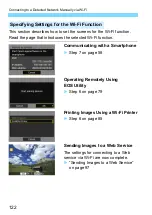
Page 122: ...Wi Fi function Communicating with a Smartphone Step 7 on page 58 Operating Remotely Using EOS Utility Step 6 on page 79 Printing Images Using a Wi Fi Printer Step 6 on page 85 Sending Images to a Web...

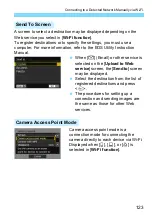
Page 123: ...ual When m Email or other service is selected on the Upload to Web service screen the Send to screen may be displayed Select the destination from the list of registered destinations and press 0 The pr...

Page 124: ...124...

Page 125: ...125 11 Reconnecting via Wi Fi This section describes how to reconnect the camera to a device for which you have already established a Wi Fi connection and how to register multiple connection settings...

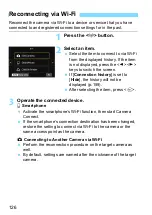
Page 126: ...Hide the history will not be displayed p 159 After selecting the item press 0 3 Operate the connected device q Smartphone Activate the smartphone s Wi Fi function then start Camera Connect If the sma...

Page 127: ...connection procedure is complete For the connection history up to three items appear in the order of registration When a connection setting is added the oldest item will be deleted from the history Wh...

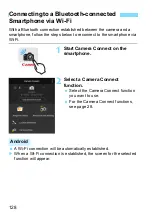
Page 128: ...nnect on the smartphone 2 Select a Camera Connect function Select the Camera Connect function you want to use For the Camera Connect functions see page 28 A Wi Fi connection will be automatically esta...

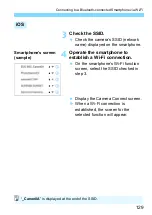
Page 129: ...phone 4 Operate the smartphone to establish a Wi Fi connection On the smartphone s Wi Fi function screen select the SSID checked in step 3 Display the Camera Connect screen When a Wi Fi connection is...

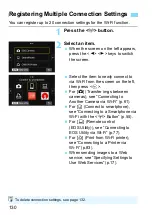
Page 130: ...er imgs between cameras see Connecting to Another Camera via Wi Fi p 61 For q Connect to smartphone see Connecting to a Smartphone via Wi Fi with the k Button p 55 For D Remote control EOS Utility see...

Page 131: ...131 12 Checking and Operating Connection Settings This section describes how to change or delete the connection settings clear the wireless communication function settings etc...

Page 132: ...Select an item When the screen on the left appears press the Y Z keys to switch the screen From the screen on the left select the item for which to change or delete the connection settings then press...

Page 133: ...ickname p 158 You can change the nickname using the virtual keyboard p 160 Viewable imgs p 43 Displayed when q Connect to smartphone is selected Settings will appear at the bottom of the screen Erase...

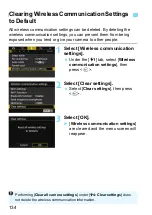
Page 134: ...communication settings Under the 51 tab select Wireless communication settings then press 0 2 Select Clear settings Select Clear settings then press 0 3 Select OK Wireless communication settings are...

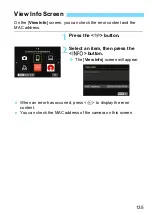
Page 135: ...nt and the MAC address 1 Press the k button 2 Select an item then press the B button The View info screen will appear When an error has occurred press 0 to display the error content You can check the...

Page 136: ...136...

Page 137: ...137 13 Troubleshooting Guide...

Page 138: ...e following chart to jump to the corresponding page Responding to Error Messages 11 p 139 12 p 139 21 p 140 22 p 141 23 p 142 61 p 143 63 p 144 64 p 144 65 p 145 66 p 145 67 p 145 68 p 146 69 p 146 91...

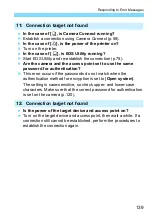
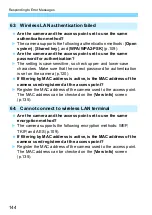
Page 139: ...thentication This error occurs if the passwords do not match when the authentication method for encryption is set to Open system The setting is case sensitive so check upper and lower case characters...

Page 140: ...erver on Turn on the DHCP server Are there enough addresses for assignment by the DHCP server Increase the number of addresses assigned by the DHCP server Remove devices assigned addresses by the DHCP...

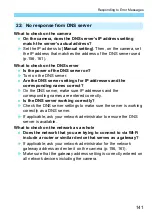
Page 141: ...addresses and the corresponding names are entered correctly Is the DNS server working correctly Check the DNS server settings to make sure the server is working correctly as a DNS server If applicable...

Page 142: ...environments using a DHCP server change the setting to Auto setting p 121 23 Device with same IP address exists on selected network Responding to Error Messages 21 23 Check also the following points w...

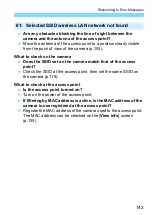
Page 143: ...mera match that of the access point Check the SSID at the access point then set the same SSID on the camera p 119 What to check at the access point Is the access point turned on Turn on the power of t...

Page 144: ...dress is active is the MAC address of the camera used registered at the access point Register the MAC address of the camera used to the access point The MAC address can be checked on the View info scr...

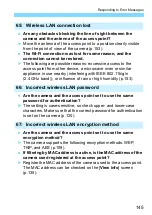
Page 145: ...humidity p 153 Are the camera and the access point set to use the same password for authentication The setting is case sensitive so check upper and lower case characters Make sure that the correct pas...

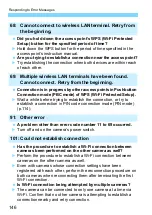
Page 146: ...ed Turn off and on the camera s power switch Has the procedure to establish a Wi Fi connection between cameras been performed on the other camera as well Perform the procedure to establish a Wi Fi con...

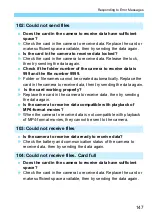
Page 147: ...sending the data again Is the card working properly Replace the card in the camera to receive data then try sending the data again Is the camera to receive data compatible with playback of MP4 format...

Page 148: ...a terminated the connection Check the communication status and re establish the Wi Fi connection between the cameras A problem other than error code number 101 to 108 occurred while the cameras are co...

Page 149: ...h an interface cable sold separately and reconfigure Web service settings using EOS Utility p 17 This error may be displayed if the camera s time setting is significantly off from the actual time Chec...

Page 150: ...ection to the printer after the printing process is finished Is another camera connected to the printer via Wi Fi Try again to establish the Wi Fi connection to the printer after the Wi Fi connection...

Page 151: ...Fi connection established operations such as shooting and playback may not be possible Terminate the Wi Fi connection then perform the operation Even with a combination of the same camera and smartpho...

Page 152: ...cannot be paired with the camera again if the camera s registration is retained on the smartphone In such a case remove the camera s registration retained in the Bluetooth settings on the smartphone...

Page 153: ...n The camera communicates over Wi Fi via IEEE 802 11b g n using radio waves in the 2 4 GHz band For this reason the Wi Fi transmission rate may drop if there are Bluetooth devices microwave ovens cord...

Page 154: ...Wireless Communication Function Notes 154 When Wi Fi is set to Enable image transfer using an Eye Fi card is disabled Using an Eye Fi Card...

Page 155: ...work you are using to steal modify or destroy information Additionally you could fall victim to other types of unauthorized access such as impersonation where someone assumes an identity to gain acces...

Page 156: ...enter ifconfig a and press the Return key The IP address assigned to the computer is indicated in the en0 item next to inet in the format For information about the Terminal application refer to the Ma...

Page 157: ...157 14 Reference...

Page 158: ...tween cameras Remote control EOS Utility Print from Wi Fi printer Send images to Web service Bluetooth function p 21 Displays the Bluetooth function screen on which you can set or check the Bluetooth...

Page 159: ...it to Disable NFC connection p 47 You can set whether to Enable or Disable NFC connection Password Set to None to allow a Wi Fi connection to be established without a password except when connected t...

Page 160: ...mode Select E at the bottom right of the bottom entry area Each time you press 0 the entry mode will change as follows Lower case 9 Numerals Symbols 1 9 Numerals Symbols 2 9 Upper case When Touch con...

Page 161: ...lect an item and press 0 The number entry screen will appear To use a gateway select Enable select Address then press 0 3 Enter the desired values Turn the 6 dial to move the input position in the upp...

Page 162: ...leted setting the necessary items select OK and press 0 The setting screen for the Wi Fi function will appear p 122 If you are not sure what to enter see Checking Network Settings p 156 or ask the net...

Page 163: ...uction Manual Wireless Communication Status Communication status LCD monitor LCD panel Wi Fi function Wireless signal strength Wi Fi function Not connected Wi Fi Disable Off Wi Fi Enable Connecting Bl...

Page 164: ...onnected with a Wi Fi connection established In Camera Connect Bluetooth function Connection status LCD monitor LCD panel Other than Disable Bluetooth connected Bluetooth not connected Disable Bluetoo...

Page 165: ...is possible Images can be sent to a smartphone Transfer images Transferring one image Transferring selected images between cameras Transferring resized images Connect to Images can be sent to and save...

Page 166: ...hat may cause undesired operation This device must not be co located or operated in conjunction with any other antenna or device except Canon accessories supplied or designated for this product The av...

Page 167: ...n Trademarks Microsoft and Windows are trademarks or registered trademarks of Microsoft Corporation in the United States and or other countries Macintosh and Mac OS are trademarks of Apple Inc registe...

Page 168: ...Card 14 I Interface cable 14 iOS 15 IP address 112 116 121 Manual setting 161 K Keyboard 160 M MAC address 109 135 N Network name 9 SSID Network settings 156 NFC 47 48 50 74 Sending images 53 Nicknam...

Page 169: ...tch search conditions 41 70 104 Sending images to a Web service 95 SSID 26 57 78 84 118 Stealth functions 109 Switch network 111 115 119 T Transferring images between cameras 61 Troubleshooting 137 V...

Page 170: ...CPW E500 000 CANON INC 2016...

Reviews: