background image

8

Initial Preparations

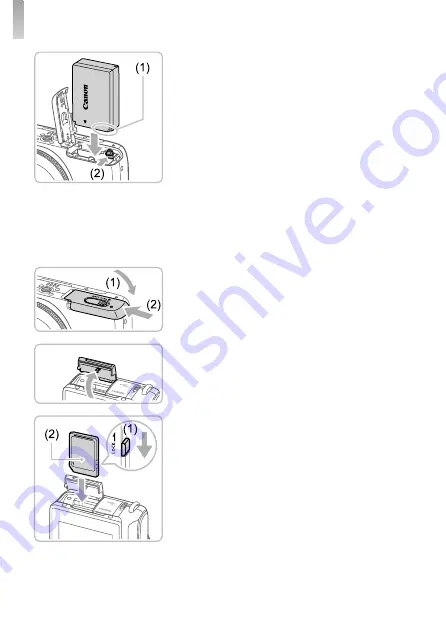
Insert the battery pack.


 Holding the battery pack with the 
terminals (1) facing as shown, press the 
battery lock (2) in the direction of the 
arrow and insert the battery pack until the 
lock clicks shut.


If you insert the battery pack facing the 
wrong way, it cannot be locked into the 
correct position. Always con

fi

 rm that the 

battery pack is facing the right way and 
locks when inserted.


To remove the battery pack, press the 
battery lock in the direction of the arrow.

 Close the battery cover.


Lower the cover (1) and hold it down as 
you slide it, until it clicks into the closed 
position (2).

 Open the memory card cover.


Open the cover in the direction shown.

 Check your card’s write-protect 
switch and insert the memory card.


Recording is not possible on memory 
cards with a write-protect switch when the 
switch is in the locked position. Slide the 
switch to the unlocked position (1).


Insert the memory card with the label (2) 
facing as shown until it clicks into place.


To remove the memory card, push it in 
until you feel a click, and then slowly 
release it.

Summary of Contents for EOS M10

Page 1: ...CEL SW2SA210 Getting Started ENGLISH...

Page 2: ...0PCU Printed matter is also included For details on the lens included in the lens kit check information on the camera package A memory card is not included Compatible Memory Cards The following memory...

Page 3: ...Access the site for your country or region Adobe Reader is required to view the manuals For instructions on downloading and installing the software refer to the Camera User Guide available for downlo...

Page 4: ...button 6 ON OFF button 7 Mode switch 8 Flash 9 Lamp 10 Strap mount 11 Flash pop up switch 12 Terminal cover 13 Lens lock pin 14 Memory card cover 15 Lens release button 16 Lens mount 17 HDMITM termin...

Page 5: ...back button 11 Exposure compensation Single image erase Up button 12 AE lock Left button 13 Quick Set menu Set button 14 Flash Right button 15 Information Down button 1 Used with NFC features see the...

Page 6: ...6 Part Names Lens EF M Lens 1 Focusing ring 2 Hood mount 3 Filter mounting thread 4 Lens retraction switch 5 Lens mount index 6 Zoom ring 7 Lens retraction index 8 Zoom position index 9 Contacts...

Page 7: ...by pushing it in 1 and down 2 3 Charge the battery pack Plug the power cord into the charger then plug the other end into a power outlet The charging lamp turns orange and charging begins When chargi...

Page 8: ...ress the battery lock in the direction of the arrow 6 Close the battery cover Lower the cover 1 and hold it down as you slide it until it clicks into the closed position 2 7 Open the memory card cover...

Page 9: ...is displayed 11 Set the date and time Press the buttons to choose an item Press the buttons to specify the date and time When finished press the button 12 Specify your home time zone Press the buttons...

Page 10: ...the buttons to choose a language and then press the button Changing the Date and Time To adjust the date and time once you have set it first press the button and then press the buttons to choose the...

Page 11: ...shown 3 Attach the lens Align the mount indexes the white dots on the lens and camera and then turn the lens in the direction shown until it clicks into place 4 Remove the front lens cap 5 Prepare to...

Page 12: ...he focus slightly To protect the lens keep the lens cap on when the camera is not in use Detaching a Lens Make sure the camera is off Hold down the lens release button 1 as you turn the lens in the di...

Page 13: ...at it will look like the lens focal length is increased by approx 1 6x For example the focal length of a 15 45mm lens is approximately equivalent to a focal length of 24 72mm on a 35mm camera Lens Ins...

Page 14: ...the zoom ring on the lens with your fingers 3 Shoot Shooting Still Images Press the shutter button lightly The camera beeps twice after focusing and AF frames are displayed around image areas in focu...

Page 15: ...identified by a icon To play movies go to step 3 3 Play movies Press the button press the buttons to choose and then press the button again Playback now begins and after the movie is finished is displ...

Page 16: ...CU AC Adapter Kit ACK E12 Included Accessories Battery Charger LC E12E Battery Pack LP E12 with terminal cover Body Jacket EH28 CJ Neck Strap EM E2 Neck Strap EM 200DB Grip GR E3 Face Jacket EH28 FJ A...

Page 17: ...p USB Port Card Slot TV Video System Computer PictBridge Compatible Printers Card Reader SD SDHC SDXC memory cards Connect Station CS100 EF Lenses EF S Lenses EF M Lenses Mount Adapter EF EOS M HDMI C...

Page 18: ...hone and iPad are trademarks of Apple Inc The SDXC logo is a trademark of SD 3C LLC HDMI the HDMI logo and High Definition Multimedia Interface are trademarks or registered trademarks of HDMI Licensin...

Page 19: ...ing standards Information subject to change without notice as are product specifications and appearance Illustrations and screenshots in this guide may differ slightly from the actual equipment The ab...

Page 20: ...20 Interface Cable IFC 200U Interface Cable IFC 500U HDMI Cable HTC 100...

Page 21: ...any of the following may incur legal penalties Altering or modifying the product Removing the certification labels from the product Do not use the wireless LAN function of this product near medical eq...

Reviews: