232
General Notes on Still Photo Shooting
o
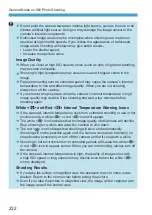
Do not point the camera toward an intense light source, such as the sun or an
intense artificial light source. Doing so may damage the image sensor or the
camera’s internal components.
o
Defocused image areas may be incomplete when shooting near maximum
aperture at high shutter speeds. If you dislike the appearance of defocused
image areas, shooting as follows may give better results.
•
Lower the shutter speed.
•
Increase the aperture value.
Image Quality
o
When you shoot at high ISO speeds, noise (such as dots of light and banding)
may become noticeable.
o
Shooting in high temperatures may cause noise and irregular colors in the
image.
o
Frequent shooting over an extended period may cause the camera’s internal
temperature to rise and affect image quality. When you are not shooting,
always turn off the camera.
o
If you shoot a long exposure while the camera’s internal temperature is high,
image quality may decline. Stop shooting and wait a few minutes before
shooting again.
White <
s
> and Red <
E
> Internal Temperature Warning Icons
o
If the camera’s internal temperature rises from extended shooting or use in hot
environments, a white <
s
> or red <
E
> icon will appear.
o
The white <
s
> icon indicates that the image quality of still photos will decline.
Stop shooting for a while and allow the camera to cool down.
o
The red <
E
> icon indicates that shooting will soon end automatically.
Shooting will not be possible again until the camera cools down internally, so
stop shooting temporarily or turn off the camera and let it cool down a while.
o
Shooting in hot environments over extended periods will cause the white <
s
>
or red <
E
> icon to appear sooner. When you are not shooting, always turn off
the camera.
o
If the camera’s internal temperature is high, the quality of images shot with
a high ISO speed or long exposure may decline even before the white <
s
>
icon is displayed.
Shooting Results
o
If you take the picture in magnified view, the exposure may not come out as
desired. Return to the normal view before taking the picture.
o
Even if you take the picture in magnified view, the image will be captured with
the image area of the normal view.
Summary of Contents for EOS RP
Page 1: ...E Advanced User Guide...
Page 66: ...66...
Page 94: ...94...
Page 295: ...295 Tab Menus Playback z z Playback 4 349 351 352 353 354 355...
Page 356: ...356...
Page 377: ...377 Setting the Interface Language 1 Select 5 LanguageK 2 Set the desired language...
Page 414: ...414...
Page 522: ...522...
Page 524: ...524 Tab Menus Customization 526 530 536 546 546...
Page 547: ...547 Tab Menus My Menu 548 551 551 552...
Page 553: ...553 553 Reference This chapter provides reference information on camera features...


