Personalizing Your Machine
3-6
Regis
teri
ng In
form
ation
in
the M
a
c
h
ine
3
4
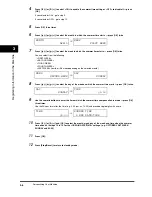
Press [ (-)] or [ (+)] to select <ON> to enable the summer time setting or <OFF> to disable it
➞
press
[OK].
If you selected <ON>, go to step 5.
If you selected <OFF>, go to step 12.
5
Press [OK] three times.
6
Press [ (-)] or [ (+)] to select the month in which the summer time starts
➞
press [OK] twice.
7
Press [ (-)] or [ (+)] to select the week in which the summer time starts
➞
press [OK] twice.
You can select from the following:
- <FIRST WEEK>
- <SECOND WEEK>
- <THIRD WEEK>
- <FOURTH WEEK>
- <LAST WEEK>
(fourth or fifth week depending on the selected month)
8
Press [ (-)] or [ (+)] to select the day of the week on which the summer time starts
➞
press [OK] twice.
9
Use the numeric buttons to enter the time at which the summer time compensation is made
➞
press [OK]
three times.
Use the 24-hour format for the time (e.g., 2:00 p.m. as 14:00) and precede single digits with a zero.
10
Press [ (-)] or [ (+)] and [OK] to select the month, week, day of the week, and time when the summer
time ends, as in steps 10 to 16 for the <1.BEGIN DATE/TIME> settings. (e.g. OCTOBER LAST WEEK,
SUNDAY and 03:00)
11
Press [OK].
12
Press [Stop/Reset] to return to standby mode.
MONTH
APRIL
➞
WEEK
FIRST WEEK
WEEK
SECOND WEEK
➞
DAY
SUNDAY
DAY
SUNDAY
➞
TIME
02:00
TIME
02:00
➞
SUMMER TIME
2.END DATE/TIME

