background image

FAXPHONE L170 Software Guide

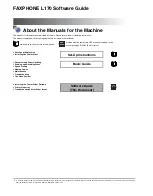
About the Manuals for the Machine

The manuals for this machine are divided as follows. Please refer to them for detailed information.
The manuals supplied with optional equipment are included in the list below.

Guides with this symbol are book manuals.

CD-ROM

Guides with this symbol are PDF manuals included on the 

accompanying CD-ROM. (See footnote.)

Setting up the Machine

Installing the Printer Driver

Set-Up Instructions

Document and Paper Handling

Sending and Receiving Faxes

Speed Dialling

Making Copies

Maintenance

Troubleshooting

The Menu System

Basic Guide

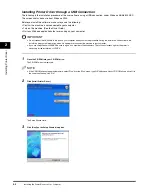
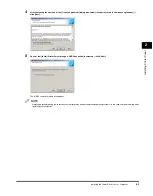
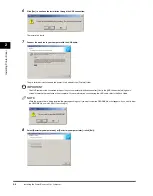
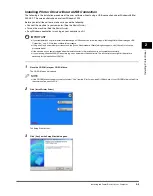
Installing the Printer Driver Software

Printer Properties

Troubleshooting Printer Driver Issues

Software Guide

(This Document)

CD-ROM

To view the manual in PDF format, Adobe Reader/Acrobat Reader/Acrobat is required. If Adobe Reader/Acrobat Reader/Acrobat is not installed on your system, please download it

from the Adobe Systems Incorporated website (http://www.adobe.com).

Summary of Contents for FAXPHONE L170

Page 1: ...ting up the Machine Installing the Printer Driver Set Up Instructions Document and Paper Handling Sending and Receiving Faxes Speed Dialling Making Copies Maintenance Troubleshooting The Menu System B...

Page 2: ...zard 2 13 Windows 2000 2 16 Windows 2000 Plug and Play 2 16 Windows 2000 Add Printer Wizard 2 18 Windows XP 2 22 Windows XP Plug and Play 2 22 Windows XP Add Printer Wizard 2 24 Using the Machine on Y...

Page 3: ...e Setup Tab 3 24 Finishing Tab 3 29 Quality Tab 3 31 Profiles 3 34 Chapter 4 Troubleshooting Finding Information 4 1 Printer Problems 4 2 Printer Driver Problems 4 4 Uninstalling Printer Driver 4 6 Ch...

Page 4: ...avoid problems caused by incorrect operation NOTE Indicates notes for operation or additional explanations Reading these is highly recommended Button Used in This Manual A button or an item is referr...

Page 5: ...soft and Microsoft Windows are referred to as Microsoft and Windows respectively Copyright Copyright 2004 Canon Inc All rights reserved No part of this publication may be reproduced transmitted transc...

Page 6: ...features including Canon Advanced Raster Printing System CARPS CARPS gives users of Windows 98 Windows Me Windows 2000 or Windows XP operating system the ability to make full use of the printer It en...

Page 7: ...driver installed Log on as a user account with Administrators rights is recommended OS CPU RAM Available free disk space Windows 98 Intel Pentium 90 MHz or greater 32 MB or greater 100 MB or greater...

Page 8: ...questions you may have regarding your printer in the online Help file provided with the driver software In the Properties dialog box you can click the Help button to display additional information abo...

Page 9: ...stem CARPS is the software that extends the power of the Windows operating system to a printer to speed up and simplify print jobs CARPS provides more printing control under Windows applications This...

Page 10: ...connect the USB cable to the port on your computer when you start the procedure During the installation of the software the installation program will prompt you when it is appropriate to connect the...

Page 11: ...select I accept the terms in the license agreement click Next 5 Confirm that Install Printer Driver through a USB Connection is selected click Next The USB Connection dialog box appears NOTE A message...

Page 12: ...TANT The USB cable must be connected to the port on your computer within 90 seconds after Yes in the USB Connection dialog box is clicked otherwise the installation will not complete For more informat...

Page 13: ...inter Driver through a USB Connection on p 2 2 first then continue this procedure If Plug and Play is automatically carried out and the Found New Hardware Wizard dialog box appears click Cancel to fol...

Page 14: ...essage recommending you to restart your computer may appear under some operating systems In this case continue installing after restarting your computer 5 Clear Install Printer Driver through a USB Co...

Page 15: ...r accept the default name 4 Select Use as Shared Printer if you want to use the printer as the shared printer only for Windows 2000 XP If you select Use as Shared Printer Click Details In the Detailed...

Page 16: ...e printer driver is installed and the printer icon is added to the Printers folder NOTE While the printer driver is being installed the message asking you if you want to view the README file or not ap...

Page 17: ...8 Me The screen shots shown are from Windows 98 Before you install the software make sure you do the following Connect the machine to your computer See the Basic Guide Turn on the machine See the Basi...

Page 18: ...folder containing the USB class driver For example if your CD ROM drive is D the path name of the folder would be D Drivers us_eng USBPORT Win 98 You can also enter the path name directly in the edit...

Page 19: ...n in Windows Me Specify the location of the driver Advanced use Browse to select the folder containing the CARPS software For example if your CD ROM drive is D the path name of the folder would be D D...

Page 20: ...you accept the default printer name leave the edit box as it is click Finish The Add Printer Wizard dialog box closes The installation of the CARPS software starts 13 When the installation is complete...

Page 21: ...n are from Windows 98 IMPORTANT If your computer has no printer driver installed through a USB connection follow the steps in Installing Printer Driver through a USB Connection on p 2 2 first then con...

Page 22: ...s 6 Place the CD ROM into the CD ROM drive 7 Use Browse to select the folder containing the CARPS software click OK For example if your CD ROM drive is D the path name of the folder would be D Drivers...

Page 23: ...ou want to use click Finish If you accept the default printer name leave the edit box as it is click Finish The installation starts NOTE If you already have another printer installed you will be asked...

Page 24: ...1 Log on as a member of Administrators Plug and Play is carried out and the USB class driver USB Printing Support is automatically detected and installed The Found New Hardware Wizard dialog box appea...

Page 25: ...your CD ROM drive is D the path name of the folder would be D Drivers us_eng WIN2K_XP You can also enter the path name directly in the edit box 7 Click Next on the Driver Files Search Results dialog...

Page 26: ...e logged on as a member of Administrators The full control access right for the printer is necessary for the installation of CARPS 1 From the Start menu select Settings Printers The Printers folder ap...

Page 27: ...6 Click Have Disk The Install From Disk dialog box appears 7 Place the CD ROM into the CD ROM drive 8 Use Browse to select the folder containing the CARPS software click OK For example if your CD ROM...

Page 28: ...u want to use click Next If you accept the default printer name leave the edit box as it is click Next NOTE If you already have another printer installed you will be asked whether to use this printer...

Page 29: ...ant to print a test page select No In this case step 14 will be skipped 13 Click Finish to start the installation The installation starts When the installation is complete the Add Printer Wizard dialo...

Page 30: ...n on the machine See the Basic Guide Start up Windows XP 1 Log on as a member of Administrators Plug and Play is carried out and the USB class driver USB Printing Support is automatically detected and...

Page 31: ...s driver For example if your CD ROM drive is D the path name of the folder would be D Drivers us_eng WIN2K_XP You can also enter the path name directly in the edit box 5 Click Next The installation st...

Page 32: ...logged on as a member of Administrators The full control access right for the printer is necessary for the installation of CARPS 1 From the Start menu select Printers and Faxes The Printers and Faxes...

Page 33: ...6 Click Have Disk The Install From Disk dialog box appears 7 Place the CD ROM into the CD ROM drive 8 Use Browse to select the folder containing the CARPS software click OK For example if your CD ROM...

Page 34: ...se click Next If you accept the default printer name leave the edit box as it is click Next NOTE If you already have another printer installed you will be asked whether to use this printer as the defa...

Page 35: ...you do not want to print a test page select No In this case step 14 will be skipped 13 Click Finish The installation starts When the installation is complete the Add Printer Wizard dialog box closes...

Page 36: ...y by starting the server even if the server was not running when the client was started If the server is running on Windows 2000 XP you can print even if no one is logged into the server Setting the M...

Page 37: ...Your Network 2 29 2 Double click the Network icon The Network dialog box appears 3 Click Add in the Configuration tab sheet The Select Network Component Type dialog box appears 4 Select Service click...

Page 38: ...ur Network 2 30 5 Click Microsoft select File and printer sharing for Microsoft Networks click OK 6 Click File and Print Sharing The File and Print Sharing dialog box appears 7 Select I want to be abl...

Page 39: ...ling Printer Driver 2 Using the Machine on Your Network 2 31 8 Select the Access Control tab sheet click either Share level access control or User level access control 9 Click OK The server service is...

Page 40: ...der Windows 2000 XP Adding Server Service Windows 2000 1 From the Start menu select Settings Network and Dial up Connections The Network and Dial up Connections folder appears 2 Right click the Local...

Page 41: ...Installing Printer Driver 2 Using the Machine on Your Network 2 33 4 Click Service click Add 5 Select File and Printer Sharing for Microsoft Networks click OK The server service is added...

Page 42: ...dding Server Service Windows XP 1 From the Start menu select Control Panel The Control Panel folder appears 2 Click Network and Internet Connections The Network and Internet Connections folder appears...

Page 43: ...Local Area Connection icon select Properties from the pop up menu The Local Area Connection Properties dialog box appears 5 Click Install The Select Network Component Type dialog box appears 6 Click...

Page 44: ...s dialog box select Share this printer in the Sharing tab NOTE For instructions on how to open the Canon FP L170 MF350 L380 L398 Properties dialog box see p 3 17 2 Enter the share name as needed NOTE...

Page 45: ...ows 98 Me servers In that case use Add Printer Wizard Network Download The following is the procedure to connect to the shared printer on your network using network download NOTE Windows 2000 XP clien...

Page 46: ...connect to the shared printer on your network using Windows 98 Me Add Printer Wizard The screen shots shown are from Windows 98 1 From the Start menu select Settings click Printers The Printers folder...

Page 47: ...perience this problem you should either log on to a Domain or setup an account on the Server PC for each user in the Workgroup that will print from a Client PC 5 Click Have Disk The Install From Disk...

Page 48: ...n Windows XP click Add a printer in Printer Tasks The Add Printer Wizard dialog box appears 3 Select Network printer in Windows XP select A network printer or a printer attached to another computer cl...

Page 49: ...isplayed in the Canon FP L170 MF350 L380 L398 Properties dialog box will vary depending on the type of operating system you are using and the method you use to access the dialog box The method you use...

Page 50: ...box by right clicking the corresponding printer icon and selecting Properties from the pop up menu The Canon FP L170 MF350 L380 L398 Properties dialog box appears The Canon FP L170 MF350 L380 L398 Pro...

Page 51: ...ge or define separator pages Refer to your Windows operating system documentation for more information Details Tab Specifies the printer port and time out settings Refer to your Windows operating syst...

Page 52: ...paper size when printed However when 11x17 B4 or A3 is selected in the Page Size the original page size is automatically reduced to fit Letter size NOTE Up to 50 sizes can be defined for Custom Paper...

Page 53: ...velope Monarch Envelope COM10 Envelope DL or Envelope C5 as Output Size Paper Type is automatically set to Envelope Watermark Inserts the selected watermark to be printed on each page 8 types of water...

Page 54: ...rk List Position Specifies the position where the watermark is printed on each page You can enter the values in the X and Y edit boxes in a range between 50 and 50 or use the X and Y slide bars to mov...

Page 55: ...g box is opened from a Windows application To register the custom paper size follow the steps in From the Printers folder on p 3 2 and perform the procedure above Paper List Displays the paper sizes a...

Page 56: ...s including the collating and binding For information on Profile refer to Profiles on p 3 13 Edging Adds a page frame to be printed on each page 11 options are available Print Date Selects if the date...

Page 57: ...location for the printed pages Gutter Opens the Gutter Settings dialog box see p 3 9 Finishing Selects if the printed pages are sorted by copy or not Advanced Settings Opens the Advanced Settings dia...

Page 58: ...the best setting for the print job according to document content Details Opens the Detailed Settings dialog box see p 3 10 Manual Grayscale Settings Enables the manual grayscale Selecting this check b...

Page 59: ...er s resolution in dot per inch 600 dpi or 300 dpi B W Halftones Selects a halftone pattern Enable Image Correction Corrects the roughness of image and inaccuracy in interpolating when printing an enl...

Page 60: ...nt Selecting Driver Matching Mode enables Matching Method and Monitor Profile Selecting Gamma Adjustment enables Gamma Matching Method Selects the matching method Monitor Profile Selects the profile a...

Page 61: ...ects the profile to apply Displays the image with the currently selected settings reflected Changes the setting for Page Layout every time you click anywhere inside the image of the page see p 3 4 The...

Page 62: ...ob Edit and Preview Saves the data in the Canon Page Composer dialog box When Edit and Preview is selected Lock button appears on the right side When you click this button Edit and Preview mode is loc...

Page 63: ...og box enables you to edit the profile selected in Profile List Name Specifies the name of the profile to be registered Icon Selects an icon to represent the profile to be registered Comment Adds comm...

Page 64: ...name of the currently selected profile NOTE When one of the pre defined profiles is selected the name cannot be changed Icon Displays and allows you to change the icon representing the currently selec...

Page 65: ...t Settings Printers in Windows XP Printers and Faxes The Printers in Windows XP Printers and Faxes folder appears 2 Click the corresponding printer icon select Properties from the File menu You can al...

Page 66: ...F350 L380 L398 Printing Preferences dialog box appears Printer Properties The Canon FP L170 MF350 L380 L398 Properties dialog box contains several tab sheets that enable you to set up the printer conf...

Page 67: ...e printer sharing settings This tab sheet is available only when the printer sharing is enabled see p 2 36 Refer to your Windows operating system documentation for more information Ports Tab Specifies...

Page 68: ...pooling Refer to your Windows operating system documentation for more information NOTE Spool print documents so program finishes printing faster and Start printing immediately are set automatically wh...

Page 69: ...ables you to edit the registered profiles see p 3 22 NOTE When one of the pre defined profile Default Settings 2 on 1 or Confidential is selected in Profile List this button is disabled Delete Removes...

Page 70: ...the name of the profile selected in the Profile tab sheet NOTE When one of the pre defined profiles is selected the name cannot be changed Icon Selects an icon to represent the new profile or allows y...

Page 71: ...e settings including the paper size scaling number of copies orientation and number of pages per sheet see p 3 24 Finishing Tab Specifies the finishing settings for the printed pages including the col...

Page 72: ...page settings including the paper size scaling number of copies orientation and number of pages per sheet For information on Profile refer to Profiles on p 3 34 Preview image Displays the image with...

Page 73: ...Poster Manual Setting disappears and Page Order appears in its place Manual Scaling Reduces or enlarges the original page size Selecting this check box enables the edit box on the right side to speci...

Page 74: ...abled only when the Watermark check box is selected in the Page Setup tab sheet see p 3 24 NOTE This option is disabled when Page Layout is set to Poster Edit Watermark Opens the Edit Watermark dialog...

Page 75: ...between 50 and 50 or use the X and Y slide bars to move the position Move to Center Relocates the watermark to the page center Angle Sets the angle of watermark You can select the corresponding radio...

Page 76: ...Size Specifies the name of custom paper Unit Selects the unit of measurement of paper size Millimeter or Inch Paper Size Specifies the width and height of the custom paper NOTE Be sure that Width does...

Page 77: ...binding For information on Profile refer to Profiles on p 3 34 Edging Adds a page frame to be printed on each page 11 options are available Edging is not available to use with Print Grayscale Settings...

Page 78: ...a binding location for the printed pages Gutter Opens the Gutter Settings dialog box see p 3 30 Finishing Selects if the printed pages are sorted by copy or not Collate or Off Advanced Settings Opens...

Page 79: ...g this check box enables Grayscale Settings to access the dialog box which allows you to set the grayscale for images see p 3 32 Print Grayscale Sample Prints nine thumbnails per sheet to provide the...

Page 80: ...his dialog box enables you to control the brightness and contrast of images This function is enabled only when Manual Grayscale Settings is selected in the Quality tab sheet see p 3 31 Two tab sheets...

Page 81: ...the image with the currently selected brightness and contrast reflected Original Displays the original image Brightness Adjusts the brightness of the preview image in the range between 5 and 5 Contra...

Page 82: ...river Matching Mode enables Matching Method and Monitor Profile Selecting Gamma Adjustment enables Gamma Matching Method Selects the matching method Monitor Profile Selects the profile appropriate for...

Page 83: ...e changes the binding location Output Method Switches the job mode between Print and Edit and Preview Print Executes a normal print job Edit and Preview Saves the data in the Canon Page Composer dialo...

Page 84: ...log box This dialog box enables you to edit the profile selected in Profile List Name Specifies the name of the profile to be registered Icon Selects an icon to represent the profile to be registered...

Page 85: ...ofile NOTE When one of the pre defined profiles is selected the name cannot be changed Icon Displays and allows you to change the icon representing the currently selected profile NOTE When one of the...

Page 86: ...ult Document Properties 3 38 View Settings Clicking View Settings opens the View Settings dialog box This dialog box displays the current settings in the Page Setup Finishing and Quality tab sheets Co...

Page 87: ...oftware interacts with the printer If you can print a self test but the printer does not print other jobs or the output is not what you expected the problem is with your computer software or cable If...

Page 88: ...ction Cause 4 Your BIOS port setting needs to be modified Remedy See your computer s documentation concerning available ports Cause 5 Your computer is not working properly Remedy Make sure your comput...

Page 89: ...CT PAPER SIZE message displays on the LCD of the printer Cause Paper setting of the machine is different from that of your computer Remedy Load the correct paper size or change the PAPER SIZE setting...

Page 90: ...esponding because the printer is off offline or not connected to the computer Remedy Make sure the printer is not paused Make sure the printer s interface cable is securely connected to both the print...

Page 91: ...ers 4 Locate the USB class driver under Universal Serial Bus Controllers Delete ONLY the USB class driver specified for you operating system If the USB class driver is displayed under Other device del...

Page 92: ...perly it might help to remove the CARPS software and install it again Before you remove the software make sure the following You have the installation software available for installation No program is...

Page 93: ...e Printers in Windows XP Printers and Faxes folder appears 2 Select the corresponding printer icon 3 From File menu select Delete The confirmation message dialog box appears 4 Click Yes The uninstalla...

Page 94: ...mm x 127 mm Plain paper colored paper recycled paper envelopes and heavy paper up to 34 lb 128 g m2 Maximum capacity 250 sheets of 17 lb bond 64 g m2 paper Multi purpose feeder 8 1 2 x 14 216 mm x 35...

Page 95: ...es more printing control under Windows applications Client A computer that is connected to the printer over a network A client does not control the printer directly It interacts with the printer throu...

Page 96: ...n Advanced Raster Printing system you are using its printer driver F Fixing assembly The device used during the print process to fix the toner onto the paper or other media through applying heat and p...

Page 97: ...le to the vertical axis J Jam A situation created when paper becomes caught along the paper path You must remove jammed paper before you can continue printing K Kilobyte KB A unit of measurement repre...

Page 98: ...ored paper recycled paper transparencies thick paper envelopes etc are grouped under several Paper Types You can access this setting from the Paper Type field on the Page Setup tab of the Printer Prop...

Page 99: ...or are currently printing Once a file has been printed it is removed from the print queue R Random Access Memory RAM The working memory of the computer in which programs and data are temporarily stor...

Page 100: ...ooler rather than directly to the printer thus freeing the computer and application for other tasks Spooled documents are printed in the order they are received T Title bar The horizontal bar that con...

Page 101: ...to it when the swap file must be used See also Physical RAM W Weight Refers to the thickness of a font light medium or bold Also refers to the thickness of paper Windows Explorer The Windows program y...

Page 102: ...tings Windows 2000 XP 3 32 Windows 98 Me 3 10 Details tab Windows 98 Me 3 3 Dialog boxes Windows 2000 XP printer properties 3 17 Windows 98 Me printer properties 3 1 dpi 5 3 Driver See Printer driver...

Page 103: ...ations 5 1 stops printing 4 3 Printer driver 4 5 5 6 Printer properties Windows 2000 XP dialog box 3 17 Windows 98 Me dialog boxes 3 1 Printer sharing settings 2 36 Printing speed 5 1 Printout is wron...

Page 104: ...2 Finishing tab 3 23 General tab 3 18 Grayscale Adjustment tab 3 33 Matching tab 3 33 Page Setup tab 3 24 Ports tab 3 19 Profile tab 3 21 Quality tab 3 31 Sharing tab 3 19 Windows 98 Me Details tab 3...

Reviews: