background image

Gl

o

s

s

a

ry

G

G-7

Sending

A fax document that has been scanned by a fax machine and sent over telephone lines, in the form of electrical pulses, to another fax 
machine. Also called TX or Transmit.

Sending speed

The rate at which faxes are transmitted through the phone line. See also 

bps

 (bits per seconds).

STANDARD

A document setting for sending normal typewritten or printed documents containing only text and no drawings, photographs, or 
illustrations.

Standby

The mode in which the machine is on and ready to use. 

T

Timed sending

See 

Delayed sending.

Tone

A button that allows you to temporarily switch to touch-tone from pulse dialing. In some countries, on-line data services may require 
that you use tone dialing.

Tone/pulse setting

The ability to set the machine to match the telephone dialing system your telephone line uses: touch-tone or rotary pulse.

Toner

A black, resin coated powder contained in the toner cartridge. The machine applies the toner to the surface of the photosensitive 
drum inside the machine via an electrophotographic mechanism.

Toner saver

You can enable or disable economy printing (toner saving feature). By enabling the ECONOMY PRT setting, toner consumption can 
be decreased by approx. 30%, resulting in a longer effective cartridge life.

Transaction number

A unique number assigned to each fax document sent (TX NO.) or received (RX NO.) by the machine and used to identify that 
particular fax document.

Transmit

See 

Sending.

TTI

Transmit Terminal ID.

 See 

Sender ID.

TX 

See 

Sending.

U

UHQ

 (Ultra High Quality) 

An exclusive Canon digital image processing system that incorporates 256 shades of gray along with a special edge enhancement 
feature which ensures that text and photos are transmitted with ultimate clarity.

l-1100.book  Page 7  Friday, February 27, 2004  7:04 PM

Summary of Contents for FAXPHONE L170

Page 1: ...his guide before operating this equipment h reading this guide store it in a safe place ence ONE L170 ...

Page 2: ...te Setting up the Machine Installing Printer Driver Set Up Instructions Document and Paper Handling Sending and Receiving Faxes Speed Dialing Making Copies Maintenance Troubleshooting The Menu System Basic Guide This Document Installing Printer Driver Software Printer Properties Troubleshooting Printer Driver Issues Software Guide CD ROM To view the manual in PDF format Adobe Reader Acrobat Reader...

Page 3: ...tly asked questions www usa canon com consumer Free technical support Monday Saturday excluding holidays for products still under warranty 1 800 828 4040 Technical support for products no longer under warranty 1 757 413 2848 NOTE Within Canada call for technical support 24 hours a day 7 days a week 1 800 263 1121 Support program specifics are subject to change without notice ...

Page 4: ...believed reliable but the accuracy and completeness thereof are not guaranteed or warranted and they are not intended to be nor should they be understood to be representations or warranties concerning the products described Your FAXPHONE L170 has been sold to you subject to the limited warranties set forth in the warranty cards Further Canon U S A reserves the right to make changes in the specific...

Page 5: ... in the machine s display is shown in capital letters such as RECEPTION OK Safety information Read this safety information thoroughly before using your machine and keep it handy in case you need to refer to it later WARNING This product emits low level magnetic flux If you use a cardiac pacemaker and feel abnormalities please move away from this product and consult your doctor CAUTION Do not disas...

Page 6: ...o not place heavy objects on the power cord pull on it or extensively bend it These actions may cause electrical damage and result in a fire or electrical shock Do not insert or unplug the power plug with wet hands as this may result in electrical shock Do not overload the wall outlet with too many electrical appliances as this may result in a fire or electrical shock Plug the machine into a stand...

Page 7: ...e followed the instructions in the guides included with your machine Adjust only those controls that are covered by the instructions in the guides since improper adjustment of other controls may result in damage and will often require extensive work by a qualified technician to restore the product to normal operation If the machine has been dropped or damaged If the machine exhibits a distinct cha...

Page 8: ...ical parts as this may result in electrical shock Do not place heavy objects on top of the machine as these may topple over and result in injury Do not subject the machine to strong physical shock or vibration Unplug the machine before moving it Do not lift the machine by any of its attachments Lift it by the recessed areas on the sides of the machine A distinct change in performance may indicate ...

Page 9: ...f using your product to scan print or otherwise reproduce any particular document and or of the use of the images scanned printed or otherwise reproduced you should consult in advance with your legal advisor for guidance Paper money Traveler s checks Money orders Food stamps Certificates of deposit Passports Postage stamps canceled or uncanceled Immigration papers Identifying badges or insignias I...

Page 10: ...writers copiers and machines of this sort generate electrical noise which often interferes with communications equipment and the sending and receiving of documents Connection of the equipment This equipment complies with Part 68 of the FCC rules and the requirements adopted by the ACTA On the rear panel of this equipment is a label that contains among other information a product identifier in the ...

Page 11: ...requency energy and if not installed and used in accordance with the instructions may cause harmful interference to radio communications However there is no guarantee that interference will not occur in a particular installation If this equipment does cause harmful interference to radio or television reception which can be determined by turning the equipment off and on the user is encouraged to tr...

Page 12: ...line per machine DDD DIRECT DISTANCE DIAL LINE or IDDD INTERNATIONAL DIRECT DISTANCE DIAL LINE IF YOU COMMUNICATE OVERSEAS NOTE Canon recommends an individual line following industry standards e g the 2500 touch tone or 500 rotary pulse dial telephones A dedicated extension off a PBX machine without Camp On signals is also permissible with your FAXPHONE L170 Key telephone systems are not recommend...

Page 13: ... may be particularly important in rural areas CAUTION Users should not attempt to make such connections themselves but should contact the appropriate electric inspection authority or electrician as appropriate NOTE This Class B digital apparatus meets all requirements of the Canadian Interference Causing Equipment Regulations Cet appareil numérique de la classe B respecte toutes les exigences du R...

Page 14: ...l covers the laser beam cannot escape from the machine during any phase of user operation CDRH Regulations The Center for Devices and Radiological Health CDRH of the U S Food and Drug Administration implemented regulations for laser products on August 2 1976 These regulations apply to laser products manufactured from August 1 1976 Compliance is mandatory for products marketsed in the United States...

Page 15: ...Laser Safety xiv CDRH Regulations xiv Contents xv Chapter 1 Introducing the FAXPHONE L170 Welcome 1 1 The Main Features of the Machine 1 2 Fax Features 1 2 Printer Features 1 3 Copier Features 1 3 Telephone Features 1 3 Using the Machine as a Printer 1 4 System Requirements 1 4 Using Your Documentation 1 5 Chapter 2 Setting Up Your Machine Choosing a Location for Your Machine 2 1 Unpacking Your Ma...

Page 16: ...elope in the Multi Purpose Feeder 4 9 Testing the Machine 4 10 Orientation of the Document and the Paper Loading 4 11 Selecting the Paper Output Area 4 12 Paper Type and Paper Output Area 4 12 Face Down Paper Output Area 4 13 Face Up Paper Output Area 4 13 Chapter 5 Speed Dialing Speed Dialing Methods 5 1 One Touch Speed Dialing 5 2 Storing Numbers for One Touch Speed Dialing 5 2 Changing or Delet...

Page 17: ...sing an Answering Machine AnsMode 7 5 Using the Machine With an Answering Machine 7 5 Receiving with a DRPD Distinctive Ring Pattern Detection service DRPD 7 5 Receiving Faxes in Memory When a Problem Occurs 7 6 Receiving While Performing Other Tasks 7 7 Canceling an Incoming Fax 7 7 Chapter 8 Setting Up and Using Polling What s Polling 8 1 Before You Use Polling Receiving 8 1 Polling Other Fax Ma...

Page 18: ... 3 Confirming and Deleting a Report Job 11 4 Chapter 12 Reports and Lists Activity Report 12 1 Transmission TX Reports 12 2 Error TX Report 12 2 TX Report 12 3 Multi TX RX Report 12 3 Reception RX Report 12 4 Memory Clear Report 12 5 Speed Dialing Lists 12 6 One Touch Speed Dial List 12 7 Coded Speed Dial List 12 7 Group Dial List 12 8 User s Data List 12 9 Document Memory List 12 10 Chapter 13 Tr...

Page 19: ... 15 3 3 COPY SETTINGS 15 5 4 FAX SETTINGS 15 6 5 ADD REGISTRATION 15 13 6 PRINTER SETTINGS 15 14 7 TIMER SETTINGS 15 15 8 PRINT LISTS 15 16 Appendix Specifications General A 1 Fax A 2 Copier A 3 Telephone A 3 Printer A 4 Printable Area Papers A 5 Printable Area Envelopes A 6 Document Sizes A 7 Printer Driver A 8 Glossary Index ...

Page 20: ...Contents xx ...

Page 21: ...ins how to get the most out of the documentation that comes with the machine and gives important safety instructions Welcome Thank you for purchasing the new Canon FAXPHONE L170 We are sure that your machine will meet your printing and copying needs easily and conveniently as well as your fax and phone requirements FAXPHONE L170 ...

Page 22: ...s transmission errors while communicating with another ECM capable machine Automatic switching between fax and voice calls The machine can automatically distinguish between fax and voice calls so that you can receive both through a single phone line Answering machine connection You can connect an answering machine to receive telephone messages while you are away Transmission speed The machine uses...

Page 23: ...achine scans documents at 300 300 dpi Printing resolution is 1200 dpi enhanced 600 dpi Copy enlargement reduction The machine can reduce or enlarge copies in the range between 50 and 200 of their original size Collate copy The machine can sort copies in page order It is convenient when you make multiple copies of a multiple page document Telephone Features Automatic dialing The machine s 3 automat...

Page 24: ...000 or Windows XP runs properly Hardware Requirements IBM or IBM compatible PC CD ROM drive or network environment with the access to CD ROM PC equipped with a USB port and the USB class driver installed Logon as a user account with Administrators rights is recommended OS CPU RAM Available free disk space Windows 98 Intel Pentium 90 MHz or greater 32 MB or greater 100 MB or greater Windows Me Inte...

Page 25: ...elp you learn how to use your machine Set Up Instructions This Guide provides basic information on how to set up and use the machine Basic Guide this Guide This Guide provides detailed information on how to use and troubleshoot your machine Software Guide This Guide stored in the CD ROM describes how to use the machine to print from your PC ...

Page 26: ...Introducing the FAXPHONE L170 1 Using Your Documentation 1 6 ...

Page 27: ...ins between 50 F and 90 5 F 10 and 32 5 C Make sure the area s relative humidity is always between 20 and 80 Keep the machine away from direct sunlight If possible place the machine near an existing telephone outlet to allow for an easy connection of the telephone line to the machine Place the machine near an electrical wall outlet that provides 120 V AC 60 Hz power Place the machine near the PC y...

Page 28: ...m the box You should have someone help by holding the box while you lift the machine and its protective packaging out of the carton Make sure you have the following items If any of the above items are damaged or missing notify your local authorized Canon dealer immediately Power cord Telephone line cord Documentation Set Up Instructions Basic Guide Warranty Warranty for S35 Cartridge Registration ...

Page 29: ...efore using Follow these steps NOTE The actual shipping materials may differ in shape quantity and position from the ones shown in the illustrations below 1 Remove all pieces of shipping tape from the exterior of the machine 2 Open the document feeder tray by flipping it down 3 Open the operation panel by grasping it at the center and gently pulling it up Remove protective sheet from the Automatic...

Page 30: ...nd its components To see how the machine will look fully assembled see Getting Acquainted With Your Machine on p 2 9 Attaching Components NOTE Make sure the tabs are inserted into the slot completely Document Output Tray Insert the tabs into the slots on the back of the machine Output Tray Insert the tray into the corresponding slots ...

Page 31: ...mbling the Machine 2 5 Installing the Paper Cassette 1 Attach the extension cover on the back of the machine 2 Pull out the paper cassette 3 Attach the cassette extension to the cassette 4 Insert the paper cassette into the machine ...

Page 32: ...ing machine to your machine If you connect a data modem to your machine and you use it extensively or others access your PC frequently through the data modem you may want a dedicated telephone line for your data modem Connecting the Machine to Your PC Your machine has a USB port that allows you to connect it to a PC To do this you need to purchase a USB cable from your dealer NOTE For best results...

Page 33: ... cord can cause the machine to malfunction Unplug the machine only by pulling on the plug itself Never pull on the cord Do not plug the machine into an outlet shared with an appliance such as an air conditioner computer electric typewriter or copier These devices generate electrical noise which can interfere with the operation of the machine Make sure nothing is laying on the power cord and that t...

Page 34: ...it is plugged in Once connected though the machine still needs to warm up before you can use it While the machine is warming up the message PLEASE WAIT appears in the LCD display NOTE If the toner cartridge has not been installed yet the message INSTALL CARTRIDGE appears in the LCD display and the Alarm indicator flashes In this case install the toner cartridge See Installing Replacing the Toner C...

Page 35: ...axed or copied b ADF Automatic Document Feeder Holds documents and feeds them automatically into the scanning machine c Document output tray Documents come out here d Slide guides Adjust to the width of documents e Operation panel Controls the machine f Output tray Holds printout Received faxes g Printer cover Open it when you install the cartridge or remove jammed paper h Multi purpose feeder Use...

Page 36: ...et jack Connect the handset c Extension phone jack Connect an extension phone d Telephone line jack Connect the telephone cable e Face up cover Open it when you output paper face up or remove jammed paper f Power socket Connect the power cord g Extension cover Protects paper supply in the cassette from dirt and dust h Machine Serial Number ...

Page 37: ...tton Use this button to set an enlargement or reduction ratio of a copy l Exposure button Use this button to adjust the copy exposure m Image Quality button Use this button to select the resolution the machine will use for the document you want to fax or copy n Stop Reset button Use this button to cancel sending or receiving faxes and other operations and bring back the standby display in the LCD ...

Page 38: ...ween letters and numbers when you are registering information d Delayed Transmission button Use this button to register a time for delayed sending e Polling button Use this button to set a document for polling sending and to poll the other fax to receive a document f Clear button Use this button to clear an entire entry during information registration g Delete button Use this button to delete char...

Page 39: ...ur Machine 2 13 Handset a Ringer Volume Switch Adjust the volume of the ringer Use a pen or another pointed object to adjust the switch to High Low or OFF b Speaker Volume Switch Adjust the volume of the handset so you can hear suitable from the speaker ...

Page 40: ...xes While a copy job is saved in memory or when the reserve copy or other functions are operating or when the In Use Memory indicator lights up When paper jams occur When an error code appears and the Alarm indicator flashes When no paper is loaded in the cassette Setting the Energy Saver Mode Manually 1 Press Energy Saver The LCD is turned off and Energy Saver lights up NOTE Right after the machi...

Page 41: ...print quality may deteriorate Do not stand the cartridge on end and do not turn it upside down If toner becomes caked in the cartridge it may prove impossible to free it even by shaking the cartridge Keep the cartridge away from computer screens disk drives and floppy disks The magnet inside the cartridge may harm these items When holding the cartridge never touch the drum protective shutter with ...

Page 42: ... cartridge from the machine when disposing of the machine CAUTION DO NOT PLACE THE CARTRIDGE IN FIRE TONER POWDER IS FLAMMABLE Installing Replacing the Toner Cartridge The machine uses a Canon S35 Cartridge The procedure on the next page explains how to install the cartridge for the first time and how to replace it when the toner runs out When the message REPLACE CARTRIDGE appears the toner in the...

Page 43: ... protective shutter of the drum in any way 5 Hold the cartridge on a flat stable surface with one hand and break the tab and pull out the seal completely with the other hand 6 Open the printer cover NOTE If you are replacing the old cartridge with the new one remove the old cartridge from the machine Then discard the old toner cartridge immediately according to the local laws and regulations for d...

Page 44: ...artridge and position the arrow mark on the cartridge towards the inside of the machine as shown below 8 Align the projections on both sides of the cartridge to the guides in the machine and slide the cartridge completely into the machine 9 Close the printer cover ...

Page 45: ...nt You will then have to start again The time until the machine returns to the standby mode can be specified in a range of 1 minute to 9 minutes You can also turn off AUTO CLEAR function See Chapter 15 The Menu System Entering Numbers Letters and Symbols Each numeric button has a number and a group of uppercase and lowercase letters assigned to it Use the chart below to determine which numeric but...

Page 46: ...r the letter or number Press the button repeatedly until the letter or number you want appears To enter two letters or symbols that are under the same button Press the numeric button press the same numeric button again For example to enter DD you would press 3 3 To enter a space Press Space under the One Touch Speed Dial panel To delete a character Press Delete under the One Touch Speed Dial panel...

Page 47: ...ansmission will be printed in small type at the top of each page This information is called the Sender information or the Transmit Terminal Identification TTI You must register your details in your machine so that whenever you send a fax the other party knows who sent it and when it was sent Below is an example of how your sender information would print on a fax sent from your machine To enter the...

Page 48: ...press Set four times 3 Use the numeric buttons to enter your fax telephone number max 20 digits including spaces press Set To enter a plus sign before the number press repeatedly until it appears For details on how to enter or delete numbers see Entering Numbers Letters and Symbols on p 3 1 4 Press Menu or to select 2 UNIT NAME press Set 5 Use the numeric buttons to enter your name max 24 characte...

Page 49: ...to standby mode Setting the Daylight Saving Time This machine supports the daylight saving time system that shifts the clock time ahead or back according to the change in seasons You can select whether the time information in your machine changes to match the daylight saving time system and set the day and time when the daylight saving time starts and ends 1 Press Menu 2 Press or to select 7 TIMER...

Page 50: ... daylight saving time starts press Set twice 9 Use the numeric buttons to enter the time at which the daylight saving time compensation is made press Set three times Use the 24 hour format for the time e g 2 00 p m as 14 00 and precede single digits with a zero 10 Press or and Set to select the month week day of the week and time when the daylight saving time ends e g OCTOBER LAST WEEK SUNDAY and ...

Page 51: ...apped tightly in its original package Store paper in a dry location out of direct sunlight To prevent curling store paper flat not upright If the paper is curled uncurl it before loading it in the cassette or multi purpose feeder Failure to do so will cause paper creases and a paper jam Unacceptable Paper Do not print on the following types of paper stock Doing so may result in paper jams Severely...

Page 52: ...tire area where the machine can technically print from your computer Printing area light shade Canon recommends that you print within this area Paper Envelope NOTE Copying areas are a little larger than printing areas Cassette Multi Purpose Feeder Paper Size A4 B5 A5 LTR LGL EXECUTIVE Envelope COM10 MONARCH DL ISO C5 Free Size Multi purpose feeder 8 1 2 14 216 mm 356 mm max 3 5 76 mm 127 mm min Pa...

Page 53: ...tock to the cassette be sure to remove the remaining paper in the cassette and reload it together with the new stock Failure to do so may cause paper jams NOTE Do not use damp curled wrinkled or torn paper as these can cause paper jams or poor print quality Highly textured extremely smooth or shiny paper does not print well The laser printing process uses high temperatures to fuse toner to the pap...

Page 54: ... the size of the paper the quality of your printouts may be adversely affected or jams may occur 4 Load the paper stack in the cassette with the print side down When you load paper with a logo on position the paper with the print side down logo side and load it so that the top of the paper feeds first in the cassette 5 Pinch and slide the width slide guides to fit the paper stack Make sure the pap...

Page 55: ...r first Then put it together with the extra paper and tap the edges After that reload it in the cassette Do not load paper from the rear of the cassette NOTE Select ENVELOPE for envelopes For details on loading envelopes in the cassette see Loading Envelopes in the Cassette on p 4 5 For information on how to use non standard size paper see Loading Paper in the Multi Purpose Feeder on p 4 8 or Load...

Page 56: ...ven the envelopes 5 Pull out the cassette completely 6 Pinch and slide the length slide guide to fit the size of the envelopes you want to load IMPORTANT If the slide guides are not adjusted correctly for the size of the envelopes the quality of your printouts may be adversely affected Do not load paper from the rear of the cassette 7 Load the envelopes with the print side down and the flap comes ...

Page 57: ...he envelopes exceed the load limit mark this may result in misfeeds NOTE If you do not completely insert the cassette into the machine paper jams may occur 10 Specify the paper size and type Press Menu press Set Press or to select 1 CASSETTE press Set twice Press or to select ENVELOPE press Set Press or to select the appropriate envelope type press Set twice Press or to select HEAVY PAPER or HEAVY...

Page 58: ...n the cassette 1 Slide the slide guides to fit the size of the paper you want to load IMPORTANT If the slide guides are not adjusted correctly for the size of the paper the quality of your printouts may be adversely affected or jams may occur 2 Insert the paper straightly into the multi purpose feeder with the print side up NOTE When you load paper with a logo on it position the paper with the pri...

Page 59: ...16 mm 3 to 8 1 2 4 Specify the paper type Press or to select the appropriate paper type press Set Press Stop Reset to return to standby mode Loading an Envelope in the Multi Purpose Feeder Use the multi purpose feeder when you want to copy or print an envelope one by one IMPORTANT The recommended envelopes are COM10 MONARCH DL and ISO C5 Using other envelopes may affect the quality of the printout...

Page 60: ...cify vertical and horizontal sizes of the envelope in the following ranges VERTICAL SIZE 127 mm to 356 mm 5 to 14 HORIZONTAL SIZE 76 mm to 216 mm 3 to 8 1 2 4 Specify the paper type Press or to select HEAVY PAPER or HEAVY PAPER H press Set Press Stop Reset to return to standby mode Testing the Machine After you have assembled your machine installed the toner cartridge loaded paper you can make sur...

Page 61: ... the Document and the Paper Loading When you load a document in the ADF the orientation of the document and the orientation of the paper in the cassette or in the multi purpose feeder are as shown below DOCUMENT COPY PAPER CASSETTE MULTI PURPOSE FEEDER ...

Page 62: ...ut IMPORTANT Do not open or close the face up cover while copying and printing Paper Type and Paper Output Area Select the suitable paper output area depending on the paper type and your purpose Paper Type Paper Output Area The Number of Output Sheets Plain Paper L face up 1 sheet face down approx 50 sheets 17 lb to 20 lb 64 g m2 to 75 g m2 Plain Paper face up 1 sheet face down approx 50 sheets 20...

Page 63: ... up the output tray when printing many pages Face Up Paper Output Area The paper is delivered with the printed side up out of the face up paper output on the back side of the machine This way is convenient for printing on transparencies envelopes or labels which tend to curl because the paper is delivered straight through the machine Open the face up cover on the back of the machine Remove the del...

Page 64: ...Paper Handling 4 Selecting the Paper Output Area 4 14 ...

Page 65: ...d Dial followed by a two digit code assigned to that number Group Dialing Send a document to a pre defined group of fax numbers The numbers must already be stored as One Touch Speed Dialing numbers or Coded Speed Dialing numbers Directory Dialing Dial a fax telephone number by pressing Directory and entering the first letter of the other party s name In this manner you can search for the fax telep...

Page 66: ...ing Numbers Letters and Symbols on p 3 1 Open the One Touch Speed Dial panel press Space to enter spaces between numbers spaces are optional and are ignored during dialing To enter a pause in the number press Redial Pause one or more times See p 9 1 5 Use the numeric buttons to enter the name you want to store max 16 letters including spaces press Set For details on how to enter or delete letters ...

Page 67: ...Touch Speed Dial panel press Clear to delete the previous entry 4 Press the numeric buttons to enter the new number press Set twice For details on how to enter or delete numbers see Entering Numbers Letters and Symbols on p 3 1 If you want to delete a digit press or to move the cursor under the digit you want to delete press Delete If you only want to change the name press Set twice after step 2 o...

Page 68: ... the number registered under that button will be displayed If you mistakenly press the wrong One Touch Speed Dial button press Stop Reset press the correct button If no fax number is assigned to the One Touch Speed Dial button you press the LCD displays NOT REGISTERED If this happens make sure you press the correct button and that the number you want to dial is registered under that button 5 Press...

Page 69: ...appears 5 Use the numeric buttons to enter the telephone number max 120 digits including spaces and pauses press Set twice For details on how to enter or delete numbers see Entering Numbers Letters and Symbols on p 3 1 Open the One Touch Speed Dial panel press Space to enter spaces between numbers spaces are optional and are ignored during dialing To enter a pause in the number press Redial Pause ...

Page 70: ...One Touch Speed Dial panel press Clear to delete the previous entry 4 Press the numeric buttons to enter the new number press Set twice For details on how to enter or delete numbers see Entering Numbers Letters and Symbols on p 3 1 If you want to delete a digit press W or X to move the cursor under the digit you want to delete press Delete If you only want to change the name press Set twice after ...

Page 71: ...ng code is displayed If no name is registered the number registered under that code will be displayed If you mistakenly enter the wrong code press Stop Reset Coded Dial enter the correct code If no fax number is assigned to the Coded Speed Dialing code you press the LCD displays NOT REGISTERED If this happens make sure you enter the correct code and that the number you want to dial is registered u...

Page 72: ... already registered under the code you select GROUP DIAL or CODED SPD DIAL is displayed To continue storing under a Coded Speed Dialing code you can use or also NOTE Each One Touch Speed Dial button or Coded Speed Dialing code can store either a name and number for speed dialing or a group Be careful not to override speed dialing numbers and names when creating groups If you wish to register a gro...

Page 73: ...5 Press Clear to delete the name press Set 6 Press Stop Reset to return to standby mode To change the number and or name 2 Press or to select the number you want to change press Set twice 3 Press Clear to delete the numbers registered under the group 4 Select the speed dialing numbers you want to register in the group press Set twice To enter in the group a number stored under a One Touch Speed Di...

Page 74: ... a group press Stop Reset start again The name registered under that One Touch Speed Dial button or Coded Speed Dialing code is displayed If you press a One Touch Speed Dial button or Coded Speed Dialing code that has no group or fax number registered under it the LCD displays NOT REGISTERED Make sure that you press the correct One Touch Speed Dial button or enter the correct Coded Speed Dialing c...

Page 75: ...the display returns to dial entry mode 3 Press a numeric button to enter the first letter of the name of the party you are searching for For example if you want to search for a name that starts with the letter H press 4 GHI twice 4 Press Set Entries starting with the letter you entered are displayed If there is no entry that starts with the letter you entered entries that start with the next lette...

Page 76: ...Speed Dialing 5 Directory Dialing 5 12 ...

Page 77: ...8 1 2 14 216 356 mm W L Min 5 13 16 4 1 8 148 105 mm Quantity Up to 50 letter size 50 A4 size or 20 legal size sheets 1 sheet for sizes other than these Thickness 0 003 0 005 0 07 0 13 mm For sheet thicker than this load 1 sheet at a time All sheets should be of the same thickness Weight 13 lb 28 lb 50 105 g m2 All sheets should be of the same weight Size Max 8 1 2 approx 39 3 8 216 mm approx 1 m ...

Page 78: ...before loading the document into the Automatic Document Feeder ADF If you have a document that will not feed into the machine properly make a photocopy of the document then load the copy instead Scanning Area The margins shown in the illustration below are outside the machine s scanning area Make sure your document s text and graphics do not extend into these margins WRINKLED OR CREASED PAPER CURL...

Page 79: ...d the document faced down in the ADF The document is now ready for scanning NOTE For multiple page documents the pages are fed one by one from the top of the stack from the first page Wait until all pages of your document have been scanned before starting a new job 50 sheets of LTR size documents or 20 sheets of LGL size documents can be set in the ADF If more than 50 sheets of LTR size documents ...

Page 80: ...hat of the original document The machine also lets you adjust the resolution it uses in sending faxes to best suit your particular document The machine has 5 resolution settings STANDARD is adequate for most text documents FINE is suitable for documents with fine print smaller than the print in this sentence PHOTO is for documents that contain photographs With this setting areas of the document th...

Page 81: ...ou are already in the Fax standby mode you can skip this step 2 Press Exposure The LCD display shows the current exposure setting 3 Press Exposure repeatedly until the scanning density you want is displayed press Set 4 Continue the operation you wish to complete If you do not proceed with any other operation the LCD display returns to standby mode NOTE You can set the scanning density so that the ...

Page 82: ... send to Regular Dialing Use the numeric buttons to dial the recipient s fax number One Touch Speed Dialing Press the One Touch Speed Dial button 1 to 32 under which you have registered the number you want to send to See Chapter 5 Speed Dialing for details on registering and using One Touch Speed Dialing Coded Speed Dialing Press Coded Dial enter the two digit code 00 to 99 under which you have re...

Page 83: ... Sending on p 6 10 Follow this procedure for memory sending 1 Load the document in the ADF For details on the types of documents you can fax their requirements and how to load documents see Document Requirements on p 6 1 and Loading Documents in the ADF on p 6 3 2 Press FAX If you are already in the FAX standby mode you can skip this step 3 Adjust any necessary settings for your document Press Ima...

Page 84: ...standby mode you can skip this step 3 Adjust any necessary settings for your document Press Image Quality to select the fax resolution See Adjusting the Image Quality Resolution on p 6 4 Press Exposure to select the scan density See Adjusting the Exposure Density on p 6 5 4 Pick up the handset 5 Dial the other party s fax telephone number For details on the different dialing methods see Dialing Me...

Page 85: ...l Documents Are Scanned 1 While documents are being sent press Stop Reset The machine asks you to confirm that you want to cancel 2 Press to cancel sending If you change your mind and want to continue sending press for NO The machine prints an ERROR TX REPORT if a transmission report is set to print automatically See 1 TX REPORT on p 15 7 C AN C E L D U R IN G TX R X Y E S N O ...

Page 86: ...by mode but you are still in automatic redialing To cancel redialing while the machine is waiting to redial follow the procedure described in Deleting a Fax Job on p 11 2 To cancel while the machine is redialing do the following Wait until the machine begins redialing Press Stop Reset NOTE The machine can print a list of document stored in memory DOCUMENT MEMORY LIST along with the transaction num...

Page 87: ... OFF to disable it press Set If you selected ON Go to step 6 If you selected OFF Go to step 8 6 Press Set again use or the numeric buttons to enter the number of times you want the machine to redial press Set twice 7 Press or the numeric buttons to select the time interval between redialings press Set 8 Press Stop Reset to return to standby mode A U TO R E DI A L O N AUTO REDIAL 1 REDIAL TIMES R E...

Page 88: ...order You can also include one destination that you dial manually using the numeric buttons or Redial Pause Be sure to press Set after your entry with the numeric keys To send a fax to more than one location do the following 1 Load the document in the ADF For details on the types of documents you can fax their requirements and how to load documents see Document Requirements on p 6 1 and Loading Do...

Page 89: ...y you need to change the TIME OUT setting See p 15 9 for more details If you want to review the numbers you entered use the or to scroll through the numbers 5 Press Start The machine then scans the document into memory and begins sending it to the destinations in numerical order starting with the One Touch Speed Dialing numbers then the Coded Speed Dialing numbers and finally the numbers dialed wi...

Page 90: ... p 6 5 4 Open One Touch Speed Dial panel press Delayed Transmission 5 Use the numeric buttons to enter the time at which you want to send the document press Set Enter the time using the 24 hour clock system Precede single digits with a zero Example 7 30 a m 07 30 11 30 p m 23 30 6 Enter the destination s using any of the following 4 methods One Touch Speed Dialing Press the desired One Touch Speed...

Page 91: ... documents even when you have set the machine for delayed sending To print copy or send other documents after setting the machine for delayed sending simply follow the procedures described in this Basic Guide To cancel a delayed sending see Deleting a Fax Job on p 11 2 The machine can print a list of document stored in memory DOCUMENT MEMORY LIST along with the transaction number of each document ...

Page 92: ...Sending Faxes 6 Delayed Sending 6 16 ...

Page 93: ...es automatically and disconnects voice calls Separate telephone line for fax use only FaxTel Fax Tel Automatically switches between fax calls and voice calls Receives faxes automatically and rings for voice calls To set the details see p 7 2 Handset or telephone connected to the machine Manual Tel Rings for every call whether it is a fax call or a voice call For a fax call you have to manually act...

Page 94: ...rom a fax machine or a telephone You can select a time between 0 and 30 seconds the default is 6 seconds F T RING TIME When your machine is set to receive both fax and telephone calls automatically the telephone rings to alert you to pick up the handset if the call is from a person If you do not pick up the handset within a certain amount of time the telephone stops ringing Use this option to chan...

Page 95: ...x tone is not detected Document received automatically The telephone starts ringing Pick up the handset to talk If you donít pick up the handset within 15 sec F T SWITCH ACTION Choose between RECEIVE factory default setting and DISCONNECT DISCONNECT RECEIVE Factory default setting Fax tone is detected and the FAXPHONE L170 switches to receive mode The machine disconnects the call Not all fax machi...

Page 96: ... the call is from a telephone or a fax machine NOTE Make sure the REMOTE RX setting in the RX SETTINGS menu is enabled See p 15 11 for details If you use your machine with Manual Mode answer incoming calls as follows 1 When the handset or the telephone rings pick up the receiver If you hear a person s voice Start your conversation If the caller wants to send a document after talking to you ask the...

Page 97: ...fax call To set this option from the machine operation panel see p 15 10 INCOMING RING setting Using an Answering Machine AnsMode Connecting an answering machine to the machine allows you to receive faxes and phone messages while you are out of the office Using the Machine With an Answering Machine Follow these guidelines when using the machine with an answering machine Set the answering machine t...

Page 98: ... a document into its memory the LCD displays one of the following messages These messages show the action you must take to correct the problem Cause The toner cartridge ran out of toner or is not installed properly Action Make sure the cartridge is installed properly and install a new one if necessary See Installing Replacing the Toner Cartridge on p 2 16 Cause The machine ran out of paper Action ...

Page 99: ... you are making copies or printing the machine stores the incoming fax in memory Then as soon as you finish making copies or printing the machine automatically prints the fax If you are entering registration information the fax is printed as soon as it is received and does not go into memory Canceling an Incoming Fax To cancel an incoming fax follow this procedure 1 Press Stop Reset 2 Press to Sto...

Page 100: ...Receiving Faxes 7 Receiving Faxes in Memory When a Problem Occurs 7 8 ...

Page 101: ... by a telephone call from the receiver NOTE Your fax can be set up to function in both roles Your fax can poll to receive a document or it can be polled to send a document that it is holding Before You Use Polling Receiving Before you try to set up polling note the following points With one operation you can poll several faxes You can dial up to 142 telephone numbers and poll those faxes to receiv...

Page 102: ...ess Polling 3 Use or to select 2 POLLING RX press Set 4 Enter the destination s using any of the following 4 methods One Touch Speed Dialing Press the desired One Touch Speed Dial button s Coded Speed Dialing Press Coded Dial enter the two digit code 00 99 using the numeric buttons Be sure to press Coded Dial before each code Directory Dialing Press Directory enter the first letter of the name of ...

Page 103: ...Enter a file name for the polling box up to 24 characters including spaces using the numeric buttons press Set For details on how to enter or delete letters see Entering Numbers Letters and Symbols on p 3 1 The message DATA ENTRY OK appears on the LCD display for a few seconds 7 Press or to select 2 PASSWORD press Set If you do not want to set a password go to step 9 8 Enter a password up to 7 dig...

Page 104: ... box so that other fax machines can poll it To use polling sending you have to previously create a polling box 1 Load the document in the ADF For details on the types of documents you can fax their requirements and how to load documents see Document Requirements on p 6 1 and Loading Documents in the ADF on p 6 3 2 Press FAX If you are already in the Fax standby mode you can skip this step 3 Adjust...

Page 105: ...d go to step 6 For details on how to enter or delete numbers see Entering Numbers Letters and Symbols on p 3 1 6 Press or to display the setting you want to change press Set To change the settings for an item follow the same procedure you used for the initial setup of the polling box See Setting Up a Polling Box on p 8 3 NOTE To change the password you have to first enter the old password it is no...

Page 106: ...have not previously set a password skip this step and go to step 6 For details on how to enter or delete numbers see Entering Numbers Letters and Symbols on p 3 1 The polling box is deleted NOTE If there is any document stored in the polling box you cannot delete the polling box and the message CANNOT DELETE appears on the LCD display If you want to delete the polling box delete the document store...

Page 107: ...e this procedure to enter pauses within or at the end of numbers 1 During dialing registration when you come to a step that asks you to enter a number for dialing use the numeric buttons to enter the number 2 To enter a pause within a number press Redial Pause To enter a pause at the end of a number press Redial Pause press Set A pause entered within a number p is 2 seconds long If necessary you c...

Page 108: ...ervices 1 Press FAX If you are already in the Fax standby mode you can skip this step 2 Lift the handset or Press Hook The In Use Memory indicator blinks green and you will hear the dial tone 3 Dial the telephone number using the numeric buttons The machine connects using the pulses required by your phone line 4 Press Tone to switch to tone dialing When Tone is pressed T is displayed in the LCD Nu...

Page 109: ...sword After Memory Lock is turned ON the machine automatically enters the Memory Lock mode The documents received when the machine is in the Memory Lock mode are stored in memory until you unlock the memory with a password and print them Follow this procedure to turn the Memory Lock ON and define the password 1 Press Menu 2 Press or to select 4 FAX SETTINGS press Set 3 Press or to select 7 SYSTEM ...

Page 110: ...password see step 6 in Turning Memory Lock ON and Setting the Password on p 9 3 the LCD displays 2 FAX DEFAULT The setting is completed and the documents received in memory are printed 3 If a memory lock password has been set enter the memory lock password using the numeric keys press Set When you press Set all the documents received in memory while the machine was in the Memory Lock mode are prin...

Page 111: ...DF on p 6 3 2 Press COPY If you are already in the Copy standby mode you can skip this step 3 Use the numeric buttons to enter the number of copies You can set up to 99 copies 4 Adjust any necessary settings for your document Press Image Quality to select the scanning resolution See Adjusting the Image Quality Resolution on p 10 6 Press Exposure to select the scanning exposure See Adjusting the Ex...

Page 112: ...cy from the output tray as it is output Specifying the Paper Size At the factory the paper size has already been set to LTR Normally you can make copies in this setting When making copies on other sizes of paper you need to specify the paper size according to the following 1 Press Menu 2 Press or to select 1 PAPER SETTINGS press Set 3 Press or to select 1 CASSETTE or 2 MP TRAY press Set 4 Press or...

Page 113: ...e according to the following Specifying the paper type can prevent poor copy quality or the printout not being printed correctly 1 Press Menu 2 Press or to select 1 PAPER SETTINGS press Set 3 Press or to select 1 CASSETTE or 2 MP TRAY press Set 4 Press or to select 2 PAPER TYPE press Set 5 Press or to select the appropriate paper type PLAIN PAPER PLAIN PAPER L HEAVY PAPER HEAVY PAPER H or TRANSPAR...

Page 114: ...select the copy ratio press Set You can select from the following 200 MAX 129 100 78 LGL LTR 64 50 MIN NOTE If the PAPER SIZE GROUP setting of COPY SETTINGS menu in the Menu is set to INCH or AB the preset copy ratios will be as follows INCH 50 64 78 100 129 and 200 A 50 70 100 141 and 200 AB 50 70 81 86 100 115 141 and 200 INCH is set as the factory default To reset the copy ratio press Enlarge R...

Page 115: ...meric buttons to enter the copy ratio press Set You can enter the copy ratio from 50 to 200 selectable in 1 increments Even after entering the copy ratio you can use or to adjust the copy ratio To increase the copy ratio press To decrease the copy ratio press NOTE To reset the copy ratio press Enlarge Reduce several times to display DIRECT 100 ratio press Set Z O O M 5 0 20 0 10 0 ZO O M 50 2 00 8...

Page 116: ...T for text only documents TEXT PHOTO for documents with text and photographs PHOTO for photographs NOTE Copy exposure automatically changes to manual mode when TEXT PHOTO or PHOTO is set Adjusting the Exposure Density You can adjust the copy exposure automatically or manually according to how light or dark your document is Adjusting Automatically 1 Press Copy If you are already in the Copy standby...

Page 117: ...tep 2 Press Exposure twice to select the manual mode 3 Press or to adjust the copy exposure press Set For a lighter copy exposure press For a darker copy exposure press NOTE When setting the exposure lighter the indicator moves to the left When setting the exposure darker the indicator moves to the right D E NS I T Y L T D K 100 LTR TEXT 01 ...

Page 118: ...et AUTO SORT to ON in the COPY SETTINGS menu See p 15 5 Follow the procedure below to set the Collate Copy function to ON 1 Press Menu 2 Press or to select 3 COPY SETTINGS press Set 3 Press or to select 5 AUTO SORT press Set 4 Press or to select ON press Set 5 Press Stop Reset to return to standby mode The Collate Copy function is set to ON To perform copying follow the procedure described in Maki...

Page 119: ...ress Enlarge Reduce to select the copy ratio See Setting Enlarging Reducing on p 10 4 4 Press Start The machine begins scanning NOTE After printing of the current copy job is complete the next copy job begins If the memory becomes full while scanning MEMORY FULL appears in the LCD When the ADF is used for scanning the document being scanned stops in the ADF In this case press Set to make the docum...

Page 120: ...served 1 Press Stop Reset while the machine is printing out 2 Press or to display the job to be deleted press Set 3 Press for YES The reserved copy job is deleted NOTE To cancel deleting the copy job press for NO Once the copy job is deleted the job can not be restored SE L EC T J OB T O C A NC E L 0 0 44 0 2 3 0 RESERVATION NO PRINTING BLANK WAITING NO PAPER PAPER JAM ETC NO OF COPIES NO OF DOCUM...

Page 121: ...ORT STATUS Confirming Transmission Status Follow the procedure below to confirm the sending or receiving status 1 Press System Monitor repeatedly until FAX MONITOR is displayed press Set NOTE To return to standby mode press Stop Reset If you perform the procedure above when the machine is not sending or receiving faxes NO CURRENT RX TX JOB appears and the display returns to the display shown in st...

Page 122: ...ve when there is no sending reservation and transmission jobs NO DOC STORED will appear and the display will return to the display shown in step 2 Deleting a Fax Job Follow the procedure below to delete the documents waiting to be sent by automatic redialing or delayed sending 1 Press System Monitor repeatedly until FAX MONITOR is displayed 2 Press or to select 3 DELETE DOCUMENT press Set 3 Use th...

Page 123: ...ed the job cannot be restored Confirming and Deleting a Print Job 1 Press System Monitor three times NOTE If there is no job NO PRINT JOBS EXIST is displayed 2 Press or to confirm the file name 3 If you want to delete the print job press Set 4 If you decide to delete the print job press for YES NOTE To cancel deleting the job press for NO Once the job is deleted the job cannot be restored The LCD ...

Page 124: ...ob and if you want to delete it press Set 3 If you decide to delete the job press for YES 4 If there are multiple report jobs press or to select the job you want to delete 5 Press Set 6 If you decide to delete the job press for YES NOTE To cancel deleting the job press for NO Once the job is deleted the job cannot be restored C A NC E L RE P O RT Y E S NO R E PO R T ST A T US 0 2 U S E R D A TA L ...

Page 125: ...u want to check the report before the 20 transactions are completed Follow this procedure to print the Activity Report 1 Press FAX If you are already in the Fax standby mode you can skip this step 2 Open One Touch Speed Dial panel press Report 3 Press Set The machine prints the ACTIVITY REPORT and the LCD returns to standby mode R E P O RT 1 A CT I V IT Y RE P O R T 12 31 2004 09 58 FAX 8334423 WO...

Page 126: ...ACTIVITY REPORT and matching the transaction number of the TX REPORT with a transaction number in the ACTIVITY REPORT you can find out exactly how many attempts were made to send the document how many pages were sent in each attempt as well as the usage time for each attempt PAGES SENT When OK appears under RESULT see below PAGES SENT represents the number of pages that were successfully transmitt...

Page 127: ...NY LIMITED SAPORS LANE BOOLE DORSET BH25 8ER TELEPHONE BOOLE 945 13 51617 FAX 123456 Our Ref 350 PJC EAC December 27 2004 Dr P N Cundall Mining Surveys Ltd Holroyd Road Reading Berks WHEN YOU SET THE FAX TO PRINT THE FIRST PAGE OF THE DOCUMENT TRANSMISSION OK TX RX NO 0006 DESTINATION TEL 20 545 8545 DESTINATION ID JOHN BARRISTER ST TIME 12 31 09 48 TIME USE 00 16 PAGES SENT 1 RESULT OK TX REPORT ...

Page 128: ...an set the machine to print the RX REPORT every time you receive a document or only if an error occurs during receiving See p 15 8 for details on setting this option RECEPTION OK TX RX NO 5008 DESTINATION TEL 1 213 978 3314 DESTINATION ID JOHN BARRISTER ST TIME 12 31 09 07 TIME USE 00 17 PGS 1 RESULT OK RX REPORT 12 31 2004 09 58 FAX 8334423 WORLD ESTATE INC 001 ...

Page 129: ...a list of documents deleted from the memory as a result of the power failure is printed automatically NOTE If there are one or more documents in the image memory when the power is cut off the machine will print the Memory Clear Report when the power is restored unless the machine is running out of paper or toner TX RX NO MODE DESTINATION TEL ID PGS SET TIME ST TIME 0001 DELAYED TX 01 ADAM BOOKS CP...

Page 130: ...list you want to print press Set You can select from the following 1 TOUCH LIST CODED DIAL LIST GROUP DIAL LIST If you selected 1 TOUCH LIST or CODED DIAL LIST press or to select SORT or NO SORT depending on what order you want the destinations to be printed Select 1 NO SORT to print the list in key number order press Set or Select 2 SORT to print the list with the names of the destinations in alp...

Page 131: ...1 4411 NATALIE SMITH 02 722 2655 ROBERT STUART 01 1 914 438 3619 SEYMOUR GREEN 12 31 2004 10 32 FAX 8334423 WORLD ESTATE INC 001 SORTED 1 TOUCH LIST NO DESTINATION TEL DESTINATION ID 01 555 1234 BILL 02 1 914 438 3619 SEYMOUR GREEN 03 1 516 911 4411 NATALIE SMITH 04 1 617222322 HUNT INVESTMENTS 08 732 2233 ADAM BOOKS CPA 12 31 2004 10 32 FAX 8334423 WORLD ESTATE INC 001 NOT SORTED NO DESTINATION T...

Page 132: ...ts 12 Speed Dialing Lists 12 8 Group Dial List 05 CANON GROUP 01 876 2398 CANON TX 02 613 9076 CANON OH 01 225 7823 CANON NY 10 233 7766 CANON CA GROUP DIAL TEL LIST 12 31 2004 13 36 FAX 833 4423 WORLD ESTATE INC 001 ...

Page 133: ...ns to standby mode NOTE The LCD returns to standby mode and the USER S DATA LIST is printed You can also print the USER S DATA LIST using Report Open One Touch Speed Dial panel press Report press or to select 1 USER DATA press Set 1 PAPER SETTINGS CASSETTE PAPER SIZE LTR PAPER TYPE PLAIN PAPER MP TRAY PAPER SIZE LTR SCANNING C ENERGY SAVER ON ENERGY SVR TIME 5MIN DATE SETUP MM DD YYYY DAYLIGHT SAV...

Page 134: ...al panel press Report Press or to select 4 DOC MEMORY LIST press Set The machine prints the DOCUMENT MEMORY LIST and the LCD returns to standby mode NOTE Once you know the transaction number of a document stored in memory you can delete it See Deleting a Fax Job on p 11 2 TX RX NO MODE DESTINATION TEL ID PGS SET TIME ST TIME 0046 DELAYED TX 01 Canon TOKYO 1 12 31 10 07 23 30 0047 TRANSMIT 02 Canon...

Page 135: ...CD displays REC PAPER JAM and OPEN PRINTER COVER CAUTION There are some areas inside the machine and cartridge which are subject to high voltages and high temperatures Take adequate precaution when performing internal inspections to avoid burns or electrical shock NOTE When removing jammed paper from inside the machine take care not to allow the toner on the jammed paper to come into contact with ...

Page 136: ...art as its surface is very delicate and susceptible to finger oil and scratches which may lead to print deterioration To avoid possible damage to the printer do not touch the pins near the left end of the transfer roller NOTE Do not expose the cartridge to light for more than 5 minutes If necessary put the cartridge in its original protective bag or wrap it with a thick cloth to prevent exposure t...

Page 137: ...of the paper outwards so that the printed surface is on the inside of the roll then gently pull the rolled up paper out of the machine 6 If the leading edge of the paper is visible but has not entered the imaging area pull the paper forwards and roll it inwards IMPORTANT Do not pull the jammed paper forward from the cassette It may cause a malfunction ...

Page 138: ...orcefully 7 Gently pull the jammed paper between the output rollers until the leading edge emerges from the back side of the machine 8 Carefully pull the jammed paper straight out through the rollers If the jammed paper is badly folded similar to the folds of an accordion ease the jammed paper loose and then pull it out of the machine 9 Close the printer cover 10 Pull out the cassette When pulling...

Page 139: ...ay be torn Do not touch the paper feed roller If you touch it this may result in misfeeds When feeding paper from the muiti purpose feeder Slowly pull out jammed paper in the direction of the arrow 12 Push the paper release levers back to their original position and close the face up cover IMPORTANT Be sure to push the paper release levers back to their original position If the levers are left pus...

Page 140: ...riginal position and check to see that jammed paper is not left in the machine If you cannot close the front cover confirm that the toner cartridge is set properly If you close the front cover forcefully this may cause damage to the machine Do not leave the front cover open for a long time after setting the toner cartridge 15 Set the cassette in the machine Push the cassette into the machine firml...

Page 141: ...ONE The handset is not placed in the handset cradle correctly Replace the handset correctly INCORRECT PAPER SIZE The size of the paper in the cassette or multi purpose feeder is different from that of the paper specified in the PAPER SIZE setting of the Menu Load the correct paper size or change the PAPER SIZE setting of the Menu See p 15 2 Then reset the machine by opening the printer cover and t...

Page 142: ... See pages 2 16 to 2 18 SCANNING MAKING SPACE IN MEM PLEASE WAIT Memory is getting low during scanning because the document has many graphics or photos When memory space becomes available as printing continues the scanning resumes automatically Then reset the machine by opening the printer cover and then closing it START AGAIN The paper in the cassette has run out the toner has run out paper jams ...

Page 143: ...at an angle Q Are the paper size and type set correctly A Specify the appropriate paper size and type in PAPER SIZE and PAPER TYPE in PAPER SETTINGS of the Menu See Loading Paper in the Cassette on p 4 3 Paper feeds skewed Printing is skewed Q Is paper loaded correctly A Make sure the paper stack in the cassette or the paper in the multi purpose feeder is loaded properly and that the slide guides ...

Page 144: ...in the cassette or the transparency in the multi purpose feeder is loaded properly and that the slide guides are adjusted correctly See Loading Paper on p 4 3 Q Is the proper transparency loaded in the multi purpose feeder A Do not use any transparencies designed for color copiers They will cause a paper jam Please use transparencies recommended by Canon Q Are the paper size and type set correctly...

Page 145: ...or information about specifications of the machine see Appendix A Specifications For safety warnings and cautions see Location in the Safety information on p v Envelopes do not feed correctly Q Are the envelopes loaded correctly A Make sure the envelopes are loaded correctly See Loading Envelopes in the Cassette on p 4 5 or Loading an Envelope in the Multi Purpose Feeder on p 4 9 Do not load more ...

Page 146: ...orrect telephone line type See Setting the Telephone Line Type on p 3 5 Q Is the document loaded A Remove the document stack it if necessary and load it in the ADF correctly Q Is the One Touch Speed Dial button or Coded Speed Dialing code you entered registered for the feature you want to use A Check the One Touch Speed Dial button or Coded Speed Dialing code and make sure it is registered correct...

Page 147: ...and have them check their fax machine Q Did the receiving fax machine answer within 55 seconds after all automatic redialing attempts A Contact the other party and have them check their fax machine For an overseas call add pauses to the registered number See Dialing Long Distance on p 9 1 Q Is the In Use Memory indicator lighting A The In Use Memory indicator may light which means the extension ph...

Page 148: ...nsMode confirm that an answering machine is connected to the machine and that it is turned on with an outgoing message properly recorded If you set 5 MAN AUTO SWITCH to ON in FAX SETTINGS of the Menu the machine will receive faxes automatically even when the receive mode is set to Manual mode See 5 MAN AUTO SWITCH on p 15 10 Q Is the memory full A Wait for the machine to finish any fax or print jo...

Page 149: ...ually Manual Mode on p 7 4 Cannot receive a document manually Q Is the machine set to receive manually A For the machine to receive faxes manually the receive mode must be set to Manual mode See Chapter 7 Receiving Faxes Q Did you press Start after hanging up the handset A Always press Start before hanging up the handset Otherwise you will disconnect the call Print quality is poor Q Are you using ...

Page 150: ... images are blotched or uneven Q Are the telephone lines in proper condition Or do you have a good connection A ECM Error Correction Mode for sending receiving should eliminate such problems However if the telephone lines are in poor condition you may have to try again Then call the sender to resend the document Q Is the sending fax machine functioning properly A The sending fax machine usually de...

Page 151: ...e correct telephone line type pulse tone A Make sure the machine is set for the correct telephone line type See Setting the Telephone Line Type on p 3 5 The telephone disconnects while you are talking Q Is the telephone line connected in securely A Check that the telephone cables are connected securely to the jacks on the machine the telephone jack on your wall and the jack on your telephone See C...

Page 152: ...go See Loading Paper in the Cassette on p 4 3 Q Did you connect the power cord to the machine just now A Wait for a while After connecting the power cord the machine cannot scan documents immediately Q Is the document loaded correctly A Remove the document stack it if necessary and load it in the ADF correctly See Loading Documents in the ADF on p 6 3 A Make sure the ADF is closed If the documents...

Page 153: ... in the cartridge A Replace the cartridge if necessary See Installing Replacing the Toner Cartridge on p 2 16 Q Is the exposure adjusted correctly A Adjust the exposure correctly using Exposure See Adjusting the Exposure Density on p 10 6 Copies are dirty Q Is the scanning glass or the scanning glass cover clean A Clean the scanning glass or the scanning glass cover See Cleaning the ADF Area on p ...

Page 154: ... copies on heavy paper Q Is the paper type set correctly A Select HEAVY PAPER or HEAVY PAPER H in PAPER TYPE in PAPER SETTINGS of the Menu See Loading Paper on p 4 3 The printouts are missing when you make copies on rough paper Q Is the paper type set correctly A Select TRANSPARENCY in PAPER TYPE in PAPER SETTINGS of the Menu See Loading Paper on p 4 3 The edges of copies are dirty when you make c...

Page 155: ... plug it in again If the problem is fixed the Alarm indicator will turn off and the LCD will return to the standby mode If the Alarm indicator remains flash unplug the machine and contact your local authorized Canon dealer or the Canon help line Printout does not match paper size Q Is the paper stack loaded and aligned correctly in the cassette or is paper loaded in the multi purpose feeder correc...

Page 156: ...ntact the Canon Customer Care Center Do not attempt to disassemble or repair the machine yourself NOTE Attempting to repair the machine yourself may void the limited warranty Before contacting the Canon Customer Care Center make sure you have the following information about your machine The machine s name FAXPHONE L170 The machine serial number on a label on the back of the machine Where you purch...

Page 157: ...cument If you disconnect the machine while it is waiting to send a document you will have to set the machine to send your document again once you finish cleaning the machine However when you have set a document for delayed transmission the machine holds the document in its memory for about 1 hour Do not use tissue paper paper towels or similar materials for cleaning they can stick to the component...

Page 158: ...rgent and then wipe the glass dry with another cloth IMPORTANT Paste ink correction fluid and other foreign matter can soil the scanning glass when you send a document through the ADF while the paste ink or correction fluid on the original is still wet This is what causes black lines on copies Whenever you load a document is the ADF always check to make sure that any paste ink or correction fluid ...

Page 159: ...t will not scratch the glass or rollers Use a soft dry clean cloth to wipe up paper dust around the rollers 4 Clean the shaded areas of the operation panel and the machine Dirt and dust particles that collect on the underside of the operation panel also affect the quality of documents you copy and send 5 When you finished close the operation panel by pressing it down from the center NOTE Be sure t...

Page 160: ...ely affected 1 Disconnect the power cord 2 If the machine is connected to a telephone or your computer remove the telephone line or printer cable 3 Open the printer cover 4 Grip the end of the cartridge and remove it from the machine In order to avoid direct sunlight place the cartridge in the protective bag that the cartridge came in when you purchased it 5 Close the printer cover 6 Pull out the ...

Page 161: ...t to change press Set NOTE For details on submenus see Menu Descriptions on p 15 2 After selecting the item or value with or press Set to enter the setting If you press Stop Reset before Set is pressed the item you have selected will not be registered Press Stop Reset to exit from the Menu If you press Menu the display returns to the previous screen AD D I T IO N A L F U NC T I O NS 3 C O PY S ET ...

Page 162: ... PAPER TYPE Sets the paper type to be used in the paper cassette PLAIN PAPER TRANSPARENCY PLAIN PAPER L HEAVY PAPER HEAVY PAPER H 2 MP TRAY 1 PAPER SIZE Sets the paper size for the multi purpose feeder A4 B5 A5 LTR LGL EXECUTIV ENVELOPE You can select from DL ISO C5 COM10 or MONARCH FREESIZE Horizontal and vertical size can be specified in millimeters 2 PAPER TYPE Sets the paper type to be used on...

Page 163: ...y switches to the mode you set in DEFAULT SETTINGS after the AUTO CLEAR function activates CURRENT MODE The machine does not automatically switch to the mode you set in DEFAULT SETTINGS even after the AUTO CLEAR function activates 3 VOLUME CONTROL Adjusts the volume of the machine 1 KEYPAD VOLUME Adjusts the keypad volume ON 1 to 3 OFF The volume is turned off 2 ALARM VOLUME Adjusts the alarm volu...

Page 164: ...LY 1 to 3 OFF The volume is turned off 6 SCANNING END TONE Adjusts the volume of the done tone sounded when the machine finished scanning ON 1 to 3 ERROR ONLY 1 to 3 OFF The volume is turned off 7 LINE MONITOR VOL Adjusts the line monitor volume ON 1 to 3 2 OFF The volume is turned off 4 PRINT EXPOSURE Adjusts the exposure to one of 5 levels center 5 TONER SAVER MODE Sets the toner saver mode ON T...

Page 165: ...re is adjusted manually The exposure can be adjusted in 9 steps center 3 STD ZOOM RATIO Selects the copy ratio 050 to 200 100 4 STANDARD COPY QTY Select the copy quantity 01 to 99 01 5 AUTO SORT Set the auto sort ON The auto sort function is turned on OFF The auto sort function is turned off 6 PAPER SIZE GROUP The paper size group can be selected If the paper size group is changed the preset copy ...

Page 166: ...RT SPEED Sets the transmission speed for all documents you send 33600bps 14400bps 9600bps 7200bps 4800bps 2400bps 4 RX START SPEED Sets the transmission speed for all documents you receive 33600bps 14400bps 9600bps 7200bps 4800bps 2400bps 2 UNIT NAME You can register your name or your company name within 24 characters including spaces 3 TX TERMINAL ID Prints your ID Transmitting Terminal ID on eac...

Page 167: ...le ON After reception the offhook alarm sounds when the handset is left off the hook OFF No offhook alarm 2 REPORT SETTINGS Sets the report setting 1 TX REPORT Enables disables automatic printing of a transmission report OUTPUT NO No report is printed PRINT ERROR ONLY Prints a report only when a transmission error occurs REPORT WITH TX IMAGE Enables disables printing of the first page of the fax u...

Page 168: ...occurs OUTPUT YES Prints a report every time you receive a document 3 ACTIVITY REPORT Enables disables automatic printing of an ACTIVITY REPORT after every 20 transactions ON Prints the ACTIVITY REPORT OFF No ACTIVITY REPORT is printed 3 TX SETTINGS Sets the transmission functions 1 ECM TX ECM Error Correction Mode transmission is turned on or off ON All transmissions are conducted with ECM if the...

Page 169: ...eed dialing ON Scanning begins automatically in 5 or 10 seconds after you enter the phone number OFF Press Start to scan document Otherwise AUTO CLEAR function activates and the LCD returns to standby mode after 2 minutes 4 RX SETTINGS Sets the reception functions 1 ECM RX ECM Error Correction Mode reception is turned on or off ON All receptions are conducted with ECM if the other party s fax supp...

Page 170: ...al telephone line 4 INCOMING RING Sets whether the machine rings when it receives a call when the machine is set to FaxOnly OFF The machine does not ring when it receives a fax In Energy Saver mode the fax may ring one or two times ON The machine rings when it receives a fax if a telephone is connected RING COUNT Sets the number of incoming rings before the machine answers 01 to 99TIMES 02TIMES 5 ...

Page 171: ...et automatically FIXED REDUCTION Reducing size is preset 97 95 90 75 2 SELECT REDUCE DIR VERTICAL ONLY Reduction is performed in the vertical direction only HORIZ VERTICAL Reduction is performed in the horizontal and vertical direction OFF Image reduction is turned off 2 TONER SUPPLY LOW Allows you to set how the machine responds when the toner supply is low RX TO MEMORY The machine receives all d...

Page 172: ...ts the functions of MEMORY LOCK RX and FAX DEFAULT 1 MEMORY LOCK RX Set the Memory Lock functions OFF Prints a document as soon as the machine receives it ON Receives and stores all documents in memory They will not be printed out unless the Memory Lock password is entered 1 MEM LOCK PASSWORD 0 to 9999999 This password protects the Memory Lock settings Setting a password is recommended You must us...

Page 173: ...achine s standard scanning density OFF LIGHT STANDARD DARK The factory default setting is in bold face Name Descriptions 1 1 TOUCH SPD DIAL Registers the information on One Touch Speed Dialing Up to 32 destinations can be registered 1 TOUCH SPD DIAL Selects a One Touch Speed Dial button 1 TEL NUMBER ENTRY Registers the other party s telephone number max 120 digits including spaces 2 NAME Registers...

Page 174: ...tion 01 to 99 01 2 AUTO ERROR SKIP Sets either printing with skipping an error automatically or without skipping an error ON The auto error skip is on The error is skipped and shifted to the next job automatically without indicating an error code OFF The auto error skip is off Skip the error and shift to the next job manually 3 ERROR TIME OUT Sets the length of time before the machine returns an e...

Page 175: ...y saver mode ON The energy saver mode is set 03MIN to 30MIN 05MIN OFF The energy saver mode is turned off 4 DATE SETUP Set the format for the DATE TIME settings menu and how the date is displayed in the LCD MM DD YYYY DD MMYYYY YYYY MM DD 5 DAYLGHT SAV TIME Sets the daylight saving time OFF The daylight saving time setting is disabled ON The daylight saving time setting is enabled 1 START DATE TIM...

Page 176: ...ORT The printout of the list is sorted 2 CODED DIAL LIST Prints the Coded Dial List 1 NO SORT The printout of the list is not sorted 2 SORT The printout of the list is sorted 3 GROUP DIAL LIST Prints the Group Dial List 3 CANCEL REPORT Cancels printout of the report Select report you want to cancel the printout REPORT STATUS Displays the report status and allows you to select the report job to be ...

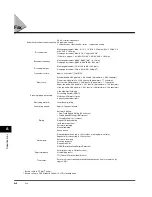
Page 177: ...memory is full Liquid crystal display 20 2 Display languages ENGLISH FRENCH SPANISH PORTUGUESE Power source 120 V 60 Hz Power source differs depending on the country in which you purchased the product Power consumption Maximum Approx 600W Minimum Approx 9 W Energy Saver Mode 5 W Dimensions W D H 17 1 4 18 3 16 13 25 64 438 462 340 mm main machine only no trays no handset Weight 24 7 lb 11 2 kg Env...

Page 178: ...ode 203 pixels in 196 lines in 8 pixels mm 7 7 lines mm Super fine mode 203 pixels in 391 lines in 8 pixels mm 15 4 lines mm Ultra fine mode 406 pixels in 391 lines in 16 pixels mm 15 4 lines mm Scanning image processing Ultra High Quality Image Processing System UHQ Halftones 256 levels of gray 9 density adjustment levels Recording method Laser Beam printing Fax printing speed Approx 19 pages min...

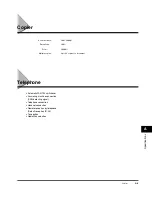
Page 179: ...nswering machine connection CNG detecting signal Telephone connection Handset connection Remote reception by telephone Default reception ID 25 Tone button Redial Pause button Scan resolution 300 300 dpi Default size 100 Zoom 50 200 Multiple copies Up to 99 copies of a document ...

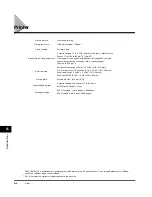
Page 180: ...g m2 to 128 g m2 Multi Purpose Feeder 17 lb to 34 lb 64 g m2 to 128 g m2 Plain paper colored paper recycled paper including 100 recycled paper transparencies envelopes labels and heavy paper up to 34 lb 128 g m2 Envelope sizes European DL envelope 8 43 64 4 21 64 220 110 mm U S Commercial No 10 envelope 9 1 2 4 3 32 241 104 mm Envelope Monarch 7 33 64 3 55 64 191 98 mm Envelope ISO C5 9 1 64 6 3 8...

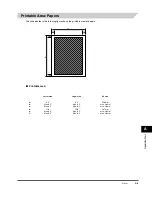
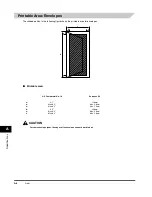
Page 181: ...ded area in the following figure shows the printable area for papers Printable area Letter size Legal size A4 size a b c d e f 8 5 Max 0 2 Max 0 2 11 0 Max 0 2 Max 0 2 8 5 Max 0 2 Max 0 2 14 0 Max 0 2 Max 0 2 210mm max 5 0mm max 5 0mm 297mm max 5 0mm max 5 0mm ...

Page 182: ...g figure shows the printable area for envelopes Printable area CAUTION For some envelope types the edges of the envelope can not be printed on U S Commercial No 10 European DL a b c d e f 4 1 Max 0 2 Max 0 2 9 5 Max 0 2 Max 0 2 110mm Max 5 0mm Max 5 0mm 220mm Max 5 0mm Max 5 0mm b c e f d ...

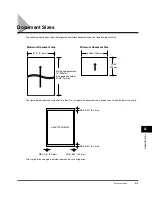
Page 183: ...ow much of a letter A4 or legal size document the machine scans when faxing or scanning The margin at each edge is outside the machine s scanning area Multi page document 14 356mm One page document 39 3 8 1 meter 8 1 2 216 mm 5 53 64 148mm 4 9 64 105mm Minimum Document Size Maximum Document Size A4 LETTER LEGAL MAX 5 32 4 0 mm MAX 5 32 4 0 mm MAX 5 32 4 0 mm MAX 1 8 3 0 mm ...

Page 184: ...e A 150 MHz Pentium processor or higher At least 32 MB of RAM and 100 MB of available hard disk space Windows 2000 A 133 MHz Pentium processor or higher At least 64 MB of RAM Windows 2000 Professional or 128 MB of RAM Windows 2000 Server and 500 MB of available hard disk space Windows XP A 233 MHz Pentium processor or higher At least 64 MB of RAM and 500 MB of available hard disk space 256 color S...

Page 185: ...u must register the numbers in the machine s memory See also One Touch Speed Dialing Coded Speed Dialing and Group Dialing Automatic Document Feeder ADF The device included in the machine that feeds the document being faxed copied or scanned into the machine Automatic image reduction The machine can print the date time company name and a fax number at the top of the faxes it receives To prevent th...

Page 186: ...a preset time in the future You do not have to be in your office to use delayed sending to one or more destinations You can set up only one delayed transmission at a time on the machine Dialing methods Ways of pressing one or more buttons to access a number to connect to an outside party or fax machine Dialing methods include One Touch Coded Speed Dialing Group Dialing Directory Dialing and regula...

Page 187: ...o you can pick up the handset With this feature one telephone line can be shared by both the telephone and the fax FINE The resolution setting for documents with very small characters and lines G G3 Group 3 fax machine Defined by CCITT ITU T Uses encoding schemes to transmit image data while reducing the amount of data that needs to be transmitted thus reducing transmission time G3 fax machines ca...

Page 188: ...lar dialing you can redial a number manually simply by pressing Redial Pause on the operation panel The last number called is the number redialed Memory broadcast Allows you to send a scanned fax to as many as 142 locations at once using a combination of One Touch Speed Dialing Coded Speed Dialing and regular dialing Memory sending Scans a document into memory before the machine dials the number s...

Page 189: ...table area The area of a sheet of paper on which a printer can reproduce text or graphics the printing area is smaller than the paper On this machine the printing area varies depending on the type of paper being used Printer driver The printer driver allows you to use the machine as a printer for your PC with Windows 98 Windows Me Windows 2000 or Windows XP installed To use the machine as a printe...

Page 190: ... ID number to start remote reception Report A document printed by the machine and containing information about the faxes it has sent or received Resolution The density of dots for any given output device Expressed in terms of dots per inch dpi Low resolution causes font characters and graphics to have a jagged appearance Higher resolution means smoother curves and angles as well as a better match ...

Page 191: ...o match the telephone dialing system your telephone line uses touch tone or rotary pulse Toner A black resin coated powder contained in the toner cartridge The machine applies the toner to the surface of the photosensitive drum inside the machine via an electrophotographic mechanism Toner saver You can enable or disable economy printing toner saving feature By enabling the ECONOMY PRT setting tone...

Page 192: ...Glossary G G 8 ...

Page 193: ...tion power cord 2 7 telephone line 2 7 USB port 2 6 COPY button 2 11 COPY SETTINGS 15 5 COPY STATUS 11 1 Copying 10 1 enlarging reducing 10 4 specifying the paper size 10 2 specifying the paper type 10 3 Custom copy ratio 10 5 D Daylight Saving time setting 3 5 Delayed sending 6 14 Delayed Transmission button 2 12 Delete button 2 12 Directory button 2 11 Directory Dialing 5 1 6 6 using 5 11 Docume...

Page 194: ...ING SPACE IN MEM message 13 8 Manual Mode 7 1 7 4 Manual sending 6 6 6 8 MEM IN USE nn message 13 7 Memory Clear Report 12 5 MEMORY FULL message 13 7 Memory Lock 9 3 password 9 3 Memory receiving 7 6 Memory sending 6 6 6 7 canceling 6 9 redialing automatically 6 10 Menu button 2 11 Menu System 15 1 Multi TX RX Report 12 3 Multi purpose feeder 2 9 loading envelope 4 9 loading paper 4 8 Multitasking...

Page 195: ...T TIME 7 2 Ringer Volume Switch 2 13 RX Report 12 4 S S35 Cartridge 2 3 Scanning density adjusting to copy 10 6 adjusting to fax 6 5 Scanning resolution adjusting to copy 10 6 adjusting to fax 6 4 Set button 2 11 Setting daylight saving time 3 5 receive mode 7 2 scanning density fax 6 5 scanning resolution fax 6 4 telephone line type 3 5 Shipping Materials removing 2 3 Slide guides 2 9 Space butto...

Page 196: ...I 4 Index I ...

Page 197: ......

Reviews: