background image

23

NOTE

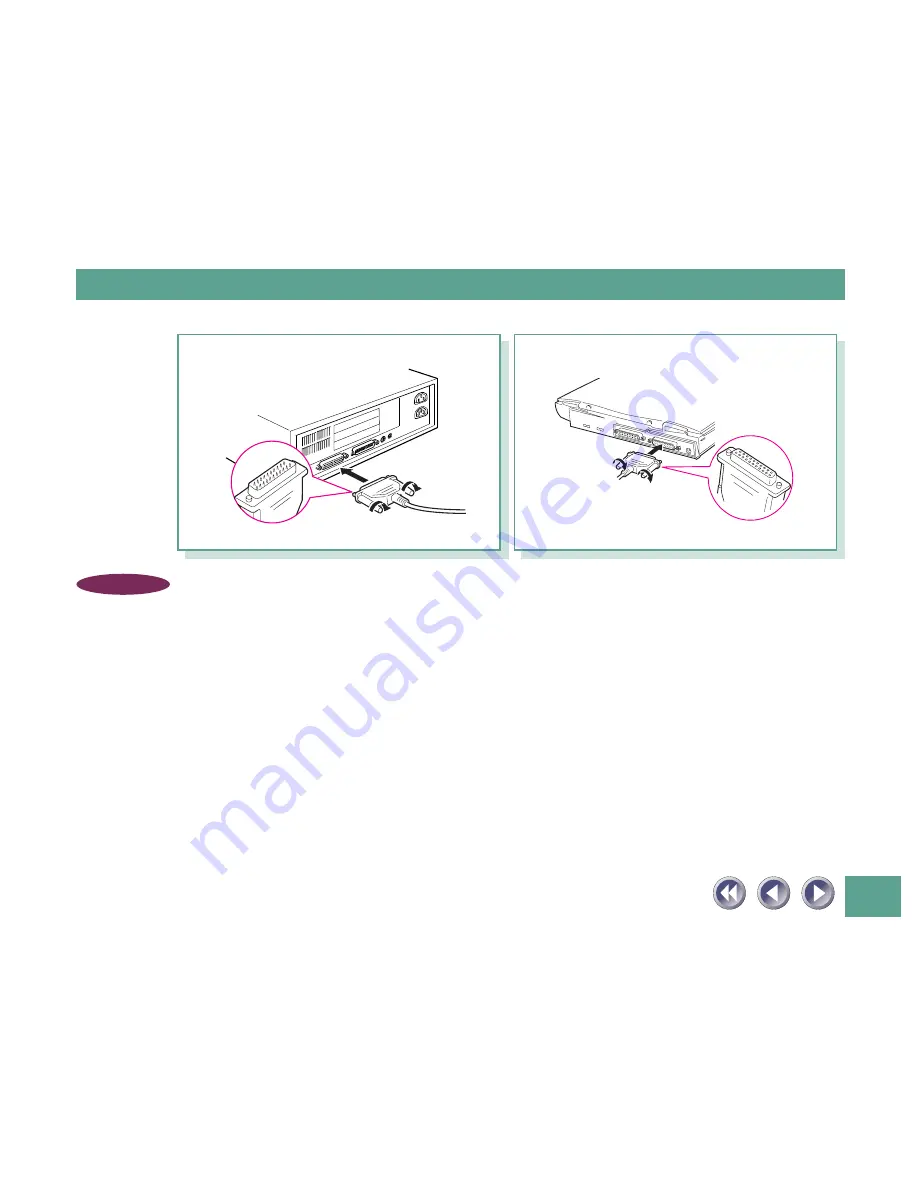
• The parallel port will have a connector that is approximately 4 cm (1.5

inches) long and labeled Parallel or Printer. It is generally found on the
back panel of the computer.

• If a printer is already connected to the computer, detach the printer cable

from the parallel port.

Parallel Cable

Scanner’s PC Port

Parallel Cable

Computer’s Parallel Port

Summary of Contents for FB330P/FB630P

Page 1: ...CanoScan FB330P FB630P Color Scanner Product Guide ...

Page 2: ...h of the bundled software programs When you have read this guide finished setting up the scanner and want to know how to achieve better scanning results read Want to know more about how to handle the scanner and the software CD ROM read Once you ve read this and mastered the major elements of CanoCraft CS P 3 7 and ScanGear Toolbox CS 2 1 read Explains how to use the CanoCraft CS P 3 7 capture and...

Page 3: ... in the Getting Started guide Each topic is intended to be read as a discrete unit You need only read the topics that apply The guide is divided into four sections Chapter 1 Placement and Connections How to position the scanner and connect it to your computer and printer Chapter 2 The Software CD ROM How to use the software CD ROM and an introduction to the software and electronic manuals Chapter ...

Page 4: ...ken when operating the equipment Ensure that you read all warnings NOTE This symbol indicates supplementary operating procedures and other useful information Read these notes at your own discretion Use of shielded cable is necessary to comply with the technical requirements of EMC Directive ...

Page 5: ... Connecting to a Computer 22 Connecting the Scanner to a Computer 22 Connecting a Printer to the Scanner 24 Connecting the Power Cord Turning on the Power 26 Chapter 2 The Software CD ROM 27 How to Use the Software CD ROM 28 Running the CD ROM Menu Program 28 If the CD ROM Menu Fails to Appear 29 About the Menu Window 30 Installing the Software 32 Software Titles 32 Installing the Software 33 View...

Page 6: ... 52 About CanoCraft CS P 54 CanoCraft CS P as a Stand Alone Application 54 CanoCraft CS P as a TWAIN Driver 56 Appendices 60 Troubleshooting 61 Problems with Software Installation 61 Problems Starting Software Programs 62 Problems with Scanning 65 Problems with Printing 69 Other Questions 70 Precautions with Printers 71 The Scanner and the Printer Cannot Be Operated at the Same Time 71 Using Windo...

Page 7: ...e without the express written permission of Canon Inc 2 The equipment and software described in this guide are subject to change without notice 3 Notwithstanding the considerable care taken in preparing this guide please note that Canon Inc does not accept liability for any results arising from the operation of the equipment or software mentioned herein 4 Please note that scanning copyrighted mate...

Page 8: ... so light that it can easily be placed or moved to suit your convenience Simple Connection to a Parallel Port Easily connected to your computer s parallel printer port with a single cable supplied Your existing printer connects to the scanner s second parallel port creating a daisy chain configuration See Precautions with Printers p 71 of this guide Standby Power and Energy Saving Features Conveni...

Page 9: ...rency bills negotiable securities and other documents prohibited by law Reproduction of such items may be subject to criminal action It is illegal to reproduce legal certificates licenses travel tickets and certain public and private documents prohibited from reproduction by law Reproduction of such items may be subject to criminal action Please noted that intellectual property protected by copyri...

Page 10: ... safely always pay attention to these cautions About Locations WARNING Do not place equipment near flammable liquids such as alcohol or thinners If the internal electrical parts come in contact with flammable liquids fire or electric shocks may result Do not place the following objects on top of the equipment If the internal electrical parts come in contact with these objects fire or electric shoc...

Page 11: ... objects on pull or excessively bend the power cord Damaged wires may cause fire or electric shocks Do not plug unplug the AC adapter with wet hands You may be electrocuted Do not connect excessive numbers of plugs into one electrical outlet It could cause fires or electric shocks Do not twist or tie electrical cords together It could cause fires or electric shocks Always plug power cords or AC ad...

Page 12: ... case it needs to be unplugged during emergencies General Handling Precautions WARNING Do not take apart or modify the equipment There are high voltage parts within that could cause fire or electric shocks if exposed If you hear unusual noises see smoke feel excessive heat or smell anything unusual immediately unplug the AC adapter and contact your retailer or Canon Customer Support Help Desk Cont...

Page 13: ... document cover The document glass may break and injure you When not in use for extended periods such as long weekends unplug the equipment for safety When transporting the equipment be extremely careful Dropping it could cause an injury Wait until the equipment has cooled before placing a cover over it Otherwise it may cause a fire Do not use the supplied CD ROM in regular CD players It produces ...

Page 14: ...n be met Surrounding temperature 5 degrees 35 degrees C 41 degrees 95 degrees F Surrounding humidity 10 90 RH without condensations Please use where the electrical conditions normal home outlets can be met in your country Make certain there is plenty of clear space around the scanner Below is a diagram looking straight down on the scanner 20 cm 8 inches 10 cm 4 inches 10 cm 4 inches ...

Page 15: ...se image errors After moving from high humidity areas to low humidity areas leave the scanner enough time to gradually adapt to the new conditions before use Do not use the scanner in areas subject to direct sunlight The humidity may rise inside the equipment and cause damage or decreased image quality If you have to use the scanner in direct sunlight make sure to use a thick curtain to block the ...

Page 16: ... subject to shocks smoke noxious fumes water vapor or dust Locations subject to strong direct sunlight Locations near TVs or devices generat ing strong magnetic fields Environments in which the air is salty or greasy ...

Page 17: ...nning unit Alignment Mark Align document edges here Document Cover Holds documents in place Scanning Unit Core component of the scanner comprising the light source and sensing units Usually found at the front of the scanner Document Glass Place documents here ...

Page 18: ...he scanner in the locked state may damage the equipment Lock the scanning unit before transporting it in a vehicle p 20 Printer Port Connector for printer cable when printer is added to configuration PC Port Port accepting the supplied parallel cable connecting the computer to the scanner Power Terminal AC adapter cord attaches here AC Adapter Power Cord ...

Page 19: ...19 Chapter 1 Placement and Connections The Scanning Unit Lock 20 Connecting to a Computer 22 Connecting the Power Cord Turning on the Power 26 ...

Page 20: ...ays unlock the scanner before plugging in the AC adapter Operating the scanner in the locked position may damage the equipment Locking the Scanning Unit Always engage the lock before transporting the scanner 1 Turn off all connected devices including the scanner computer printer or other device Follow the recommended procedures to shut down and turn off the computer printer or other device in that...

Page 21: ...anning unit has correctly returned to the front of the scanner then unplug the AC adapter from the electrical outlet Lastly unplug the power cord plug from the scanner 3 Lock the scanning unit by pushing the lock switch toward the lock mark WARNING Carrying or transporting the scanner without locking the scanning unit may damage it Be particularly careful to lock the scanning unit when transportin...

Page 22: ...NING Ensure that the computer s power is off before attempting these procedures In addition ensure that the scanner s AC adapter is unplugged Connecting the Scanner to a Computer The connectors at either end of the parallel cable are different Check to ensure you insert the correct one Parallel Cable Supplied Scanner s PC Port ...

Page 23: ... 1 5 inches long and labeled Parallel or Printer It is generally found on the back panel of the computer If a printer is already connected to the computer detach the printer cable from the parallel port Parallel Cable Scanner s PC Port Parallel Cable Computer s Parallel Port ...

Page 24: ...er to the configuration connect the printer to the printer port on the scanner Use the cable supplied with the printer Printer Port on the Scanner Printer Cable PC Port on the Scanner A parallel cable should already be connecting the computer to this port ...

Page 25: ...nts to software settings after the preceding steps Refer to the notice titled What to Do if a Printer is Not Operating Correctly p 71 Since data is sent through the scanner to the printer ensure that the scanner power is on before attempting to print even when not using the scanner Devices other than printers cannot be attached to the scanner s printer port ...

Page 26: ...pplied with the scanner Other adapters may damage the equipment There is no power switch on this scanner The power is activated as soon as the AC adapter is plugged into a power source The unit can be left on standby with the AC adapter plugged in under normal operating conditions To power down the scanner first turn off the computer and other peripheral devices before unplugging the scanner s AC ...

Page 27: ...27 Chapter 2 The Software CD ROM How to Use the Software CD ROM 28 Installing the Software 32 Viewing Electronic Manuals 36 Displaying the CD ROM Contents 46 Troubleshooting 49 ...

Page 28: ...anuals that will maximize your use of the scanner This section explains how to use the CD ROM Running the CD ROM Menu Program The CD ROM menu program will automatically display when you place the disk in the CD ROM drive 1 Language select window will display Select your language 2 The menu window is shown below ...

Page 29: ...led Canoscan D that appears in the My Computer window Although an D appears after the CD ROM title in this example indicating the name of the drive it may be labeled with a different letter on your system This letter may be ignored for the purposes of this procedure 3 Language select window will display Select your language ...

Page 30: ...all Uninstall Software Installs the software onto your computer s hard drive that is required for scanning Can also be used to uninstall the software View the Electronic Manuals Presents electronic manuals for the software contained on the disk Display the CD ROM Contents Displays the list of folders and files contained on the disk ...

Page 31: ... Presents troubleshooting tips when scanning isn t proceeding as expected or when you encounter a problem operating the scanner Exit Closes the CD ROM menu program Each of these items is described on the following pages ...

Page 32: ... P Copy Installed automatically with CanoCraft CS P A program that allows your computer scanner and printer easily make a color copy ScanGear Toolbox CS 2 1 Approximately 2 MB A program that can scan and load images directly into application pro grams copy images and perform other semi automated tasks ScanGear Toolbox CS 2 1 is hereafter referred to as ScanGear Toolbox Ulead Photo Express 2 0 SE A...

Page 33: ...anuals contained on the CD ROM WARNING Installation of the above programs requires approximately 144 megabytes on your hard disk Please refer to the Troubleshooting section of this guide if you experience difficulty in installing the software p 61 NOTE Software descriptions are contained in the Guide to the Software section of the Getting Started guide starting on page 23 Installing the Software W...

Page 34: ...omputer drive Select your language from the language select window 2 Click the Install Uninstall Software button from the CD ROM menu that automatically appears The following dialog will display 3 Click the Start Installation button on the bottom right of the window Install Uninstall Software ...

Page 35: ...er normal circumstances Experienced computer users may wish to selectively install the programs However the CanoCraft CS P must be installed to operate the scanner Once installation of all the software is complete follow the on screen instructions of CanoScan Setup Utility to restart your computer 5 Remove the CD ROM ...

Page 36: ...pics with a single mouse click on a hyperlink or item in the table of contents or index The manuals also support keyword search functions You can of course also print them out on your printer List of Electronic Manuals The CD ROM contains five electronic manuals Product Guide this guide CanoCraft CS P 3 7 Refer to this manual for detailed instructions on how to use the CanoCraft CS P and CanoCraft...

Page 37: ... recognition program Software for Viewing Electronic Manuals Adobe Acrobat Reader program is supplied for viewing the manuals The Adobe Acrobat Reader should already have been installed on your computer in order to read the electronic manuals In case it is not installed see page 33 for installation instructions NOTE Descriptions of CanoCraft CS P CanoCraft CS P Copy Ulead Photo Express 2 0 SE and ...

Page 38: ...wing window will display 2 Select the manual you wish to view Adobe Acrobat Reader will automatically display the selected manual 3 Click Return to the previous menu when you have finished viewing Click the of the Adobe Acrobat Reader Window The main menu will display View the Electronic Manuals ...

Page 39: ...lectronic Manuals This section briefly explains how to use the major functions of Adobe Acrobat Reader to view the electronic manuals Changing Pages Page ahead or back with the buttons below Manual Contents Previous Next ...

Page 40: ... bookmark display shows an overview area in which each topic and subtopic is bookmarked Click on a bookmark to jump directly to that topic Select bookmark display with this button Click the icon of the topic you wish to view ...

Page 41: ...41 Zoom In Out Zoom in or out on part of a page Click this icon to select the zoom tool then click on the area you wish to magnify Hold the Ctrl and click the zoom tool on the page to zoom out ...

Page 42: ...42 Click a Page Reference to Jump to a Topic Clicking on a page reference hyperlink takes you directly to that topic Clicking on a page reference takes you directly to that topic ...

Page 43: ...43 Clicking on an item in the table of contents or index also takes you directly to that topic Clicking on a table of contents or index item takes you directly to that topic ...

Page 44: ...p to a Topic with a Keyword Search Entering a keyword into the Find dialog takes you to the associated topic Click the Tools menu and select Find to initiate a search Enter a keyword and click the Find button ...

Page 45: ...eferences or may not jump to the selected topic when a page reference or item in the table of contents and index is clicked For more information on Adobe Acrobat Reader please refer to the Reader Online Guide in its Help menu Click the close box to exit Adobe Acrobat Reader ...

Page 46: ... the CD ROM menu The following window will display 2 Click the icon of a folder to view its contents The contents of selected folder will display To close the window click its close box on the upper right 3 When you have finished viewing folder contents click Return to the previous menu The main menu will display Display the CD ROM Contents ...

Page 47: ...ontains a file required for the CanoScan Setup Utility Acroread F English F Ar32e301 Installs Adobe Acrobat Reader Ople F Disk1 F Setup Installs Caere OmniPage Limited Edition Photoex F Setup Installs Ulead Photo Express 2 0 SE Manual F English F Product Product Guide electronic manual Canocrft CanoCraft CS P electronic manual Ople Caere OmniPage Limited Edition electronic manual Pe2 Ulead Photo E...

Page 48: ...48 CanoCrft F English F Disk1 F Readme Setup Installs CanoCraft CS P Toolbox F English F Disk1 F Readme Setup Installs ScanGear Toolbox CS ...

Page 49: ...you are having problems performing a task 1 Click Troubleshooting in the CD ROM menu The following window will display 2 Follow the instructions on the screen to proceed through the trouble shooting section 3 Click Return to the previous menu when you have finished viewing The main menu will display Troubleshooting ...

Page 50: ...0 Exiting the CD ROM Menu Program 1 Return to the menu window 2 Click the Exit button The menu window will close 3 Remove the CD ROM from the drive Handle the disk with care and store it in a safe place ...

Page 51: ...51 Chapter 3 How to Use the Scanner Positioning Documents 52 About CanoCraft CS P 54 ...

Page 52: ...lace the document face down on the document glass with its top edge at the front of the scanner the edge farthest away from the document cover hinge Align the edges of the document with the alignment mark 3 Close the document cover being careful not to move the document from alignment Alignment Mark Bottom Edge of Document Top Edge of Document ...

Page 53: ...quipped with an ultra sensitive scanning unit Opening the document cover during scanning or improperly closing it may not produce proper results When the document cover cannot be closed because you are scanning thick documents such as books cover the document glass with a dark cloth to prevent ambient light from affecting the scan ...

Page 54: ...one program As a TWAIN driver within a graphics program see page 56 for expla nation CanoCraft CS P as a Stand Alone Application 1 Ensure that the scanner is plugged See Connecting the Power Cord page 26 for instructions on how to power the scanner 2 Click the Start button on the Windows taskbar and select Programs Canon CanoCraft CS P 3 7 and CanoCraft CS P 3 7 in succession ...

Page 55: ...oCraft CS P will start and display the following window Use this win dow to preview and scan images For instructions for these procedures please see the electronic manual entitled CanoCraft CS P User s Guide ...

Page 56: ...o load images directly into the host program For example you can start Ulead Photo Express 2 0 SE and use its buttons to open a TWAIN driver for the scanner A CanoCraft CS P window will display 1 Ensure that the scanner is plugged See Connecting the Power Cord page 26 for instructions on how to power the scanner 2 Click the Start button on the Windows taskbar and select Programs Ulead Photo Expres...

Page 57: ...57 Ulead Photo Express 2 0 SE will start and its window will display 3 Click the File menu and select Acquire and Scanner in succession ...

Page 58: ...hat CanoScan FB330P FB630P is selected in the Select data source list box and click the Acquire button The CanoCraft CS P window will appear in the Ulead Photo Express 2 0 SE window Use this window to scan a document ...

Page 59: ...ation and when it is used as a TWAIN driver As a TWAIN driver the save button becomes the scan button When the scans are finished the CanoCraft CS P window can be closed and the scanned images will be displayed in the Ulead Photo Express 2 0 SE window for editing or retouching For further instructions on the use of Ulead Photo Express 2 0 SE please consult its electronic manual Methods for startin...

Page 60: ...60 Appendices Troubleshooting 61 Precautions with Printers 71 Care and Maintenance 75 Major Specifications 77 ...

Page 61: ...rmation page 33 of the Getting Started guide Keep this information in a safe place for future reference For assistance with problems related to the installation and operation of the software please also refer to the Readme and Help files accompany ing each program These files contain important information that may not be found in the manuals Problems with Software Installation Installation is unsu...

Page 62: ...ISK1 SETUP EXE To install ScanGear Toolbox CS D TOOLBOX ENGLISH DISK1 SETUP EXE To install Ulead Photo Express 2 0 SE D PHOTOEX SETUP EXE To install Caere OmniPage Limited Edition D OPLE DISK1 SETUP EXE To install Adobe Acrobat Reader D ACROREAD ENGLISH AR32E301 EXE To read the electronic manuals on the CD ROM navigate to the D MANUAL folder and open the PDF files in the respective subfolders Prob...

Page 63: ...g Started CanoCraft CS P will not start Cause 1 Insufficient memory RAM available to run CanoCraft CS P Solution Close other programs and run CanoCraft CS P Cause 2 CanoCraft CS P Copy running Solution CanoCraft CS P cannot run at the same time as CanoCraft CS P Copy Close CanoCraft CS P Copy See CanoCraft CS P User s Guide Cause 3 CanoCraft CS P already running within another application as a TWA...

Page 64: ...and alone program Solution Close the version of CanoCraft CS P that is already running Cause 3 CanoCraft CS P not installed Solution Install CanoCraft CS P See p 33 Cause 4 Application program is not TWAIN_32 compatible Solution Start CanoCraft CS P from within a TWAIN_32 compatible program Cause 5 Printing in progress Solution CanoCraft CS P cannot be started as a TWAIN driver while printing is i...

Page 65: ...y setting lock switch to unlocked posi tion See p 20 Cause 3 Software incorrectly installed Solution Reinstall software See p 33 Cause 4 CanoCraft CS P not installed Only Ulead Photo Express 2 0 SE and or Caere OmniPage Limited Edition installed Solution CanoCraft CS P is required for scanning Install it See p 33 Cause 5 Printing in progress Solution Scanner cannot be used while printing Initiate ...

Page 66: ...n motion Solution Clear all documents and objects from the document glass close the document cover unplug the AC adapter from the electrical outlet and then plug it back in Scan quality is poor Cause 1 Document cover is open Solution Close the document cover Cause 2 Original document floating on document glass Solution Gently press down on the document cover to prevent the document from floating C...

Page 67: ...terns Solution 1 Gently press down on the document cover Solution 2 Move the photo on the document glass to break the adhesion Solution 3 Clean the document glass See p 75 Stripes appear on scan of publication Cause Moiré effect from scan of publication at low resolution print screen lines highlighted by optical interference producing striped patterns The appearance of this effect is dependent upo...

Page 68: ...nd document glass with a dark cloth to prevent ambient light from affecting the scan Slow scanning speed Cause 1 Improper parallel port setting Solution Adjust parallel port setting See Getting Started Cause 2 Computer can only interface with the scanner with the parallel port setting set to the slowest mode Nibble mode Solution Faster speed not obtainable with current computer Cause 3 Epson Print...

Page 69: ... the scanner power must be on to print Connect the AC adapter to the scanner and electrical outlet See p 26 Cause 3 WPS Windows Printing System printer in use Solution WPS printers cannot be used when connected through the scanner To use both the printer and the scanner alternately connect the devices to the computer s parallel port as required Cause 4 Scanning in progress Solution Printer cannot ...

Page 70: ...ipheral devices employing a parallel port connection be connected to the scanner Answer The only peripheral devices that can be connected to this scanner are printers employing parallel port connections Can a externel parallel switch be used with the scanner Answer No Scanner cannot connect to a computer Cause Scanner connected to incompatible computer Solution Scanner is PC AT compatible and not ...

Page 71: ...ions initiation of a scan command may succeed during a print job but the printing operation may cease and result in a printer error Using Windows Printing System WPS Printers Windows Printing System compatible printers such as Canon BJC 610W BJC 620W LBP 460 and LBP 660 models will not operate properly when connected via the scanner To use such printers directly connect the printer to the computer...

Page 72: ...the Settings 1 Click the Windows Start menu and select Settings and Printers 2 Click the icon of the printer to select it Click the File menu in the window and select Properties 3 In the printer s properties dialog select the Details tab and click the Spool Settings button 4 Click the Start printing after last page is spooled option to make it active and click the OK button 5 Click the OK button i...

Page 73: ...ng speed that is moderately slower than if this setting is not selected Use of the Epson Printer Window software that accompanies Epson printers may cause the scanner s scan speed to drop dramatically failure of the scanner to be recognized by the computer and incorrect operation of CanoCraft CS P If you experience problems please try to solve them by following the procedures below to disable the ...

Page 74: ...inters That Are Operating Incorrectly Begin by turning off the printer s bi directional functions in its status monitor or control panel Please refer to the instructions that accompanied your printer for an explanation of this operation If this does not solve the problem connect the printer directly to the computer s parallel port and alternate with the scanner as required ...

Page 75: ...dampen the connectors ports or other metallic components on the scanner s back panel Immediately remove any moisture that contacts these components by wiping them with a dry cloth Do not use a sodden cloth or apply a liquid directly to any portion of the scanner Any moisture that enters the interior the underside of the document glass or the sensors may degrade image quality and lead to malfunctio...

Page 76: ...76 Never use substances containing thinners or benzene to clean the equipment Outer Casing Document Cover Document Glass Thinner Benzene ...

Page 77: ...00 x 600 dpi 600 x 1200 dpi Selectable Resolution 25 to 2400 dpi Scanning Bit Color 12 bits Input 8 bits output for each color RGB Depth Grayscale 12 bits Input 8 bits output Dithering 64 tones Scanning Speed 1 Color 17 1 msec line Grayscale 5 7 msec line B W 5 7 msec line Prescan Speed 15 sec Interface Parallel interface IEEE 1284 ECP Maximum Document Size A4 Letter 216 x 297 mm 8 5 x 11 7 inches...

Page 78: ...can FB330P CanoScan FB630P Power Requirements AC Adapter 100 120 230 240 V 2 Power Consumption 9 watts maximum standby 5 watts using supplied adapter Dimensions W x D x H 256 x 372 5 x 39 mm 10 1 x 14 7 x 2 5 inches Weight Approximately 1 5 kg 3 3 pounds Operating Range Temperature 5ºC to 35ºC 41ºF to 95ºF Humidity 10 90 without condensation formation ...

Page 79: ...22 24 26 Connector 22 23 Copyright 7 9 D Display CD ROM Contents 46 48 Document Cover 17 52 75 76 Document Glass 17 52 75 76 Document Size 53 77 E Electronic Manuals 30 36 Epson Inkjet 25 Exiting the CD ROM Menu Program 50 H Handling Precautions 12 13 I Install Uninstall Software 30 32 35 Install Uninstall Software Button 34 Installing the Software 32 35 Insufficient Free Hard Disk Space 61 Insuff...

Page 80: ...er Port 18 24 Printer Settings 71 74 S Safety Precautions 10 Save Button 59 Scan Button 59 Scanning Unit 17 21 53 Scanning Unit Lock 17 20 Setup 14 Software Requirements 32 33 Space Around the Scanner 14 Specifications 77 Standby Operation 8 26 Start Button 54 T Temperature 14 Text Data 33 Thick Documents 53 Transport 18 20 21 Troubleshooting 61 TWAIN Driver 54 56 59 TWAIN_32 Compliant 56 U Unlock...

Page 81: ...er Support 02151 349 555 Info Desk 02151 349 566 Mailbox 02151 349 577 Telefax 02151 349 588 CANON ITALIA S p A Palazzo L Strada 6 20089 Milanofiori Rozzano MI Italy TEL 02 8248 1 FAX 02 8248 4604 Pronto Canon 02 8249 2000 http www canon it CANON OY AB Kornetintie 3 00380 Helsinki Finland Tel 010 544 20 Help Desk 0600 0 22606 Fax 010 544 4382 CANON SVENSKA AB S 127 88 Skärholmen Sweden BRUHN A S V...

Page 82: ...ngapore 079906 CANON MARKETING SERVICES PTE LTD 2 Alexandra Road 04 01A Delta House Singapore 159919 Tel 65 2735311 Fax 65 2733317 CANON MARKETING MALAYSIA SDN BHD 13A Jalan 219 46100 Petaling Jaya Selangor Darul Ehsan Malaysia Tel 603 7577210 7570707 7579666 Fax 603 7563802 7563012 CANON MARKETING THAILAND CO LTD 2nd Floor Indosuez House 152 Wireless Road Bangkok 10330 Thailand Tel 66 2 6514000 F...

Reviews: