COPYRIGHT © 2001 CANON INC.
2000 2000 2000 2000
NM-PDL REV.0 JULY 2001
CHAPTER 3 INSTALLATION
3-1
1 Installation
This chapter includes the following information:
• Connecting power and checking out the iR-M1 (see below)
• Connecting the iR-M1 to the copier (page 3-3)
• Printing the Test Pages (page 3-4)
• Connecting to the network (page 3-5)
• Connecting a PC to the parallel port (page 3-7)
• Shutting down and restarting the iR-M1 (page 3-15)
This chapter also includes information on Control Panel screens and icons.
1.1 Preliminary Checkout
When you have just unpacked or serviced a iR-M1, power it on before you connect it to
the copier and the network. Diagnostics are run automatically during startup; the iR-M1 is
checked for internal problems.
1.1.1 To Connect Power and Start the iR-M1
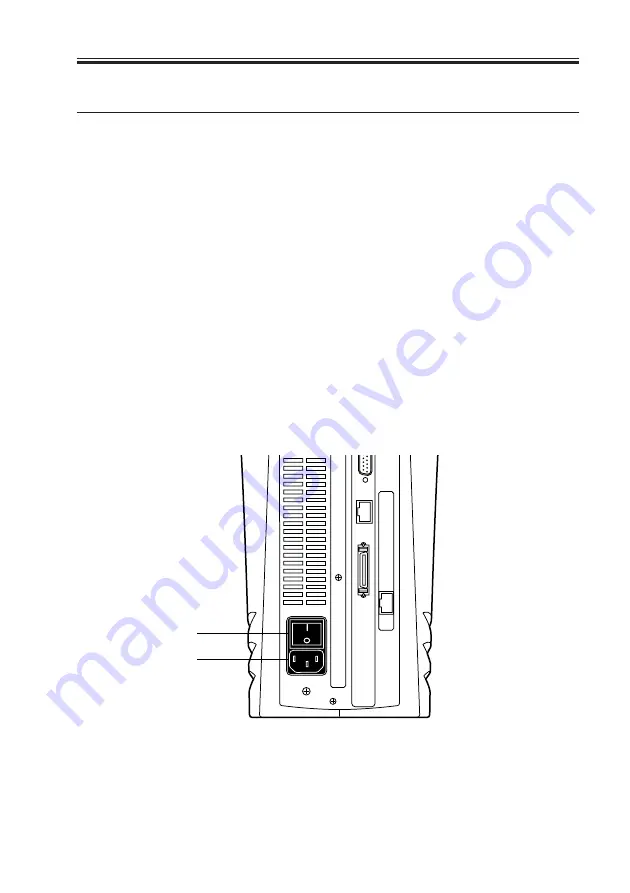
1. Connect the recessed end of the iR-M1 power cable to the power connector on the back
panel of the iR-M1.
2. Make sure that the iR-M1 power switch is in the Off position (press O), and plug the
other end of the power cable into a wall outlet.
F03-101-01 Connecting the power cable
Power switch
Power connector
Summary of Contents for FY8-13HR-000
Page 11: ...COPYRIGHT 2001 CANON INC 2000 2000 2000 2000 NM PDL REV 0 JULY 2001 CHAPTER 1 INTRODUCTION ...
Page 26: ...COPYRIGHT 2001 CANON INC 2000 2000 2000 2000 NM PDL REV 0 JULY 2001 CHAPTER 3 INSTALLATION ...
Page 81: ...COPYRIGHT 2001 CANON INC 2000 2000 2000 2000 NM PDL REV 0 JULY 2001 CHAPTER 5 TROUBLESHOOTING ...
Page 98: ...COPYRIGHT 2001 CANON INC 2000 2000 2000 2000 NM PDL REV 0 JULY 2001 CHAPTER 6 PARTS CATALOG ...
Page 102: ...COPYRIGHT 2001 CANON INC 2000 2000 2000 2000 NM PDL REV 0 JULY 2001 APPENDIX ...
Page 105: ...PRINTED IN U S A 0701AB00 This publication is printed on 100 recycled paper ...


