background image

4-1

Sending Faxes

4

Documents You Can Fax

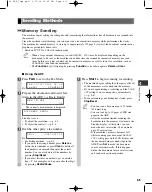
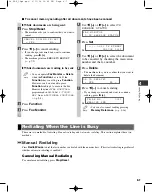
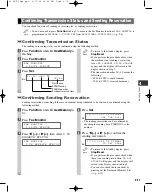
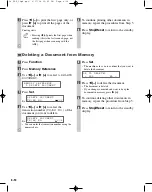
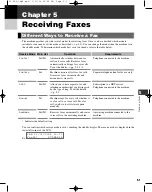
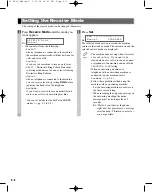
For information on the types of documents you can fax, their requirements, and details on setting up documents,

Basic Guide.

Adjusting the Quality of Your Faxes

Canon’s UHQ (Ultra High Quality) imaging technology enables you to send documents with image quality
output similar to the original. The machine allows you to adjust the resolution and contrast to best suit your
particular document.

• You cannot change settings while your machine is scanning a document.

Setting the Scanning Resolution

Resolution is a measure of the fineness or clarity of a printout. Low resolutions may cause text and graphics to
have a jagged appearance, while higher resolutions provide smoother curves and lines, crisp text and graphics,
and a better match to traditional typeface designs.

• Higher resolution produces higher output quality, but requires longer transmission time.

NOTE

NOTE

Preparing to Send a Fax

Sending Faxes

Chapter 4

1

Press

FAX Resolution 

repeatedly to

select the desired resolution.

Ex:
• You can select the resolution from the following:

- STANDARD

Suitable for most text-only documents.

- FINE

Suitable for fine-print documents.

- PHOTO

Suitable for documents that contain photographs.

- SUPER FINE

Suitable for documents that contain fine print
and images (the resolution is four times that of

STANDARD

).

- ULTRA FINE

Suitable for documents that contain fine print
and images (the resolution is eight times that of

STANDARD

).

2

Press

Set

.

Ex:

• You can set the Fax Resolution so that the

desired resolution such as 

STANDARD

is

automatically returned after the 

AUTO

CLEAR

function activates or documents are

scanned. (

p. 9-8) 

Since

RESOLUTION

of

FAX DEFAULT

is

set to 

OFF

as the factory default setting,

the resolution set using 

FAX Resolution

will remain unchanged.

NOTE

F A X

1 2 / 0 3 / 2 0 0 4

1 5 : 3 0

F a x T e l

F I N E

F A X

R E S O L U T I O N

S T A N D A R D

04 FAX_Chp4.qxd  6/17/04 12:45 PM  Page 4-1

Summary of Contents for imageCLASS D860

Page 1: ...be Reader Acrobat Reader Acrobat is required If Adobe Reader Acrobat Reader Acrobat is not installed on your system please download it from the Adobe Systems Incorporated website http www adobe com Copyright Copyright 2004 by Canon Inc All rights reserved No part of this publication may be reproduced transmitted transcribed stored in a retrieval system or translated into any language or computer l...

Page 2: ...orts 28 8 Kbps modem speeds or lower depending on telephone line conditions Disclaimers The information in this document is subject to change without notice CANON INC MAKES NO WARRANTY OF ANY KIND WITH REGARD TO THIS MATERIAL EITHER EXPRESS OR IMPLIED EXCEPT AS PROVIDED HEREIN INCLUDING WITHOUT LIMITATION THEREOF WARRANTIES AS TO MARKETABILITY MERCHANTABILITY FITNESS FOR A PARTICULAR PURPOSE OF US...

Page 3: ...celing the Print Out List 3 10 Registering a Password and Subaddress 3 11 Chapter 4 Sending Faxes Preparing to Send a Fax 4 1 Documents You Can Fax 4 1 Adjusting the Quality of Your Faxes 4 1 Dialing Methods 4 2 Sending Methods 4 5 Memory Sending 4 5 Canceling Sending 4 6 Redialing When the Line is Busy 4 7 Manual Redialing 4 7 Automatic Redialing 4 8 Sequential Broadcasting 4 8 Delayed Sending 4 ...

Page 4: ...ansaction REPORT 7 4 RX Reception REPORT 7 4 Chapter 8 Troubleshooting LCD Messages 8 1 Faxing Problems 8 2 Sending Problems 8 2 Receiving Problems 8 3 Telephone Problems 8 5 If a Power Outage Occurs 8 5 If You Cannot Solve the Problem 8 6 Chapter 9 Setting the Additional Functions Understanding the Additional Functions 9 1 Accessing the Additional Functions 9 1 Menu Descriptions 9 2 Appendix Spec...

Page 5: ...iters copiers and machines of this sort generate electrical noise which often interferes with communications equipment and the sending and receiving of documents Connection of the Equipment This equipment complies with Part 68 of the FCC rules and the requirements adopted by the ACTA On the rear panel of this equipment is a label that contains among other information a product identifier in the fo...

Page 6: ... installed and used in accordance with the instructions may cause harmful interference to radio communications However there is no guarantee that interference will not occur in a particular installation If this equipment does cause harmful interference to radio or television reception which can be determined by turning the equipment off and on the user is encouraged to try to correct the interfere...

Page 7: ...quipment that is thermostatically controlled The rated value is 120 volts and 15 amperes The CA11A modular jack should be relatively close to the power outlet to facilitate installation Notice This equipment meets the applicable Industry Canada Terminal Equipment Technical Specifications This is confirmed by the registration number The abbreviation IC before the registration number signifies that ...

Page 8: ...dian Users Canon Canada Inc offers a full range of customer technical support options For interactive troubleshooting e mail technical support the latest driver downloads and answers to frequently asked questions www canon ca Automated interactive telephone support on most current products 24 hours 7 days a week 1 800 652 2666 Free live technical support Monday Friday excluding holidays for produc...

Page 9: ...tions for details on the topic of the previous sentence Basic Guide Refer to the Basic Guide for details on the topic of the previous sentence machine The word machine refers to the imageCLASS D880 default A setting that remains in effect unless you change it document or fax The original sheet s of paper you send or receive menu A list of settings from which you select an item to set up or change ...

Page 10: ...x 00 FAX_Contents qxd 6 17 04 12 42 PM Page x ...

Page 11: ...witches standby display to the Fax Mode In Use Memory indicator Flashes green when a fax is being received or sent Lights green when the reservation of fax transmission is set or a fax is received into the memory Alarm indicator Flashes orange when the machine has a problem such as paper jams etc The error message is displayed on the LCD display Energy Saver Key Sets or cancels the energy saver mo...

Page 12: ...mission Key Specifies the fax sending time for the delayed sending function Book Sending Key This key can be used to send documents from the platen glass Key Enters a plus sign Space Key Enters a space between letters and numbers Delete Key Deletes characters one by one Clear Key Deletes all characters Function Key After pressing this key you can use the keys marked 01 to 12 except for 06 to 08 fo...

Page 13: ...nal Device The machine has two jacks on the left side for connection of the following L Telephone line External device such as a telephone or an answering machine Making Connections NOTE Receive Mode Fax Resolution Date Time Standby Display If you need to send and receive faxes and voice calls connect the cable from the telephone or answering machine to the jack 2 Connect the supplied telephone ca...

Page 14: ...d an external device to the machine be sure to select the correct receive mode p 5 1 Recommended Device Connections Receive Modes Machine and Telephone FaxTel DRPD Manual Machine Only FaxOnly Machine and Answering Machine AnsMode Machine Answering Machine and Telephone AnsMode IMPORTANT Wall Jack Wall Jack Answering Machine Wall Jack Answering Machine Telephone Wall Jack Telephone 01 FAX_Chp1 qxd ...

Page 15: ...r more than two minutes when entering data the machine will automatically return to the standby mode with the auto clear function AUTO CLEAR can be set within a range of 1 to 9 minutes at one minute intervals You can also disable the auto clear function Basic Guide NOTE Key Letters A Numbers 1 _ 1 A B C a b c 2 D E F d e f 3 G H I g h i 4 J K L j k l 5 M N O m n o 6 P Q R S p q r s 7 T U V t u v 8...

Page 16: ...epeatedly until the symbol you want appears Ex 3 If you want to enter another symbol use e to move the cursor to the right then press repeatedly until the symbol you want appears Ex A A A _ 1 Press T to switch to the letter mode A Ex 2 Press the numeric key that contains the letter you want Ex Press the key repeatedly until the letter you want appears Each key cycles through the letters it contain...

Page 17: ...om the home office on the East coast and then have the document relayed to you locally We hope you will have these features set up in the very near facsimile communications December 28 Dear Member By now you have all had a chance to become familiar with your new Canon fax units and are ready to set up a reliable economical communications network that offers many exciting features We can save money...

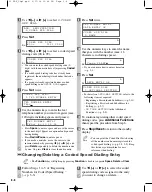
Page 18: ...OK DATE TIME SETTING 12 03 04 15 30 DATE TIME SETTING 12 03 04 12 10 TIMER SETTINGS 1 DATE TIME SETTING ADDITIONAL FUNCTIONS 5 TIMER SETTINGS 1 Press Additional Functions 2 Use 4 or e to select 3 FAX SETTINGS 3 Press Set four times Ex 4 Use the numeric keys to enter your fax number max 20 digits including spaces Ex If you have already registered your fax telephone number the previous entry will be...

Page 19: ... characters including spaces Ex If you are unsure how to enter characters p 2 1 If you have already registered your name or company s name previous entry will be displayed To change your name press Clear to delete the previous entry and re enter Press Space to enter a space and move the cursor to the right If you make a mistake press 4 or e to move the cursor to the incorrect character then press ...

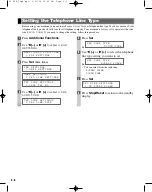
Page 20: ...t 3 FAX SETTINGS 3 Press Set three times 4 Use 4 or e to select 2 TEL LINE TYPE 5 Press Set Ex 6 Use 4 or e to select the telephone line type setting you want to set Ex You can select from the following ROTARY PULSE TOUCH TONE 7 Press Set 8 Press Stop Reset to return to the standby display TEL LINE SETTINGS 3 TX START SPEED TEL LINE TYPE ROTARY PULSE TEL LINE TYPE TOUCH TONE TEL LINE SETTINGS 2 TE...

Page 21: ...e same document to several destinations The following pages describe how to register numbers for speed dialing For instructions on dialing using the speed dialing methods pp 4 3 4 4 The Function key will light up by pressing Function to be able to operate Space Delete or Clear Registering Numbers for One Touch Speed Dialing NOTE One Touch Speed Dialing NOTE What is Speed Dialing Speed Dialing Chap...

Page 22: ...the following items as required Registering a Password and Subaddress p 3 11 Registering a Password and Subaddress for Polling p 5 7 TX TIME SETTING in the Additional Functions p 9 9 10 To continue registering other one touch speed dialing keys press Additional Functions then repeat the procedure from Step 4 11 Press Stop Reset to return to the standby display Place the destination label provided ...

Page 23: ...you do not want to change the name proceed to Step 7 If you are unsure how to enter characters p 2 1 7 Press Set 8 Press Stop Reset to return to the standby display To Delete a One Touch Speed Dialing Entry 4 Press Function then Clear to delete the fax telephone number If you do not want to delete the fax telephone number proceed to Step 6 If you delete the number by mistake press Stop Reset befor...

Page 24: ...e numeric keys to enter the name that goes with the number max 16 characters including spaces Ex If you are unsure how to enter characters p 2 1 11 Press Set Ex For details on OPTIONAL SETTING refer to the following items as required Registering a Password and Subaddress p 3 11 Registering a Password and Subaddress for Polling p 5 7 TX TIME SETTING in the Additional Functions p 9 9 12 To continue ...

Page 25: ...ction then Clear to delete the previous entry then re enter the name Ex If you do not want to change the name proceed to Step 8 If you are unsure how to enter characters p 2 1 7 Press Set 8 Press Stop Reset to return to the standby display To Delete a Coded Speed Dialing Entry 4 Press Function then Clear to delete the fax telephone number If you do not want to delete the fax telephone number proce...

Page 26: ...ve a subaddress or password registered To register a group under a one touch speed dialing key Use 4 or e to select the key under which you want to register the group 01 to 12 Ex If a fax telephone number has already been registered in this key 1 TOUCH SPD DIAL or GROUP DIAL appears If fax functions have been programmed into keys marked 01 to 12 using PROG 1 TOUCH KEY in the Additional Functions P...

Page 27: ... registered for one touch speed dialing Press the one touch speed dialing key assigned to each number you want to register in the group Repeat for the other keys Ex To enter a destination registered for coded speed dialing Press Coded Dial then use the numeric keys to enter the two digit code assigned to the number you want to register in the group Repeat for the other codes Ex 9 Press Set twice 1...

Page 28: ...ER Speed Dialing Lists 1 Press Additional Functions 2 Use 4 or e to select 7 PRINT LISTS 3 Press Set 4 Use 4 or e to select 2 SPEED DIAL LIST 5 Press Set 6 Use 4 or e to select the list you want to print Ex You can select from the following 1 TOUCH LIST CODED DIAL LIST 1 TOUCH DETAIL CODED DETAIL GROUP DIAL LIST 7 Press Set If you selected 1 TOUCH LIST or 1 TOUCH DETAIL CODED DIAL LIST or CODED DE...

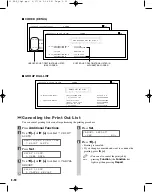
Page 29: ...516p488 6700 Canon U S A REGULAR TX A 32 81 773 3173 Canon UK REGULAR TX SORTED LIST DESTINATIONS LISTED IN ALPHABETICAL ORDER UNSORTED LIST DESTINATIONS LISTED IN KEY ORDER 12 03 2004 17 07 FAX 123 4567 CANON 001 1 TOUCH DETAIL 01 DESTINATION TEL 2 887 0166 DESTINATION ID Canon AUSTRALIA TX TYPE REGULAR TX 03 DESTINATION TEL 905 795 1111 DESTINATION ID Canon CANADA 12 03 2004 17 07 FAX 123 4567 C...

Page 30: ...CANADA 12 03 2004 17 09 FAX 123 4567 CANON 001 CODED SPEED DIAL TEL LIST 2 A 00 DESTINATION TEL 2131 1250 DESTINATION ID Canon DEUTSCH TX TYPE REGULAR TX A 02 DESTINATION TEL 1 49 39 25 25 DESTINATION ID Canon FRANCE SORTED LIST DESTINATIONS LISTED IN ALPHABETICAL ORDER UNSORTED LIST DESTINATIONS LISTED IN KEY ORDER 1 Press Additional Functions 2 Use 4 or e to select 7 PRINT LISTS 3 Press Set 4 Us...

Page 31: ...t 4 Use 4 or e to select 1 1 TOUCH SPD DIAL or 2 CODED SPD DIAL Ex 5 Press Set Ex 6 Use 4 or e to select the one touch speed dialing number or coded speed dialing code Ex 7 Press Set 8 Use 4 or e to select 3 OPTIONAL SETTING 9 Press Set Ex 10 Use 4 or e to select ON 11 Press Set 12 Use 4 or e to select 2 TX TYPE 13 Press Set Ex 14 Use 4 or e to select SUBADDRESS TX 15 Press Set twice Ex PASSWORD S...

Page 32: ... enter a subaddress up to 20 digits using the numeric keys T or Space Be sure to enter the subaddress of the other party correctly taking into account the position of spaces If you make a mistake press 4 or e to move the cursor to the incorrect character then press Delete Or press Clear to clear your entire entry 19 Press Set Ex 20 To continue registering other passwords and subaddresses press Add...

Page 33: ... output quality but requires longer transmission time NOTE NOTE Preparing to Send a Fax Sending Faxes Chapter 4 1 Press FAX Resolution repeatedly to select the desired resolution Ex You can select the resolution from the following STANDARD Suitable for most text only documents FINE Suitable for fine print documents PHOTO Suitable for documents that contain photographs SUPER FINE Suitable for docum...

Page 34: ... fax number by using the numeric keys just like dialing a telephone number Ex w Press Start Ex If you enter the wrong number press Stop Reset or Clear to clear your entire entry then enter the correct number The Function key will light up by pressing Function to be able to operate Clear NOTE TEL 9057951111 2 on 1 Collate Paper Select Enlarge Reduce Image Quality Exposure Additional Functions In Us...

Page 35: ...eed dialing code you entered TEL 1 49 39 25 25 A02 Canon FRANCE 2 on 1 Collate Paper Select Enlarge Reduce Image Quality Exposure Additional Functions In Use Memory Alarm Stop Reset Start Energy Saver ABC DEF GHI JKL MNO PRS TUV WXY OPER SYMBOLS Tone Report Memory Reference Fax Monitor Delayed Transmission Book Sending Clear Delete Space Function Redial Pause Coded Dial Directory Receive Mode FAX ...

Page 36: ...This feature is convenient when you know the other party s name but cannot recall the One Touch Speed Dialing key the code for Coded Speed Dialing or Group Dialing where the number is registered TEL GROUP DIAL A21 Canon GROUP 1 TEL GROUP DIAL 03 Canon GROUP 2 1 Press Directory NO TEL appears if the name of the other party is not registered and the display will return to the dial entry mode 2 Press...

Page 37: ... 4 2 If you enter the wrong number press Delete to delete the last number or press Clear to delete all the numbers you entered then enter the correct number You can also delete all the numbers by pressing Stop Reset If you must first dial a number to get an outside line 9 for example add a pause after that digit by pressing Redial Pause 4 Press Start to begin scanning for sending The machine begin...

Page 38: ...then enter the correct number You can also delete all the numbers by pressing Stop Reset If you must first dial a number to get an outside line 9 for example add a pause after that number by pressing Redial Pause 8 Press Start to begin scanning 9 Place the next document on the platen glass and press Start to begin scanning Repeat for other documents 10 After all of the documents have been scanned ...

Page 39: ... are waiting to be sent You can operate Fax Monitor or Delete when the Function key is lit If the Function key is not lit press Function However you do not need to press Function in Step 1 to execute the Fax Monitor function if FAX MONITOR is programmed in PROGRAM 1 TOUCH KEY from ADDITIONAL FUNCTIONS p 9 4 1 Press Function 2 Press Fax Monitor 3 Use 4 or e to select TX RESERVE STATUS 4 Press Set E...

Page 40: ... destinations Regular dialing using the numeric keys or redialing 10 destinations You can enter the destinations in any order Be sure to press Set after your entry with the numeric keys If you frequently send documents to the same group of destinations you can group them and register these numbers for group dialing You can register up to 111 fax numbers with group dialing and send the same documen...

Page 41: ...ting p 9 6 If you want to review the numbers you entered press 4 or e to scroll through the numbers 4 Press Start When scanning is complete the machine starts to dial the number The machine will first send the document to the one touch speed dialing destinations then the coded speed dialing destinations and finally to the destination dialed using regular dialing If you prefer not to start scanning...

Page 42: ...platen glass or load it face down in the ADF When using the platen glass press Function and then Book Sending and select the document size with 4 or e Proceed to Step 3 2 Press Function 3 Press Delayed Transmission 4 Use the numeric keys to enter the reservation time to send documents Ex 5 Press Set 6 Enter a destination using a one touch speed dialing key a coded speed dialing code Redial Pause o...

Page 43: ...will appear and the display will return to the display shown in Step 2 The transaction number TX RX means the following 0001 to 4999 A sent document 5001 to 9999 A received document NOTE 16 50 0056 TX 12345 FAX MONITOR 1 RX TX STATUS Destination TX RX mode TX RX number Scanned received time 1 Press Function while In Use Memory is lit 2 Press Fax Monitor 3 Press 4 or e then select 2 TX RESERVE STAT...

Page 44: ...n TOKYO 3 12 03 16 30 14 00 0047 DELAYED TX 04 Canon ITALIA 2 12 03 16 37 14 05 0048 DEL SQ BDCST A 02 Canon FRANCE 1 12 03 16 42 14 07 01 Canon CANADA 14 07 0049 DEL SQ BDCST 03 Canon GROUP 2 1 12 03 16 55 14 10 DOCUMENT MEMORY LIST TX RX NO MODE DESTINATION TEL ID PGS SET TIME ST TIME 12 03 2004 17 15 FAX 123 4567 CANON 001 NOTE Documents Stored in Memory 1 Press Function 2 Press Memory Referenc...

Page 45: ...ment you want to send again Ex 6 Press Set 7 Enter the fax number 8 Press Set For dialing methods p 4 2 Press Set twice if you use the numeric keys to dial the fax number Sending starts TEL RESEND DOCUMENT SELECT LOCATIONS RESEND DOCUMENT TX RX NO 0053 RESEND DOCUMENT TX RX NO 0051 NOTE MEMORY REFERENCE 4 RESEND DOCUMENT MEMORY REFERENCE 1 DOC MEMORY LIST 1 Press Function 2 Press Memory Reference ...

Page 46: ...nt in memory press e 8 To continue deleting other documents in memory repeat the procedure from Step 5 9 Press Stop Reset to return to the standby display OK TO DELETE YES NO DELETE DOCUMENT TX RX NO 0004 DELETE DOCUMENT TX RX NO 0001 MEMORY REFERENCE 5 DELETE DOCUMENT 7 Press 4 to print the first page only or press e to print all the pages of the document Printing starts Pressing 4 prints the fir...

Page 47: ... Tel Fax Tel Operation Automatically switches between fax calls and voice calls Receives faxes automatically and rings for voice calls To set the details pp 5 3 5 4 Machine answers all calls as fax calls It receives faxes automatically and disconnects voice calls Allows you to have separate fax and telephone numbers that you distinguish by the type of ring To set the details p 5 5 Machine rings fo...

Page 48: ...s pp 5 3 to 5 5 2 Press Set Ex The selected receive mode is set and the machine returns to the standby mode The current date and the selected receive mode are displayed The machine does not ring when it receives a fax in FaxOnly If you want to be alerted when a fax call is received connect a telephone to the machine and enable the INCOMING RING setting When an answering machine or a telephone with...

Page 49: ...d The fax tone is not detected The document is received automatically The machine starts ringing Pick up the handset to talk If you do not pick up the handset within 15 sec F T SWITCH ACTION Choose between RECEIVE Factory default setting and DISCONNECT DISCONNECT RECEIVE The machine receives the fax The fax tone is detected and the machine switches to the receive mode The machine disconnects the c...

Page 50: ...ice Ex 12 Use 4 or e to select RECEIVE or DISCONNECT Ex This setting tells the machine what to do if no one picks up the handset within the specified ring time set in Step 10 Select RECEIVE to receive the call or DISCONNECT to disconnect the call The default setting is RECEIVE 13 Press Set 14 Press Stop Reset to return to the standby display RX SETTINGS 3 DRPD SELECT FAX F T SWITCH ACTION DISCONNE...

Page 51: ...ice Also this service may not be offered in all areas Types of Ring Patterns Your telephone company will assign a distinctive ring pattern to each number when you order the DRP service See the fax ring pattern to match that assigned by the telephone company 1 Press Additional Functions 2 Use 4 or e to select 3 FAX SETTINGS 3 Press Set 4 Use 4 or e to select 4 RX SETTINGS 5 Press Set 6 Use 4 or e t...

Page 52: ...n the machine to begin receiving the fax Hang up the handset If no paper is loaded in the cassette the LCD displays RECEIVED IN MEMORY When paper is loaded the machine automatically resumes printing The machine will beep and HANG UP PHONE will be displayed if the handset is not hung up properly Make sure the handset is seated properly in its cradle If you do not want the machine to beep disable th...

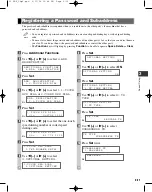
Page 53: ...or Clear NOTE Registering a Password and Subaddress for Polling Receiving Faxes 5 1 Press Additional Functions 2 Use 4 or e to select 4 ADD REGISTRATION 3 Press Set 4 Use 4 or e to select 1 1 TOUCH SPD DIAL or 2 CODED SPD DIAL Ex 5 Press Set Ex 6 Use 4 or e to select the one touch speed dialing number or coded speed dialing code Ex 7 Press Set 8 Use 4 or e to select 3 OPTIONAL SETTING 9 Press Set ...

Page 54: ...up to 20 digits using the numeric keys T or Space Be sure to enter the subaddress of the other party correctly taking into account the position of spaces If you make a mistake press Delete to delete the last character or press Clear to clear your entire entry 19 Press Set Ex 20 To continue registering other passwords and subaddresses press Additional Functions then repeat the procedure from Step 4...

Page 55: ...the action to take p 8 1 The machine memory can store up to approximately 255 pages Once the pages are printed they are deleted from memory If the memory becomes full you will not be able to receive the remaining pages Contact the other party and ask them to resend the remainder of the fax The maximum number of pages that the machine s memory can store differs depending on the other party s machin...

Page 56: ...eives all pages of the document in memory first and then prints them out In this case reception takes longer If there is insufficient memory to receive a document the document will not print in page order even if PRINT IN ORDER is set to ON NOTE 2 1 1 2 3 3 2 1 Document sent in page order 1 2 3 PRINT IN ORDER setting is disabled Reverse page order PRINT IN ORDER setting is enabled Page order 1 2 3...

Page 57: ...national access code Ex If you enter the wrong number press Stop Reset then enter the correct number For details on international access codes contact your local telephone company 4 If necessary press Redial Pause to enter a pause Ex A pause entered within a number p is two seconds long For a longer pause press Redial Pause again to insert another two second pause Alternatively you can change the ...

Page 58: ...4 When the recorded message of the information service answers press T Tone to switch to tone dialing Ex When T Tone is pressed T is displayed on the LCD display If your telephone line uses tone dialing proceed to the next step 5 Use the numeric keys on the machine to enter the numbers requested by the information service Ex Numbers entered after pressing T Tone will be dialed using tone dialing A...

Page 59: ...ou can enable or disable automatic printing of this report after every 20 transactions You can also manually set the machine to print it Prints after transmission of a document You can enable or disable this feature or set the machine to print a report only when an error occurs You can also set the machine to print the first page of the document under the transmission report to remind you of the c...

Page 60: ... 887 0166 5004 AUTO RX ECM 4 OK 00 59 A12 03 16 27 Canon EUROPE 20 545 8545 0002 TRANSMIT ECM 1 OK 01 20 A12 03 16 30 Canon EUROPE 20 545 8545 0003 TRANSMIT ECM 1 OK 04 12 12 03 16 53 03 3758 2111 5005 AUTO RX ECM 1 OK 01 16 12 03 17 08 Canon AUSTRALIA 2 887 0166 0004 TRANSMIT 3 NG 00 51 12 03 17 20 CANON OPTICS 1 432 2060 0005 TRANSMIT 0 NG 00 01 ACTIVITY REPORT 12 03 2004 17 28 FAX 123 4567 CANO...

Page 61: ...O 0004 DESTINATION TEL 20 545 8545 DESTINATION ID Canon EUROPE ST TIME 12 03 17 21 TIME USE 00 18 PAGES SENT 1 RESULT NG 0018 BUSY NO SIGNAL THE SLEREXE COMPANY LIMITED SAPORS LANE BOOLE DORSET BH25 8ER TELEPHONE BOOLE 945 13 51617 FAX 1234567 Our Ref 350 PJC EAC December 3 2004 Dr P N Cundall Mining Surveys Ltd Holroyd Road Reading Berks 12 03 2004 17 21 FAX 123 4567 CANON 001 ERROR TX REPORT IF ...

Page 62: ...t an RX REPORT similar to the one shown below will be printed RX REPORT RECEPTION OK TX RX NO 5004 DESTINATION TEL 905 795 1111 DESTINATION ID Canon CANADA ST TIME 12 03 17 52 TIME USE 01 59 PGS 4 RESULT OK 12 03 2004 17 52 FAX 123 4567 CANON 001 OK RECEPTION SUCCESSFUL NG SOME OR NO PAGES RECEIVED NUMBER OF PAGES RECEIVED RECEPTION DURATION RECEPTION TIME RX Reception REPORT MULTI TX RX REPORT TX...

Page 63: ...u entered has not been registered The machine received the fax in memory because paper or toner ran out or a paper jam occurred When the machine sends or receives a fax it assigns a unique identification number nnnn Action Place the next document on the platen glass then press Start The length of the document should be within 14 356 mm Replace the handset correctly Wait for the machine to send any...

Page 64: ...be working properly Make sure that there is a dial tone when you lift the handset of the telephone connected to the machine If there is no dial tone contact your local telephone company The receiving fax machine may not be a G3 fax machine Make sure that the receiving fax machine is compatible with the machine which is a G3 fax machine The other party s telephone may be busy or the other party s f...

Page 65: ...p space p 4 13 4 14 An error may have occurred during reception Print an ACTIVITY REPORT and check for an error p 7 2 No paper in the cassette Make sure that paper is loaded in the cassette Set up Instructions The telephone line may not be connected properly Make sure that all line connections are secure p 1 3 The machine does not switch automatically between telephone and fax reception The machin...

Page 66: ...h the Cartridge and replace it if necessary Basic Guide No paper may be loaded in the cassette Make sure that paper is loaded in the cassette Set up Instructions Faxed images are blotched or uneven The telephone lines may be in poor condition or you may have a bad connection ECM Error Correction Mode sending receiving should eliminate such problems However if the telephone lines are in poor condit...

Page 67: ...r about two hours During a power outage functions are limited as follows You cannot send receive or copy documents You can make or receive calls When power is restored to the machine the machine will automatically print a list of documents that were stored in memory at the time of the power outage Make sure that LTR size paper is loaded in the cassette If a different paper size is loaded the repor...

Page 68: ...he Basic Guide contact your service representative Canon s support personnel are trained in the technical support of Canon s products and should be able to help you with your problem For details on contacting your service representative Basic Guide If You Cannot Solve the Problem 08 FAX_Chp8 qxd 6 17 04 12 48 PM Page 8 6 ...

Page 69: ...s Setting the Additional Functions Chapter 9 1 Press Additional Functions to display the menus The Additional Functions key blinks 2 Press 4 or e to select the menu you want to change Ex 3 Press Set 4 Use 4 or e to select the sub menu you want to change Ex 5 Press Set For details on the submenus pp 9 2 to 9 10 After selecting the item or value with 4 or e press Set to enter the setting If you pres...

Page 70: ...en after the AUTO CLEAR function activates VOLUME CONTROL Adjusts the volume of the unit 1 KEYPAD VOLUME Adjusts the keypad volume ON 1 to 3 1 OFF The volume is turned off 2 ALARM VOLUME Adjusts the alarm volume ON 1 to 3 1 OFF The volume is turned off 3 TX DONE TONE Adjusts the volume of the done tone sounded when sending is complete ON 1 to 3 1 ERROR ONLY 1 to 3 1 OFF The volume is turned off 4 ...

Page 71: ... voice call 1 to 3 2 8 LINE MONITOR VOL Adjusts the line monitor volume ON 1 to 3 2 OFF The volume is turned off MP TRAY PAPERSIZE CAS PAPER SIZE PRINT EXPOSURE MP PAPERTYPE HIGH COPY MODE TONER SAVER MODE PRT FEED INTERVAL and DISPLAY LANGUAGE Basic Guide COPY SETTINGS For details Basic Guide NOTE 9 Setting the Additional Functions Name Description The factory default setting is in bold face 09 F...

Page 72: ...TTI POSITION OUTSIDE IMAGE Terminal ID is printed outside the image border INSIDE IMAGE Terminal ID is printed inside the image border 2 TEL NUMBER MARK Selects the prefix for the identification header number FAX TEL 4 DENSITY CONTROL Sets the density of the documents LIGHT Set for dark documents STANDARD Set for the documents of normal density DARK Set for light documents 5 PROG 1 TOUCH KEY Progr...

Page 73: ... first page is not printed OUTPUT YES Prints a report every time you send a document 2 RX REPORT Enables disables automatic printing of a reception report OUTPUT NO No report is printed PRINT ERROR ONLY Prints a report only when a reception error occurs OUTPUT YES Prints a report every time you receive a document 3 ACTIVITY REPORT Enables disables automatic printing of an ACTIVITY REPORT after eve...

Page 74: ... after the fax number is entered using speed dialing ON Scanning begins automatically in 5 or 10 seconds after you enter the phone number OFF Press Start to scan the document Otherwise the machine will return to the standby mode after two minutes while the AUTO CLEAR function activates RX SETTINGS Sets the reception functions 1 ECM RX ECM error correction mode receiving is turned on or off ON All ...

Page 75: ...e machine keeps ringing until someone answers the call manually with the handset or a connected extension telephone ON F T RING TIME Sets the length of time that elapses before the machine switches to the document receive mode 5 to 99 SEC 15 SEC 6 REMOTE RX Receives from a remote telephone with preset setting ON Remote receiving is turned on REMOTE RX ID You can dial a number code from the remote ...

Page 76: ...solution OFF The setting of resolution set using FAX Resolution remains even after the AUTO CLEAR function activates STANDARD Suitable for most text only documents FINE Suitable for documents containing fine print PHOTO Suitable for documents that contain photographs SUPER FINE Suitable for documents that contain fine print and images the resolution is four times that of STANDARD ULTRA FINE Suitab...

Page 77: ... in memory The machine transmits the document at the transmission time If you have set more than two transmission time settings the document will be transmitted at the preset time closest to the time that the document has been scanned Once you set the transmission time the machine will transmit the document at the same time on every day However you cannot use the one touch speed dialing key to sen...

Page 78: ... Functions SPEED DIAL LIST Prints the list of the fax telephone numbers registered in the One Touch Speed Dialing keys Coded Speed Dialing codes or for Group Dialing 1 1 TOUCH LIST Prints the 1 TOUCH LIST 1 NO SORT The printout of the list is not sorted 2 SORT The printout of the list is sorted 2 CODED DIAL LIST Prints the CODED DIAL LIST 1 NO SORT The printout of the list is not sorted 2 SORT The...

Page 79: ...03 pels in 196 lines in 8 pels mm 7 7 lines mm SUPER FINE 203 pels in 392 lines in 8 pels mm 15 4 lines mm ULTRA FINE 406 pels in 392 lines in 16 pels mm 15 4 lines mm Dialing Automatic dialing One touch speed dialing 12 destinations Coded speed dialing 100 destinations Group dialing Max 111 destinations Directory dialing with Directory key Regular dialing with numeric keys Automatic redialing Man...

Page 80: ...A 2 10 FAX_Appendix qxd 6 17 04 12 49 PM Page A 2 ...

Page 81: ... setting 9 10 Canceling automatic redialing 4 8 manual redialing 4 7 printing lists 3 10 receiving 5 9 sending 4 6 CHANGE DOCUMENT message 8 1 Clear key 1 2 Coded Dial key 1 2 CODED DIAL LIST description 7 1 printing 3 8 sample 3 9 3 10 CODED SPD DIAL setting 9 10 Coded speed dialing changing deleting 3 4 description 3 1 registering numbers for 3 3 using 4 3 Confirming sending reservation 4 11 tra...

Page 82: ...External device connecting 1 4 F F T RING TIME setting 9 6 F T SWITCH ACTION setting 5 3 5 4 9 6 FAX DEFAULT settings 9 8 FAX key 1 1 Fax Monitor key 1 2 FaxOnly description 5 1 5 2 device connections 1 4 FAX Resolution key 1 2 FaxTel description 5 1 5 2 device connections 1 4 setting options for 5 3 FAX TEL OPT SET settings 9 6 FINE description 4 1 setting 4 1 9 8 Function key 1 2 G GROUP DIAL LI...

Page 83: ...Mistake correcting 2 2 MULTI TX RX REPORT description 7 4 sample 7 4 N NAME setting for 1 TOUCH SPD DIAL 9 9 for GROUP DIAL 9 10 NO TEL message 8 1 NORMAL RING setting 9 7 Numbers entering 2 2 Numeric keys 1 1 O OFFHOOK ALARM setting 9 5 One touch speed dialing changing deleting 3 2 description 3 1 keys 1 2 registering numbers for 3 1 using 4 3 OPTIONAL SETTING for 1 TOUCH SPD DIAL 9 9 OTHER RING ...

Page 84: ...g 4 3 Set key 1 1 Setting resolution 4 1 Settings list of 9 10 Problems cannot solve 8 6 faxing 8 2 receiving 8 3 receiving in memory when 5 9 sending 8 2 telephone 8 5 PROG 1 TOUCH KEY settings 9 4 Q Quality adjusting 4 1 R Receive Mode device connections 1 4 settings 5 2 Receive Mode key 1 2 RECEIVED IN MEMORY message 8 1 Receiving See also individual receive modes canceling 5 9 in memory when p...

Page 85: ...4 problems 8 5 Telephone line connecting 1 3 setting type 2 6 Time entering 2 4 TIME OUT setting 9 6 Timer sending See Delayed sending Tone T key 1 1 Tone dialing switching to 6 2 TONER SUPPLY LOW setting 9 8 TOUCH TONE setting 2 6 9 4 TTI POSITION setting 9 4 TX DONE TONE setting 9 2 TX ERROR RESEND setting 9 6 TX REPORT description 7 1 7 3 sample 7 3 settings 9 5 TX START SPEED setting 9 4 TX TE...

Reviews: