Adding Pages to an Existing PDF file
Specify an existing PDF file to which you want to add the newly scanned document data. The data is added to the existing file as
additional pages. Place the document, start MF Toolbox, and proceed with this procedure. The PDF file you select must be created with
MF Toolbox. Newly scanned document data cannot be added to PDF files created with other applications.
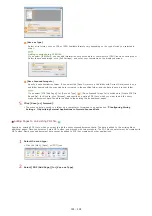
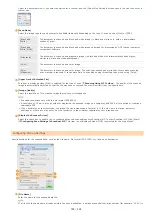
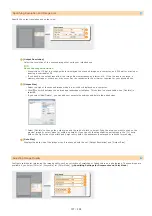
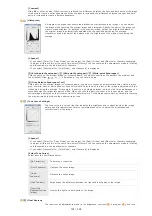
[Save as Type]
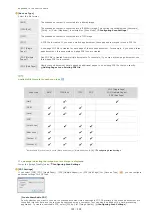
Select a file format, such as PDF or JPEG. Available formats vary depending on the type of scan you selected in
step 1.
Adding comments to a JPEG file
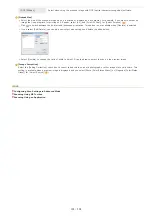
If you select [JPEG/Exif], you can add information such as the date or comments to JPEG files when saving them.
Select the scanned image, click [Exif Settings], and enter your comments on the displayed screen.
[Save Scanned Image to]
Specify a save destination folder. If you select the [Save Pictures to a Subfolder with Current Date] check box, a
subfolder named with the scanning date is created in the specified folder, and the data is saved to that folder.
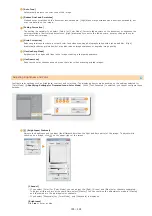
If you select [PDF (Add Page)] for [Save as Type] (
), [Save Scanned Image to] is switched to [Create PDF File
Based On]. In this case, click [Browse], and specify an existing PDF file to which you want to add the newly
scanned document data. The data is added to the existing file as additional pages.
Click [Save] or [Forward].
The scanned data is saved to a folder on a computer or forwarded to an application.
Specifying External Applications to Forward Scanned Data
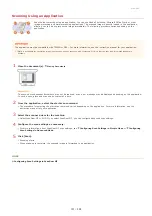
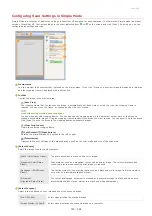
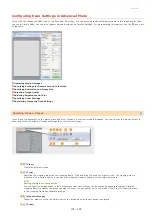
Select the scan type.
Click the [Mail], [Save], or [PDF] icon.
Select [PDF (Add Page)] for [Save as Type].
5
1
2
㻝㻞㻠㻌㻛㻌㻟㻟㻢
Summary of Contents for imageCLASS MF211
Page 1: ...㻝㻌㻛㻌㻟㻟㻢 ...
Page 29: ...LINKS Using the Operation Panel 㻞㻥㻌㻛㻌㻟㻟㻢 ...
Page 48: ...LINKS Loading Paper in the Paper Drawer Loading Paper in the Manual Feed Slot 㻠㻤㻌㻛㻌㻟㻟㻢 ...
Page 50: ...Exiting Quiet Mode Press to exit quiet mode 㻡㻜㻌㻛㻌㻟㻟㻢 ...
Page 77: ...LINKS Printing a Document 㻣㻣㻌㻛㻌㻟㻟㻢 ...
Page 84: ...Printing a Document Printing Borders Printing Dates and Page Numbers 㻤㻠㻌㻛㻌㻟㻟㻢 ...
Page 171: ...Configuring DNS 㻝㻣㻝㻌㻛㻌㻟㻟㻢 ...
Page 178: ...LINKS Setting Up Print Server 㻝㻣㻤㻌㻛㻌㻟㻟㻢 ...
Page 184: ...Setting a Wait Time for Connecting to a Network 㻝㻤㻠㻌㻛㻌㻟㻟㻢 ...
Page 190: ...LINKS Setting IPv4 Address Setting IPv6 Addresses Viewing Network Settings 㻝㻥㻜㻌㻛㻌㻟㻟㻢 ...
Page 211: ...㻞㻝㻝㻌㻛㻌㻟㻟㻢 ...
Page 296: ...For more information Printing a Document 㻞㻥㻢㻌㻛㻌㻟㻟㻢 ...
Page 300: ...For more information about this function see Printing Posters 㻟㻜㻜㻌㻛㻌㻟㻟㻢 ...
Page 318: ...Click Back Exit 6 㻟㻝㻤㻌㻛㻌㻟㻟㻢 ...
Page 330: ...Make sure that the correct port is selected for the printer 㻟㻟㻜㻌㻛㻌㻟㻟㻢 ...
Page 337: ...㻝㻌㻛㻌㻠㻣 ...
Page 367: ...㻟㻝㻌㻛㻌㻠㻣 ...
Page 371: ...The uninstaller starts Click Uninstall Click OK 4 5 㻟㻡㻌㻛㻌㻠㻣 ...


