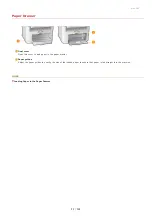
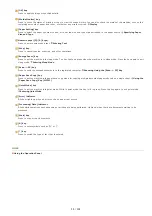
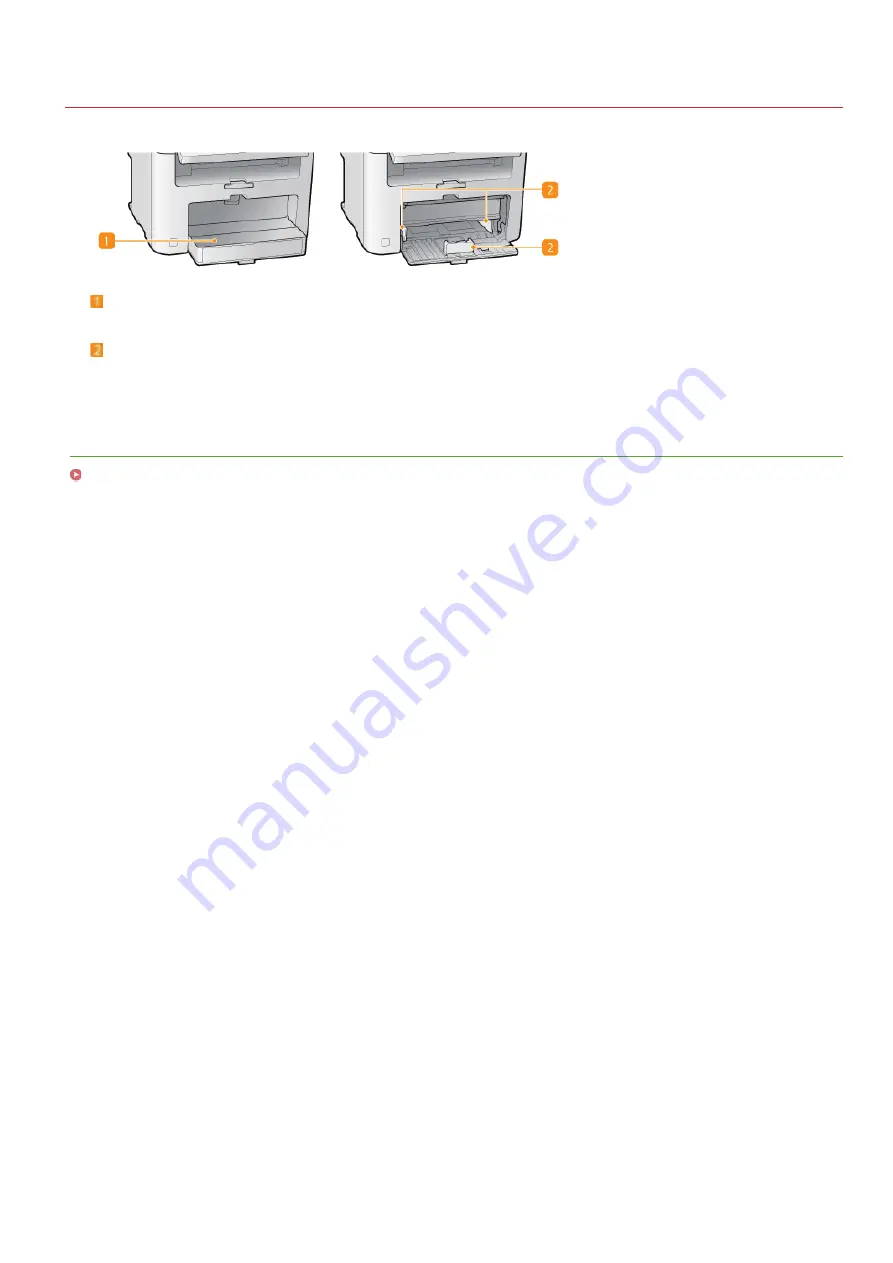
background image

0L40-00E

Paper Drawer

Dust cover

Open this cover to load paper in the paper drawer.

Paper guides

Adjust the paper guides to exactly the size of the loaded paper to ensure that paper is fed straight into the machine.

LINKS

Loading Paper in the Paper Drawer

㻞㻞㻌㻛㻌㻟㻟㻢

Summary of Contents for imageCLASS MF211

Page 1: ...㻝㻌㻛㻌㻟㻟㻢 ...

Page 2: ... Registering a Custom Paper Size 47 Entering Quiet Mode 49 Entering Sleep Mode 51 Setting Auto Shutdown Time 52 Copying 53 Basic Copy Operations 54 Canceling Copies 56 Various Copy Settings 58 Enlarging or Reducing 59 Selecting Document Type 60 Adjusting Density 61 Adjusting Sharpness 62 Copying Multiple Documents onto One Sheet 2 on 1 4 on 1 63 Using the Paper Save Copy Key MF211 64 Copying Both ...

Page 3: ...F Toolbox 121 Configuring Scan Settings in MF Toolbox 127 Scanning Using an Application 131 Configuring Scan Settings in ScanGear MF 132 Configuring Scan Settings in Simple Mode 133 Configuring Scan Settings in Advanced Mode 135 Network MF212w 145 Connecting to a Network 146 Selecting Wired LAN or Wireless LAN 148 Connecting to a Wired LAN 149 Connecting to a Wireless LAN 150 Setting Up Connection...

Page 4: ...ng Documents and Checking the Machine Status 214 Setting Up Menu Options from Remote UI 217 Setting Menu List 219 Network Settings MF212w 220 Output Report 227 Preferences 228 Timer Settings 231 Copy Settings 235 Scan Settings 236 Printer Settings 237 Adjustment Maintenance 239 System Management Settings 244 Initialize Menu 250 Troubleshooting 251 Clearing Jams 252 When an Error Message Appears 25...

Page 5: ...mproving Efficiency 295 Going Digital 297 So Much More 299 Specifications 301 Machine Specifications 302 Wireless LAN Specifications MF212w 303 Document Type 304 Scan Area 305 Paper 306 Copy Specifications 308 Scanner Specifications 309 Printer Specifications 310 Consumables 311 Manuals Included with the Machine 312 Using e Manual 313 Installing e Manual 314 Uninstalling e Manual 317 Screen Layout...

Page 6: ... others Before using this machine read this chapter and follow the instructions to properly use this machine Do not perform any operations not described in this manual Canon will not be responsible for any damages resulting from use not described in this manual improper use or repair changes not performed by Canon or a third party authorized by Canon 㻢㻌㻛㻌㻟㻟㻢 ...

Page 7: ...ce cables may be damaged resulting in a fire or electrical shock Do not use near any medical equipment Radiowaves emitted from this machine may interfere with medical equipment which may cause a malfunction and result in serious accidents If any foreign substance falls into this machine unplug the power plug from the AC power outlet and contact your local authorized Canon dealer Do not install in ...

Page 8: ...apidly and when the machine is moved from a cool or dry location to a hot or humid location Using the machine under these conditions may result in paper jams poor print quality or damage to the machine Let the machine adjust to the ambient temperature and humidity for at least 2 hours before use When using wireless LAN MF212w Set the machine at a distance of 50 m or less from the wireless LAN rout...

Page 9: ...so may result in a fire or electrical shock Do not wrap the power cord or tie it in a knot as this may result in a fire or electrical shock Insert the power plug completely into the AC power outlet Failure to do so may result in a fire or electrical shock Remove the power plug completely from the AC power outlet during a thunder storm Failure to do so may result in a fire electrical shock or damag...

Page 10: ... fall resulting in injury For your safety please unplug the power cord if the machine will not be used for a long period of time Use caution when opening and closing covers to avoid injury to your hands Keep hands and clothing away from the rollers in the output area If the rollers catch your hands or clothing this may result in personal injury The inside of the machine and the output slot are ver...

Page 11: ...ecautions Follow the instructions in the caution label attached to this machine Avoid shaking or applying shock to this machine Do not forcibly open and close doors covers and other parts Doing so may result in damage to the machine Do not touch the contacts Doing so may result in damage to the machine Do not turn OFF the machine during printing Also do not open and close the cover and do not remo...

Page 12: ...hinners or other flammable substances Do not use tissue paper or paper towels If these substances come into contact with electrical parts inside the machine they may generate static electricity or result in a fire or electrical shock Check the power cord and plug periodically for damage Check the machine for rust dents scratches cracks or excessive heat generation Use of poorly maintained equipmen...

Page 13: ... immediately Use caution so that toner does not get into your eyes or mouth If toner should get into your eyes or mouth immediately wash with cold water and consult a physician Use caution so that toner does not come into contact with your skin If it should wash with soap and cold water If there is any irritation on your skin consult a physician immediately Keep the toner cartridges and other cons...

Page 14: ...e salty air Locations where there are corrosive gases i e aerosol sprays and ammonia Locations subject to high temperature and high humidity Locations subject to dramatic changes in temperature and humidity where condensation may easily occur Locations with a large amount of dust Locations within the reach of children Be careful of counterfeit toner cartridges Please be aware that there are counte...

Page 15: ...e operation panel and how to view the display Parts and Their Functions Using the Operation Panel This section describes how to toggle the display and select items Using the Operation Panel Placing Documents This section describes how to place documents on the platen glass Placing Documents Loading Paper This section describes how to load the paper into the paper drawer and manual feed slot Loadin...

Page 16: ...This section describes how to set the sleep mode Entering Sleep Mode Setting Auto Shutdown Time This section describes how to enable the Auto Shutdown Time setting Setting Auto Shutdown Time 㻝㻢㻌㻛㻌㻟㻟㻢 ...

Page 17: ... to describing the parts of the machine used for such basic operations as placing documents loading paper and replacing the toner cartridges this section also describes the keys on the operation panel and display Read this section for tips on how to use the machine properly Front Side Back Side Interior Manual Feed Slot Paper Drawer Operation Panel 㻝㻣㻌㻛㻌㻟㻟㻢 ...

Page 18: ... lift handles when carrying the machine Relocating the Machine Power switch Turns the power ON or OFF To restart the machine turn OFF the machine wait for at least 10 seconds and turn it back ON Paper stopper Prevents paper that has been output after printing from falling Manual feed slot Load the paper into the manual feed slot when you want to temporarily use a type of paper different from that ...

Page 19: ...ecting the machine and a computer For connection steps see Getting Started Manuals Included with the Machine LAN port MF212w Connect a LAN cable when connecting the machine to a wired LAN router etc For connection steps see Getting Started Manuals Included with the Machine Power socket Connect the power cord For connection steps see Getting Started Manuals Included with the Machine 㻝㻥㻌㻛㻌㻟㻟㻢 ...

Page 20: ...per jams How to Replace Toner Cartridges Clearing Jams Toner cover Open this cover to replace the toner cartridges or clear paper jams How to Replace Toner Cartridges Clearing Jams Paper exit guide Open this guide to clear paper jams Clearing Jams LINKS How to Replace Toner Cartridges 㻞㻜㻌㻛㻌㻟㻟㻢 ...

Page 21: ...ver Open this slot to load paper in the manual feed slot Paper guides Adjust the paper guides to exactly the width of the loaded paper to ensure that paper is fed straight into the machine LINKS Loading Paper in the Manual Feed Slot 㻞㻝㻌㻛㻌㻟㻟㻢 ...

Page 22: ...er Open this cover to load paper in the paper drawer Paper guides Adjust the paper guides to exactly the size of the loaded paper to ensure that paper is fed straight into the machine LINKS Loading Paper in the Paper Drawer 㻞㻞㻌㻛㻌㻟㻟㻢 ...

Page 23: ...ther functions as well as the status of the machine and error information Also view the screen when specifying the settings of the machine Reset key Press to cancel the settings and restore the previously specified settings key When specifying settings press to return to the previous screen When entering text press to move the cursor to the left Press to decrease a setting value such as density fo...

Page 24: ...ng Paper Size and Type Numeric keys 0 9 keys Press to enter numbers and text Entering Text Stop key Press to cancel copying scanning and other operations Energy Saver key Press to put the machine into sleep mode The key lights up green when the machine is in sleep mode Press the key again to exit sleep mode Entering Sleep Mode Scan PC1 Scan PC2 keys Press to send the scanned documents to the regis...

Page 25: ...tings press to return to the previous screen When entering text press to move the cursor to the left Press to decrease a setting value such as density for scanning copying etc key When specifying settings press to select the item above the currently selected item When changing setting values press to increase a value key When specifying settings press to proceed to the next screen When entering te...

Page 26: ...key again to exit sleep mode Entering Sleep Mode Scan PC key Press to send the scanned documents to the registered computer Scanning Using the Scan PC Key Paper Save Copy key Press to put the machine into paper save copy mode for copying multiple document pages reduced on a single sheet Using the Paper Save Copy Key MF211 Quiet Mode key Press to put the machine into quiet mode While in quiet mode ...

Page 27: ...settings when you load a paper size that is different from the previously loaded paper size Note that the paper setting must be correctly specified so that the paper is fed properly Selecting Paper Tray Use to select the paper for each tray Specifying Paper Size and Type Select Frequently Used Paper Sizes You can set the machine to display only frequently used paper sizes in the selection screen M...

Page 28: ...tatus of the selected item The Copy Job Status screen is shown below as an example Network Information MF212w Displays the network settings such as the IP address of the machine and status such as the condition of wireless LAN communications Viewing Network Settings When a Message Is Displayed Messages are displayed at the top of the screen in situations such as when toner level is low or when a c...

Page 29: ...LINKS Using the Operation Panel 㻞㻥㻌㻛㻌㻟㻟㻢 ...

Page 30: ...se when entering numbers You can also enter the value directly using the numeric keys when the numeric key icon is displayed in the top left corner of the screen as shown below Entering Text The numbers in parentheses beneath the value input field indicate the range of possible values Using Proceeding to next screen Returning to previous screen Press to proceed to the next screen Press to return t...

Page 31: ...t and numbers Entering Text You can change a variety of display related settings such as the scrolling speed or display language Display Settings To change the screen that is automatically displayed when the machine remains idle for a specified length of time Function After Auto Reset 㻟㻝㻌㻛㻌㻟㻟㻢 ...

Page 32: ... type of text is indicated by the aA or 12 of Entry Mode You can also select Entry Mode and press to switch the type of text Types of Text That Can Be Entered The text that can be entered using the numeric keys and are listed below Key aA 12 _ 1 ABCabc 2 DEFdef 3 GHIghi 4 JKLjkl 5 MNOmno 6 PQRSpqrs 7 TUVtuv 8 WXYZwxyz 9 Not available 0 space _ Not available 㻟㻞㻌㻛㻌㻟㻟㻢 ...

Page 33: ...ter a space move the cursor to the end of the text and press Example of Entering Text and Numbers Example Canon 1 1 Press repeatedly until aA is selected 2 Press repeatedly until the letter C is selected 3 Press repeatedly until the letter a is selected 4 Press repeatedly until the letter n is selected 5 Press repeatedly until the letter o is selected 6 Press repeatedly until the letter n is selec...

Page 34: ...re that any glue ink or correction fluid on the documents has completely dried Open the platen glass cover Place the document face down on the platen glass Align the corner of the document with the top left corner of the platen glass To scan transparent documents for example tracing paper or transparencies cover them with plain white paper Gently close the platen glass cover The machine is ready t...

Page 35: ...achine Plain paper 60 to 90 g m Plain 60 90 g m Plain L 60 90 g m Recycled paper 60 to 90 g m Recycled Color paper 60 to 90 g m Color Heavy paper 90 to 120 g m Heavy 1 90 120 g m 120 to 163 g m Heavy 2 120 163 g m Bond paper 60 to 90 g m Bond 1 60 90 g m 90 to 120 g m Bond 2 90 120 g m 120 to 163 g m Bond 3 120 163 g m Envelope Envelope Transparency Transparency Label Labels If set to Plain and th...

Page 36: ...may emit from the paper output area or water droplets may form on the back side of the operation panel or around the paper output area There is nothing unusual about any of these occurrences which occur when the heat generated from fixing toner on the paper causes moisture in the paper to evaporate most likely to occur at low room temperatures LINKS Registering a Custom Paper Size 㻟㻢㻌㻛㻌㻟㻟㻢 ...

Page 37: ...ientation Paper cannot be loaded in landscape orientation Make sure to load the paper in portrait orientation Lift the dust cover Slide the paper guides apart Size abbreviations on the paper guides The abbreviations on the paper guides in the paper drawer indicate paper sizes as follows LGL Legal LTR Letter STMT Statement EXEC Executive Insert the paper into the paper drawer until the paper stops ...

Page 38: ...se or too tight can cause misfeeds or paper jams Lower the dust cover When Legal size paper is loaded The paper guides at the rear edge of the paper will be extended Open the dust cover extension then lower the dust cover Pull out the paper stopper to open Continue to Specifying Paper Size and Type When changing the paper size or type The factory default settings for paper size and type are A4 and...

Page 39: ...r in the Manual Feed Slot with the side to print face up previously printed side face down Load one sheet at a time per each print You can use only the paper printed with this machine You cannot print on the side that has previously been printed on If you are using A5 paper the reverse side may not be printed correctly LINKS Paper 㻟㻥㻌㻛㻌㻟㻟㻢 ...

Page 40: ...ait orientation Open the manual feed cover Spread the paper guides apart Slide the paper guides outward Insert the paper into the manual feed slot until the paper stops Load the paper in portrait orientation with the short edge toward the machine with the print side face up Paper cannot be loaded in landscape orientation When loading envelopes or paper with a logo see Loading Envelopes or Loading ...

Page 41: ...r guides securely against the edges of the paper Paper guides that are too loose or too tight can cause misfeeds or paper jams Pull out the paper stopper to open Continue to Specifying Paper Size and Type 5 㻠㻝㻌㻛㻌㻟㻟㻢 ...

Page 42: ...velopes in the paper drawer or manual feed slot see Loading Paper in the Paper Drawer or Loading Paper in the Manual Feed Slot Follow the procedure below to prepare the envelopes before loading Only one envelope at a time can be loaded in the manual feed slot Follow steps 1 to 4 in the procedure below to prepare the envelope for loading Close the flap of each envelope Flatten them to release any r...

Page 43: ...ntation short edge first with the non glued side front side face up Load envelopes in the same orientation for both the paper drawer and manual feed slot Load the envelopes so that their flaps are at the left Loaded Orientation 㻠㻟㻌㻛㻌㻟㻟㻢 ...

Page 44: ...printed paper with the proper facing and orientation For a description of the general procedure for loading paper in the paper drawer or manual feed slot see Loading Paper in the Paper Drawer or Loading Paper in the Manual Feed Slot Load the paper with the logo side the side to print the document face up Load only one sheet of paper in the manual feed slot each time you print Printing on Paper wit...

Page 45: ...inting error may occur Press Paper Setting Use to select MP Tray or Drawer 1 and press Select the loaded paper size and press If the loaded paper size is not displayed use to select Other Sizes and press Select the loaded paper type and press When a frequently used paper size is known You can set the machine to display only frequently used paper sizes in the selection screen 1 Press Paper Setting ...

Page 46: ...lect a frequently used paper size and press to checkmark it Uncheckmarked paper sizes are displayed in the Other Sizes screen 5 Select Apply and press LINKS Loading Paper in the Paper Drawer Paper 㻠㻢㻌㻛㻌㻟㻟㻢 ...

Page 47: ...t Custom and press Specify the paper size 1 Specify the length of the X shorter side Select X and press Input the length of the X side using with to move the cursor between the digits for inputting whole numbers and fractions and press 2 Specify the length of the Y longer side Select Y and press Input the length of the Y side and press 3 Select Apply and press Select the paper type and press 1 2 3...

Page 48: ...LINKS Loading Paper in the Paper Drawer Loading Paper in the Manual Feed Slot 㻠㻤㻌㻛㻌㻟㻟㻢 ...

Page 49: ... of functions becomes slower When the machine cannot enter quiet mode The machine is in Special Mode A particular paper size or paper type is specified Specifying a time for the machine to enter quiet mode You can specify a time for the machine to enter or exit quiet mode automatically For example this is useful when wanting to reduce operation noise only for late night operation Timer Settings Qu...

Page 50: ...Exiting Quiet Mode Press to exit quiet mode 㻡㻜㻌㻛㻌㻟㻟㻢 ...

Page 51: ...ine is performing an operation such as adjustment or cleaning When a paper jam occurs When the menu screen is displayed When an error message is displayed on the screen There are some exceptions The machine sometimes enters sleep mode when error messages are displayed When You Want to Set the Auto Sleep Timer The factory default settings for the amount of time that elapses before the machine enter...

Page 52: ...hine may automatically shut down even if you are operating the machine from the Remote UI or from the Send Function Setting Tool A malfunction may occur particularly if the machine shuts down while data is being imported When you import data using the Remote UI or use the Send Function Setting Tool set Auto Shutdown Time to 0 Off in advance NOTE The default setting is 4 hours MF212w users If any s...

Page 53: ...erations Canceling Copies Using Copy Settings to Suit Your Needs Enlarging or Reducing Collating Copies by Page Selecting Document Type Adjusting Density Adjusting Sharpness Copying Multiple Documents onto One Sheet 2 on 1 4 on 1 Copying Both Sides of an ID Card onto One Page Using the Paper Save Copy Key MF211 Simplifying Your Frequent Copy Operations Changing Default Settings 㻡㻟㻌㻛㻌㻟㻟㻢 ...

Page 54: ...y Use to select the settings Various Copy Settings Press Copying starts If you want to cancel copying press Yes Canceling Copies When copying several pages onto a single sheet or when collating When N on 1 is any setting other than Off or Collate is set to On copy after first scanning all of the document 1 Place the next document on the platen glass and press Repeat this step until you finish scan...

Page 55: ...rs When copying documents with text or images that extend to the edges of the page The edges of the document might not be copied For more information about the scan margins see Scan Area If you always want to make copies with the same settings Changing Default Settings 㻡㻡㻌㻛㻌㻟㻟㻢 ...

Page 56: ... copying after checking the copy status Canceling in the Screen That is Displayed While Copying Cancel Yes Press to Cancel Yes If the Screen Displays a List of Documents When is Pressed Documents have been scanned and are waiting to be printed Select the copy document to cancel Select cancel job Yes Use to Cancel Copy Job Status Cancel Yes 㻡㻢㻌㻛㻌㻟㻟㻢 ...

Page 57: ...ying Copy details The number of copies settings and other details are displayed If you only want to check the details without canceling copying press to return to the copy main screen LINKS Basic Copy Operations 㻡㻣㻌㻛㻌㻟㻟㻢 ...

Page 58: ... to save paper or make your documents easier to read Enlarging or Reducing Selecting Document Type Adjusting Density Adjusting Sharpness Copying Multiple Documents onto One Sheet 2 on 1 4 on 1 Copying Both Sides of an ID Card onto One Page Collating Copies by Page Using the Paper Save Copy Key MF211 㻡㻤㻌㻛㻌㻟㻟㻢 ...

Page 59: ...5 A4 or by setting a custom copy ratio in increments of 1 COPY SCAN Copy Ratio Select the copy ratio Custom Ratio Use or the numeric keys to enter the copy ratio and press You can set any copy ratio from 25 to 400 in 1 increments Preset copy ratio Select a copy ratio LINKS Basic Copy Operations 㻡㻥㻌㻛㻌㻟㻟㻢 ...

Page 60: ...hat only contain text Text Photo High Speed Suitable when copying documents that contain both text and photos Priority is given to speed over image quality Text Photo Suitable when copying documents that contain both text and photos Photo Suitable when copying documents that contain printed photos such as magazines or pamphlets If Text Photo High Speed Text Photo or Photo is selected and Density i...

Page 61: ...automatically set an optimal density for a document COPY SCAN Density Adjust the density Auto Density An optimal density for the document is automatically set Original Type is automatically set to Text Selecting Document Type Manual Density Use to adjust the density LINKS Basic Copy Operations Adjusting Sharpness Correct Density 㻢㻝㻌㻛㻌㻟㻟㻢 ...

Page 62: ... improve the appearance of magazine photos COPY SCAN Sharpness Adjust the sharpness Press Decreases the sharpness resulting in a softer image Example If you want to improve the appearance of magazine photos Press Increases the image sharpness Example If you want to sharpen text and lines written in pencil LINKS Basic Copy Operations Adjusting Density 㻢㻞㻌㻛㻌㻟㻟㻢 ...

Page 63: ...ressing but the edges of the document might not be copied if you increase it 2 on 1 4 on 1 is not available when using ID Card Copy When you copy multiple documents onto one page margins may be created in the copied image COPY SCAN N on 1 Select 2 on 1 or 4 on 1 Select the document size on the Scan Size screen 2 on 1 4 on 1 Select 2 on 1 to copy two pages of documents onto a single sheet or select...

Page 64: ...pressing but the edges of the document might not be copied if you increase it Paper Save Copy is not available when using 2 on 1 4 on 1 or ID Card Copy When you copy multiple documents onto one page margins may be created in the copied image Select the paper save copy setting Select the document size on the Scan Size screen Paper save copy settings Select one of four setting combinations Original ...

Page 65: ...driver s license or ID card ID Card Copy is available with A4 Letter size paper or larger Copy Ratio is automatically set to 100 When 2 on 1 4 on 1 is set pressing ID Card Copy will not place the machine in ID Card Copy mode In this instance set N on 1 to Off or change it to ID Card Copy Place the card ID Card Copy Turn the card over How to place the card LINKS Basic Copy Operations 㻢㻡㻌㻛㻌㻟㻟㻢 ...

Page 66: ...pies are grouped by page and not collated For example if you are making three copies of a five page document the printouts will be arranged in the following page order 1 1 1 2 2 2 3 3 3 4 4 4 5 5 5 On The copies are grouped into complete sets in sequential page order For example if you are making three copies of a five page document the printouts will be arranged in the following page order 1 2 3 ...

Page 67: ...match the operations that you perform frequently you can eliminate the need to configure the same settings every time you make copies Copy Settings Change Default Settings Select the setting Change the default value of the selected item Apply Settings Select the item you want to set and change the default value LINKS Basic Copy Operations Various Copy Settings Copy Settings 㻢㻣㻌㻛㻌㻟㻟㻢 ...

Page 68: ...our smartphone or tablet from an iPhone iPad or Android terminal Using AirPrint You can print without using a printer driver by sending print data wirelessly from Apple devices Using AirPrint MF212w Printing with the Canon Mobile Application You can print from the machine using a smartphone or tablet For more information on this function see the Canon website This machine also supports Mopria With...

Page 69: ...mputer For more information see MF Driver Installation Guide About the Printer Driver Help Clicking Help on the printer driver screen displays the Help screen On this screen you can see the detailed descriptions that are not in the e Manual If you are a Macintosh user see MF Driver Installation Guide for installing the printer drivers and Printer Driver s Help for using print functions For Mac OS ...

Page 70: ...rientation and click OK Tabs Click each tab to display the print setting screens and specify the print settings as necessary Various Print Settings Copies Specify the number of copies Orientation Specify the print orientation Portrait or Landscape The orientation setting for the document that is specified on the application is usually reflected on the printer driver You can register the settings y...

Page 71: ...the procedure below Windows 8 Server 2012 Display the charms at the right of the screen and tap or click Devices the printer you are using Print When you print in this way you can only specify settings for some of the print functions Windows 8 1 Server 2012 R2 Display the charms at the right of the screen and tap or click Devices Print the printer you are using Print When you print in this way you...

Page 72: ...rinter icon and click See what s printing or double click the icon of the printer driver for the machine Select the document you want to cancel and click Document Cancel Click Yes Printing of the selected document is canceled Several pages may be output after you cancel printing Canceling from the Remote UI MF212w You can cancel printing from the Job Status page on the Remote UI Checking Current S...

Page 73: ... Pressed Select the document to cancel Select cancel job Yes Use to Cancel Print Job Status Select the document on the Print Job Status screen Cancel Yes Several pages may be output after you cancel printing LINKS Printing a Document Checking the Printing Status From the Operation Panel 㻣㻟㻌㻛㻌㻟㻟㻢 ...

Page 74: ...find your printouts that you thought had been printed you may want to see whether an error has occurred Press Use to select Print Job Status and press Select the document whose status you want to check and press Print Job Status Displays a list of the documents that are being processed or are waiting to be processed Details Displays detailed information about the document selected from the list LI...

Page 75: ...uch as Enlarged Reduced Enlarging or Reducing Collating Printouts by Page Printing Multiple Pages onto One Sheet Printing Posters Printing Borders Printing Dates and Page Numbers Printing Watermarks Selecting Document Type Saving Toner Combining and Printing Multiple Documents 㻣㻡㻌㻛㻌㻟㻟㻢 ...

Page 76: ...fied Basic Settings tab Select the document size in Page Size Select the paper size in Output Size OK Specifying Print Ratio in Increments of 1 Basic Settings tab Select the Manual Scaling check box Enter the print ratio in Scaling OK Depending on the selected paper size you may not be able to set the optimum enlarging reducing ratio For example there may be large blank spaces on your printout or ...

Page 77: ...LINKS Printing a Document 㻣㻣㻌㻛㻌㻟㻟㻢 ...

Page 78: ...s Collate The printouts are grouped into complete sets in sequential page order For example if you are printing three copies of a five page document the printouts will be arranged in the following page order 1 2 3 4 5 1 2 3 4 5 1 2 3 4 5 Group The printouts are not collated For example if you are printing three copies of a five page document the printouts will be arranged in the following page ord...

Page 79: ...t the page distribution layout OK Page Layout Select the number of pages to print onto a single sheet from 1 on 1 to 16 on 1 For example to print 16 pages onto a single sheet select 16 on 1 For options such as Poster 2 x 2 see Printing Posters Printing may not be performed properly if you combine this setting with an application setting for collating printouts Page Order Select a page distribution...

Page 80: ...ument and paste it together Basic Settings tab In Page Layout select the dimensions of your poster for example Poster 2 x 2 OK There are four size settings Poster 1 x 2 Poster 2 x 2 Poster 3 x 3 and Poster 4 x 4 Select the Print Border check box to add borders on your printouts The borders are helpful if you want to paste the printouts together or cut off the margins LINKS Printing a Document Enla...

Page 81: ...e lines in the margins of printouts Page Setup tab Click Page Options Select the border type in Edging OK OK Edging Select the border type Preview Displays a preview with the selected border LINKS Printing a Document Printing Dates and Page Numbers Printing Watermarks 㻤㻝㻌㻛㻌㻟㻟㻢 ...

Page 82: ... position to print the print date Print User Name Specify the position to print the user name logon name for the computer used to print the document Print Page Number Specify the position to print the page number Changing the Print Format of Dates and Page Numbers You can change formatting details such as font and font size when printing dates logon names or page numbers Click Format Settings on t...

Page 83: ... Watermark check box to display the list of the watermarks in the Watermark Name drop down list Select a watermark from the menu Edit Watermark Displays the screen to create or edit watermarks LINKS Add Click to create a new watermark Up to 50 watermarks can be registered Name Enter the created watermark name Attributes Alignment Print Style Click each tab to specify the text color or print positi...

Page 84: ...Printing a Document Printing Borders Printing Dates and Page Numbers 㻤㻠㻌㻛㻌㻟㻟㻢 ...

Page 85: ...oto images in optimal print quality General A versatile option that is suitable when printing most documents Publications Suitable when printing documents that have a mix of photo images charts and graphs Graphics Suitable when printing documents that have charts or graphs Photos Suitable when printing photo images Designs CAD Suitable when printing design drawings that have many fine lines High D...

Page 86: ...g Document Type Select the document type for which you want to enable the toner save setting Advanced Settings A screen with settings is displayed Click Toner Save and select On from the drop down list on the bottom of the screen You can specify whether to enable the toner save setting for each document type Specify the toner save setting for each document type listed in Objective In the Advanced ...

Page 87: ... size Open a document in an application and display the print dialog box How to display the print dialog box differs for each application For more information see the instruction manual for the application you are using Select the printer driver for the machine and click Preferences or Properties Select Edit and Preview in Output Method Click OK on the Information pop up screen Click OK at the bot...

Page 88: ...elected in step 6 are combined Print Preview Displays a preview of the document to be printed Document List Print Settings Click the Document List tab to display the documents added in steps 1 to 4 You can remove documents by selecting them in the list and clicking Delete from List Click the Print Settings tab to display the screen for specifying print settings such as the number of copies The set...

Page 89: ...ewer settings available than when using the ordinary printing method On the Document Name list select the combined document print job you want to print and click Printing starts For instructions on how to cancel printing see Canceling Prints LINKS Printing a Document 8 㻤㻥㻌㻛㻌㻟㻟㻢 ...

Page 90: ...ayed automatically in the printer driver screen and you can skip the operations to specify them and proceed to printing immediately Set TOP SECRET as a watermark and register it in profiles You can then select this watermark from profiles whenever you need it Registering Combinations of Frequently Used Print Settings Set 2 on 1 as a default setting in the printer driver From the next print job eve...

Page 91: ...ttings that you want to register as a profile and click Add Make print settings as required on the Basic Settings Page Setup Finishing and Quality tabs Various Print Settings Enter a profile name in Name select an icon and then click OK As necessary enter comments about the profile in Comment Click View Settings to see the settings that will be registered Editing a profile By clicking Edit on the ...

Page 92: ...f the currently selected profile You can change the settings of the currently selected profile In addition the changed settings can be registered as another profile LINKS Printing a Document Changing Default Settings 㻥㻞㻌㻛㻌㻟㻟㻢 ...

Page 93: ...r screen the setting will always be 2 on 1 eliminating the need to change this setting every time you make prints To perform the following procedure log on to your computer with an administrator account Open the printer folder Displaying the Printer Folder Right click the icon of the machine and then click Printing preferences Change the settings on the printing preferences screen and click OK Mak...

Page 94: ...ity functionality in AirPrint set a key pair and a digital certificate before using TLS Encrypting Communication of Print Data for Apple Devices with TLS Configuring Settings for Key Pairs and Digital Certificates Make sure that the machine is turned ON and is connected to the LAN For information on how to make sure see Getting Started Manuals Included with the Machine From the application on your...

Page 95: ...onnected to the LAN For information on how to make sure see Getting Started Manuals Included with the Machine Open a document in an application and display the print dialog box How to display the print dialog box differs for each application For more information see the instruction manual for the application you are using Select this machine in the print dialog box The printers connected to your M...

Page 96: ... identifying the machine You can also disable the AirPrint function of the machine Use the Remote UI to change these settings Start the Remote UI and log on in System Manager Mode Starting Remote UI Depending on your Web browser the procedure to start the Remote UI may be different See the instruction manuals for the Web browser you are using Click Settings Registration If you are using a mobile d...

Page 97: ...nter Name and Location are reflected in the following settings respectively Printer Name can also be set in mDNS Name IPv4 Settings Location can also be set in Location Device Information Settings You cannot print using AirPrint Make sure that the machine is turned ON If the machine is turned ON restart the machine and see if the problem is solved Make sure that the paper is loaded in the machine ...

Page 98: ...g on to the Remote UI in System Manager Mode To check the machine status or supplies you can also log on in End User Mode Trademarks Apple Bonjour iPad iPhone iPod touch Macintosh Mac OS and OS X are trademarks of Apple Inc registered in the U S and other countries AirPrint and the AirPrint logo are trademarks of Apple Inc 1 2 3 4 㻥㻤㻌㻛㻌㻟㻟㻢 ...

Page 99: ...e and an Apple device with Transport Layer Security TLS TLS allows data to be encrypted and sent or received over the network To use TLS you need to specify a key pair and enable the TLS function Generate or install the key pair for TLS before enabling TLS Configuring Settings for Key Pairs and Digital Certificates Start the Remote UI and log on in System Manager Mode Starting Remote UI Click Sett...

Page 100: ...ote UI 1 Click Network Settings AirPrint Security Settings 2 Click Edit 3 Select the Use TLS check box set required items and then click OK Use Authentication When using AirPrint you can use authentication To use authentication select the check box and then specify a User Name Set Change Password Specify a password to use for authentication To specify a password select the check box and then speci...

Page 101: ...LINKS Using AirPrint MF212w Generating Key Pairs Using CA issued Key Pairs and Digital Certificates 㻝㻜㻝㻌㻛㻌㻟㻟㻢 ...

Page 102: ...ate contains a digital signature which enables the machine to detect any spoofing or tampering of data It is extremely difficult for third parties to abuse digital certificates A digital certificate that contains a public key of a certification authority CA is referred to as a CA certificate CA certificates are used for verifying the device the machine is communicating with for features such as pr...

Page 103: ...ificate Signing Request CSR Start the Remote UI and log on in System Manager Mode Starting Remote UI Click Settings Registration Click Security Settings Key and Certificate Settings Click Generate Key Deleting a registered key pair Click Delete on the right of the key pair you want to delete click OK TLS is displayed for a currently used key pair and the key pair cannot be deleted In this case dis...

Page 104: ...End Date YYYY MM DD Enter the date to which the certificate is valid between 01 01 2000 and 12 31 2099 A date earlier than Validity Start Date YYYY MM DD cannot be set Country Region Click the Select Country Region radio button and select the country region from the drop down list You can also click the Enter Internet Country Code radio button and enter a country code such as US for the United Sta...

Page 105: ...registered key pair Click Delete on the right of the key pair you want to delete click OK TLS is displayed for a currently used key pair and the key pair cannot be deleted In this case disable the function or replace the key pair before deleting it Select Generate Key and Certificate Signing Request CSR and click OK Generate Key and Certificate Signing Request CSR 1 2 3 4 5 㻝㻜㻡㻌㻛㻌㻟㻟㻢 ...

Page 106: ...ning Request CSR Settings Country Region Click the Select Country Region radio button and select the country region from the drop down list You can also click the Enter Internet Country Code radio button and enter a country code such as US for the United States State City Enter up to 24 alphanumeric characters for the location as necessary Organization Organization Unit Enter up to 24 alphanumeric...

Page 107: ...ify the file for the certificate signing request and click Register LINKS Using CA issued Key Pairs and Digital Certificates Verifying Key Pairs and Digital Certificates Encrypting Communication of Print Data for Apple Devices with TLS 9 10 㻝㻜㻣㻌㻛㻌㻟㻟㻢 ...

Page 108: ...ystem Manager Mode Starting Remote UI Click Settings Registration Click Security Settings Key and Certificate Settings for key pairs or CA Certificate Settings for CA certificates Click Register Key and Certificate or Register CA Certificate Deleting a registered key pair or CA certificate Click Delete on the right of the key pair or CA certificate you want to delete click OK You cannot delete the...

Page 109: ...air or CA certificate is installed in the machine Register the key pair or CA certificate Registering a key pair 1 Click Register on the right of the key pair you want to register 2 Enter the name of the key pair and password and then click OK Key Name Enter up to 24 alphanumeric characters for the name of the key pair to be registered Password Enter up to 24 alphanumeric characters for the passwo...

Page 110: ...LINKS Generating Key Pairs Verifying Key Pairs and Digital Certificates Encrypting Communication of Print Data for Apple Devices with TLS 㻝㻝㻜㻌㻛㻌㻟㻟㻢 ...

Page 111: ... Start the Remote UI and log on in System Manager Mode Starting Remote UI Click Settings Registration Click Security Settings Key and Certificate Settings for key pairs or CA Certificate Settings for CA certificates Click the icon for the key pair or certificate that you want to verify Certificate details can be viewed on this screen Click Certificate Verification 1 2 3 4 5 㻝㻝㻝㻌㻛㻌㻟㻟㻢 ...

Page 112: ...The result from verifying the certificate is displayed as shown below LINKS Generating Key Pairs Using CA issued Key Pairs and Digital Certificates 㻝㻝㻞㻌㻛㻌㻟㻟㻢 ...

Page 113: ...installing the software and Canon Scanner Driver Guide for using scan functions For Mac OS Users Depending on the operating system and the version of the scanner driver or applications you are using the screens in this manual may differ from your screens Scanning from the Machine You can scan and save documents to your computer by using the operation panel of the machine Scanning from the Machine ...

Page 114: ...is machine in MF Network Scan Utility Register by following the procedure below This procedure is not required if the machine and your computer are connected via USB The scan function is not available if the machine and your computer are connected in an IPv6 environment Use IPv4 or a USB connection Click in the system tray Select the check box for the machine and click OK Up to ten computers can b...

Page 115: ... press This screen is not displayed if only a computer is connected to the machine via USB Select the scan type Scan type Color Resolution File format Color Scan Color 300 dpi PDF searchable High compression B W Scan Black and white 300 dpi TIFF Custom 1 Color 300 dpi JPEG Exif Custom 2 Color 300 dpi PDF searchable Standard compression A PDF format where characters on the document are scanned as t...

Page 116: ...he computer About the save destination folder By default the scanned data is saved to the Pictures or My Pictures folder A subfolder named with the scanning date is created and the data is saved to that folder To change the save destination see Configuring Storing Settings Scan from the machine more easily If you have regularly used preferences such as scanning in color or black and white or a pre...

Page 117: ...the Scan PC Key Using the Scan PC Key MF211 users The only available shortcut key is The Network Connection option and screen for selecting a destination computer are not displayed Register the save destination computer and type of scan in or for MF211 Press Use to select Scan Settings and press Select Shortcut Key Settings Register Select shortcut key and press Select the key to which you want to...

Page 118: ...0 dpi TIFF Custom 1 Color 300 dpi JPEG Exif Custom 2 Color 300 dpi PDF searchable Standard compression A PDF format where characters on the document are scanned as text data and the text can be searched using a computer Documents are scanned in black and white only with no intermediate shades of gray To change settings You can change settings from MF Toolbox Configuring Scan Settings in MF Toolbox...

Page 119: ...the platen glass and press Repeat this step until you finish scanning all of the pages When there is only one page to be scanned proceed to the next step Use to select Finish Scanning and press The save destination folder is displayed on the computer About the save destination folder By default the scanned data is saved to the Pictures or My Pictures folder A subfolder named with the scanning date...

Page 120: ...ation included with the machine that enables you to scan documents or images to a computer You can forward the scanned data to a specified application or attach it to an e mail message Scanning Using an Application You can scan images by using an application such as a word processing or image processing application and load the images directly into the application You do not need to start another ...

Page 121: ...e Click the icon for the type of scan you want to perform Mail The scanned document is sent as an e mail attachment You can also save it to the computer and manually attach it to an e mail later OCR Characters in the document are extracted as text data through OCR optical character recognition processing You can edit the extracted data by using an OCR software Specify the OCR software in advance S...

Page 122: ...anner Driver check box on the screen in step 6 and click Start to start ScanGear MF Configuring Scan Settings in Simple Mode Configuring Scan Settings in Advanced Mode If the screen shown below is displayed you can continue scanning documents When you can only scan one page at a time such as when the JPEG format is specified this screen is not displayed 1 If there are additional pages of documents...

Page 123: ...tart Scanning starts To cancel click Cancel The scanned images are displayed as thumbnails on the Scanned Image screen When scanning several documents The screen shown below is displayed 1 If there are additional pages of documents to be scanned place the next document on the platen glass and click Next Repeat this step until you finish scanning all of the pages When there is only one page to be s...

Page 124: ... click Exif Settings and enter your comments on the displayed screen Save Scanned Image to Specify a save destination folder If you select the Save Pictures to a Subfolder with Current Date check box a subfolder named with the scanning date is created in the specified folder and the data is saved to that folder If you select PDF Add Page for Save as Type Save Scanned Image to is switched to Create...

Page 125: ...ancel click Cancel When scanning several documents The screen shown below is displayed 1 If there are additional pages of documents to be scanned place the next document on the platen glass and click Next Repeat this step until you finish scanning all of the pages When there is only one page to be scanned proceed to the next step 2 Click Finish When scanning is complete the scanned document is sav...

Page 126: ...mputer name that appears on the display of the machine during this procedure Comment You can enter a comment for each type of scan Edit the comment as necessary Close Toolbox after Finishing Scanning when Started from Device When you scan by using the operation panel of the machine MF Toolbox starts You can specify whether you want to automatically close the MF Toolbox screen when you finish scann...

Page 127: ...an application as a forward destination and other settings For Macintosh users available functions vary For Mac OS Users Configuring Scan Settings Configuring Storing Settings Specifying External Applications to Forward Scanned Data Configure the scan settings such as the original document size color mode and resolution Select Source Select the location where the document was placed Select Platen ...

Page 128: ...Using MF Toolbox The quality of the scanned image is automatically adjusted so that the file size does not exceed the maximum limit that you specify here Image Quality Select the resolution of the scanned image that suits your intended use Available resolutions vary with the file format PDF JPEG A resolution of 75 dpi is a rough guide for displaying the scanned image on a computer and 300 dpi for ...

Page 129: ...data is added as additional pages to an existing PDF file that you specify Adding Pages to an Existing PDF file Available file formats for each scan type If a message indicating the image size is too large is displayed Lower the Image Quality value Configuring Scan Settings PDF Settings If you select PDF PDF Single Page PDF Multiple Pages or PDF Add Page for Save as Type you can configure advanced...

Page 130: ... created in the folder specified in Save Scanned Image to and the data is saved to that folder If you specify an application to which you want to forward the scanned data the specified application automatically starts when scanning is complete For example you can specify Adobe Photoshop or other image processing application If you select Mail for the type of scan and specify an e mail application ...

Page 131: ... The second or subsequent documents may not be scanned or an error message may be displayed depending on the application In such a case place and scan one document at a time From the application select the start scan command The procedure for selecting the start scan command varies depending on the application For more information see the instruction manual for your application Select the scanner ...

Page 132: ...o start ScanGear MF Scanning Using MF Toolbox Starting from an application You can use ScanGear MF to load the scanned image into Adobe Photoshop Microsoft Office Word or other image processing and word processing applications Select ScanGear MF from the scan commands Scanning Using an Application You can do the following by using ScanGear MF Previewing the image before scanning Specifying the sca...

Page 133: ...o scan You can specify up to ten areas Click Scan to scan the areas in the cropping frames as separate images Clear Crop Frame Clears the selected cropping frame Left Rotate Right Rotate Rotates the preview image 90 degrees to the left or right Information Displays the current settings of the scanned image such as the color mode and size of the scan area Select Source Select the image type to scan...

Page 134: ...hen Flexible is selected If you select Add Delete you can add new output size settings and delete the added sizes Select Flexible to change the ratio of width to height Drag the area you want to scan on the preview image Image Correction Select the Fading Correction check box to correct faded colors on an old photograph or other images into vivid colors This setting is available when a preview ima...

Page 135: ... preview image is displayed You can specify the area you want to scan and check the effects of image adjustments on the preview image Operating Preview Images Clear Clears the preview image Crop Specifies the cropping area with the cropping frame Click and drag the area you want to crop The cropping area is indicated with a dotted line You can move the cropping frame or change its size with your m...

Page 136: ...inal size click this button again Specifying Settings for Documents and Color Mode Original Input Method Select Platen Glass Input Size Specify the size of the scanning area For normal cases select the same size as the document To specify the size with values select a unit and enter the values for width and height To lock the width to height ratio of the image click The image size that can be scan...

Page 137: ...large a memory shortage or other error may occur Set the resolution to the minimum required for your intended use Output Size Select the size of the scanned image when it is printed or displayed on a computer Click to switch between the portrait and landscape orientation This button is not available when Flexible is selected If you select Add Delete you can add new output size settings and delete ...

Page 138: ...educes graininess to create a smooth color tone when scanning photographs taken with high speed film High dramatically reduces graininess but may also reduce image sharpness or degrade image quality Use Unsharp Mask Emphasizes the edges and lines in the image creating a sharper appearance Use Descreen Reduces the color unevenness and moire that occur when scanning printed images Adjusting Brightne...

Page 139: ...opping frame you want to render as an achromatic color which is black grey or white each of which does not have color depth Color tone on the rest of the image is adjusted with the clicked part being the average For example if snow on a photograph image is bluish click this part because you essentially want to render this part as white When you click this part the snow is no longer bluish and the ...

Page 140: ... boundary that separates whether a color is rendered as black or white Colors below a certain density level are rendered as white and colors above a certain density level are rendered as black Threshold Level Slide or enter a value To render more parts as black slide to the right or enter a larger value Registering or Calling Settings Call registered brightness or color settings for to and Registe...

Page 141: ...Text and Table If the application settings are specified to scan documents in color those settings are replaced and documents are scanned with the ScanGear MF color mode set to Color Mode Text and Table Text Enhanced If the application settings are specified to scan documents in black and white those settings are replaced and documents are scanned with the ScanGear MF color mode set to Text Enhanc...

Page 142: ...Mode Scanner Tab Configure the temporary save destination of files the playing of audio files and other settings Select Folder Where Temporary Files are Saved Click Browse to change the folder to which an image is temporarily saved Sound Settings You can specify the music or sounds that are played while the machine is scanning or when scanning is complete Click Browse to specify a file to be playe...

Page 143: ...ame for the settings to register Use a name that is easy to find in the drop down list Calling registered Favorite Settings Display a preview image and select the registered setting in the drop down list Registering the Brightness or Color Setting To register only the brightness contrast histogram tone curve or threshold setting follow the procedure below Place the document s and click Preview 3 4...

Page 144: ...ary Select Add Delete in the drop down list The Add Delete Tone Curve Settings or Add Delete Threshold Settings screen is displayed Enter a name into Setting Name and click Add Save Enter a name for the settings to register Use a name that is easy to find in the drop down list Calling the registered setting Display a preview image and select the registered setting in the drop down list 2 3 4 㻝㻠㻠㻌㻛...

Page 145: ...lso been designed for convenience and ease of use Relax and proceed with the network setup one step at a time Connecting to a Computer Viewing the Machine s Network Settings Connecting to a Network Viewing Network Settings Configuring or Preparing for Print Scan Functions Configuring the Machine for Printing from a Computer Customizing the Machine for More Convenient Network Experience Configuring...

Page 146: ... Start Follow these steps to connect the machine to a network Check your computer settings Make sure that the computer is correctly connected to the network For more information see the instruction manuals for the devices you are using or contact the device manufacturers Make sure that the network settings have been completed on the computer If the network has not been set up properly you will not...

Page 147: ...he IP address as necessary This step is required when you want to assign a specific IP address to the machine or change the dynamic IP addressing protocol from the default DHCP Setting IP Addresses 㻝㻠㻣㻌㻛㻌㻟㻟㻢 ...

Page 148: ...he setting from Wired LAN to Wireless LAN or vice versa you will need to uninstall MF Drivers installed on your computer and then reinstall them MF Driver Installation Guide Press Use to select Network Settings and press If a screen for entering a PIN is displayed enter the PIN with the numeric keys and press Setting the System Manager PIN Select Select Wired Wireless LAN and press Select Wired LA...

Page 149: ...ne to the router Connect a LAN cable Connect the machine to a router by using a LAN cable Push the connector in until it clicks into place Wait approximately 2 minutes While you wait the IP address is set automatically You can set the IP address manually Setting IP Addresses LINKS Connecting to a Network 1 2 㻝㻠㻥㻌㻛㻌㻟㻟㻢 ...

Page 150: ...low For the wireless security compatibility of your wireless router see the instruction manuals for your networking devices or contact your manufacturer 128 104 64 40 bit WEP WPA PSK TKIP AES CCMP WPA2 PSK TKIP AES CCMP Required devices for wireless LAN connection The machine does not come with a wireless router Have the router ready as necessary The wireless router must conform to IEEE 802 11b g ...

Page 151: ...twork Key Selecting a Wireless Router Select this setup option if you need to manually set up the connection but want to complete the setup as easily as possible Setting Up Connection by Selecting a Wireless Router Manually Entering the Setup Information If you want to specify security settings in detail such as authentication and encryption settings manually enter the SSID and network key to set ...

Page 152: ...ss If the Enable the wireless LAN message is displayed select Yes and press Read the message that is displayed and press Select WPS Push Button Mode and press Select Yes and press Press and hold the WPS button on the wireless router The button must be pressed within 2 minutes after pressing in step 6 Depending on the networking device you may need to press and hold the button for 2 seconds or long...

Page 153: ... with the strongest signal Signal strength is measured using RSSI Received Signal Strength Indication Reducing power consumption You can set the machine to enter Power Save Mode based on signals emitted from the wireless router Power Save Mode If the IP address of the machine has changed In a DHCP environment the IP address of the machine may be changed automatically If this happens the connection...

Page 154: ... Use to select Network Settings and press If a screen for entering a PIN is displayed enter the PIN with the numeric keys and press Setting the System Manager PIN Select Wireless LAN Settings and press If the Enable the wireless LAN message is displayed select Yes and press Read the message that is displayed and press Select WPS PIN Code Mode and press Select Yes and press A PIN code is generated ...

Page 155: ... is available for connection the machine connects to the device with the strongest signal Signal strength is measured using RSSI Received Signal Strength Indication Reducing power consumption You can set the machine to enter Power Save Mode based on signals emitted from the wireless router Power Save Mode If the IP address of the machine has changed In a DHCP environment the IP address of the mach...

Page 156: ...entry method Setting Up Connection by Specifying Detailed Settings Press Use to select Network Settings and press If a screen for entering a PIN is displayed enter the PIN with the numeric keys and press Setting the System Manager PIN Select Wireless LAN Settings and press If the Enable the wireless LAN message is displayed select Yes and press Read the message that is displayed and press Select S...

Page 157: ...2 minutes until the IP address settings of the machine are completed Signal strength When more than one wireless router is available for connection the machine connects to the device with the strongest signal Signal strength is measured using RSSI Received Signal Strength Indication Reducing power consumption You can set the machine to enter Power Save Mode based on signals emitted from the wirele...

Page 158: ...ect Yes and press Read the message that is displayed and press Select SSID Settings Enter Manually Enter the SSID that you have written down Enter the SSID using the numeric keys select Apply and press Entering Text Specify the security settings based on the information that you have written down If you do not need to specify the security settings select None and press Using WEP 1 Select WEP and p...

Page 159: ...ntering Text 6 Select Select WEP Key and press 7 Select the WEP key you have edited and press 1 Select WPA WPA2 PSK and press 2 Select an encryption method and press Auto Sets the machine to automatically select AES CCMP or TKIP to match the setting of the wireless router AES CCMP Sets AES CCMP as the encryption method 3 Enter the network key that you have written down Enter the network key using ...

Page 160: ... completed Signal strength When more than one wireless router is available for connection the machine connects to the device with the strongest signal Signal strength is measured using RSSI Received Signal Strength Indication Reducing power consumption You can set the machine to enter Power Save Mode based on signals emitted from the wireless router Power Save Mode If the IP address of the machine...

Page 161: ...ols Authentication Encryption When manually setting up a wireless connection by specifying detailed settings you need to specify security settings Check the following information Security types WEP WPA PSK WPA2 PSK Authentication method Open System Shared Key Encryption method TKIP AES CCMP Checking the SSID and Network Key from a Computer The SSID or the network key may have been changed If you d...

Page 162: ...ion is necessary write down all the information that is displayed If wireless routers are not found Click Refresh If nothing happens check that the settings are correctly configured on the computer and the wireless router LINKS Connecting to a Wireless LAN Setting Up Connection by Selecting a Wireless Router Setting Up Connection by Specifying Detailed Settings 4 5 㻝㻢㻞㻌㻛㻌㻟㻟㻢 ...

Page 163: ...o a network requires a unique network IP address Two versions of IP addresses are available IPv4 and IPv6 Configure these settings depending on the network environment To use IPv6 addresses you need to properly configure the IPv4 address settings 㻝㻢㻟㻌㻛㻌㻟㻟㻢 ...

Page 164: ...quire Select to automatically assign an IP address via a protocol such as DHCP When Auto Acquire On is displayed automatic addressing is enabled Manually Acquire Select to configure the IP address settings by manually entering an IP address In order to select this option Auto Acquire must be set to Off Check Settings Select when you want to view the current IP address settings Automatically assign...

Page 165: ... whether the settings are correct Make sure that the Remote UI screen can be displayed with your computer Starting Remote UI If a computer is not available you can check the connection by using the operation panel Testing the Network Connection Press Use to select Network Settings and press If a screen for entering a PIN is displayed enter the PIN with the numeric keys and press Setting the System...

Page 166: ...sed to communicate with devices beyond a router A link local address is automatically set when the IPv6 function of the machine is enabled Manual address 1 An address that is entered manually When using this address specify the prefix length and default router address Stateless address 6 An address that is generated automatically using the MAC address of the machine and the network prefix that is ...

Page 167: ...address prefix length and default router address in the corresponding text boxes IP Address Enter an IPv6 address Addresses that start with ff or multicast address cannot be entered Prefix Length Enter a number that indicates how many bits are available for the network address Default Router Address Specify the IPv6 address of the default router as necessary Addresses that start with ff or multica...

Page 168: ... displayed with your computer by using the IPv6 address of the machine Starting Remote UI Using the operation panel IPv6 settings can also be accessed from Menu screen IPv6 Settings LINKS Setting IPv4 Address Viewing Network Settings 㻝㻢㻤㻌㻛㻌㻟㻟㻢 ...

Page 169: ...d by setting a certain interval before the machine starts communicating Setting a Wait Time for Connecting to a Network You can print a list of the current network settings Output Report Network Information IPv4 Select the setting to view Network Information IPv6 Select the setting to view Press Use to select Network Settings and press If a screen for entering a PIN is displayed enter the PIN with...

Page 170: ... setting to view and press Viewing WEP and WPA WPA2 PSK information 1 Select Security Settings and press 2 Confirm and select the current security setting and press If the security settings are not configured None is displayed 3 Select the setting to view and press WEP WPA WPA2 PSK Wireless LAN Status and Latest Error Information can be viewed from Press Network Information Wireless LAN Informatio...

Page 171: ...Configuring DNS 㻝㻣㻝㻌㻛㻌㻟㻟㻢 ...

Page 172: ... perform the basic setup procedures including the printer driver installation MF Driver Installation Guide Printing protocols are rules for delivering document data created on a computer to the machine and can be selected according to the printing purpose or the network environment Ports are gateways for passing document data from a computer to the printer Incorrect port settings are often the cau...

Page 173: ...and WSD Web Services on Devices To change protocols port numbers see Changing Port Numbers MF212w Start the Remote UI and log on in System Manager Mode Starting Remote UI Click Settings Registration Click Network Settings TCP IP Settings Configure printing protocols Configuring LPD or RAW 1 Click Edit in LPD Print Settings or RAW Print Settings 2 Configure the settings as necessary 1 2 3 4 㻝㻣㻟㻌㻛㻌㻟...

Page 174: ...Scanning Available for Windows Vista 7 8 8 1 WSD scanning enables you to scan documents to a computer without installing the scanner driver Select the check box to scan documents via WSD When not using WSD scanning clear the check box Use Computer Scanning Select the check box to use WSD scanning by operating the machine with the operation panel This check box can only be selected when the Use WSD...

Page 175: ...WSD Settings Setting up WSD network devices on Windows Vista 7 8 8 1 The WSD printer and scanner can be added from the printer folder Open the printer folder Displaying the Printer Folder click Add a device or Add a printer and follow the on screen instructions For more information about how to install MF Drivers for the WSD network printer see MF Driver Installation Guide LINKS Configuring Printe...

Page 176: ...gure the printer port settings on the computer To perform the following procedure log on to your computer with an administrator account Open the printer folder Displaying the Printer Folder Right click your printer icon and click Printer properties or Properties Click the Ports tab and configure the required settings Adding a port If the IP address of the machine has been changed add a new port Ad...

Page 177: ...or RAW ports Click Close 3 Click Auto Detect select the machine when it is detected and click Next If the machine is not detected Click Refresh If the problem persists click IP address or MAC address enter the IP address or MAC address of the machine Viewing Network Settings and then click Next 4 Click Add Finish 5 Click Close 1 Click Configure Port 2 Click the LPR or RAW radio button in Protocol ...

Page 178: ...LINKS Setting Up Print Server 㻝㻣㻤㻌㻛㻌㻟㻟㻢 ...

Page 179: ...n the operating system and the bit architecture 32 bit or 64 bit of the print server and client computers When implementing a print server in a domain environment consult your Network Administrator To obtain device information when using a print server Canon Driver Information Assist Service must be added during the printer driver installation MF Driver Installation Guide Open the printer folder D...

Page 180: ...ver 2003 R2 under Version Windows Vista 7 8 8 1 Server 2008 Server 2008 R2 Server 2012 Server 2012 R2 x86 under Processor If you do not know whether your Windows Vista 7 8 8 1 Server 2008 Server 2008 R2 Server 2012 Server 2012 R2 is a 32 bit or 64 bit operating system see Checking the Bit Architecture 3 Insert the User Software and Manuals DVD ROM into the drive on the computer click Browse to spe...

Page 181: ...LINKS Printing from a Computer Double click the shared printer Follow the on screen instructions to install the drivers 2 3 㻝㻤㻝㻌㻛㻌㻟㻟㻢 ...

Page 182: ...5R Configuring the Machine for Your Network Environment The configuration of a network varies depending on the purpose of the network Specify the settings necessary to suit your network environment 㻝㻤㻞㻌㻛㻌㻟㻟㻢 ...

Page 183: ... to configure Ethernet settings automatically or manually Configuring Ethernet settings automatically Select On and press The machine detects and automatically sets the communication mode and the Ethernet type that can be used Configuring Ethernet settings manually 1 Select Off and press 2 Select the communication mode Select Communication Mode select Half Duplex or Full Duplex Half Duplex Alterna...

Page 184: ...Setting a Wait Time for Connecting to a Network 㻝㻤㻠㻌㻛㻌㻟㻟㻢 ...

Page 185: ...may vary on each network Change the settings of the machine as necessary For more information contact your Network Administrator Press Use to select Network Settings and press If a screen for entering a PIN is displayed enter the PIN with the numeric keys and press Setting the System Manager PIN Select TCP IP Settings MTU Size Select the MTU and press Press LINKS Configuring Ethernet Settings Sett...

Page 186: ...er you change the way that network devices are connected or if you add a new device If this type of problem occurs set a wait time for connecting to the network Press Use to select Network Settings and press If a screen for entering a PIN is displayed enter the PIN with the numeric keys and press Setting the System Manager PIN Select Waiting Time for Connection at Startup and press Enter the wait ...

Page 187: ...DHCP option settings as necessary Note that the procedures for configuring DNS are different for IPv4 and IPv6 Start the Remote UI and log on in System Manager Mode Starting Remote UI Click Settings Registration Click Network Settings TCP IP Settings Configure DNS settings Configuring IPv4 DNS 1 Click Edit in IPv4 Settings 2 Configure IPv4 DNS settings 1 2 3 4 㻝㻤㻣㻌㻛㻌㻟㻟㻢 ...

Page 188: ... the machine s IP address is changed When specifying the interval between updates enter the time in hours in the DNS Dynamic Update Interval text box mDNS Settings Use mDNS Adopted by Bonjour mDNS multicast DNS is a protocol for associating a host name with an IP address without using DNS Select the check box to enable mDNS and enter the mDNS name in the mDNS Name text box DHCP Option Settings Acq...

Page 189: ...e machine belongs to such as example com DNS Dynamic Update Select the check box to dynamically update the DNS records whenever the machine s IP address is changed To specify the type s of addresses you want to register to the DNS server select the check box for Register Manual Address Register Stateful Address or Register Stateless Address To specify the interval between updates enter the time in...

Page 190: ...LINKS Setting IPv4 Address Setting IPv6 Addresses Viewing Network Settings 㻝㻥㻜㻌㻛㻌㻟㻟㻢 ...

Page 191: ...Remote UI The machine does not support the trap notification feature of SNMP To change the port number of SNMP see Changing Port Numbers MF212w SNMP management software when installed on a computer on the network enables you to configure monitor and control the machine remotely from the computer For more information see the instruction manuals for your management software Start the Remote UI and l...

Page 192: ...hanging the values of MIB objects Read Only Permits only viewing the values of MIB objects Use Dedicated Community Dedicated Community is a preset community intended exclusively for Administrators using Canon software Select the check box to use Dedicated Community If you do not need to use Dedicated Community clear the check box Enabling SNMPv1 Disabling SNMPv1 Clear the Use SNMPv1 check box 1 Se...

Page 193: ...ormation from Host Select the check box to enable monitoring of the printer management information of the machine via SNMP To disable monitoring of the printer management information clear the check box Click OK Disabling SNMPv1 Some of the functions of the machine become unavailable such as obtaining machine information via the printer driver Using the operation panel SNMPv1 settings can also be ...

Page 194: ...take advantage of negligence or improper use Either way you may incur unanticipated losses when your confidential information is leaked To counter these risks the machine is equipped with a variety of security functions Set the necessary configuration depending on your network environment Establishing the Basics of Information Security Protecting the Machine from Unauthorized Access Preparing for ...

Page 195: ...ing the Machine from Unauthorized Access Prevent unauthorized third parties from accessing and using the machine You can implement multiple security measures such as using firewalls and changing port numbers 㻝㻥㻡㻌㻛㻌㻟㻟㻢 ...

Page 196: ...gs via the Remote UI MF212w Start the Remote UI and log on in System Manager Mode Click Settings Registration System Management Edit and specify the necessary settings on the displayed screen By using the Remote UI you can register a variety of information including contact information Administrator comments the installation location of the machine as well as to the settings that you can register ...

Page 197: ...orized third parties can access computers and other communication devices that are connected to a network To prevent this unauthorized access specify the settings for packet filter a feature that restricts communication to devices with specified IP addresses or MAC addresses 㻝㻥㻣㻌㻛㻌㻟㻟㻢 ...

Page 198: ...s or ranges of IP addresses can be specified for both IPv4 and IPv6 The packet filters described in this section control communications over TCP UDP and ICMP Start the Remote UI and log on in System Manager Mode Starting Remote UI Click Settings Registration Click Security Settings IP Address Filter Click Edit for the filter type that you want to use IPv4 Address Inbound Filter Select to restrict ...

Page 199: ...ther IP addresses Allowed Addresses Allows communication received only with devices having their IP addresses entered for Address to Register and restricts communication with devices with any other IP addresses Registered as both Allows communication received only with devices having their IP addresses registered in Allowed Addresses and restricts communication with devices with any other IP addre...

Page 200: ...ash and a number indicating the prefix length fe80 1234 64 Deleting an IP address from exceptions Select an IP address and click Delete 3 Click OK You can enable or disable the IP Address Filter settings from Menu IPv4 Address Filter IPv6 Address Filter LINKS Specifying MAC Addresses for Firewall Rules 㻞㻜㻜㻌㻛㻌㻟㻟㻢 ...

Page 201: ...sses can be specified This function is unavailable when the machine is connected to a wireless LAN Start the Remote UI and log on in System Manager Mode Starting Remote UI Click Settings Registration Click Security Settings MAC Address Filter Click Edit Inbound Filter Select to restrict receiving data from the machine to a computer by specifying MAC addresses Specify the settings for packet filter...

Page 202: ...h devices with any other MAC addresses You do not need to delimit the address with hyphens or colons Check for entry errors If MAC addresses are incorrectly entered you may become unable to access the machine from the Remote UI in which case you need to set MAC Address Filter to Off MAC Address Filter Deleting a MAC address from exceptions Select a MAC address and click Delete 3 Click OK You can e...

Page 203: ...y the port number settings depending on the network environment To change the port number for proxy server see Setting a Proxy MF212w Press Use to select Network Settings and press If a screen for entering a PIN is displayed enter the PIN with the numeric keys and press Setting the System Manager PIN Select TCP IP Settings Port Number Settings Select a port and press Learning more about the ports ...

Page 204: ... only facilitates management of traffic between in house and outside networks but also blocks unauthorized access and consolidates anti virus protection for enhanced security When setting a proxy make sure that you have the necessary proxy information including the IP address port number and a user name and password for authentication Start the Remote UI and log on in System Manager Mode Starting ...

Page 205: ...lect the check box to use a proxy server specified in the same domain Use Proxy Authentication To enable authentication by the proxy server select the check box and enter up to 24 alphanumeric characters for the user name in the User Name text box Set Change Password To set or change the password for the proxy authentication when it is enabled select the check box and enter up to 24 alphanumeric c...

Page 206: ...y rarely be used or provide opportunities for misuse For security purposes the machine can be set to limit its capabilities by partially or completely disabling these functions Disabling HTTP Communication and Remote Management Disabling HTTP Communication Disabling Remote UI 㻞㻜㻢㻌㻛㻌㻟㻟㻢 ...

Page 207: ...isabling HTTP disables some of the network capabilities such as the Remote UI WSD printing Press Use to select Network Settings and press If a screen for entering a PIN is displayed enter the PIN with the numeric keys and press Setting the System Manager PIN Select TCP IP Settings Use HTTP Select Off and press Off Disables HTTP communication On Enables HTTP communication LINKS Using Remote UI MF21...

Page 208: ...the Remote UI to reduce the risk of having your machine controlled remotely over the network by malicious third parties Press Use to select System Management Settings and press If a screen for entering a PIN is displayed enter the PIN with the numeric keys and press Setting the System Manager PIN Select Remote UI Settings Use Remote UI Select Off and press Off Disables the Remote UI On Enables the...

Page 209: ...r Functions of the Remote UI Managing Documents and Checking the Machine Status Setting Up Menu Options from Remote UI Basics of the Remote UI Starting Remote UI Remote UI Screens System Requirements The following environment is required to use the Remote UI In addition set the Web browser to enable Cookies Windows Windows XP Vista 7 8 8 1 Microsoft Internet Explorer 7 0 or later Macintosh Mac OS ...

Page 210: ... certificate settings or TLS settings have no errors continue browsing the Web site Log on to the Remote UI When a System Manager PIN is not set Select System Manager Mode or End User Mode System Manager Mode You can perform all the Remote UI operations and settings If a System Manger PIN is not set factory default settings you do not need to input anything End User Mode You can check the status o...

Page 211: ...㻞㻝㻝㻌㻛㻌㻟㻟㻢 ...

Page 212: ...k to the Error Information page will be displayed Consumables Information Displays paper information and the remaining amount of toner Click Check Consumables Details to display the screen for checking consumables Checking Consumables Support Link Displays the support link specified in Device Information under System Management Status Monitor Cancel Displays the status of the current print documen...

Page 213: ...ge main page Menu Click an item the content is displayed in the right page Setting Up Menu Options from Remote UI Breadcrumb Trail Indicates the series of pages you opened to display the currently displayed page You can check what page is currently displayed Top Icon Moves the scroll box up to the top of the page when the page is scrolled down Edit Allows you to register or change machine settings...

Page 214: ...ob by clicking Cancel If you logged on in System Manager Mode all the print documents currently printing and waiting to be printed will be listed If you entered your user name when you logged on in End User Mode your user name will only be displayed on the documents that you printed Click Job Number on the paused documents to display detailed information You can check the user name and the page co...

Page 215: ...chase Consumables to display the page for purchasing consumables To display Purchase Consumables Set Displ Consumables Purchase Button RUI to On in the display System Management Settings The maximum print speed is displayed Log on to the Remote UI Starting Remote UI Status Monitor Cancel Device Features Information about the machine and the system manager is displayed This information is set in Sy...

Page 216: ...g Remote UI Status Monitor Cancel Device Information The total number of pages that have been printed by the copy and print functions is displayed Log on to the Remote UI Starting Remote UI Status Monitor Cancel Check Counter LINKS Remote UI Screens Checking Print Total Counter 㻞㻝㻢㻌㻛㻌㻟㻟㻢 ...

Page 217: ...de Start the Remote UI Starting Remote UI Click Settings Registration Click the menu item you want to set For more information about the settings menu see each item below Menu items Referents Preferences Paper Settings Specifying Paper Size and Type Display Settings Preferences Timer Settings Timer Settings Function Settings Copy Settings Copy Settings Printer Settings Printer Settings System Mana...

Page 218: ...Settings Security Settings Security Initialize Setting Information Initialize Menu LINKS Remote UI Screens 㻞㻝㻤㻌㻛㻌㻟㻟㻢 ...

Page 219: ...ist There are various settings in this machine You can adjust each of the settings in detail Access these settings by pressing You can print the setting menu in list form to check the current settings Output Report 㻞㻝㻥㻌㻛㻌㻟㻟㻢 ...

Page 220: ...rrent settings or specify the setting for saving power consumption See Getting Started Manuals Included with the Machine WPS Push Button Mode Select to automatically configure a wireless connection by using the button on a WPS wireless router Setting Up Connection Using WPS Push Button Mode WPS PIN Code Mode Select to configure a wireless connection by entering a PIN code for a WPS wireless router...

Page 221: ...N Status Latest Error Information Channel SSID Settings Security Settings Power Save Mode Specify settings for using the machine in a TCP IP network such as IP address settings IPv4 Settings Specify settings for using the machine in an IPv4 network IP Address Settings Configure the IP address which is used for identifying devices such as computers and printers on a TCP IP network Setting IPv4 Addr...

Page 222: ... functions without DNS servers Configuring DNS Off On mDNS Name DHCP Option Settings Select whether to acquire the host name and whether to use the dynamic update function via the DHCP options when DHCP is enabled Configuring DNS Acquire Host Name Off On DNS Dynamic Update Off On IPv6 Settings Specify settings for using the machine in an IPv6 network Use IPv6 Enable or disable IPv6 in the machine ...

Page 223: ...tings Enable or disable LPD a printing protocol that can be used on any hardware platform or operating system Configuring Printing Protocols and WSD Functions Off On RAW Print Settings Enable or disable RAW a Windows specific printing protocol Configuring Printing Protocols and WSD Functions Off On WSD Settings Enable or disable automatic browsing and acquiring information for the printer or scann...

Page 224: ... of packets the machine sends or receives Changing the Maximum Transmission Unit 1300 1400 1500 Specify the settings for monitoring and controlling the machine from a computer running SNMP compatible software Monitoring and Controlling the Machine with SNMP SNMPv1 Settings Enable or disable SNMPv1 When enabling SNMPv1 specify a community name and access privileges to Management Information Base MI...

Page 225: ...for Connecting to a Network 0 to 300 sec Select the communication mode of Ethernet half duplex full duplex and the Ethernet type 10BASE T 100BASE TX You can also view the MAC address of the machine Auto Detect Select whether to automatically detect or manually select the communication mode and the Ethernet type Configuring Ethernet Settings Off Communication Mode Half Duplex Full Duplex Ethernet T...

Page 226: ...the machine which is a number unique to each communication device Viewing the MAC Address Select to return the Network Settings to the factory defaults Initialize System Management Settings Initialize Network Settings 㻞㻞㻢㻌㻛㻌㻟㻟㻢 ...

Page 227: ... that has been registered in the machine by printing a User Data List Reports or lists can be printed on A4 or Letter size paper Loading Paper Output Report User Data List Check that the size of paper displayed on the screen is loaded in the machine Yes Example User Data List 㻞㻞㻣㻌㻛㻌㻟㻟㻢 ...

Page 228: ...Catalan Croatian Czech Danish Dutch English Estonian Finnish French German Greek Hungarian Italian Latvian Lithuanian Norwegian Polish Portuguese Romanian Russian Slovak Slovene Spanish Swedish Turkish Remote UI Language Select the display language used for the Remote UI screens Czech Danish Dutch English Finnish French German Hungarian Italian Norwegian Polish Portuguese Russian Spanish Swedish T...

Page 229: ...t which two different messages are alternately displayed 1 to 2 to 5 sec Scrolling Speed Adjust the speed for scrolling the screen by selecting from three levels Slow Standard Fast Preferences Display Settings Contrast Use to adjust the brightness Preferences Display Settings Invert Screen Colors Select On or Off Preferences Display Settings Millimeter Inch Entry Switch Select Millimeter or Inch P...

Page 230: ... to automatically move the cursor to the right of the entered character Select Manual to manually move the cursor to the right of the entered character Auto Manual Preferences Display Settings Scrolling Speed Select the speed Preferences Display Settings Cursor Movement Select Auto or Manual 㻞㻟㻜㻌㻛㻌㻟㻟㻢 ...

Page 231: ...reduce the operation sound of the machine when you want it to run more quietly quiet mode Set a time for the machine to enter quiet mode automatically You can also set the machine to always run in quiet mode Entering Quiet Mode Start Time Off On Start time setting to enter quiet mode End Time Off On Stop time setting to exit quiet mode Specify date and time settings including the date format and t...

Page 232: ...ime Settings Enable or disable daylight saving time If daylight saving time is enabled specify the dates from which and to which daylight saving time is in effect Off On Start Month Week Day End Month Week Day Timer Settings Date Time Settings Time Format Select the display setting Timer Settings Date Time Settings Current Date Time Settings Set the date and time 1 Timer Settings Date Time Setting...

Page 233: ...er Auto Reset is performed when the error does not prevent the user from continuing to use a function 0 Auto Reset is disabled 1 to 2 to 9 min The screen displayed after the Auto Reset is performed can be selected in Function After Auto Reset Select whether to return the display to the default screen after the Auto Reset is performed If Default Function is selected the display returns to the main ...

Page 234: ...ally shut down the machine after the specified period of idle time has elapsed since the machine entered the sleep mode Setting Auto Shutdown Time 0 Auto Shutdown is disabled 1 to 4 to 8 hr Timer Settings Auto Offline Time Set the time period Auto Shutdown Time 㻞㻟㻠㻌㻛㻌㻟㻟㻢 ...

Page 235: ...ing Default Settings Number of Copies 1 to 99 Density 4 to 0 to 4 Auto Density Original Type Text Text Photo High Speed Text Photo Photo Copy Ratio Custom Ratio 100 1 1 400 Max 200 141 A5 A4 70 A4 A5 50 25 Min N on 1 Off 2 on 1 4 on 1 ID Card Copy Select Layout Collate Off On Sharpness Seven Levels Specify the initial copy density You can also change the copy density temporarily Adjusting Density ...

Page 236: ...ts into a specified computer just by pressing a button You can view the registered settings by selecting Confirm Destination Scanning Using the Scan PC Key Register Scan PC1 Off USB Connection Color Scan B W Scan Custom 1 Custom 2 Network Connection Color Scan B W Scan Custom 1 Custom 2 Scan PC2 Off USB Connection Color Scan B W Scan Custom 1 Custom 2 Network Connection Color Scan B W Scan Custom ...

Page 237: ...instead display an alert message When an Error Message Appears Force Output Display Error Select the image processing when printing from a mobile device with AirPrint Mopria etc Select Gradation for photos and illustrations and Error Diffusion for mostly text documents for more attractive printouts Gradation Error Diffusion Select whether to give priority to print speed or to print quality when us...

Page 238: ...Speed Priority Image Quality Priority Printer Settings AirPrint Speed Image Quality Priority Select Speed Priority or Image Quality Priority 㻞㻟㻤㻌㻛㻌㻟㻟㻢 ...

Page 239: ...ty may become blurred If the print results on special types of paper are not satisfactory the following settings may improve the quality of the printouts Special Mode U If toner appears splattered around text and patterns in a printout select On Off On When set to On Print quality can be affected by the type of paper especially lightweight paper and the printing environment especially high humidit...

Page 240: ...st this setting if streaks adhere to the print paper Off Mode 1 Mode 2 Mode 3 Mode 4 After the setting is changed By specifying Off or Mode 1 streaks may adhere to the print paper By specifying Mode 3 or Mode 4 outlines may be blurred or images may appear somewhat grainy The print density becomes lighter as the setting progresses from Off to Mode 4 After printing from a smartphone or tablet Adjust...

Page 241: ... Special Mode C Adjust this setting if streaks adhere to the print paper Off On After the setting is enabled When set to On this setting takes priority over the setting for Special Mode Z While more effect is gained than with Special Mode Z print speed is slower Special Mode D Adjust this setting if streaks adhere to the print paper Copy Off On Print Off On Adjustment Maintenance Special Processin...

Page 242: ...or on curled paper Off On When set to On White patches may appear in images printed on paper other than lightweight paper Special Mode J If printing is uneven when printing fine lines or faint images select On Off On When set to On The following may occur Definition may be affected Toner appears in non print areas when using a new toner cartridge Toner may be used up more quickly Adjustment Mainte...

Page 243: ... faded select On Off On When set to On Print speed is slower Clean the fixing assembly after a toner cartridge is replaced or if black streaks appear on printouts Fixing Assembly Adjustment Maintenance Special Processing Special Mode K On Clean Fixing Assembly 㻞㻠㻟㻌㻛㻌㻟㻟㻢 ...

Page 244: ...PDL Selection Plug and Play Update Firmware Initialize System Management Settings Initialize All Data Settings See Network Settings MF212w Specify the PIN exclusively for Administrators who have access privileges to Network Settings and System Management Settings You can set the PIN from System Manager PIN You can also register the name of an Administrator Setting the System Manager PIN System Man...

Page 245: ...ying IP Addresses for Firewall Rules Off On MAC Address Filter Enable or disable settings for filtering packets received from devices with specified MAC addresses Specifying MAC Addresses for Firewall Rules Off On System Management Settings Device Information Settings Select Device Name or Location Enter Device Name or Location Entering Text Apply Security Settings 1 System Management Settings Sec...

Page 246: ...d CH Ukraine UA Great Britain GB Other Select whether to use the Remote UI a feature that enables you to specify the machine settings by using a Web browser Disabling Remote UI Use Remote UI Off On Select whether to use this feature to go online for remote scanning even without using the operation panel Off On System Management Settings Security Settings MAC Address Filter Inbound Filter Select Of...

Page 247: ...Toner Status Settings Off On Displ Purchase Button Off On Use as USB Device System Management Settings Use as USB Device Select Off or On Restart the machine Enable Product Extended Survey Program System Management Settings Enable Product Extended Survey Program Select Off or On Displ Consmbls Info RUI Toner Status 1 System Management Settings Displ Consmbls Info RUI Toner Status Select Displ Cons...

Page 248: ...PC Select to manually install the firmware update available on the Canon Web site yourself For instructions on how to install the update see the instruction manual available on the Web site When the machine uses a wireless LAN update with Via Internet below or use a USB cable to connect Via Internet Select to automatically install the firmware update without using a computer Follow the on screen i...

Page 249: ...ormation Settings Security Settings Remote UI Settings Auto Online for Remote Scan Use as USB Device Enable Product Extended Survey Program Displ Consmbls Info RUI Toner Status PDL Selection Plug and Play Initialize All Delete all data on the machine and return it to its factory default settings Initialize System Management Settings 1 1 1 Initialize All Data Settings Initialize All Data Settings Y...

Page 250: ...isted below at once or you can restore individual settings separately Initializing Menu If a screen for entering a PIN is displayed enter the PIN with the numeric keys and press Setting the System Manager PIN Preferences Timer Settings Copy Settings Scan Settings Printer Settings Adjustment Maintenance Initialize All 㻞㻡㻜㻌㻛㻌㻟㻟㻢 ...

Page 251: ...n When an Error Message Appears Common Problems If you suspect that the machine is malfunctioning see the following sections before contacting Canon Common Problems Installation Settings Problems Copying Problems Printing Problems Printing Results are Not Satisfactory If printing results are not satisfactory see When You Cannot Print Properly When a Problem Cannot Be Solved If a problem persists s...

Page 252: ...per stack on a flat surface to even the edges of the paper before loading it into the machine Check that the paper is appropriate for the machine Paper Check that no jammed paper fragments remain in the machine Do not forcibly remove the jammed document or paper from the machine Forcibly removing the paper may damage parts If you are not able to remove the paper contact your local authorized Canon...

Page 253: ... guide 1 Pull out toward you while pressing the button to open the output guide 2 Gently pull out the document 3 Close the output guide Check whether paper is jammed inside the machine 1 Gently pull out any paper between the fixing assembly and roller until you can see the edge of the paper 2 3 4 㻞㻡㻟㻌㻛㻌㻟㻟㻢 ...

Page 254: ...drawer 1 Slowly pull out any paper in the manual feed slot 2 Open the paper cover and remove any loaded paper 3 Gently pull out the document 4 Load paper and close the paper cover Install the toner cartridge Align the right and left projections with the toner cartridge guides and push securely all the way in 5 6 㻞㻡㻠㻌㻛㻌㻟㻟㻢 ...

Page 255: ...Close the toner cover and lower the operation panel If you cannot close the toner cover Make sure that the toner cartridge is inserted properly Forcing it closed may cause damage 7 㻞㻡㻡㻌㻛㻌㻟㻟㻢 ...

Page 256: ... specific period of time Connect again paying attention to the time limit Setting Up Connection Using WPS Push Button Mode Setting Up Connection Using WPS PIN Code Mode An SSID or network key of a wireless router was entered manually but the entry was incorrect Check the SSID and network key and enter the correct ones again Checking the SSID and Network Key Setting Up Connection by Specifying Deta...

Page 257: ...er Could not connect using WPS When automatic setting with WPS was attempted the connection failed due to an error Wait for a while and set again If the problem persists check whether the wireless router supports WPS If WPS is supported Check whether the machine is properly installed and ready to connect to the network Installation Settings Problems If WPS is not supported Set using another connec...

Page 258: ...hanging the WEP authentication method to Open System Setting Up Connection by Selecting a Wireless Router Setting Up Connection by Specifying Detailed Settings The authentication method of the machine is set to Shared Key but that of the wireless router is set to Open System Change the WEP authentication method to Shared Key at the wireless router and connect again For more information about how t...

Page 259: ...ted is not set to the machine correctly Check the network key the WEP key of the wireless router and set it to the machine again Checking the SSID and Network Key Setting Up Connection by Selecting a Wireless Router Setting Up Connection by Specifying Detailed Settings The authentication method of the machine is set to Shared Key but that of the wireless router is set to Open System Connect again ...

Page 260: ...rted Manuals Included with the Machine Are the LAN cable and USB cable connected correctly Check whether these cables are connected correctly Parts and Their Functions Is sleep mode activated If you leave the machine unattended for a specific period of time it enters sleep mode for power conservation not allowing you to operate it To cancel sleep mode press Is any message displayed on the screen I...

Page 261: ...ess Viewing Network Settings The connection method cannot be switched between a wired LAN and a wireless LAN Did you select a wired LAN or a wireless LAN on the operation panel on the machine as well This selection is required to have the machine switch to your selection Selecting Wired LAN or Wireless LAN You are unsure of the SSID or the network key of the wireless router to be connected The SSI...

Page 262: ...r Are there any appliances such as microwave ovens or digital cordless phones that emit radio waves near the machine Perform one of the following settings again Setting Up Connection Using WPS Push Button Mode Setting Up Connection Using WPS PIN Code Mode Setting Up Connection by Selecting a Wireless Router Setting Up Connection by Specifying Detailed Settings When you need to manually set up the ...

Page 263: ...0L40 07S Copying Problems See Common Problems also Printing results are not satisfactory Paper creases or curls When You Cannot Print Properly 㻞㻢㻟㻌㻛㻌㻟㻟㻢 ...

Page 264: ...See Common Problems also Printing results are not satisfactory Paper creases or curls When You Cannot Print Properly You cannot print Is a printer driver installed to your computer correctly MF Driver Installation Guide 㻞㻢㻠㻌㻛㻌㻟㻟㻢 ...

Page 265: ... Smudge Marks Appear on the Edge of Printouts Streaks Appear on Printouts White Streaks Appear Toner Smudges and Splatters Appear Printouts Are Faded Printed Pages Have White Specks A Portion of the Page Is Not Printed Print Density Is Uneven Printouts Are Grayish Cannot Scan a Printed Barcode Paper Creases Paper Curls Printouts Are Skewed Printouts Are Skewed Paper Is Not Fed Two or More Sheets A...

Page 266: ...ar on Printouts Are you using appropriate paper Check usable paper and replace with appropriate paper Paper Loading Paper If using the appropriate paper still does not solve the problem change one of the Special Mode Z Special Mode C and Special Mode D settings Special Processing To print from a computer change the setting for Special Print Adjustment in the printer driver Mode 1 has the least eff...

Page 267: ...eplacing Toner Cartridges Printouts Are Faded Is toner running low Check how much toner is left and replace the toner cartridges as necessary Replacing Toner Cartridges Are you using appropriate paper Check usable paper and replace with appropriate paper Also specify the paper size and type settings properly Paper Loading Paper Specifying Paper Size and Type Are you using the machine in a special ...

Page 268: ...Portion of the Page Is Not Printed Do you print data without margins This symptom occurs if a margin is set to none in the printer driver A margin of 5 mm or less around the edge of paper or 10 mm or less around the edge of envelopes is not printable with the machine Make sure to have margins around the document to print Finishing tab Advanced Settings Expand Print Region and Print Off Print Densi...

Page 269: ...cation for two to three hours then try printing again This may solve the problem If the problem persists replace the toner cartridge Replacing Toner Cartridges Cannot Scan a Printed Barcode Are you trying to scan a barcode printed with factory default settings In the printer driver specify Special Settings 1 for the setting of Special Print Mode Replacing Toner Cartridges When set to Special Setti...

Page 270: ...m persists after using appropriate paper change the setting for Special Mode V Special Processing Paper Curls Are you using appropriate paper Check usable paper and replace with appropriate paper Also specify the paper size and type settings properly Paper Loading Paper Specifying Paper Size and Type If using plain paper 60 to 90 g m making the following change in the printer driver may solve the ...

Page 271: ...Drawer Are you printing on curled envelopes Uncurl the envelopes and print again Loading Envelopes Paper Is Not Fed Two or More Sheets Are Fed Together Is paper loaded correctly Fan the paper stack thoroughly so that paper is not stuck together Check whether paper is loaded correctly Loading Paper Check whether the number of sheets of paper loaded is appropriate and whether the appropriate paper i...

Page 272: ...achine yourself If you disassemble or repair the machine yourself it may not be covered by warranty When Contacting Canon When contacting us have the following information ready Product name MF212w MF211 Dealer where you purchased the machine Details about your problem such as what you did and what happened as a result Serial number eight alphanumeric characters long found on the label on the back...

Page 273: ...hine becomes dirty Machine Interior Replacing Toner Cartridges If you want to check the remaining toner level Replacing Toner Cartridges How to replace toner cartridges How to Replace Toner Cartridges Relocating the Machine Relocating the machine for maintenance or an office move Relocating the Machine Checking the Total Pages Printed by the Machine If you want to check the total page number of pr...

Page 274: ...ou use it safely and easily Carefully read the safety instructions before you start cleaning Maintenance and Inspections Where to Clean Exterior of the machine Exterior Interior of the machine and fixing assembly Fixing Assembly Machine Interior Platen glass and the underside of the platen grass cover Platen Glass 㻞㻣㻠㻌㻛㻌㻟㻟㻢 ...

Page 275: ...d from the AC power outlet When you turn OFF the machine data that is waiting to be printed is deleted Clean the exterior of the machine Use a soft well wrung out cloth dampened with water or a mild detergent diluted with water Wait for the exterior of machine to dry completely Reconnect the power cord and turn ON the machine 1 2 3 4 㻞㻣㻡㻌㻛㻌㻟㻟㻢 ...

Page 276: ...he AC power outlet When you turn OFF the machine data that is waiting to be printed is deleted Open the platen glass cover Clean the platen glass and the underside of the platen glass cover Clean the areas with a cloth dampened with water Then wipe the area with a soft dry cloth Wait for the cleaned area to dry completely Gently close the platen glass cover Reconnect the power cord and turn ON the...

Page 277: ...l feed slot Loading Paper in the Paper Drawer Loading Paper in the Manual Feed Slot before performing the following procedure Cleaning requires toner Make sure that there is sufficient toner remaining beforehand It takes approximately 90 seconds to clean the fixing assembly Checking Toner Level Loading Paper in the Manual Feed Slot Press Use to select Adjustment Maintenance and press Select Clean ...

Page 278: ...sure the platen glass cover is completely closed If a thick original such as a book is placed on the platen glass remove the original Forcing the operation panel up may cause damage Open the toner cover by the grip at the front right of the toner cover Pull the toner cartridge out of the machine Using a lint free clean soft dry cloth wipe away toner paper dust from the inside Install the toner car...

Page 279: ...r and lower the operation panel If you cannot close the toner cover Make sure that the toner cartridge is inserted properly Forcing it closed may cause damage Reconnect the power cord and turn ON the machine 7 8 㻞㻣㻥㻌㻛㻌㻟㻟㻢 ...

Page 280: ...o evenly distribute the toner inside the cartridge Replace the toner cartridge if you see this message before you start to print a large job You can continue printing when this message is displayed but the print quality may deteriorate If Printouts Are Poor in Quality If your printouts begin to show any of the following features one of your toner cartridges is nearly empty Replace the nearly empty...

Page 281: ... Displays the amount of remaining toner Depending on the environment in which your machine is located other internal parts may reach the end of their lifetime before the toner runs out LINKS Consumables 㻞㻤㻝㻌㻛㻌㻟㻟㻢 ...

Page 282: ...e the platen glass cover is completely closed If a thick original such as a book is placed on the platen glass remove the original Forcing the operation panel up may cause damage Open the toner cover by the grip at the front right of the toner cover Pull the toner cartridge out of the machine Shake the toner cartridge 5 or 6 times as shown below to evenly distribute the toner inside the cartridge ...

Page 283: ...oner cover and lower the operation panel If you cannot close the toner cover Make sure that the toner cartridge is inserted properly Forcing it closed may cause damage LINKS Replacing Toner Cartridges 6 㻞㻤㻟㻌㻛㻌㻟㻟㻢 ...

Page 284: ...a thick original such as a book is placed on the platen glass remove the original Forcing the operation panel up may cause damage Open the toner cover by the grip at the front right of the toner cover Pull the toner cartridge out of the machine Remove the replacement toner cartridge from the protective bag Shake the toner cartridge 5 or 6 times as shown below to evenly distribute the toner inside ...

Page 285: ...ay not be able to pull it out completely If the sealing tape becomes stuck when pulling it out keep pulling until it is completely removed Install the toner cartridge Align the right and left projections with the toner cartridge guides and push securely all the way in Close the toner cover and lower the operation panel If you cannot close the toner cover Make sure that the toner cartridge is inser...

Page 286: ...ends on your environment Power plug Power cord USB cable LAN cable When transporting the machine across a long distance remove the toner cartridges How to Replace Toner Cartridges Open the paper cover and remove any paper If the paper guides are extended return them so that they fit in the paper drawer Close all the open covers and move the machine to the new location Check how heavy the machine i...

Page 287: ...Viewing the Counter Value You can check total for the number of pages used for printouts This total includes lists in addition to copies and printouts of data from computers Device Status Check Counter 㻞㻤㻣㻌㻛㻌㻟㻟㻢 ...

Page 288: ...0L40 08W Initializing Settings You can restore the following settings Initializing Menu Initializing System Management Settings Initializing All Data Settings 㻞㻤㻤㻌㻛㻌㻟㻟㻢 ...

Page 289: ...ent Settings see Initializing System Management Settings If a screen for entering a PIN is displayed enter the PIN with the numeric keys and press Setting the System Manager PIN Initialize Menu Select the item you want to initialize Yes Items for initializing Select the setting you want to initialize Initialize All Initializes all the settings 㻞㻤㻥㻌㻛㻌㻟㻟㻢 ...

Page 290: ... numeric keys and press Setting the System Manager PIN System Management Settings Initialize System Management Settings Select the item that you want to initialize Yes Restart the machine if necessary Items for initializing Select the setting you want to initialize Initialize All Initializes all the settings MF212w To initialize the settings in Network Settings you can also press Network Settings ...

Page 291: ...registered data and initialize all settings Setting Menu List together at the same time You are required to restart the machine after initializing all data settings If a screen for entering a PIN is displayed enter the PIN with the numeric keys and press Setting the System Manager PIN System Management Settings Initialize All Data Settings Yes Yes Restart the machine 㻞㻥㻝㻌㻛㻌㻟㻟㻢 ...

Page 292: ... 092 Appendix This chapter contains technical specifications of this machine instructions on how to use the e Manual disclaimers copyright information and other important information for customers 㻞㻥㻞㻌㻛㻌㻟㻟㻢 ...

Page 293: ...3 Feature Highlights Give the features that are described in this section The features are grouped under four headings Going Green and Saving Money Improving Efficiency Going Digital and So Much More 㻞㻥㻟㻌㻛㻌㻟㻟㻢 ...

Page 294: ...nto one sheet Printing Multiple Pages onto One Sheet For saving energy and money a sleep mode that powers down a machine when nobody is using it has become an essential feature This machine will enter sleep mode automatically and can also be put to sleep whenever you want Press once to put the machine to sleep Press it again to instantly wake the machine back into action For more information about...

Page 295: ... To easily scan documents Scanning Using the Scan PC Key Remote UI lets you manage a lot from your computer all without having to go over to the machine Configure settings and keep an eye on the machine s status with an intuitive easy to understand Web browser interface that you ll master immediately Save your time and energy for things other than taking care of the machine For more information ab...

Page 296: ...For more information Printing a Document 㻞㻥㻢㻌㻛㻌㻟㻟㻢 ...

Page 297: ...inal and or civil liability If you are uncertain about the legality of using your product to scan print or otherwise reproduce any particular document and or of the use of the images scanned printed or otherwise reproduced you should consult in advance with your legal advisor for guidance For more information about this function see Configuring Scan Settings in ScanGear MF You can convert scanned ...

Page 298: ... that you can then edit with a text editor For more information about this function see Scanning Using MF Toolbox Some applications work with the machine to let you easily import scanned images directly into documents you re working on This way you can skip the steps of opening a separate application just for receiving the scanned images and then exporting them to the application you re really usi...

Page 299: ...site For information on Mopria including certified terminals visit http www mopria org For more information Using the Machine as a Printer For more information Using the Machine as a Scanner TM TM No cables easy installation simple maintenance If you ve got a WPS wireless LAN router bypass the settings process altogether and be ready to go before you know it Enjoy the kind of clutter free and easy...

Page 300: ...For more information about this function see Printing Posters 㻟㻜㻜㻌㻛㻌㻟㻟㻢 ...

Page 301: ...tions are subject to change without prior notice due to improvements of the machine Machine Specifications Wireless LAN Specifications MF212w Document Type Scan Area Paper Copy Specifications Scanner Specifications Printer Specifications 㻟㻜㻝㻌㻛㻌㻟㻟㻢 ...

Page 302: ...rox 10 7 kg Dimensions W x L x H 390 x 371 x 312 mm Environmental Conditions Temperature 10 to 30 C Humidity 20 to 80 RH no condensation Host Interface MF212w 100BASE TX 10BASE T Hi Speed USB IEEE 802 11b g n Infrastructure mode MF211 Hi Speed USB Acceptable Documents Supported Document Types Acceptable Paper Stock Paper Printable Range Printable Area Scan Range Scan Area The current value display...

Page 303: ... 48 54 Mbps IEEE 802 11b 1 2 5 5 11 Mbps IEEE 802 11n SGI Invalidated 20 MHz 6 5 13 19 5 26 39 52 58 5 65 Mbps SGI Validated 20 MHz 7 2 14 4 21 7 28 9 43 3 57 8 72 2 Mbps Communication Mode Infrastructure Mode Security WEP 64 128 bit WPA PSK TKIP AES WPA2 PSK AES 802 1x LEAP EAP FAST PEAP EAP TLS EAP TTLS Connection Method WPS Wi Fi Protected Setup Manual setup 㻟㻜㻟㻌㻛㻌㻟㻟㻢 ...

Page 304: ... Plain paper Heavy paper Photograph Small documents for example index cards Special types of paper for example tracing paper transparencies etc Booklet Up to 24 mm thickness Size W x L Up to 216 x 297 mm Weight Up to 2 kg Paper Capacity 1 sheet 㻟㻜㻠㻌㻛㻌㻟㻟㻢 ...

Page 305: ...area of the document Make sure that text and images in your documents fit within the shaded area The scan area varies depending on the function used and where documents are placed Copy The scan area for copying may differ from the printable area Printable Area Scan 㻟㻜㻡㻌㻛㻌㻟㻟㻢 ...

Page 306: ...27 mm Custom Paper Size You can load Envelope Monarch and Index Card only in the manual feed slot Custom paper size of 76 2 to 216 0 mm in width and 210 to 356 mm in length can be loaded in the paper drawer Custom paper size of 76 2 to 216 0 mm in width and 127 to 356 0 mm in length can be loaded in the manual feed slot The default paper size of the machine is set to A4 Change the paper size setti...

Page 307: ...0 sheets 1 sheet Bond paper 60 to 163 g m 100 sheets 1 sheet Transparency 50 sheets 1 sheet Label 100 sheets 1 sheet Envelope 20 sheets 1 sheet Use laser printer transparencies Paper Type and Setting for the Machine Loading Paper Printable Area The shaded areas in the image below indicate the printable area of the document 1 1 㻟㻜㻣㻌㻛㻌㻟㻟㻢 ...

Page 308: ...irst Copy Time A4 9 seconds or less The copy speed on A4 size plain paper on one side printing is measured during continuous copying Copy speeds vary depending on the output resolution the paper type and size and the paper feeding direction Copy speeds on smaller paper sizes may be slower Plus the machine may experience downtime or decrease the copy speed in the middle of a continuous copy run to ...

Page 309: ...s Type Color scanner Maximum Scan Size Up to 216 x 297 mm Scan Resolution Optical resolution Up to 600 x 600 dpi Software interpolation resolution 9 600 x 9 600 dpi Driver TWAIN WIA 1 0 Windows XP WIA 2 0 Windows Vista 7 8 㻟㻜㻥㻌㻛㻌㻟㻟㻢 ...

Page 310: ...on environment and paper type used The print speed on A4 size plain paper on one side printing is measured during continuous printing Print speeds vary depending on the output resolution the paper type and size and the paper feeding direction Print speeds on smaller paper sizes may be slower Plus the machine may experience downtime or decrease the print speed in the middle of a continuous print ru...

Page 311: ...rtridges The average yield of the toner cartridge that comes with the machine is 1 700 sheets The average yield is based on ISO IEC 19752 the global standard related to Method for the determination of toner cartridge yield for monochromatic electrophotographic printers and multi function devices that contain printer components issued by ISO International Organization for Standardization when print...

Page 312: ...als to setting up the machine e Manual This Manual This manual describes all the functions of the machine in a manual that is viewed using a Web browser You can browse information by category or enter a keyword to search for pages on a specific topic Using e Manual MF Driver Installation Guide This manual describes how to install the MF drivers MF Toolbox and the supplied software on the User Soft...

Page 313: ...ning the keyword are displayed You can find the page you are looking for from those results You can also enter phrases such as connecting to a network The keyword search also supports the AND Boolean to search for multiple keywords Search Tab Search the site map Click Site Map on the top part of the screen and a list of all the e Manual topics is displayed From there you can find the topic you are...

Page 314: ... click OK if you are prompted to do so If the Software Programs Manuals Setup screen does not appear remove the DVD ROM from the drive and insert it again or see Displaying the Software Programs Manuals Setup Screen Click Custom Installation Select USB Connection and click Next Select USB Connection even if connected using a network Clear all the check boxes except for Manuals and click Install 1 ...

Page 315: ...he License Agreement and click Yes to agree Select the folder to install to and click Install The installation begins Wait a moment This process may take some time Click Exit Click Next Exit 5 6 7 8 㻟㻝㻡㻌㻛㻌㻟㻟㻢 ...

Page 316: ... the computer Select a language and click OK if you are prompted to do so If the Software Programs Manuals Setup screen does not appear remove the DVD ROM from the drive and then insert it again or see Displaying the Software Programs Manuals Setup Screen 2 Click Manuals 3 Click e Manual Depending on the operating system you are using a security warning message may appear If the message appears al...

Page 317: ...ware and Manuals DVD ROM into the drive on the computer Select a language and click OK if you are prompted to do so Click Start Software Programs If the above screen is not displayed see Displaying the Software Programs Manuals Setup Screen Click Start for Manual Uninstaller Click Uninstall Uninstall begins Wait a moment This process may take some time Click Exit 1 2 3 4 5 㻟㻝㻣㻌㻛㻌㻟㻟㻢 ...

Page 318: ...Click Back Exit 6 㻟㻝㻤㻌㻛㻌㻟㻟㻢 ...

Page 319: ...e top page Contents tab Search tab Click to toggle the display between the table of contents and search Contents The titles of chapters are displayed Place the mouse pointer over one of the titles and topics of the chapter are displayed on the right Click a topic and its page is displayed Top Click to return to the top page Site map Click to display all the e Manual topics Help 㻟㻝㻥㻌㻛㻌㻟㻟㻢 ...

Page 320: ... onto it Feature Highlights Quick Help Click to view how to solve problems or maintain the machine For Mac OS Users Click to view precautions when using Mac OS Notice Click to view important information you should know when using the machine Office Locations Click to display contact information for any inquiries about the machine Feature Highlights Provides a variety of practical examples of ways ...

Page 321: ...ing it displays the subsections of that topic Click to close the expanded topic Print all All pages of the selected chapter are opened in a separate window The chapter can be printed if necessary Navigation See what chapter topic you are currently viewing Click to return to the page top Click to display the previous or following topic Click to jump to the corresponding page To return to the previo...

Page 322: ...you can predict the general location of the topic that you are looking for Search options selector Select the check box to make your search case sensitive Search with these conditions Click to display the search results with the conditions specified with and Search result dialog box Displays the search results of the pages that contain the specified keywords From the results locate the page you ar...

Page 323: ...Title Topic Displays titles and topics Click a title or topic to jump to the page Click to return to the page top Click to go to the previous or next chapter 㻟㻞㻟㻌㻛㻌㻟㻟㻢 ...

Page 324: ...a clarification of an operation or contains additional explanations for a procedure Indicates useful functions or tips for using the machine Keys and Buttons Used in this Manual Keys on the operation panel and buttons on the computer display appear in the following notation Type Example Keys on the operation panel Settings displayed on the operation panel Timer Settings Specify destination Buttons...

Page 325: ...0L40 0A1 Others This section describes basic Windows operations and includes disclaimers copyright information and other information 㻟㻞㻡㻌㻛㻌㻟㻟㻢 ...

Page 326: ...s Windows Server 2008 Start select Control Panel double click Printers Windows 8 Server 2012 Right click the lower left corner of the screen select Control Panel View devices and printers Windows 8 1 Server 2012 R2 Right click Start select Control Panel View devices and printers Displaying Shared Printers in the Print Server Open Windows Explorer Windows XP Vista 7 Server 2003 Server 2003 R2 Serve...

Page 327: ...xe in Search programs and files or Start Search under the Start menu 2 Press the ENTER key Windows 8 Server 2012 1 Right click the lower left corner of the screen select Run 2 Enter D Minst exe and then click OK Windows 8 1 Server 2012 R2 1 Right click Start select Run 2 Enter D Minst exe and then click OK Printing a Test Page in Windows You can check whether the printer driver is operational by p...

Page 328: ... Control Panel Windows 8 Server 2012 Right click the lower left corner of the screen select Control Panel Windows 8 1 Server 2012 R2 Right click Start select Control Panel Display System Windows Vista 7 8 8 1 Server 2008 R2 Server 2012 Server 2012 R2 Click System and Maintenance or System and Security System Windows Server 2008 Click System Check the bit architecture For 32 bit versions 32 bit Ope...

Page 329: ...2012 Right click the lower left corner of the screen select Control Panel Windows 8 1 Server 2012 R2 Right click Start select Control Panel 2 Display System Windows Vista 7 8 8 1 Server 2008 R2 Server 2012 Server 2012 R2 Click System and Security or System and Maintenance System Windows Server 2008 Double click System Checking the LPR RAW Printer Port Open the printer folder Displaying the Printer...

Page 330: ...Make sure that the correct port is selected for the printer 㻟㻟㻜㻌㻛㻌㻟㻟㻢 ...

Page 331: ...or Mac OS see the following guide or help Function Object Reference Print function Installing the Driver Getting Started MF Driver Installation Guide Canon MF Printer Driver Guide Using each feature Driver s Help Canon MF Printer Driver Guide Scan function Installing the Driver Getting Started MF Driver Installation Guide Canon Scanner Driver Guide Scanning Setting the MF Toolbox or ScanGear MF Ca...

Page 332: ...t is hermetically sealed within the protective housing and external cover No radiation can leak from the machine in the normal operation of the product by the user This machine is classified as a Class 1 Laser Product under IEC 60825 1 2007 EN60825 1 2007 220 to 240 V Model The label shown below is attached to the laser scan unit on the machine This machine has been classified under IEC 60825 1 20...

Page 333: ... Equipment Program is an international program that promotes energy saving through the use of computers and other office equipment The program backs the development and dissemination of products with functions that effectively reduce energy consumption It is an open system in which business proprietors can participate voluntarily The targeted products are office equipment such as computers display...

Page 334: ...se med de väsentliga egenskapskrav och övriga relevanta bestämmelser som framgår av direktiv 1999 5 EG Ù Ú Û Romanian Ý Û Ë Û Þ Ë ß ß à alte prevederi relevante incluse în Directiva 1999 5 CE âãìíïðòóô ùôó Bulgarian ú ûïòýþÿ þ óìïðôðï þýíþ ïðÿ ûï òã òý ûôý ôùôòó ïûôÿ ô ð íôý ðôìþ ô ô ôùôòó ïûôÿ ûï ôð óýô ï ú Íslenska Icelandic Hér með lýsir CANON INC því yfir að AW NM383 sé í samræmi við grunnkröf...

Page 335: ...s of Adobe Systems Incorporated in the United States and or other countries Apple Bonjour iPad iPhone iPod touch Macintosh Mac OS and OS X are trademarks of Apple Inc registered in the U S and other countries AirPrint and the AirPrint logo are trademarks of Apple Inc Microsoft Windows Windows Vista Windows Server Internet Explorer Word Excel and Power Point are either registered trademarks or trad...

Page 336: ... A CANON EUROPA N V Bovenkerkerweg 59 1185 XB Amstelveen The Netherlands CANON CHINA CO LTD 15F Jinbao Building No 89 Jinbao Street Dongcheng District Beijing 100005 PRC CANON SINGAPORE PTE LTD 1 HarbourFront Avenue 04 01 Keppel Bay Tower Singapore 098632 CANON AUSTRALIA PTY LTD Building A The Park Estate 5 Talavera Road Macquarie Park NSW 2113 Australia CANON GLOBAL WORLDWIDE SITES http www canon...

Page 337: ...㻝㻌㻛㻌㻠㻣 ...

Page 338: ...lling from the Supplied CD ROM DVD ROM 9 Installing after Downloading from the Canon Website 20 Installing to Use WSD 27 Uninstalling 32 Troubleshooting 36 Appendix 37 Using the Installation Guide 38 Screen Configuration of the Installation Guide 39 Viewing the Installation Guide 42 Other 43 Basic Windows Operations 44 Notice 47 㻞㻌㻛㻌㻠㻣 ...

Page 339: ...tall the MF Drivers and MF Toolbox so the machine is ready to print from a computer Installing Uninstalling This section explains how to uninstall the MF Drivers or MF Toolbox Uninstalling Troubleshooting This section explains how to resolve problems that may occur during installation and uninstallation of the MF Drivers or MF Toolbox Troubleshooting Appendix This section explains how to use the I...

Page 340: ...s an e mail attachment file store it on the hard disk etc Toner Status This application informs you with the amount of cartridge consumption on the computer it is installed on pop up display You can also access a site for purchasing cartridges directly from the application Additional Software Programs Address Book Import Export Tool You can use Address Book Import Export Tool to export import an a...

Page 341: ...er driver UFRII LT XPS Fax driver Scanner driver Network Scan Utility MF Toolbox Toner Status Address Book Import Export Tool Canon MF LBP Wireless Setup Assistant Presto PageManager 1 Supported only over network connection 2 Supported only with Windows Server 2008 3 Supported only with 32 bit editions 4 Supported only over wireless LAN connection 5 These software may not be supplied depending on ...

Page 342: ...Selection Plug and Play Tap Network or USB Select the driver you are using Selectable page description language Network Fax UFRII LT UFRII LT XPS USB UFRII LT UFRII LT XPS Restart the machine If you selected USB in step 4 turn OFF the machine and wait for at least 10 seconds before turning it back ON Press Use to select System Management Settings and press If a screen for entering a PIN is display...

Page 343: ...er you are using and press Selectable page description language Network UFRII LT UFRII LT XPS USB UFRII LT UFRII LT XPS Restart the machine If you selected USB in step 4 turn OFF the machine and wait for at least 10 seconds before turning it back ON 4 5 6 㻣㻌㻛㻌㻠㻣 ...

Page 344: ...ers Installing from the Supplied CD ROM DVD ROM Installing after Downloading from the Canon Website The latest MF Driver and MF Toolbox versions are available for downloading from the Canon website Download the MF Drivers or MF Toolbox if for example the drivers on the CD ROM DVD ROM do not support the operating system of your computer Installing after Downloading from the Canon Website Adding a W...

Page 345: ...e machine and a computer via a USB cable install the software before connecting the USB cable A USB cable is not included with the machine Prepare one separately The options to be displayed differ depending on your country or region Log on to the computer with an administrator account Insert the User Software and Manuals CD ROM DVD ROM into the drive on the computer Click Easy Installation If you ...

Page 346: ...twork Connection and click Next In Server 2003 Server 2008 Server 2008 R2 Server 2012 Server 2012 R2 this screen is not displayed Proceed to the following procedure Click Install Read the License Agreement and click Yes to agree 5 6 㻝㻜㻌㻛㻌㻠㻣 ...

Page 347: ...ork proceed to step 8 To connect the machine and a computer via USB cable proceed to step 10 Installation of the drivers starts When the following screen appears click Yes Select the machine and click Next If no machines are displayed in Device List 7 8 㻝㻝㻌㻛㻌㻠㻣 ...

Page 348: ...set on the machine OK Check the settings and click Start Installation of the drivers starts Click Exit In Windows Server 2003 Server 2008 Server 2008 R2 Server 2012 Server 2012 R2 MF Toolbox is not installed Proceed to step 13 Click Start Installation of MF Toolbox starts Click Exit Follow the on screen instructions to install Toner Status Follow the on screen instructions to install the e Manual ...

Page 349: ...s It does not send any other information including your personal information You can uninstall the Product Extended Survey Program at any time Uninstalling the Product Extended Survey Program Click Next Select the Restart Computer Now Recommended check box and click Restart after removing the CD ROM DVD ROM Log on to the computer with an administrator account Insert the User Software and Manuals C...

Page 350: ...k Run MInst exe Select the connection method with the computer USB Connection Select USB Connection and click Next Wired Wireless LAN Connection Select Network Connection and click Next In Server 2003 Server 2008 Server 2008 R2 Server 2012 Server 2012 R2 this screen is not displayed Proceed to the following procedure Select the check box next to the application you want to install and click Instal...

Page 351: ... connect the machine and a computer via a network proceed to step 8 To connect the machine and a computer via USB cable proceed to step 13 Installation of the drivers starts When the following screen appears click Yes Select the machine and click Next 6 7 8 㻝㻡㻌㻛㻌㻠㻣 ...

Page 352: ...nd click Update Device List If the machine is still not displayed at all click Search by IP Address enter the IP address set on the machine OK Select the drivers to install and click Next To obtain device information for using a print server Select the Canon Driver Information Assist Service check box Specify details for each driver 9 10 㻝㻢㻌㻛㻌㻠㻣 ...

Page 353: ... and click OK to install additional drivers Check the displayed information and click Start Installation of the drivers starts Configure the machine normally used and make a test print To configure the machine as the machine normally used select the driver and click Next To print a test page select the driver and click Next Click Exit In Windows Server 2003 Server 2008 Server 2008 R2 Server 2012 S...

Page 354: ... 10 years It does not send any other information including your personal information You can uninstall the Product Extended Survey Program at any time Uninstalling the Product Extended Survey Program Click Next Select the Restart Computer Now Recommended check box and click Restart after removing the CD ROM DVD ROM You can check whether the MF Drivers MF Toolbox e Manual and etc are installed corr...

Page 355: ...ox is installed correctly an MF Toolbox icon appears on the desktop Network Scan Utility When Network Scan Utility is installed correctly a Network Scan Utility icon appears in the taskbar e Manual When the e Manual is installed correctly an e Manual icon appears on the desktop If you install the e Manual with Custom Installation the icon does not appear Toner Status When Toner Status is installed...

Page 356: ...ers from the Canon website http www canon com For more information about how to download the drivers see the driver download page for your machine Unzip the downloaded file If you are making a wired or wireless LAN connection connect the machine to the computer Before starting installation of the drivers configure network settings For more information about how to configure network settings see Ge...

Page 357: ...es to agree Select the connection method with the computer USB Connection Select USB Connection and click Next Installation of the drivers starts Proceed to step 17 Wired Wireless LAN Connection Select Network Connection and click Next 8 9 10 㻞㻝㻌㻛㻌㻠㻣 ...

Page 358: ...layed in Device List Check the computer and machine connection and IP address settings Viewing Network Settings e Manual and click Update Device List If the machine is still not displayed at all click Search by IP Address enter the IP address set on the machine OK Select the drivers to install and click Next If you did not select Printer proceed to step 14 If you did not select either Printer or F...

Page 359: ...ain device information for using a print server Select the Canon Driver Information Assist Service check box Select the printer drivers to install and click Next Specify details for each driver 13 14 㻞㻟㻌㻛㻌㻠㻣 ...

Page 360: ...ional drivers Check the displayed information and click Start Installation of the drivers starts Configure the machine normally used and make a test print To configure the machine as the machine normally used select the driver and click Next To print a test page select the driver and click Next Click Restart Log on to the computer with an administrator account Download the MF Toolbox from the Cano...

Page 361: ...pears in the printer folder Displaying the Printer Folder Scanner driver network connection When the scanner driver is installed correctly an icon for the installed scanner appears in the Scanners and Cameras or Scanners and Cameras Properties folder Scanner driver USB connection When the scanner driver is installed correctly an icon for the installed scanner appears in the Scanners and Cameras or...

Page 362: ...If the icon is not displayed Uninstall the drivers Uninstalling the MF Drivers and repeat the installation from the beginning 㻞㻢㻌㻛㻌㻠㻣 ...

Page 363: ...st install the printer driver and then add a network printer Installing the MF Drivers Adding a Network Printer Log on to the computer with an administrator account Open the printer folder Displaying the Printer Folder Click Add a printer or Add Printer Click Add a local printer Check that LPT1 is selected under Use an existing port and click Next Click Have Disk Installing the MF Drivers 1 2 3 4 ...

Page 364: ...ing system Specify us_eng or uk_eng 32bit Driver folders of the CD ROM DVD ROM or downloaded file 64 bit operating system Specify us_eng or uk_eng x64 Driver folders of the CD ROM DVD ROM or downloaded file If you do not know whether to specify the 32 bit version or the 64 bit version Checking the Bit Architecture Click OK Select your printer and click Next 7 8 9 10 㻞㻤㻌㻛㻌㻠㻣 ...

Page 365: ...ct Do not share this printer and click Next If you want to share the printer make sharing settings for the printer added with Adding a Network Printer Setting Up Print Server e Manual Click Finish An icon for the installed printer is displayed in the printer folder 11 12 13 㻞㻥㻌㻛㻌㻠㻣 ...

Page 366: ...art File Explorer select Network Right click the newly added printer icon and click Install Installation for using WSD is complete when an icon for the printer is added to the printer folder Deleting unneeded printer icons When you have finished installing the network printer the icon added in step 13 of Installing the MF Drivers is no longer needed To delete the icon right click it and select Rem...

Page 367: ...㻟㻝㻌㻛㻌㻠㻣 ...

Page 368: ... want to uninstall Uninstalling the MF Drivers Start the uninstaller from the User Software and Manuals CD ROM DVD ROM or from the MF Drivers file that you downloaded 1 Insert the User Software and Manuals CD ROM DVD ROM into the drive on the computer To start the uninstaller from the MF Drivers file that you downloaded carry out the following step 2 Open the folder where the uninstaller is stored...

Page 369: ...all starts Click Exit Log on to the computer with an administrator account Display Programs and Features or Add or Remove Programs Displaying Programs and Features or Add or Remove Programs Uninstalling the MF Toolbox 4 5 6 1 2 㻟㻟㻌㻛㻌㻠㻣 ...

Page 370: ...e Programs Select Canon Laser Printer Scanner Fax Extended Survey Program and click Uninstall or Remove The uninstaller starts Click OK Log on to the computer with an administrator account Display Programs and Features or Add or Remove Programs Displaying Programs and Features or Add or Remove Programs Select Toner Status and click Uninstall or Remove Uninstalling the Product Extended Survey Progr...

Page 371: ...The uninstaller starts Click Uninstall Click OK 4 5 㻟㻡㻌㻛㻌㻠㻣 ...

Page 372: ... installed while the MF Toolbox is open To access these applications from the toolbox you need to manually register them to the toolbox Configuring Scan Settings in MF Toolbox e Manual It takes too long to uninstall the MF Drivers Windows XP Quit all running applications including anti virus applications before uninstalling the software The Canon folder remains in the Start menu after the software...

Page 373: ...0L90 00H Appendix The Appendix provides information you should know such as how to use the Installation Guide disclaimers and copyright information 㻟㻣㻌㻛㻌㻠㻣 ...

Page 374: ...ext to the topics Top Page Topic Page Search by keyword You can search by entering keywords such as USB or environment Pages containing the keywords are displayed You can also enter phrases such as install the MF Drivers The search will find topics containing all of the words in the phrase AND search Search Tab Search the site map Click Site Map on the top part of the screen to display a list of a...

Page 375: ...f chapters Place the mouse pointer over one of the titles to display the topics in that chapter on the right Click a topic to display its page Top Click to return to the top page from any other page Site Map Click to display the titles of all Installation Guide topics Help Click to display information on how to view the Installation Guide how to perform a search and other information Print Click t...

Page 376: ...ing it displays the subsections of that topic Click to close an expanded topic Print all All pages of the selected chapter are opened in a separate window You can print them as necessary Navigation This shows which chapter topic you are currently viewing Click to return to the page top Click to display the previous or next topic Click to jump to the corresponding page To return to the previous pag...

Page 377: ...x to make your search case sensitive Search with these conditions and specify the conditions After setting them press this to perform the search and display the results in the Result list Result list This displays pages that contain the specified keywords From the results locate the page you are looking for and click the topic title of the page If the results cannot be displayed on one page click ...

Page 378: ...void damage to the printer or property Indicates a clarification of an operation or contains additional explanations for a procedure Buttons Buttons on the computer display are indicated with the following notation Example from the Installation Guide Next Computer Screens Depending on the operating system you are using the appearance of the displays in this guide may differ slightly from the displ...

Page 379: ...0L90 00X Other This section describes basic Windows operations and includes disclaimers copyright information and other information 㻠㻟㻌㻛㻌㻠㻣 ...

Page 380: ...Network discovery select Turn on network discovery Windows 7 Server 2008 R2 Start select Control Panel View network status and tasks Change advanced sharing settings under Network discovery select Turn on network discovery Windows 8 Server 2012 Right click the lower left corner of the screen select Control Panel View network status and tasks Change advanced sharing settings under Network discovery...

Page 381: ...7 8 8 1 Server 2008 Server 2008 R2 Server 2012 Server 2012 R2 Click System and Security or System and Maintenance System Windows Server 2008 Double click System Check the bit architecture 32 bit operating systems 32 bit Operating System is displayed 64 bit operating systems 64 bit Operating System is displayed Displaying Programs and Features or Add or Remove Programs Windows XP Server 2003 Start ...

Page 382: ...select Device Manager Windows 8 Server 2012 Right click the lower left corner of the screen Control Panel Hardware and Sound select Device Manager Windows 8 1 Server 2012 R2 Right click Start Control Panel Hardware and Sound select Device Manager Windows Server 2003 Start Control Panel System Hardware select Device Manager Windows Server 2008 Start select Control Panel double click Device Manager ...

Page 383: ...TING FROM THE USE OF THIS MATERIAL Copyright Copyright CANON INC 2014 No part of this publication may be reproduced transmitted transcribed stored in a retrieval system or translated into any language or computer language in any form or by any means electronic mechanical magnetic optical chemical manual or otherwise without the prior written permission of Canon Inc Trademarks Microsoft Windows Win...

Reviews: