
1
Chapter 1 Introduction
Chapter 2 Important Safety Instructions
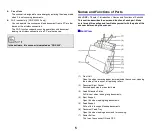
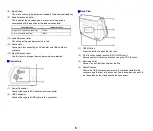
Chapter 3 Before Using the Scanner
Chapter 4 Placing Documents
Chapter 5 Scanning with CaptureOnTouch
Chapter 6 Setting the Scanner Driver
Chapter 7 Special Scanning
Chapter 8 Regular Maintenance
Chapter 9 Replacing Consumable Parts
Chapter 10 Uninstalling the Software
Chapter 11 Troubleshooting
Chapter 12 Appendix
6T3-0030-05E
Summary of Contents for imageFORMULA DR-C225 2
Page 85: ...85 External Dimensions HOME Chapter 12 Appendix External Dimensions Front View Side View ...
Page 86: ...86 ...
Page 87: ...87 ...
Page 88: ...88 ...


