Chapter 11
11-4
A = SSO basic function support
B = SSO basic fu Multi domain fu LLS cache function support
C = SSO basic fu Multi domain fu LLS cache function s Server 2003 Active Directory support
Browser
The following combinations of operations are guaranteed for the access from Web browser to MEAP device.
T-11-11
11.1.3 Setting Up the Network
0018-6613
imagePRESS C1 P / imagePRESS C1 / imagePRESS C1+ (Printer) / imagePRESS C1+
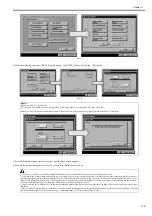
To allow a MEAP device to accept accesses through the network, for example you operate a device with SMS, the On option must be selected on Use HTTP screen.
The option is selected by default. The setting can be changed on the control panel of the MEAP device.
1) Make the following selections: [Additional Functions] button > [System Settings] button>
(Down-arrow) button.
imagePRESS C1
imagePRESS C1
imagePRESS C1
V3.1.0
A
A
A
A
B
C
C
C
C
V3.9.1
A
A
A
A
B
C
C
C
C
iR C2880/ iR C3380
iR C2880 / C3380
iR C2880 / C3380
V3.2.0
A
A
A
A
B
C
C
C
C
iR3025/ iR3030/ iR3035/
iR3045
iR3025/ iR3030/ iR3035/
iR3045
iR3025/ iR3030/ iR3035/
iR3045
V3.4.1
A
A
A
A
B
C
C
C
C
iR 5055/ iR 5065/ iR
5075
iR 5055/ iR 5065/ iR
5075
iR 5055/ iR 5065/ iR
5075
V3.5.0
A
A
A
A
B
C
C
C
C
iR C5185
iR C5185
iR C5185
V3.6.0
A
A
A
A
B
C
C
C
C
V3.10.0
A
A
A
A
B
C
C
C
C
imagePRESS C6000/
C6000VP/ C7000VP
imagePRESS C6000/
C7000VP
imagePRESS C6000/
C7000VP
V3.8.0
A
A
A
A
B
C
C
C
C
V3.13.0
A
A
A
A
B
C
C
C
C
-
iR 3180C/ iR3180Ci
iR C3180i / iR C2580i
V3.9.0
A
A
A
A
B
C
C
C
C
iR 5050
-
-
V3.9.0
A
A
A
A
B
C
C
C
C
iR C5058/ C5068/
C6880i
iR C5880/ C5880i/
C6880/ C6880i
iR C5880/ C6880/
C6880i
V3.9.0
A
A
A
A
B
C
C
C
C
-
CLC5151/ CLC4040
-
V3.10.0
A
A
A
A
B
C
C
C
C
iR C3480/ C3080/ C2550 iR C3580/ C3080/ C2380 iR C3580/ C3080/ C2550 V3.10.0
A
A
A
A
B
C
C
C
C
iR 3225/ iR 3230/ iR
3235/ iR 3245
iR 3225/iR 3235/ iR 3245 iR 3225/ iR 3230/ iR
3235/ iR 3245
V3.10.0
A
A
A
A
B
C
C
C
C
imagePRESS C1+
imagePRESS C1+
imagePRESS C1+
V3.10.0
A
A
A
A
B
C
C
C
C
MEMO:
- It must improve in the version of SSO Login application and version of SA when you want to use the function B or C.
- The right of access to the domain controller and the right of access to the Windows 2003 DNS are necessary, when the domain authentication is used with SSO.
Important information when using conventional SSO
- The device using SSO authentication and the Windows server on which Security Agent is installed must exists in the same domain.
- In the case that Security Agent has been installed in Windows XP Professional SP2, Windows Server 2003 SP1/Server 2003 R2 and Windows Firewall is set enabled,
Security Agent (SA.exe) needs to be added as an exceptional program of Windows Firewall. If not being designated a directory of installation, SA.exe is stored in the
following directory. C:\Program Files\Canon\SSOPackage\SecurityAgent
- In the case that Active Directory has been constructed in Windows Server 2003 SP1/Server 2003 R2 and Windows Firewall is set enabled, TCP port '5678' used by
Security Agent needs to be added in Windows Firewall.
OS
Supported Browser
Microsoft Windows 98SE
Microsoft Windows NT Workstation 4.0 SP6a
Microsoft Internet Explorer 5.01 SP2,
Microsoft Internet Explorer 5.5 SP2,
Microsoft Internet Explorer 6 SP1
Microsoft Windows ME
Microsoft Internet Explorer 5.5 SP2,
Microsoft Internet Explorer 6 SP1
Microsoft Windows 2000 Professional SP3
Microsoft Internet Explorer 5.01 SP3,
Microsoft Internet Explorer 5.5 SP2,
Microsoft Internet Explorer 6 SP1,
Microsoft Windows XP Professional
Microsoft Internet Explorer 6 SP1,
Microsoft Internet Explorer 7
Microsoft Windows Vista
Microsoft Internet Explorer 7
MEMO:
If the System manager ID and system password have already been assigned, ID Entry dialog appears after System Settings button is pressed. Enter the system manager
ID and the password, and click ID key to go into System Management Mode.
Product Name of MEAP Device
Version of
SSO Login
Application
Versio
n of
SA
US
EU
AO
V1.1.0 V1.2.0 V1.3.0 V1.3.1 V2.0.0 V2.0.1 V3.0.1 V3.1.0 V3.1.1
Summary of Contents for imagePRESS C1
Page 1: ...Oct 22 2008 Service Manual imagePRESS C1 Series ...
Page 2: ......
Page 6: ......
Page 38: ...Contents ...
Page 39: ...Chapter 1 Introduction ...
Page 40: ......
Page 42: ......
Page 72: ...Chapter 1 1 30 F 1 18 ...
Page 85: ...Chapter 1 1 43 T 1 26 ...
Page 88: ......
Page 89: ...Chapter 2 Installation ...
Page 90: ......
Page 94: ......
Page 234: ......
Page 235: ...Chapter 3 Basic Operation ...
Page 236: ......
Page 238: ......
Page 244: ......
Page 245: ...Chapter 4 Main Controller ...
Page 246: ......
Page 248: ......
Page 276: ...Chapter 5 Original Exposure System ...
Page 277: ......
Page 332: ...Chapter 6 Laser Exposure ...
Page 333: ......
Page 342: ...Chapter 6 6 8 F 6 10 1 Laser Light 2 Laser Shutter 3 Laser Shutter Lever 1 1 2 2 1 2 3 3 3 3 ...
Page 344: ...Chapter 7 Image Formation ...
Page 345: ......
Page 431: ...Chapter 7 7 82 ...
Page 462: ...Chapter 8 Pickup Feeding System ...
Page 463: ......
Page 504: ...Chapter 8 8 39 7 F 8 52 8 F 8 53 9 F 8 54 1 3 2 1 2 4 3 1 2 4 3 ...
Page 505: ...Chapter 8 8 40 10 F 8 55 11 F 8 56 12 F 8 57 1 4 2 3 5 4 1 3 2 1 4 2 5 3 ...
Page 506: ...Chapter 8 8 41 13 F 8 58 14 F 8 59 15 F 8 60 5 1 2 3 4 1 2 3 5 4 1 2 3 4 5 ...
Page 507: ...Chapter 8 8 42 16 F 8 61 1 2 3 4 5 ...
Page 509: ...Chapter 8 8 44 3 F 8 64 A Duplexing reversal position 4 F 8 65 2 1 A 2 1 ...
Page 510: ...Chapter 8 8 45 5 F 8 66 6 F 8 67 2 1 2 1 ...
Page 511: ...Chapter 8 8 46 7 F 8 68 8 F 8 69 3 2 1 3 2 1 ...
Page 512: ...Chapter 8 8 47 9 F 8 70 10 F 8 71 3 2 1 2 3 1 ...
Page 513: ...Chapter 8 8 48 11 F 8 72 B Duplexing re pickup stop position 12 F 8 73 3 2 B 1 3 1 2 ...
Page 514: ...Chapter 8 8 49 13 F 8 74 14 F 8 75 1 2 3 1 2 3 ...
Page 516: ...Chapter 8 8 51 F 8 77 SL3 M10 PS17 ...
Page 533: ...Chapter 8 8 68 F 8 154 1 2 4 3 2 3 4 ...
Page 534: ...Chapter 9 Fixing System ...
Page 599: ...Chapter 10 Externals and Controls ...
Page 642: ...Chapter 11 MEAP ...
Page 643: ......
Page 645: ......
Page 695: ...Chapter 12 Maintenance and Inspection ...
Page 696: ......
Page 698: ......
Page 700: ...Chapter 12 12 2 F 12 1 28 9 10 14 13 29 29 11 12 27 6 3 1 2 5 4 7 8 15 16 ...
Page 701: ...Chapter 12 12 3 F 12 2 17 20 24 23 25 26 19 18 24 21 22 ...
Page 704: ...Chapter 12 12 6 F 12 3 1 2 3 4 9 6 5 7 8 11 12 13 14 15 10 ...
Page 715: ...Chapter 12 12 17 F 12 18 1 1 2 2 ...
Page 716: ...Chapter 13 Standards and Adjustments ...
Page 717: ......
Page 719: ......
Page 732: ...Chapter 14 Correcting Faulty Images ...
Page 862: ...Chapter 15 Self Diagnosis ...
Page 894: ...Chapter 16 Service Mode ...
Page 895: ......
Page 1222: ...Chapter 17 Upgrading ...
Page 1223: ......
Page 1225: ......
Page 1256: ...Chapter 17 17 31 F 17 65 2 Turn off the main power switch and remove the USB device ...
Page 1257: ...Chapter 18 Service Tools ...
Page 1262: ......
Page 1263: ......
Page 1264: ...Oct 22 2008 ...
Page 1265: ......


