


IMPORTANT:
Make sure to remove the security chip from the old motherboard before returning the old motherboard to your authorized
service/support center. If you fail to install the security chip on the new motherboard, the imagePRESS Server will not start
up and all customer-purchased software options will be lost.
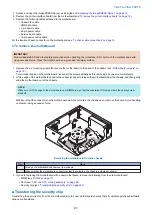
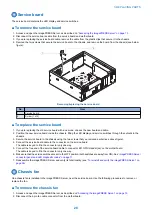
● To transfer the security chip to the new motherboard
1. Locate the extraction tool provided in the new motherboard kit.
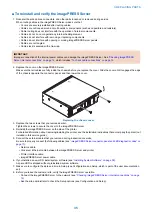
2. Remove the security chip from socket J23 on the old motherboard (see
“Motherboard jumpers” on page 19
).
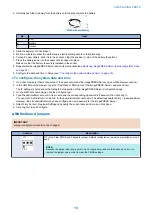
Carefully position the extraction tool around the edges of the security chip, and pull the chip straight out of the socket. Make
sure not to put stress on surrounding components.
IMPORTANT:
Do not rock the chip from side to side when removing it from the socket. Doing so may result in permanent damage to the
security chip.
1
2
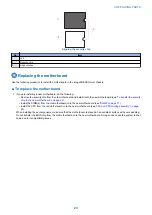
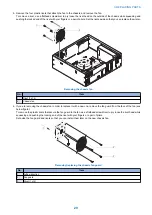
Removing the security chip from the motherboard
No.
Item
1
Security chip
2
Motherboard
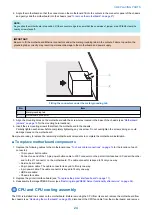
3. Inspect the security chip and carefully straighten any bent pins with needlenose pliers.
4. Install the security chip in socket J23 on the new motherboard.
NOTE:
Be sure to align the small notch in the security chip with the notch in the outline that appears inside socketJ23. If you install the
security chip incorrectly, you may corrupt the security chip and/or the motherboard.
3. REPLACING PARTS
22
Summary of Contents for imagePRESS Server G200
Page 1: ...Revision 1 1 imagePRESS Server G200 Service Manual...
Page 6: ...Introduction 1 Introduction 2...
Page 11: ...USING THE IMAGEPRESS SERVER 2 Using the imagePRESS Server 7...
Page 13: ...The imagePRESS Server Tools menu 2 USING THE IMAGEPRESS SERVER 8...
Page 14: ...REPLACING PARTS 3 Replacing Parts 10 Cleaning the imagePRESS Server 36...
Page 42: ...INSTALLING SYSTEM SOFTWARE 4 Installing System Software 38...
Page 52: ...TROUBLESHOOTI NG 5 Troubleshooting 48...
Page 65: ...SPECIFICATIONS 6 Specifications 61...
Page 77: ...9 10 11 2x 1x 12 1x Cross Ethernet Cable 1x 7 INSTALLATION PROCEDURE 72...


