background image

07

Easy Operation Guide


Copy

08

Making a Copy


Easy Operation Guide

Co

py

Pr

ef

ac

e

O

th

er

Pr

in

t

Sc

an

Se

nd

/F

ax

1

2

3

4

Making a Copy

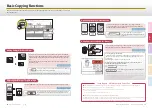
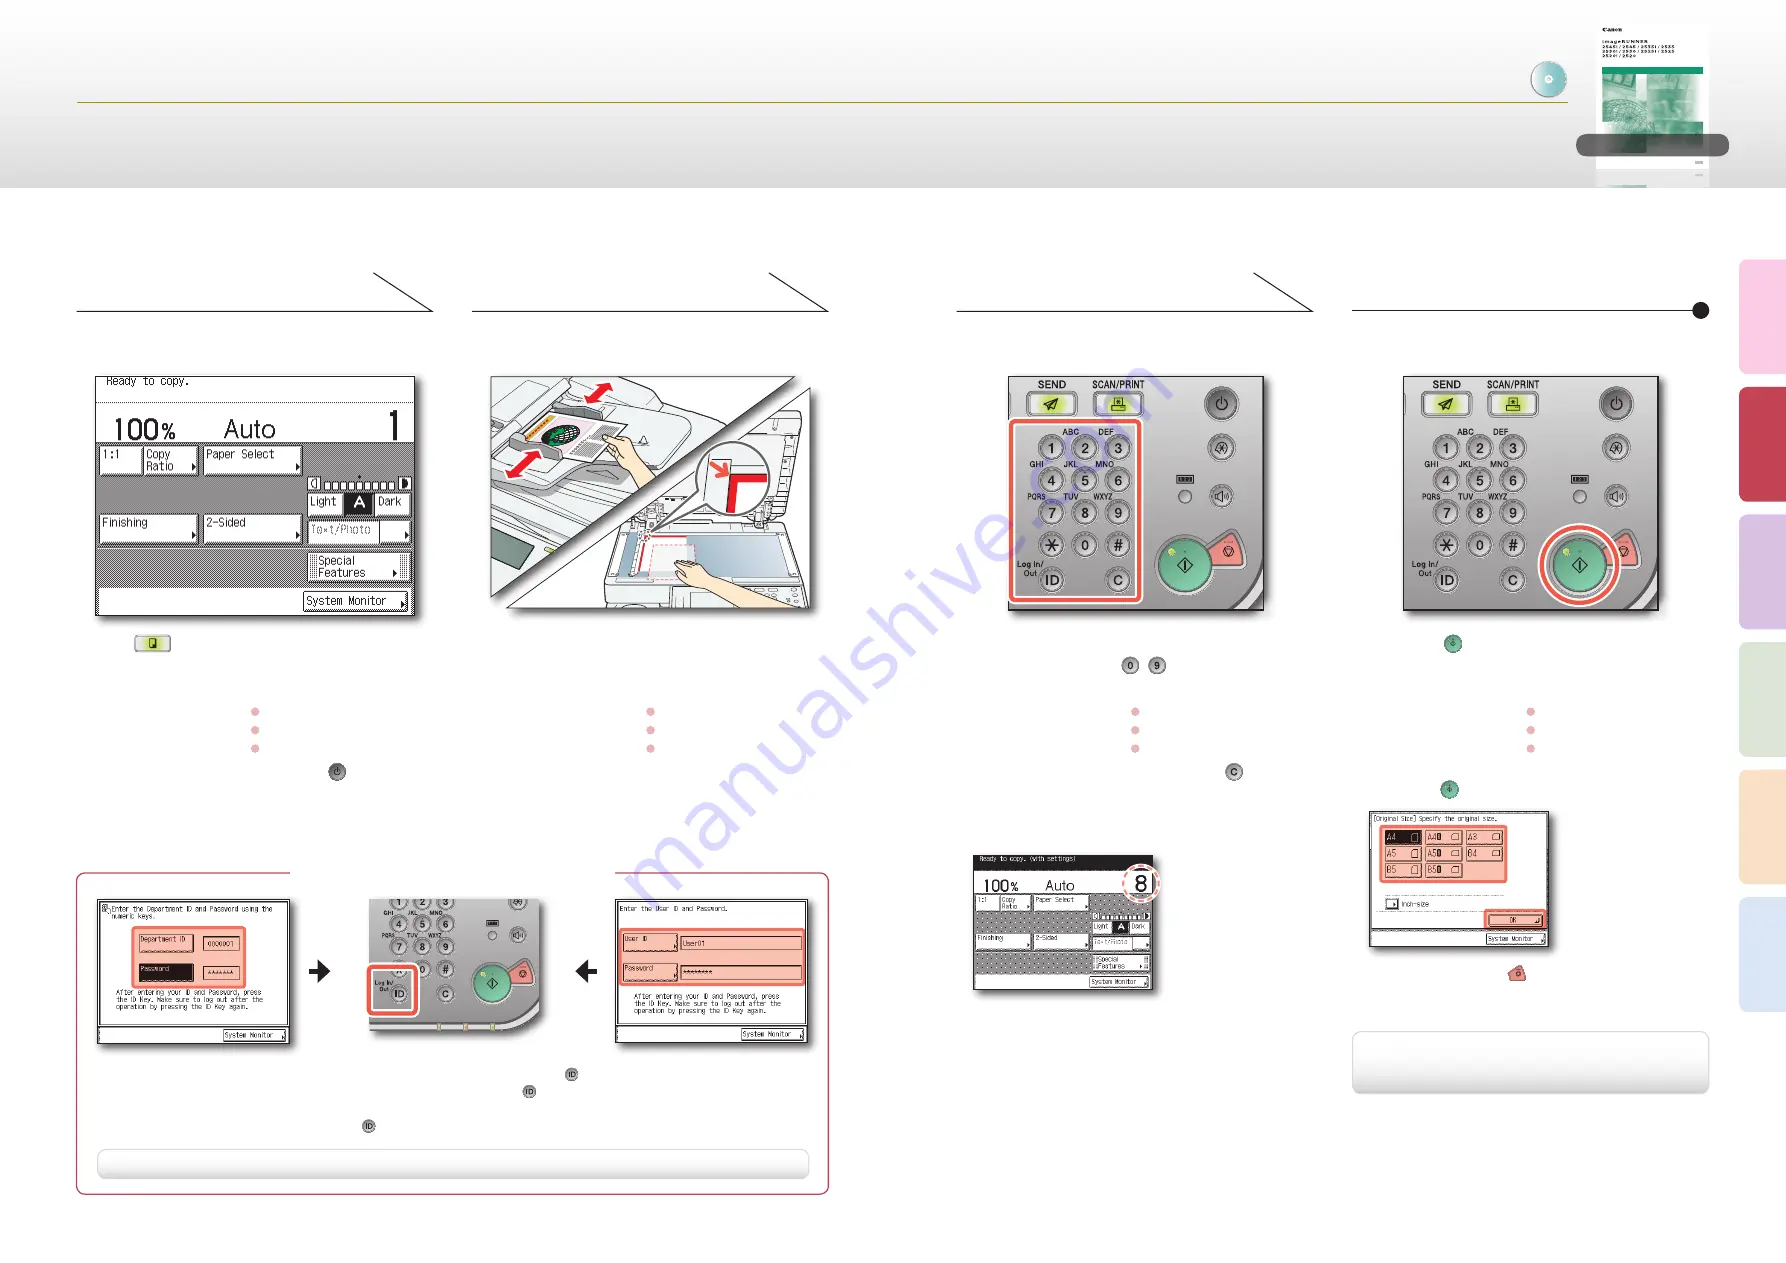
This section describes the basic operation procedure for copying originals.

Display the Copy Screen

Place Your Originals

Specify the Number of Copies

Start Copying

Press 

 (COPY) to display the top screen 

of the Copy function.

Place your originals in the feeder or on the 
platen glass.

Enter the desired number of copies 
(1 to 999) using  –  (numeric 
keys).

Press   (Start).

Close the feeder/platen cover after placing your originals on 
the platen glass.

To change the value you have entered, press 

 (Clear) 

enter the correct value.
The number of copies you specify is displayed on the upper 
right side of the touch panel display.

When the screen below appears, select the original size 


press [OK] 


 (Start).

To cancel copying, press 

 (Stop). You can also cancel the 

current copy job by pressing [Cancel] on the screen 
indicating the copy processing status.

*

If the machine is in the Sleep mode, press 

 (Power).

How to Log in to the Machine

*  The canceling procedure differs depending on the job status. 

For more information, see Chapter 1, “Introduction to Copy 

Function,” in the Copying Guide.

PDF on User Manual CD-ROM

Enter your Department ID and password if the screen prompts you to do so 

 press   (Log In/Out).

Enter your User ID and password if the screen prompts you to do so 

 press   (Log In/Out).

Insert the control card if the screen prompts you to do so.
When you have finished the operations, press   (Log In/Out) or remove the control card to log out.

For more information, see Chapter 2, “Basic Operations,” in the Reference Guide.

Copying Guide 

Copying Guide 

Please read this guide before operating this product.
After you finish reading this guide, store it in a safe place for future reference. 

ENG

Copying Guide

Copying Guide 

Copying Guide 

Please read this guide before operating this product.

After you finish reading this guide, store it in a safe place for future reference. 

ENG

Summary of Contents for imageRUNNER 2545i

Page 1: ...unction Printing from a Computer 17 Specifying the Printer Driver Settings 19 Printing from a USB Memory Media Device Media Print 21 Sending Facsimile Functions Sending a Document E mail I fax File Se...

Page 2: ...se read this guide before operating this product After you finish reading this guide store it in a safe place for future reference ENG Reference Guide Reference Guide Please read this guide before ope...

Page 3: ...Easily and Quickly 28 Recalling the Most Recent Settings Specifying the File Format for Sending Documents 29 Setting the Send Screen to Suit Your Needs 30 Printing the Sender Information When Sending...

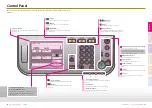
Page 4: ...es or menu are displayed on the touch panel display with the Main Power Indicator lighting up the machine is in the Sleep mode Additional Functions key Press to access the Additional Functions menu Co...

Page 5: ...by pressing Cancel on the screen indicating the copy processing status If the machine is in the Sleep mode press Power How to Log in to the Machine The canceling procedure differs depending on the jo...

Page 6: ...to Optimizing the Copy Output Quality Stack Bypass A Multi purpose Paper Tray To specify the paper size and type Load the paper in the stack bypass as illustrated select the paper size press Next sele...

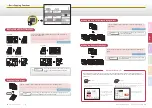
Page 7: ...er Press Finishing Collate OK as indicated on the touch panel display Making Copies in Sets Arranged in Page Order You can set the machine to output the copies in groups of individual pages Press Fini...

Page 8: ...at actual size Copying ID Cards Copying Different Size OriginalsTogether Press ID Card Copy select the layout type press Next select the paper source press OK Done as indicated on the touch panel dis...

Page 9: ...mode select the side of the original on which to erase the shadow instead of selecting the original size Erasing Dark BordersWhen Copying Bound Originals 2 on 1 Photo 70 Text Photo Group 1 2 3 You can...

Page 10: ...roperties In each sheet of the printer setting dialog box specify the print settings that suit your preferences click OK Specify the number of prints and pages to print as necessary click OK The name...

Page 11: ...ng Style Configuring the Page Settings On the Page Setup sheet you can specify the page settings On the Finishing sheet you can specify the finishing style 1 2 3 4 1 Objective Enables you to print a d...

Page 12: ...hine is in the Sleep mode press Power Enter your ID and password or insert the control card if the screen prompts you to do so For more information on logging in to the machine see How to Log in to th...

Page 13: ...g originals by pressing Cancel on the screen indicating the send processing status For information on specifying destinations see p 27 If the machine is in the Sleep mode press Power Enter your ID and...

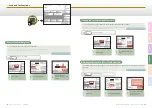
Page 14: ...hine see How to Log in to the Machine on p 07 If the screen shown below appears enter your user name and password and specify the login destination press Log In When the screen below appears select th...

Page 15: ...press Divide into Pages Done Press Recall The Recall function enables you to send a document using any of the last three addresses scan settings and send settings that were used Recalling the Most Rec...

Page 16: ...I Faxes Faxes Press Additional Functions You can set the machine to automatically forward the received I fax fax documents to any desired destination If a received document matches the forwarding con...

Page 17: ...higher resolution Note however that the file size increases as you increase the resolution Scanning FineText and Images Clearly 1 1 This section describes the operation procedures for the Send and Fax...

Page 18: ...525 2520 Scanning Different Size OriginalsTogether You can adjust the density of the background color when scanning color originals You can adjust red green and blue separately Adjusting the Backgroun...

Page 19: ...ey have been scanned The Stamp mode is available only when the optional Stamp Unit B1 is attached to the feeder optional for the imageRUNNER 2545 2535 2530 2525 2520 Affixing Stamps on Scanned Origina...

Page 20: ...an Online Place your originals in the feeder or on the platen glass Open the Color Network ScanGear From the menu of the application select the command to start the scanning operation Start Scanning S...

Page 21: ...Status page is displayed Go to other pages as necessary by using the menu on the left side of the page Accessing the Remote UI Start Your Web Browser Start your web browser enter the IP address of the...

Page 22: ...fax number again which will prevent dialing mistakes Preventing misdialing when sending a fax Press Restrict the Send Function Confirm Entered Fax Numbers and make the desired settings Chapter 3 in t...

Page 23: ...the Staple Cartridge 5 Reference Scanning The scanned images of the originals scanned with the platen glass feeder have marks or stains Routine Cleaning 5 Reference Memory becomes full during scannin...

Page 24: ...r regional dealer CANON LATIN AMERICA INC 703 Waterford Way Suite 400 Miami Florida 33126 U S A CANON AUSTRALIA PTY LTD 1 Thomas Holt Drive North Ryde Sydney N S W 2113 Australia CANON CHINA CO LTD 15...

Reviews: