COPYRIGHT © 1999 CANON INC. CANON imageRUNNER 400/330 REV.0 JAN. 1999 PRINTED IN JAPAN (IMPRIME AU JAPON)
12-49
CHAPTER 12 INSTALLATION
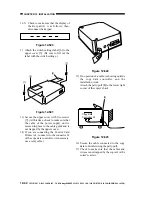
21) Check to make sure that the
communication between the copier and
the controller is normal.
Connect the copier's power plug, and turn
on the power switch; then, check that
LED2 [29] (orange) is flashing.
Figure 12-618
22) Press the copier's Copy Start key, and
check to make sure that LED3 [30] (pink)
flashes each time paper is delivered.
Figure 12-619
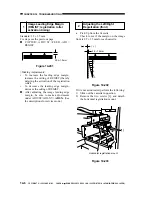
23) Attach the switch settings label [31] on
the upper cover of the controller. (The
label should be filled out with switch
settings.)
Figure 12-620
24) Secure the upper cover [1] of the
controller with two screws [2]. (When
doing so, check to make sure that the
cable of the power supply unit is retained
by the cable guide inside the controller
and is not trapped by the upper cover [1].)
LED1 LED2 LED3
2
1
LED5
LED6
LED4
IC6
SW1
SW4
SW3
6
1
BAT1
CN4
1
2
CN3
CN2
[29]
SW2
LED1 LED2 LED3
2
1
LED5
LED6
LED4
IC6
SW1
SW4
SW3
6
1
BAT1
CN4
1
2
CN3
CN2
SW2
[30]
[1]
[2]
[2]
[31]

