Chapter 2
2-8
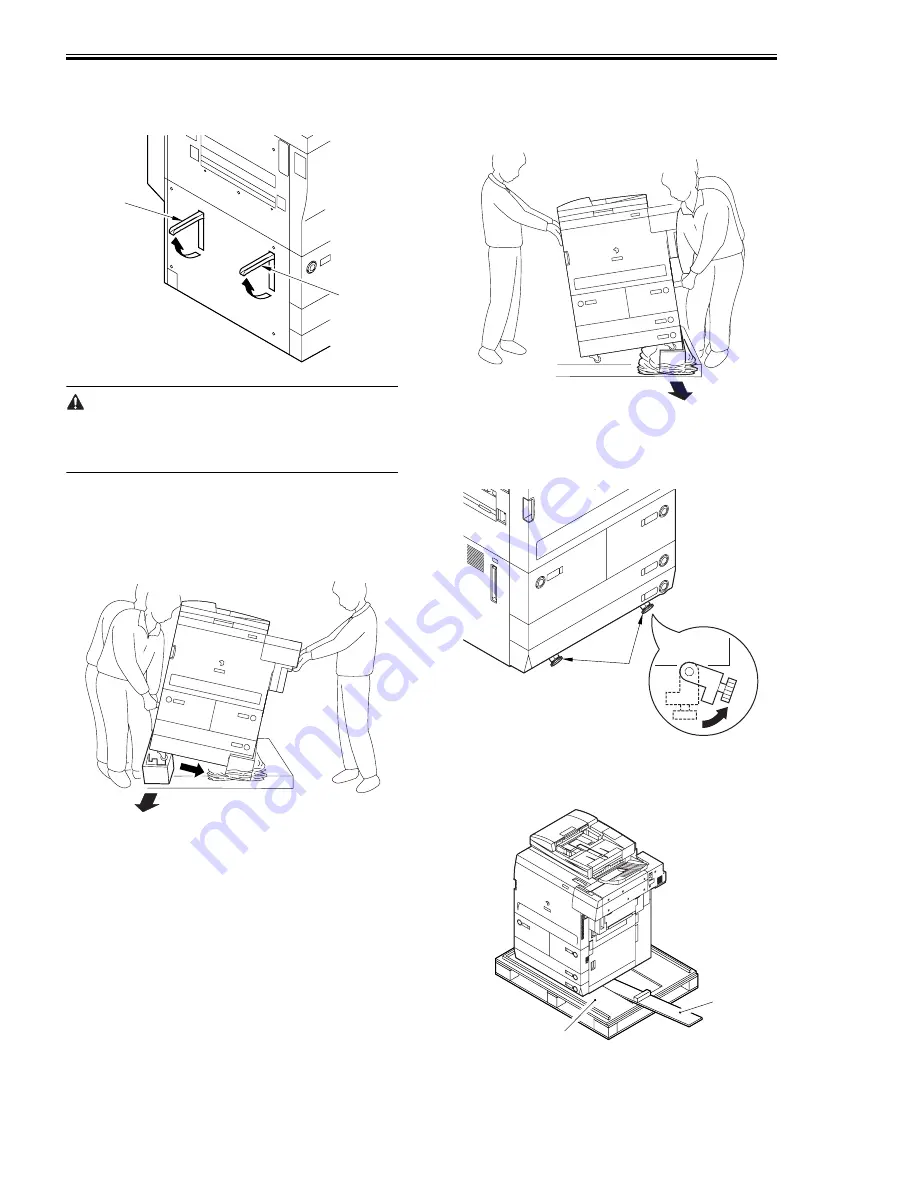
5) Close the upper right cover.
6) Shift up the grip (front, rear) [1] found on the
left side of the machine.
F-2-9
Be sure to go through steps 7) and 8) in correct se-
quence; otherwise, the machine can become dis-
placed.
7) Holding the grips (front, rear) on the delivery
side of the machine, lift the machine slightly to
remove the pad.
At this time, put away the plastic bag toward
the pad.
F-2-10
8) Holding the grips (front, rear) on the pickup
side of the machine, lift the machine slightly,
and remove the remaining pad and the plastic
bag at the same time.
F-2-11
9) Shift the 2 adjusters (front) [1] found at the
bottom of the machine so that they face
upward, making sure that they are unlocked.
F-2-12
10) Take out the 2 slope plates [2] from the
middle of the skid [1].
F-2-13
[1]
[1]
[1]
[1]
[2]
Summary of Contents for IMAGERUNNER 7095 PRINTER
Page 20: ...Chapter 1 Introduction...
Page 46: ...Chapter 2 Installation...
Page 88: ...Chapter 3 Basic Operation...
Page 94: ...Chapter 4 Main Controller...
Page 116: ...Chapter 5 Original Exposure System...
Page 165: ...Laser Exposure Chapter 6...
Page 175: ...Chapter 7 Image Formation...
Page 231: ...Chapter 8 Pickup Feeding System...
Page 287: ...Chapter 9 Fixing System...
Page 312: ...Chapter 10 External and Controls...
Page 346: ...Chapter 11 MEAP...
Page 350: ...Chapter 12 RDS...
Page 360: ...Chapter 13 Maintenance Inspection...
Page 375: ...Chapter 14 Standards Adjustments...
Page 407: ...Chapter 15 Correcting Faulty Images...
Page 433: ...Chapter 16 Self Diagnosis...
Page 460: ...Chapter 17 Service Mode...
Page 559: ...Chapter 18 Upgrading...
Page 583: ...Chapter 19 Service Tools...
Page 588: ...APPENDIX...
Page 615: ......


