Chapter 2
2-17
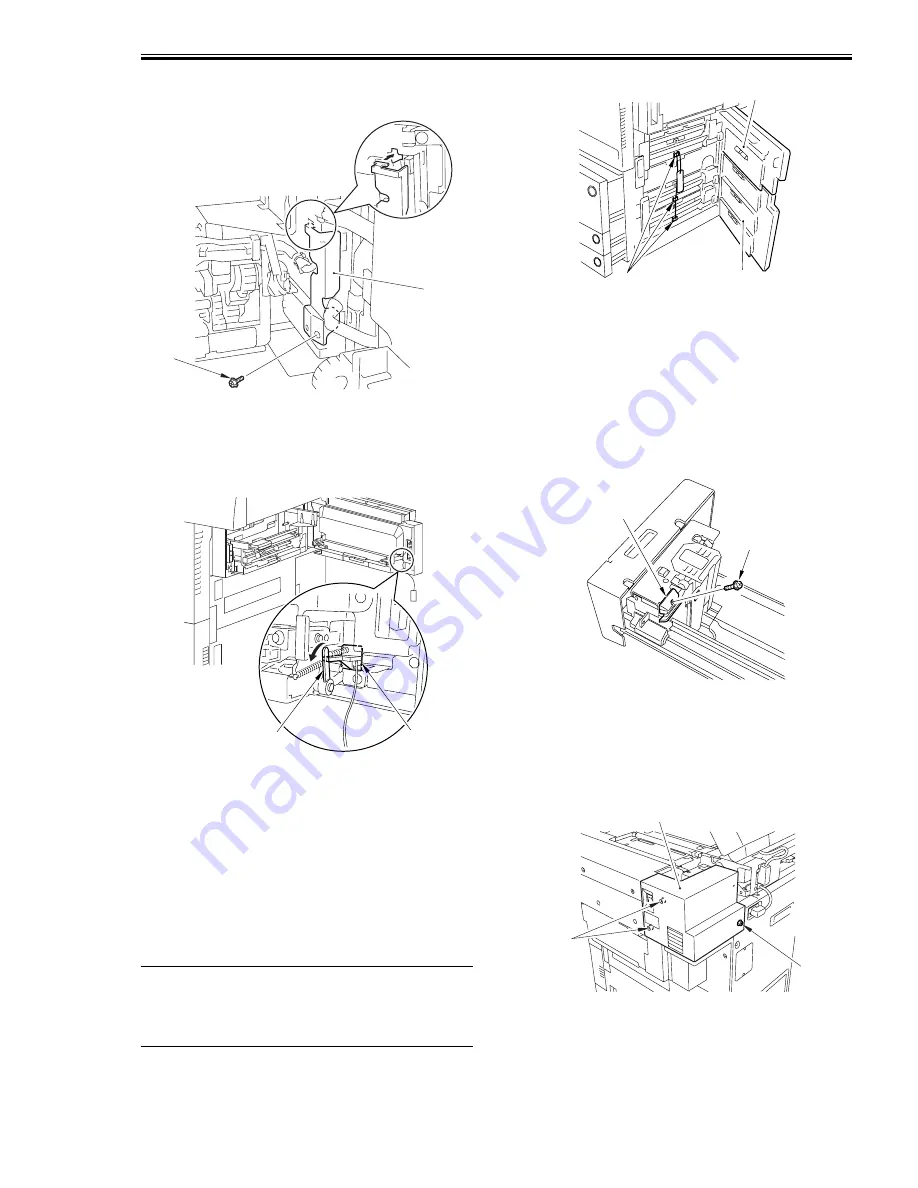
12) Attach the connector cover [1].
- screw (RS tightening; M4X10) [2]
F-2-54
2.2.8 Mounting the Pickup Assembly
0010-8957
1) Shift the lever [1] in the direction of the arrow,
and remove the pickup roller release spacer [2].
F-2-55
2) Close the manual feeder tray unit.
3) Push the release button of the front deck (right)
and the cassette 3/4, and slide them out
halfway.
4) Slide out the cassette 3/4, and remove the
packing tape from where the host machine and
the cassette come into contact (left side of the
host machine and right side of cassette 4).
5) Open the upper right cover [1] and the lower
right cover [2], and remove the 3 pickup roller
release spacers [3].
MEMO:
If the deck/cassette is inside the machine, the
spacer is locked in place and cannot be removed;
be sure to slide the unit out halfway to unlock it.
F-2-56
6) Close the upper right cover and the lower right
cover.
7) Close the front deck (right) and the cassette 3/
4.
8) Press the release button of the front deck (left),
and slide out the deck.
9) Mount the included deck locking plate [1] to
the front deck (left).
- screw (RS tightening; M4X10; white) [2]
Front Deck (left)
F-2-57
10) Close the front deck (left).
2.2.9 Mounting the Control Panel
0011-4903
1) Remove the upper rear right cover [1].
- 3 screws [2]
F-2-58
[1]
[2]
[1]
[2]
[1]
[2]
[3]
[1]
[2]
[2]
[2]
[1]
Summary of Contents for IMAGERUNNER 7095 PRINTER
Page 20: ...Chapter 1 Introduction...
Page 46: ...Chapter 2 Installation...
Page 88: ...Chapter 3 Basic Operation...
Page 94: ...Chapter 4 Main Controller...
Page 116: ...Chapter 5 Original Exposure System...
Page 165: ...Laser Exposure Chapter 6...
Page 175: ...Chapter 7 Image Formation...
Page 231: ...Chapter 8 Pickup Feeding System...
Page 287: ...Chapter 9 Fixing System...
Page 312: ...Chapter 10 External and Controls...
Page 346: ...Chapter 11 MEAP...
Page 350: ...Chapter 12 RDS...
Page 360: ...Chapter 13 Maintenance Inspection...
Page 375: ...Chapter 14 Standards Adjustments...
Page 407: ...Chapter 15 Correcting Faulty Images...
Page 433: ...Chapter 16 Self Diagnosis...
Page 460: ...Chapter 17 Service Mode...
Page 559: ...Chapter 18 Upgrading...
Page 583: ...Chapter 19 Service Tools...
Page 588: ...APPENDIX...
Page 615: ......


