background image

ENG

Basic Operation Guide

After you finish reading this guide, store it in a safe place for future reference. 

Summary of Contents for imageRUNNER ADVANCE 4225

Page 1: ...ENG Basic Operation Guide After you finish reading this guide store it in a safe place for future reference ...

Page 2: ...ing to Your Needs 22 Flow of Basic Operations How to Make a Copy 24 Things You Can Do with the Copy Functions 26 Sending a Fax 30 Things You Can Do with the Fax Functions 32 Sending Scanned Data E Mail Fax I Fax File Servers 36 Things You Can Do with the Scan and Send Functions 38 Storing Scanned Data 42 Things You Can Do with the Scan and Store Functions 44 Printing Stored Data 46 Sending Stored ...

Page 3: ...uency of Paper Jams 138 Clearing Staple Jams For Optional Products 139 If Memory Becomes Full During Scanning 147 When an Error Message Is Displayed 149 When an Error Code Is Displayed 150 Printer Fax Driver Troubleshooting 151 Service Call Message 152 Frequently Asked Questions 158 ...

Page 4: ...ace for future reference Setup Guide Describes the settings required before using functions such as the network settings for sending e mail Describes how to add applications and update the firmware ENG Setup Guide After you finish reading this guide store it in a safe place for future reference Basic Operation Guide This Manual Provides an overview of the functions and describes the basic operatio...

Page 5: ...the machine correctly and avoid damage to the machine or property Indicates a clarification of an operation or contains additional explanations for a procedure Reading these notes is highly recommended Indicates an operation that must not be performed Read these items carefully and make sure not to perform the described operations Driver Installation Guide Provides instructions on installing the p...

Page 6: ...cation you want to save it 3 Double click the index html file inside the iRADV_4251 Manual_enu folder to display the e Manual Depending on the operating system you are using a security protection message may appear In this case allow the content to be displayed When you start the e Manual the following page the top page appears If the e Manual CD ROM Does Not Start The CD ROM auto run function may...

Page 7: ...e information of optional product and software 8 Select from purpose This section includes the introduction of functions of the machine for each purpose 9 Office Locations Inquiries for the machine are displayed 10 Trademarks The trademarks are displayed 11 Copyright The information of copyrights is displayed 12 Disclaimers The disclaimers are displayed Performing a Search Enter a keyword in the e...

Page 8: ...8 MEMO ...

Page 9: ... Can Do What This Machine Can Do 10 Main Power and Energy Saver Key 12 Parts and Their Functions 14 External View 14 Internal View 15 Feeder 16 Control Panel and Touch Panel Display 18 Main Menu Screen Settings 20 Changing Settings According to Your Needs 22 ...

Page 10: ...efficiency Equipped with features that meet the needs of document work in a digitized office the imageRUNNER ADVANCE 4251 4245 4235 4225 represents the ultimate in a digital multitasking machines What This Machine Can Do Copy You can make two sided copies from one sided originals or copy two pages onto one side of the paper to reduce printing cost There are other modes such as the Collate modes p ...

Page 11: ...o be accessed from other imageRUNNER ADVANCE machines for operations such as printing stored data p 42 p 46 Use Remote Scanner You can use this machine as a remote scanner by TWAIN compatible computer software You can scan up to 11 x 17 in size at a resolution of 600 x 600 dpi See e Manual Scanner Print Secured File You can send print data protected with a PIN password from a computer to the machi...

Page 12: ...trical shock If you are using a login service log in using the procedure for the login service you are using If you want to turn OFF the main power and then back ON again wait for at least 10 seconds after the main power indicator is turned OFF before turning ON the main power However when Quick Startup Settings for Main Power is enabled if you don t wait more than 20 seconds after the Main Power ...

Page 13: ... Sending or receiving I fax or fax documents cannot be done when the main power is turned OFF If the message Backing up stored data from the Remote UI is displayed on the touch panel display do not turn the main power OFF This may cause the machine to fail to back up the stored data Data stored in the machine may be damaged if the Advanced Box is accessed by another imageRUNNER ADVANCE machine or ...

Page 14: ...es to the machine You can also connect the machine to a network using a USB cable 7 Right Cover of the Main Unit Open this cover when clearing a paper jam inside the main unit 8 Multi Purpose Tray Use the multi purpose tray to feed paper manually and for loading nonstandard paper stock such as envelopes 9 Paper Drawer s Upper Right Cover Open this cover when clearing a paper jam in Paper Drawers 1...

Page 15: ...ks thick originals thin originals transparencies etc 2 Upper Cover of the Fixing Unit Open this cover to clear a paper jam in the fixing unit 3 Waste Toner Container Waste toner accumulates here 4 Toner Replacement Cover Open this cover to replace the toner cartridge 5 Toner Cartridge When toner runs out pull out the toner cartridge and replace it with a new one ...

Page 16: ... Tray Originals placed here are automatically fed sheet by sheet to the platen glass Place originals into this tray with the surface that you want to scan face up 4 Original Output Area Originals that have been scanned from the original supply tray are output into the original output area in the order that they are fed into the feeder 5 Original Set Indicator Lights when originals are placed in th...

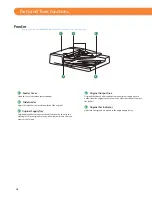
Page 17: ...17 Before You Start Using This Machine ...

Page 18: ...ator Flashes or blinks green when the machine is performing operations and maintains a steady green light when fax data is stored in memory 12 Reset key Press to restore the standard settings of the machine 13 ID Log In Out key Press to log in out when a login service such as Department ID Management or SSO H has been set 14 Numeric keys Press to enter numerical values 15 Touch Panel Display The s...

Page 19: ...f you are managing the machine with a login service such as Department ID Management or SSO H Single Sign On H a log in screen appears If the log in screen appears enter the Department ID and PIN or the user name and password press Log In Out or Log In on the screen Press Log In Out or Log Out after you finish using the machine to log out Use Help If Help is displayed on the top right of the funct...

Page 20: ... and the function to assign to it 3 Press OK Example of Registration Main Menu Screen Settings Select the function that appears on the list and press Up or Down to change the order in which it is displayed You can place or delete one blank button space by pressing Add Blank or Delete Blank respectively You can specify settings for the displayed screen by pressing on the top right of the screen To ...

Page 21: ...Menu Settings 2 Specify the other settings 3 Press OK If Display Language Keyboard Switch is set to On appears on the Main Menu screen If Display Settings Reg Shortcut is set to On Settings Reg Shortcut appears on the Main Menu screen From Settings Reg Shortcut you can select shortcut buttons to the setting screens for Auto Adjust Gradation Paper Settings and Paper Type Management Settings If Disp...

Page 22: ...d cleaning the feeder Function Settings You can specify and register settings for using each function more conveniently such as registering shortcut buttons for the Copy function setting automatic redialing for the Fax function and setting the maximum data size to send via e mail Set Destination You can register fax and e mail destinations in the address book In addition to registering frequently ...

Page 23: ...Can Do with the Scan and Send Functions 38 Storing Scanned Data 42 Things You Can Do with the Scan and Store Functions 44 Printing Stored Data 46 Sending Stored Data 48 Things You Can Do with the Access Stored Files Functions File Operation 50 Things You Can Do with the Access Stored Files Functions Print 51 Things You Can Do with the Access Stored Files Functions Send 54 Operating the Machine fro...

Page 24: ... Function Select Copy from the Main Menu screen Press Copy Copy Basic Features Screen is displayed You can set various copying functions For more information see from p 26 to p 29 in this manual This section describes the flow of basic copy operations How to Make a Copy If a log in screen for Department ID Management or SSO H appears you must enter the applicable authentication information ID pass...

Page 25: ...fter specifying the settings press Start Press Start If you make a mistake when entering values press Clear enter the correct value The specified copy quantity appears on the screen as shown below If the following screen appears press Start to scan the next original After all of the originals are scanned press Start Copying When copying is complete remove your originals ...

Page 26: ... reducing enlarging a scanned document to a preset paper size or by entering a value to specify a desired scan ratio 2 Select Paper You can select the paper size type and the paper source You can also set the machine to automatically recognize the original size and the copy ratio and then copy 3 Copy Sample You can check the copy result of one set before making multiple sets of copies You can also...

Page 27: ...ically interleaves a sheet of paper between each transparency when copying onto transparencies 7 Original Type Image quality for scanning is adjusted according to the type of original such as Text Photo Printed Image Photo Printout or Text 8 Density Change the exposure You can press to make the exposure darker or to make the exposure lighter You can set the machine to automatically adjust the expo...

Page 28: ...entire original image shifted by a designated width to create a margin on the copies You can set different width values for the each side of the paper 5 Shift This mode enables you to make copies with the entire image shifted to the center or a corner You can use the numeric keys to specify the location 6 Print Date You can copy the date day month and year onto the output You can specify the size ...

Page 29: ...gs and copy them as one document 5 Cascade Copy This mode enables you to print copies from the machine and a cascade copy printer 6 Superimpose Image This mode superimposes an image image form previously scanned registers it in the memory of the machine and then places it on the image of the original 7 Store in Mail Box You can store the scanned originals in the User Inbox The specified copy mode ...

Page 30: ...iginals face down Gently close the feeder platen cover When you select Fax from the Main Menu screen you can display the screen for selecting a line For more information see e Manual Settings Registration You can set various facsimile functions For more information see from p 32 to p 35 in this manual If a log in screen for Department ID Management or SSO H appears you must enter the applicable au...

Page 31: ...can specify the destination using the one touch buttons or Address Book For more information on storing the destination see e Manual Fax If the following screen appears press Start to scan the next original After all of the originals are scanned press Start Sending After a job is sent the send settings may be retained except the specified destinations To cancel the settings press Reset To send oth...

Page 32: ...e networ k 6 Previous Settings You can recall the three most recent destinations or fax settings You can send a fax using the recalled destination or settings 7 Favorite Settings Press to register the favorite settings You can also recall the registered settings 8 Resolution If the resolution is high you can send fine text and images clearly If the resolution is low the data size becomes smaller a...

Page 33: ...t a pause after the country code and at the end of the telephone number 2 Backspace Press when you enter an incorrect number to delete the number before the cursor 3 Set Details Displayed when multiple lines are set to be used Press to set the subaddress and password or to select the telephone line to use for transmission 4 Subaddress You can send or receive fax documents with increased security b...

Page 34: ...receive the facsimile and then start scanning the originals You can directly send without storing the original in the memory 7 Select Line You can select the telephone line to use for sending a facsimile 8 Sender Name TTI You can register a department name or personal name in advance and show this on the destination fax machine Set the Sender Name after specifying the destination 9 Job Build You c...

Page 35: ...e enables you to preview the scanned data of your originals and to check the page count before sending a fax You can also delete a specified page 3 Finished Stamp You can print a stamp approximately 1 8 3 mm in diameter on the front side of scanned and sent originals 4 Job Done Notice Press to have the machine notify the user through e mail when the fax job is done ...

Page 36: ...ng on the file format optional products are required to use the Scan function Sending Scanned Data E Mail Fax I Fax File Servers 1 2 Selecting Function Select Scan and Send from the Main Menu screen Press Scan and Send Scan and Send Basic Features screen is displayed Placing Originals Place the original on the feeder or the platen glass Placing originals in the feeder Adjust the slide guides to fi...

Page 37: ... buttons or frequently used settings Also if you want to send to a new destination not yet stored press New Destination enter the destination After a job is sent the send settings may be retained except the specified destinations To cancel the settings press Reset To send other jobs with the same settings specify destinations for the jobs as the destination specified for the previous job is not re...

Page 38: ...stored in a one touch button you can specify the destination quickly Press To Remote Add Book to specify destinations registered in the one touch buttons of a server machine by accessing from a client machine on the network 3 New Destination Press to specify a new destination not stored in the Address Book or one touch buttons 4 Send to Myself You can specify your own e mail address as the destina...

Page 39: ...ou can send fine text and images clearly If the resolution is low the data size becomes smaller and you can reduce the time it takes to send 5 Scan Size You can select the original scanning size If you press Auto Size the machine automatically recognizes the size of the original when scanning 6 File Format If you are sending to an e mail address or file server you can specify the file format You c...

Page 40: ...You can scan originals of different size fed together in one group 5 Erase Frame This mode enables you to erase shadows that appear when scanning various types of originals You can also erase shadows of the punch holes 6 Copy Ratio Specify the desired zoom ratios You can change the zoom ratio by reducing enlarging a scanned document to a preset paper size or by entering a value to specify a desire...

Page 41: ...n the front side of scanned and sent originals 4 Job Done Notice Press to have the machine notify the user through e mail when the send job is done 5 E Mail Priority You can set a priority level when sending e mail 6 Reply to You can specify a reply to address when sending an e mail or I fax 7 Subject Message You can specify a subject and enter a message when sending an e mail or I fax If you do n...

Page 42: ...an select the type of storage location This section describes the flow of basic Scan and Store operations It also describes an example of how to store scanned data in a mail box Depending on the file format optional products are required to use the Scan function Storing Scanned Data 1 Placing Originals Place the original on the feeder or the platen glass Placing originals in the feeder Adjust the ...

Page 43: ...box Press Scan The Scan screen is displayed 4 Start Scanning After specifying the settings press Start Press Start You can set various scan functions For more information see from p 44 to p 45 in this manual If the following screen appears press Start to scan the next original After all of the originals are scanned press Start Storing When scanning is complete remove your originals ...

Page 44: ...lt Set This mode is useful if you want to clear all settings and reset the settings All settings are cleared 8 2 Sided Original Set to scan two sided originals You can select Book Type or Calendar Type 9 Density Change the exposure You can press to make the exposure darker or to make the exposure lighter You can set the machine to automatically adjust the exposure 10 File Name You can specify a fi...

Page 45: ...s of the punch holes 5 Sharpness This mode enables you to adjust image quality for copying You can use this mode when you want to soften and sharpen text lines or the outline of the image 6 Nega Posi This mode enables you to scan and record the original image by inverting the hues and gradations 7 Job Build You can scan originals that are too many to be placed at once by dividing them into multipl...

Page 46: ...mail box This section describes the flow of basic Access Stored Files operations The procedure for printing files stored in a mail box is used here as an example Printing Stored Data If a log in screen for Department ID Management or SSO H appears you must enter the applicable authentication information ID password PIN If the Copy Card Reader F1 is attached first insert a control card If a login s...

Page 47: ...screen is displayed 4 Start Printing After specifying the settings press Start Printing Press Start Printing When printing is complete the display returns to the Mail Box Selection screen You can set various print settings on the screen displayed when Change Print Settings is pressed For more information see from p 51 to p 53 in this manual ...

Page 48: ...s section describes the flow of basic Access Stored Files operations The procedure for sending a file stored in a mail box is used here as an example Sending Stored Data If a log in screen for Department ID Management or SSO H appears you must enter the applicable authentication information ID password PIN If the Copy Card Reader F1 is attached first insert a control card If a login service such a...

Page 49: ...to send press Send Select the file to send Press Send 4 Start Sending Specify the destination press Start Sending Press Address Book Select the destinations press OK Press Start Sending You can set various send functions For more information see p 54 to p 55 in this manual ...

Page 50: ...display the menu for adding or deleting a file or displaying the detailed information of a file 7 Display Image This mode enables you to preview the stored file and check the page count 8 Details You can check the detailed information of the stored file Edit File Screen 9 Delete You can delete stored files You can erase unnecessary files and arrange the storage location 10 Merge Multiple Files You...

Page 51: ... settings You can recall the registered frequently used settings for future use 5 Merge Files and Print Press to merge multiple files and print as one file This key is displayed only when multiple files are selected 6 Delete File After Printing Press to have a file automatically deleted after it is printed 7 Restore Default Set Press to cancel all settings 8 Start Printing Press to start printing ...

Page 52: ...lues for the each side of the paper 6 Print Date This mode enables you to print the date onto the output You can specify the size position or direction of the date 7 Watermark This mode enables you to print a watermark and user defined text onto the output You can specify the size position or direction 8 Copy Set Numbering This mode enables you to print copy set numbers You can specify the size po...

Page 53: ... size 9 Enlarge Reduce You can set the machine to enlarge or reduce data from JPEG or TIFF image files to fit the desired paper size 4 Enlarge Print Area You can set the blank borders at each side of the page to 0 0 mm and print all the way to the edges of the page 10 Image Orientation You can set the machine to compare the size of JPEG and TIFF image data and automatically change the orientation ...

Page 54: ...ecify a new destination not stored in the Address Book or one touch buttons 4 Send to Myself You can specify your own e mail address as the destination The administrator can restrict general users to send e mail only to their addresses 5 Specify Destinations Press to display the methods for specifying destinations or the destination list 6 Personal Folder You can specify your personal folder as th...

Page 55: ...ically extract the first text block in the document for use as its file name 4 Sender Name TTI You can register a department name or personal name in advance and show this on the destination fax machine Set the Sender Name after specifying the destination 5 E Mail Priority You can set a priority level when sending e mail 6 Reply to You can specify a reply to address when sending an e mail or I fax...

Page 56: ... the following settings 1 Press Settings Registration 2 Press Management Settings License Other Remote UI 3 Press On OK 4 Turn OFF the main power of the machine and then turn ON the main power again The Remote UI setting is made effective only after turning the machine s main power OFF and then ON For instructions on turning ON OFF the machine see p 12 13 in this manual The Remote UI User Interfac...

Page 57: ...nd specify the settings To check the job status Click Status Monitor Cancel To specify the settings Click Settings Registration Remote UI Last Page To login as the administrator enter the System Manager ID and System PIN click Administrator Login To login as a general user click General User Login If the Log In screen is displayed enter the user name and password click Log In If a login service su...

Page 58: ...ter you can use the machine to print data created using application software This section describes the flow of basic operations to print data from your computer Printing from a Computer Printing methods may differ depending on the applications you are using For details see the instruction manuals provided with the application software The screens may differ depending on the operating system and t...

Page 59: ...ettings click OK Click OK When printing is complete collect the output A printer driver is software required for printing from application software To display detailed descriptions for each print setting click Help on the bottom right of the Properties screen The print job status can be checked from the Remote UI For more information see p 57 in this manual ...

Page 60: ...60 MEMO ...

Page 61: ...ize 74 Replacing the Stamp Cartridge Feeder 78 Replacing the Staple Cartridge For Optional Products 80 Replacing the Staple Cartridge in the Stapler Unit Staple Finisher G1 Booklet Finisher G1 80 Replacing the Staple Case in the Saddle Stitcher Unit Booklet Finisher G1 83 Replacing the Staple Cartridge Inner Finisher D1 86 Removing Punch Waste For Optional Products 88 External 2 3 Hole Puncher B2 ...

Page 62: ...e mode do not remove the output sheets that are waiting to be stapled Printing and stapling resume after you clear the paper jam Register the size and type of the loaded paper in Paper Settings in Preferences Settings Registration You can use custom paper sizes For more information see e Manual Settings Registration Registering Editing Deleting Custom Paper Sizes You can name register and edit cus...

Page 63: ...per always fan the sheets several times and align the edges to facilitate feeding 3 Load the paper stack into the paper drawer 1 Make sure that the paper size setting of the paper drawer matches the size of the paper to load in the paper drawer 2 Load the paper stack against the right wall of the paper drawer 3 Gently push the paper drawer back into the machine until it clicks into place in the cl...

Page 64: ...out which side of the paper to load follow those instructions When the paper is loaded into the paper drawer the side facing up is the one printed on If problems such as poor print quality or paper jams occur try turning the paper stack over and reloading it For more information on the print direction of preprinted paper paper which has logos or patterns already printed on it see e Manual Copy Rew...

Page 65: ... to adjust the paper size 2 Grip the handle and pull out the paper drawer until it stops 3 Remove all of the remaining paper 2 Adjust the position of the paper drawer guides 1 Slide the left guide while squeezing it on the top to align it with the mark for the desired paper size 2 Slide the front guide while squeezing it on the top to align it with the mark for the desired paper size Slide the gui...

Page 66: ... the plate 3 Insert the plate straight down and close the inside cover The paper size that cannot be used depending on the model and settings is also listed on the paper size plate 5 Gently push the paper drawer back into the machine until it clicks into place in the closed position When returning the paper drawer to its original position be careful not to get your fingers caught as this may resul...

Page 67: ...o stick together and result in difficulties feeding the transparencies In this case fan the loaded transparency sheets or if you have loaded 50 or more sheets reduce the number of sheets to less than 50 or use new transparencies When printing on transparencies depending on the type of image the image may become dense When this happens adjust the density for the output image If a paper jam occurs f...

Page 68: ...e the paper to load Open the packaging for the paper and remove the paper stack For high quality printouts use paper recommended by Canon Before loading paper always fan the sheets several times and align the edges to facilitate feeding 3 Load the paper stack into the paper deck unit 1 Load the paper stack against the back left guide of the paper deck unit 2 Close the paper deck unit When the pape...

Page 69: ...ccommodate more paper the lifter will descend Only load LTR paper into the paper deck unit Paper cannot be loaded horizontally If there are instructions on the paper package about which side of the paper to load follow those instructions When the paper is loaded into the paper deck unit the side facing down is the one printed on If problems such as poor print quality or paper jams occur try turnin...

Page 70: ...r Envelopes that are self sticking which use ink glue or other substances that can melt burn vaporize or emit smells under the heat of a fixing unit approximately 418 F Depending on the materials used for the seal the glue may melt under the fixing unit s heat sealing the envelopes When the envelope cassette is attached and envelope is selected for the paper type the envelope is ejected to the tra...

Page 71: ...efore loading the envelopes 1 Take five envelopes loosen them as shown and then stack them together Repeat this step five times for each set of five envelopes 2 Place the envelopes on a clean level surface and press all the way around the envelopes by hand in the direction of the arrows to remove any curls Repeat this step five times for each set of five envelopes 3 Hold down the four corners of t...

Page 72: ...y melt due to the heat and pressure of the fixing unit Take particular care to spread the envelopes out in the direction that they will be fed Do not print on the back side of the envelopes the side with the flap If the envelopes become filled with air flatten them by hand before loading them into the Envelope Feeder Attachment D1 ...

Page 73: ...he receptacle to lock them into place 2 Align the leading edges of the envelopes and make sure that they are held in place under the claws Load the envelopes as shown below Envelopes which have been rolled or curled must be straightened out prior to use Make sure that the height of the envelope stack does not exceed the height limit mark The maximum height quantity of envelopes that can be loaded ...

Page 74: ...envelopes load more envelopes and follow the instructions on the touch panel display Printing resumes Loading the Envelope after Specifying the Size This section explains how to load the envelopes that are specified in Settings Registration into the envelope cassette Make sure that you change the envelope settings from the Settings Registration screen before carrying out the following procedure Se...

Page 75: ...er several envelopes at a time 3 Slide the left guide to align it with the mark for the desired envelope size Left Guide 4 Adjust the front guide 1 2 3 1 3 1 Loosen the two screws fixing the front width guide of the envelope feeder attachment 2 Press down on the envelope receptacle and move the front width guide to align it with the mark for the desired envelope size 3 Fix the front width guide in...

Page 76: ... envelopes as shown below Envelopes which have been rolled or curled must be straightened out prior to use Make sure that the height of the envelope stack does not exceed the height limit mark The maximum height quantity of envelopes that can be loaded into the cassette is approximately 1 1 4 30 mm The maximum height quantity of envelopes varies depending on the envelope type and user operating co...

Page 77: ...lope sizes see e Manual Settings Registration When returning the paper drawer to its original position be careful not to get your fingers caught as this may result in personal injury Never place paper or any other items in the empty part of the paper drawer next to the envelopes Doing so may cause paper jams If output has been stopped due to an insufficient number of envelopes load more envelopes ...

Page 78: ...nk gets onto your hands or clothing wash it off immediately with cold water The feeder is standard equipped for the imageRUNNER ADVANCE 4251 4245 1 Open the covers 1 Pull the lever open the feeder cover 2 Open the inner cover holding it by its tab 2 Load the stamp cartridge 1 Remove the old stamp cartridge using tweezers 2 Push in the new stamp cartridge until it clicks using tweezers Make sure th...

Page 79: ...79 Routine Maintenance 3 Close the covers 1 Close the inner cover 2 Close the feeder cover When closing the covers be careful not to get your fingers caught as this may result in personal injury ...

Page 80: ...r G1 Booklet Finisher G1 and Inner Finisher D1 are optional products We recommend that you order staple cartridges from your local authorized Canon dealer before your stock runs out Replacing the Staple Cartridge in the Stapler Unit Staple Finisher G1 Booklet Finisher G1 Remove the orange seal that holds the staples together after you place the staple cartridge into the staple case Use only staple...

Page 81: ...tridge 4 Insert a new staple cartridge into the staple case 2 1 3 1 Insert a new staple cartridge 2 Press the spring loaded case down until it clicks into place 3 Remove the seal holding the staples together by pulling it straight out Do not remove the seal that holds the staples together before you place the staple cartridge into the staple case Only one staple cartridge can be inserted at a time...

Page 82: ...ly in place 6 Close the front cover of the finisher When closing the front cover of the finisher be careful not to get your fingers caught as this may result in personal injury After the cover is closed the stapler unit may automatically perform a dry stapling operation to reposition the staples ...

Page 83: ...tray before replacing the staple cartridge of the saddle stitcher unit This procedure is necessary only if the Booklet Finisher G1 is attached the Booklet Finisher G1 is an optional product Use only staple cases intended for use with this machine Remove the black part on the end before inserting the staple case 1 Open the front cover of the finisher ...

Page 84: ...he new staple case in until it clicks into place Only one staple case can be inserted at a time When replacing the staple cases replace both the front and back staple cases 4 Push the saddle stitcher unit back into its original position 1 Pull the stapler unit of the saddle stitcher unit towards you and then push it down into its original position 2 Grip the handle of the saddle stitcher unit and ...

Page 85: ...en closing the front cover of the finisher be careful not to get your fingers caught as this may result in personal injury When you have replaced the staple case be sure to manually reposition the staples in the saddle stitcher unit See e Manual Settings Registration ...

Page 86: ...nisher 1 Open the front cover of the finisher 2 Lift and pull out the staple case from the stapler unit holding it by the green tab 2 Pull out the empty staple cartridge from the staple case PUSH 2 1 1 1 Press the areas indicated by PUSH on both sides of the staple case 2 Once you have released the spring loaded case pull out the staple cartridge ...

Page 87: ... case Only one staple cartridge can be inserted at a time Make sure that you pull the seal straight out If you pull it out at an angle it may tear 4 Attach the staple case 1 Gently push the staple case back into the finisher and push down firmly until it is securely in place 2 Close the front cover of the finisher When closing the front cover of the finisher be careful not to get your fingers caug...

Page 88: ...rocedure described below to remove the punch waste The External 2 3 Hole Puncher B2 and Inner 2 3 Hole Puncher A1 are optional products External 2 3 Hole Puncher B2 The External 2 3 Hole Puncher B2 is available only when the Staple Finisher G1 or Booklet Finisher G1 is attached 1 Pull out the punch waste tray 1 Open the front cover of the puncher 2 Pull out the punch waste tray 2 Discard the punch...

Page 89: ...e careful not to get your fingers caught as this may result in personal injury If the punch waste tray is not securely in place you cannot make copies or prints in the Hole Punch mode Inner 2 3 Hole Puncher A1 The Inner 2 3 Hole Puncher A1 is available only if the Inner Finisher D1 is attached 1 Pull out the punch waste tray 1 Open the front cover of the inner finisher 2 Pull out the punch waste t...

Page 90: ...s original position 1 Push the punch waste tray back into its original position 2 Close the front cover of the inner finisher When closing the cover be careful not to get your fingers caught as this may result in personal injury If the punch waste tray is not securely in place you cannot make prints in the Hole Punch mode ...

Page 91: ...originals even if you do not replace the toner cartridge immediately Do not burn or throw used toner cartridges into open flames as this may cause the toner to ignite resulting in burns or a fire If you accidentally spill or scatter toner carefully wipe up the loose toner with a damp soft cloth and avoid inhaling any toner dust Do not use a vacuum cleaner that is not equipped with safety measures ...

Page 92: ...r cartridge After replacing toner cartridges if printed gradation and density are different from the gradation and density printed before you replaced the toner cartridges perform an Auto Adjust Gradation in Adjustment Maintenance Settings Registration See e Manual Settings Registration 1 Remove the toner cartridge 1 Open the toner replacement cover 2 Pull out the toner cartridge Pull the toner ca...

Page 93: ...counterclockwise to remove it 3 Insert the new toner cartridge 1 Push the new toner cartridge in the direction indicated by the arrow on the cartridge 2 Push the new toner cartridge in until it stops Support the new toner cartridge with your hand from underneath while pushing it into the machine with your other hand Firmly push the toner cartridge in until it stops Otherwise the toner cartridge wi...

Page 94: ...94 4 Close the toner replacement cover When closing the toner replacement cover be careful not to get your fingers caught as this may result in personal injury ...

Page 95: ...nd avoid inhaling any toner dust Do not use a vacuum cleaner that is not equipped with safety measures to prevent dust explosions to clean up loose toner Doing so may cause damage to the vacuum cleaner or result in a dust explosion due to static discharge Keep toner out of the reach of small children If toner is ingested consult a physician immediately If toner gets onto your hands or clothing was...

Page 96: ...he cover from the used waste toner container 2 Use the provided cover to cover up the opening of the used waste toner container 4 Remove the protective cap of the new waste toner container 1 Remove the cover from the opening of the used waste toner container 2 Attach the cover to the waste toner container ...

Page 97: ...iner in the bottom left area 6 Close the front cover of the machine 1 Turn the lever to the left 2 Close the front cover of the machine When closing the front cover of the machine be careful not to get your fingers caught as this may result in personal injury ...

Page 98: ... do not dampen it too much as this may damage the original or break the machine Do not use alcohol benzene paint thinner or other solvents for cleaning Doing so may result in damage to the plastic parts The feeder is standard equipped for the imageRUNNER ADVANCE 4251 4245 Platen Glass and Underside of the Feeder Platen Cover If the platen glass or the underside of the feeder platen cover is dirty ...

Page 99: ...pin the rollers while cleaning them If the document feed scanning area is dirty documents may not be scanned clearly and the size of the document may not be detected correctly 1 Clean the rollers of the feeder 1 Pull the lever and open the feeder cover 2 Clean the rollers a total of three places inside the feeder cover 2 Clean the rollers inside the inner cover 1 Open the inner cover holding it by...

Page 100: ...the plastic area 2 Close the inner cover and then close the feeder cover When closing the covers be careful not to get your fingers caught as this may result in personal injury 4 Clean the feeder scanning area thin glass strip 1 Open the feeder 2 Clean the feeder scanning area ...

Page 101: ...r and the surrounding area 1 Turn the resin roller while turning the feed dial 2 Clean the area while turning the resin roller 3 Close the feeder When closing the feeder be careful not to get your fingers caught as this may result in personal injury ...

Page 102: ...r 1 Press Settings Registration 2 Press Adjustment Maintenance Maintenance Clean Feeder 3 Place 10 sheets of blank paper into the feeder press Start It takes approximately 15 seconds to clean the feeder Use normal LTR size paper When cleaning is complete try scanning again Feeder Cleaning cannot be performed during printing To cancel feeder cleaning while it is in progress press Cancel ...

Page 103: ...aces exposed to open flames as this may cause the paper to ignite resulting in burns or a fire Some commercially available paper types are not suited for this machine Contact your local authorized Canon dealer when you need to purchase paper To prevent moisture build up tightly wrap any remaining paper in its original package for storage For high quality printouts use paper recommended by Canon To...

Page 104: ...sult in a dust explosion due to static discharge Keep toner out of the reach of small children If toner is ingested consult a physician immediately Store toner cartridges in a cool location away from direct sunlight The recommended storage conditions are temperatures below 86 F and humidity below 80 Be careful of counterfeit toners Please be aware that there are counterfeit Canon toners in the mar...

Page 105: ...r Finisher D1 Staple J1 Genuine Supplies Canon has developed and manufactured Toner Parts and Supplies specifi cally for use in this machine For optimal print quality and for optimal machine performance and productivity we recommend that you use Genuine Canon Toner Parts and Supplies Contact your Canon Authorized Dealer or Service Provider for Genuine Canon Supplies ...

Page 106: ...106 MEMO ...

Page 107: ... Booklet Finisher G1 140 Saddle Stitcher Unit of the Booklet Finisher G1 142 Inner Finisher D1 145 If Memory Becomes Full During Scanning 147 For the Copy Function 147 For the Fax Scan and Send Function 147 For the Scan and Store Function 148 When an Error Message Is Displayed 149 When an Error Code Is Displayed 150 Printer Fax Driver Troubleshooting 151 Service Call Message 152 Contacting Your Lo...

Page 108: ...he paper from scattering and getting into your eyes or mouth If the toner gets into your eyes or mouth wash them immediately with cold water and immediately consult a physician The fixing unit and its surroundings inside the machine may become hot during use When removing jammed paper or when inspecting the inside of the machine do not touch the fixing unit and its surroundings as doing so may res...

Page 109: ... See the applicable section to clear the paper jam Paper Drawer p 116 Main Unit p 111 Cassette Feeding Unit AF1 Optional p 117 Paper Deck Unit B2 Optional p 119 Inside the Top Cover p 124 External 2 3 Hole Puncher B2 p 126 Inside the Front Cover p 129 Buffer Pass Unit H1 p 125 Saddle Stitcher Unit p 131 ...

Page 110: ...110 1 1 3 Feeder p 122 When the Inner 2 3 Hole Puncher A1 Is Attached p 134 When the Inner 2 3 Hole Puncher A1 Is Not Attached p 133 Inner 2Way Tray H1 Optional p 137 ...

Page 111: ...pose tray remove the loaded paper This section uses illustrations of the machine with the Inner Finisher D1 attached 1 Open the right cover of the machine 2 1 1 Press the open button of the right cover of the machine 2 Open the right cover of the machine 2 Remove any jammed paper protruding from the first output tray If you cannot remove the jammed paper remove it from below 3 Remove any jammed pa...

Page 112: ... following the procedure below 1 Remove any jammed paper from the area near the output area If the Inner Finisher D1 and Inner 2 3 Hole Puncher A1 or Staple Finisher G1 Booklet Finisher G1 and Buffer Pass Unit H1 are attached remove any jammed paper following the procedure below 2 3 1 1 Pull out the output unit 2 Remove any jammed paper 3 Close the output unit If a paper jam occurs when you are pr...

Page 113: ...hine do not touch the fixing unit and its surroundings as doing so may result in burns 6 Remove any jammed paper from the lower part of the fixing unit and the area near the registroller 1 2 1 Remove any jammed paper from the lower part of the fixing unit 2 Remove any jammed paper from the area near the registroller The fixing unit and its surroundings inside the machine may become hot during use ...

Page 114: ...ral part behind the right cover of the machine The lower part behind the right cover of the machine may become hot during use When removing jammed paper or when inspecting the inside of the machine do not touch this area of the machine as doing so may result in burns 9 Remove any jammed paper from the feeding unit of the multi purpose tray If you cannot remove the jammed paper from the bottom side...

Page 115: ...in personal injury Gently close the covers until they click into place in the closed position 11 Close the right cover of the machine When closing the cover be careful not to get your fingers caught as this may result in personal injury Gently close the cover until it clicks into place in the closed position If the Paper Deck Unit B2 was moved away from the main unit reconnect it to the main unit ...

Page 116: ... the main unit before proceeding with this procedure 1 Remove any paper jammed in the paper drawer s upper right cover 2 1 3 1 Open the paper drawer s upper right cover holding it by its handle 2 Remove any jammed paper 3 Close the paper drawer s upper right cover When closing the cover be careful not to get your fingers caught as this may result in personal injury Gently close the cover until it ...

Page 117: ... unit reconnect it to the main unit 4 Follow the instructions on the screen The screen indicating the directions on how to clear the paper jam is displayed repeatedly until the paper jam is cleared Cassette Feeding Unit AF1 Optional If the Paper Deck Unit B2 is attached move the paper deck unit away from the main unit before proceeding with this procedure 1 Open the paper drawer s upper right cove...

Page 118: ...drawer s upper right cover 2 Close the paper drawer s lower right cover When closing the covers be careful not to get your fingers caught as this may result in personal injury Gently close the covers until they click into place in the closed position 4 Remove any paper jammed in the cassette feeding unit 1 2 3 1 Press the open button of the paper drawer that is feeding the paper 2 Grip the handle ...

Page 119: ...esult in personal injury If the Paper Deck Unit B2 was moved away from the main unit reconnect it to the main unit 6 Follow the instructions on the screen The screen indicating the directions on how to clear the paper jam is displayed repeatedly until the paper jam is cleared Paper Deck Unit B2 Optional 1 Move the paper deck unit away from the main unit 2 1 1 Press the release button 2 Move the pa...

Page 120: ...r can also be jammed in the feeding slot on the side of the main unit Remove any jammed paper from the feeding slot 3 Reconnect the paper deck unit to the main unit If the paper jam message is no longer displayed when you reconnect the paper deck unit proceed to step 7 When connecting the paper deck unit to main unit be careful not to get your fingers caught as this may result in personal injury ...

Page 121: ...r deck unit In this case press Energy Saver to reactivate the machine and then press the open button on the paper deck unit 5 Remove any jammed paper Look carefully as jammed paper may be difficult to see 6 Close the paper deck unit When closing the paper deck unit be careful not to get your fingers caught as this may result in personal injury 7 Follow the instructions on the screen The screen ind...

Page 122: ...aper The feeder is standard equipped for the imageRUNNER ADVANCE 4251 4245 1 Remove any paper jammed in the feeder cover 2 1 1 1 Pull the lever and open the feeder cover 2 Remove any jammed paper 2 Open the inner cover and remove any paper jammed 1 2 2 1 Open the inner cover holding it by its tab 2 Turn the feed dial on the inner side of the feeder cover and remove the jammed paper ...

Page 123: ...ersonal injury 4 Remove any paper jammed in the feeder 2 1 3 1 Open the feeder 2 Remove any jammed paper 3 Close the feeder When closing the feeder be careful not to get your fingers caught as this may result in personal injury 5 Follow the instructions on the screen The screen indicating the directions on how to clear the paper jam is displayed repeatedly until the paper jam is cleared ...

Page 124: ...tput slot 2 Remove any jammed paper that is visible If you cannot see any paper check whether there is any jammed paper in the output area If a paper jam occurs when you are printing in the Staple mode do not remove the output sheets that are waiting to be stapled Printing and stapling resume after you clear the paper jam 2 Open the top cover of the finisher and remove any jammed paper 1 1 2 2 3 3...

Page 125: ...ve any jammed paper from the buffer pass unit 1 3 2 1 Open the buffer pass unit 2 Remove any jammed paper 3 Close the buffer pass unit When closing the buffer pass unit be careful not to get your fingers caught as this may result in personal injury 2 Follow the instructions on the screen The screen indicating the directions on how to clear the paper jam is displayed repeatedly until the paper jam ...

Page 126: ...126 External 2 3 Hole Puncher B2 1 Open the front cover of the puncher waste tray 2 Align the pointed notch on the knob within the shaded region ...

Page 127: ...e the jammed paper remove it from below 4 Open the top cover of the finisher and remove any jammed paper 1 1 2 2 3 3 2 1 1 Booklet Finisher G1 2 Staple Finisher G1 1 Open the top cover of the finisher 2 Remove any jammed paper 3 Close the top cover of the finisher When closing the cover be careful not to get your fingers caught as this may result in personal injury ...

Page 128: ...he top cover 2 Close the front cover When closing the covers be careful not to get your fingers caught as this may result in personal injury 6 Follow the instructions on the screen The screen indicating the directions on how to clear the paper jam is displayed repeatedly until the paper jam is cleared ...

Page 129: ...ay to remove the jammed paper The Booklet Finisher G1 is an optional product Inside the Front Cover 1 Open the front cover of the finisher 2 Remove any jammed paper from the upper delivery guide 2 1 Upper Delivery Guide 1 Open the upper delivery guide 2 Remove any jammed paper The upper delivery guide is spring loaded When you release the upper delivery guide it returns to its original position ...

Page 130: ... delivery guide to its original position be careful not to get your fingers caught as this may result in personal injury 4 Close the front cover of the finisher When closing the cover be careful not to get your fingers caught as this may result in personal injury 5 Follow the instructions on the screen The screen indicating the directions on how to clear the paper jam is displayed repeatedly until...

Page 131: ...titcher Unit 1 Open the front cover of the finisher 2 Turn the knob on the right in the direction of the arrow counterclockwise until it stops 3 While pushing in the knob on the left turn it in the direction of the arrow clockwise ...

Page 132: ...to the right 2 Remove any jammed paper 3 Return the delivery guide to its original position When returning the delivery guide to its original position be careful not to get your fingers caught as this may result in personal injury 6 Close the front cover of the finisher When closing the cover be careful not to get your fingers caught as this may result in personal injury ...

Page 133: ... described below while referring to the directions that appear on the touch panel display to remove the jammed paper The Inner Finisher D1 and Inner 2 3 Hole Puncher A1 are optional products If there is paper in the output tray remove the output paper before proceeding with this procedure When the Inner 2 3 Hole Puncher A1 Is Not Attached 1 Follow the instructions in Main Unit to remove any jammed...

Page 134: ...t to get your fingers caught as this may result in personal injury 4 Follow the instructions on the screen The screen indicating the directions on how to clear the paper jam is displayed repeatedly until the paper jam is cleared When the Inner 2 3 Hole Puncher A1 Is Attached 1 Follow the instructions in Main Unit to remove any jammed paper p 111 ...

Page 135: ... inside the inner finisher 1 1 3 2 1 Grip the lever and pull the finisher away from the main unit 2 Press down and hold the inner guide and remove any jammed paper 3 Return the finisher to its original position When returning the finisher to its original position be careful not to get your fingers caught as this may result in personal injury ...

Page 136: ... the front cover be careful not to get your fingers caught as this may result in personal injury 6 Follow the instructions on the screen The screen indicating the directions on how to clear the paper jam is displayed repeatedly until the paper jam is cleared ...

Page 137: ... touch panel display to remove the jammed paper The Inner 2Way Tray H1 is an optional product 1 Follow the instructions in Main Unit to remove any jammed paper p 111 2 Remove any jammed paper from the Inner 2Way Tray 3 Follow the instructions on the screen The screen indicating the directions on how to clear the paper jam is displayed repeatedly until the paper jam is cleared ...

Page 138: ... of paper left inside the machine Pulling jammed paper out of the machine by force may leave parts of the paper torn inside leading to frequent paper jams If paper tears while you are trying to remove jammed paper from the machine make sure that you remove all of the torn pieces The paper loaded in the paper drawer differs from the setting Make sure that the paper loaded in the paper drawer matche...

Page 139: ...d repeatedly until the staple jam is cleared If you press Close you can continue operations such as setting modes or scanning originals even if the jammed staple is not removed immediately Locations of Staple Jams For information on the parts of the machine in which staple jams occur and instructions on clearing staple jams see the following A B 1 2 1 2 1 2 Staple Finisher G1 Booklet Finisher G1 p...

Page 140: ...pear on the touch panel display to remove the jammed staple Make sure to close all covers and paper drawers of the machine before clearing any staple jams The Staple Finisher G1 and Booklet Finisher G1 are optional products 1 Open the front cover of the finisher 2 1 1 Booklet Finisher G1 2 Staple Finisher G1 2 Pull out the staple case holding it by the green tab ...

Page 141: ...staple case to its original position 4 Gently push the staple case back into the finisher and push down firmly until it is securely in place 5 Close the front cover of the finisher When closing the cover be careful not to get your fingers caught as this may result in personal injury After the cover is closed the stapler unit may automatically perform a dry stapling operation to reposition the stap...

Page 142: ...fore clearing any staple jams Before clearing a staple jam in the saddle stitcher unit remove all paper that has been output to the booklet tray The Booklet Finisher G1 is an optional product 1 Open the front cover of the finisher 2 Pull out the saddle stitcher unit 2 1 2 1 1 Stapler Unit of the Saddle Stitcher Unit 2 Saddle Stitcher Unit 1 Grip the handle of the saddle stitcher unit and pull out ...

Page 143: ... the jammed staples holding it by its left and right sides 1 2 4 Push down the tab on the staple case A B 1 2 1 Push down Part A to unlock 2 Push up Part B 5 Remove any jammed staples B 2 1 1 Remove any jammed staples 2 Return Part B to its original position ...

Page 144: ...he saddle stitcher unit and return it to its original position When returning the saddle stitcher unit to its original position be careful not to get your fingers caught as this may result in personal injury 8 Close the front cover of the finisher When closing the cover be careful not to get your fingers caught as this may result in personal injury When you have cleared the staple jam be sure to m...

Page 145: ...touch panel display to remove the jammed staples Make sure to close all covers and paper drawers of the machine before clearing any staple jams The Inner Finisher D1 is an optional product 1 Remove any jammed paper protruding from the output tray 2 Pull out the staple case 1 2 1 Open the front cover of the finisher 2 Pull out the staple case holding it by the green tab ...

Page 146: ...inal position 4 Attach the staple case 2 1 1 Gently push the staple case back into the finisher and push down firmly until it is securely in place 2 Close the front cover of the finisher When closing the cover be careful not to get your fingers caught as this may result in personal injury After the cover is closed the stapler unit may automatically perform a dry stapling operation to reposition th...

Page 147: ... Scan and Send you can send up to 999 pages at one time Delete any unnecessary files in the Mail Box and Fax I Fax Inbox to free up memory For the Copy Function Follow the directions below based on the message that appears on the touch panel display If the message Scanning will be canceled because the memory is full Do you want to print the scanned pages appears Select Yes or No Yes No The pages s...

Page 148: ...Do you want to store the scanned pages appears Select Yes or No Yes No The pages scanned into memory are stored When storing is complete scan the remaining originals The pages scanned into memory are not stored If the message Scanning will be canceled because the memory is full Wait a moment then try again appears Select OK OK Returns to the Basic Features screen of the function you are using ...

Page 149: ...rinting cannot be performed because of an operational error When you need to make a decision or take some action during scanning or printing When you need to make a decision or take some action while browsing the network Example of an Error Message on the Touch Panel Display Example of an Error Message on the Web Browser For information on error messages and instructions on resolving errors see e ...

Page 150: ...a job or operation is not completed normally Results row of the Communication Management Report If an error occurs during a send receive or fax job the error code is printed iRADVXXXX 04 15 2013 START TIME END TIME TYPE DELIVER DEPT ID ADDRESS BOOK DEPT ID ADDRESS BOOK DEPT ID ADDRESS BOOK DEPT ID ADDRESS BOOK DELIVER DELIVER DELIVER TO FROM DATA DETAILS RESULT DEVICE INFORMATION COMMUNICATION LOG...

Page 151: ...ve problems when using the printer driver or fax driver for Windows The following screens indicate the directions on how to display Troubleshooting from the screen for the printer driver The screens may differ depending on the operating system and the type and version of the printer driver you are using ...

Page 152: ...me functions may still be available When Limited Functions Mode Is Displayed If Limited Functions Mode is displayed you can temporally set the Limited Functions Mode to continue to use the machine until the cause of the malfunction is cleared For more information see Setting the Limited Functions Mode from the Service Call Message Screen on p 155 If a screen such as the one below is displayed and ...

Page 153: ...ompting you to contact your local authorized Canon dealer is displayed follow the procedure described below 1 Turn OFF the main power of the main unit 1 2 3 1 Open the main power switch cover 2 Press the main power switch to the side 3 Close the main power switch cover If you turn OFF the main power switch when there is a job waiting to print that job is erased 2 Wait at least 10 seconds after the...

Page 154: ...is may result in electrical shock Always grasp the power plug when disconnecting the power cord Pulling on the power cord may expose or snap the core wire or otherwise damage the power cord If the power cord is damaged this could cause current to leak resulting in a fire or electrical shock When you contact your local authorized Canon dealer have the following information available Product name De...

Page 155: ... On See e Manual Security 1 Press Limited Functions Mode Yes A message prompting you to restart the machine turning the main power switch OFF and then ON appears 2 Turn OFF the main power of the main unit 1 2 3 1 Open the main power switch cover 2 Press the main power switch to the side 3 Close the main power switch cover 3 Wait at least 10 seconds after the Main Power Indicator is turned off and ...

Page 156: ...the Scan function is restricted Copy Fax 1 Scan and Send Scan and Store 2 Access Stored Files 3 Fax I Fax Inbox Secure Print Remote Scan Web Access Shortcut to Settings Registration Tutorial Workflow Composer Document Scan Code Analyzer for MEAP 4 Other MEAP Applications 5 Control Panel Available Unavailable Available Functions When the Print function is restricted When the Scan function is restri...

Page 157: ...ilable by installing each MEAP application May not be available depending on the restricted functions 6 The registered button may not be available depending on the restricted functions 7 Print List on the Job Log screen and Register on the Consumable screen are not available A print job is automatically canceled when the Print function is restricted A scan job is automatically canceled when the Sc...

Page 158: ... in a one touch button p 168 Q15 Can I add an arbitrary subject when sending e mail p 169 Q16 How do I change the storage period for the scanned file stored in the Mail Box p 169 Q17 How do I access the Advanced Box from a computer p 170 Q18 How do I forward received data to the Advanced Box p 170 Q19 How do I set to create a booklet with a file in a mail box p 171 Q20 I cannot print PDF files sto...

Page 159: ...ed on the touch panel display What do they mean p 181 Q39 I cannot print from the computer Did the machine malfunction p 181 Q40 It seems as though turning OFF the machine is different from the previous imageRUNNER I am afraid that this may be a wrong operation p 182 Q41 The touch panel display is completely black p 182 Q42 I have just sent an important document via facsimile Can I check to make s...

Page 160: ...el 2 Press Copy Print Job Status from the Print drop down list 3 Select the job press Interrupt Priority Print 4 Press Interrupt and Print Additional Information You can scan the original even if the machine is waiting or printing Reserved Copying For more information see e Manual Copy 2 When copying the Scan screen for the next document is displayed Is there a way to not display this screen When ...

Page 161: ...cement Setting procedure 1 Press Scan and Send or Fax Options 2 Press Finished Stamp Close Additional Information After the original is sent you can also send a job done notice to the specified e mail address Job Done Notice For more information see e Manual Scan and Send or Fax 4 Do I need to enter the address of the recipient every time You can store frequently used destination in the Address Bo...

Page 162: ...stination and Selecting a Group Destination Registering a group destination in the Address Book 1 Press Address Book Register Edit Register New Dest 2 Press Group enter the name and register the group in the Address Book 3 Press Add from Address Book select the addresses to register 4 Press OK OK Storing from the Touch Panel Display 1 Press Scan and Send or Fax Address Book Register Edit 2 Press R...

Page 163: ...ick Permission 6 Select the users you want to authorize access select Allow for Full Control 7 Click OK OK Close Using Windows Vista 1 Right click the new folder click Property Sharing 2 Click Share select the users you want to authorize access click Add 3 Select Co owner for Permission Level for the added users click Share End 4 Click Advanced Sharing select Share this folder click Permission 5 A...

Page 164: ... the keyboard 7 Can I move the Address Book registered on another Canon machine onto this machine You can use the import and export mode of the Remote UI to move the Address Book Exporting the Address Book from Another Canon Machine 1 Click Settings Registration select Data Management for Management Settings 2 Click Address Lists for Import Export Individually Export 3 Select the Address List and ...

Page 165: ...uently used e mail addresses are stored in the Address Book you can specify the address quickly For more information see e Manual Settings Registration 9 When sending a fax can the machine be set so that the sender s fax number and name be displayed After registering the sender s name you can specify to print the TX Terminal ID when sending a fax 11 11 2013 MON 15 00 Atlanta office 001 001 Date Ti...

Page 166: ...ures screen You can store the current settings as the default settings from on the Scan and Send Basic Features screen Before Change After Change To register the settings as the default settings 1 Press Scan and Send specify the scan settings and the file format 2 Press Change Default Settings Yes Additional Information For more information on each file format see e Manual Scan and Send ...

Page 167: ... a way to prevent a transmission error when sending a facsimile to a new destination If Confirm Entered Fax Number in Settings Registration is set a screen to enter the number for confirmation is displayed By entering the number again you can reduce the risk of transmission error Setting procedure 1 Press Settings Registration 2 Press Function Settings Send Fax Settings 3 Press Confirm Entered Fax...

Page 168: ...X 4 Press OK Setting forwarding conditions for the receiving line 1 Press Settings Registration 2 Press Function Settings Receive Forward Common Settings 3 Press Forwarding Settings select the line from the Receive drop down list select Register set the forwarding conditions 4 Press Close Additional Information For more information on the forwarding conditions see e Manual Settings Registration 14...

Page 169: ...efault Subject in Settings Registration is inserted as the subject The default setting is Attached Image 16 How do I change the storage period for the scanned file stored in the Mail Box You can change the time until files are automatically erased from Set Register Mail Boxes in Settings Registration Change the setting as necessary You can set the time until the files are automatically erased to 0...

Page 170: ...Forwarding Settings Register specify the forwarding conditions 4 Press Forwarding Destination Address Book specify the Advanced Box destination 17 How do I access the Advanced Box from a computer If the Advanced Box is opened with SMB check the following Checking the settings for Open to Public 1 Press Settings Registration 2 Press Function Settings Store Access Files Advanced Box Settings 3 Press...

Page 171: ...Print Settings Options 3 Press Booklet Booklet Scan Fold Saddle Stitch 4 Specify the cover settings orientation and detailed settings press OK Additional Information For details on the Booklet mode settings see e Manual Access Stored Files Use a document that was stored with the Booklet Scan mode set For details on the Booklet Scan mode settings see e Manual Scan and Store 20 I cannot print PDF fi...

Page 172: ... the computer booklet was not made even though saddle stitch booklet mode was set The Saddle Stitch mode cannot be used if you exceed the maximum number of sheets that can be saddle stitched In that case you can use the Divided Booklet mode The maximum number of sheets that can be saddle stitched is 16 sheets 14 lb to 22 lb bond 52 g m2 to 81 g m2 10 sheets 22 lb to 28 lb bond 82 g m2 to 105 g m2 ...

Page 173: ...n be manually adjusted Additional Information For more information see e Manual Copy 23 The printed paper appears dirty Also the color appears to be different from the original If streaks are printed on the paper or the image is not printed evenly the inside of the feeder may be dirty Follow the procedure below to clean the feeder You can also automatically correct the gradation of the image from ...

Page 174: ...dditional Information For information on loading paper see e Manual Maintenance 25 I had printed from the computer but I did not find the output I am afraid that someone may have taken it by mistake You can check the Print Logs from the touch panel display of this machine If the job is listed as OK on the Log and you did not find the output the print job may have intermixed with another user s out...

Page 175: ...tructions on installing the Network ScanGear Driver see the Network ScanGear User s Guide on the UFR II User Software CD ROM 27 Can I make copies or send a facsimile of different size originals at the same time You can make copies or send a facsimile of different size originals at the same time by using the Different Size Originals mode The Different Size Originals mode enables you to copy scan di...

Page 176: ...n A paper jam is more likely to occur with paper already printed on compared to new paper 29 Can I output paper to a different tray according to the function You can set the output tray for each function and set priorities for outputting paper The output trays indicated by Tray A B and C differ according to the optional product attached to the machine Setting procedure 1 Press Settings Registratio...

Page 177: ...ize LGL LTR LTRR STMTR EXEC and Custom Size 5 1 2 x 7 1 8 to 11 3 4 x 15 3 8 139 7 mm x 182 mm to 297 mm x 390 mm Type Plain 1 Plain 2 Recycled Color Heavy 1 Heavy 2 Pre Punched Paper Drawer 2 3 and 4 Weight 16 lb bond to 34 lb cover 60 to 128 g m2 Size 11 x 17 LGL LTR LTRR STMTR EXEC Envelope No 10 COM10 Monarch DL ISO C5 and Custom Size 5 1 2 x 7 1 8 to 11 3 4 x 17 139 7 mm x 182 mm to 297 mm x ...

Page 178: ... forwarding errors are printed If you select Off no jobs with forwarding errors are printed Additional Information For more information see e Manual Settings Registration Additional Information For more information on the available paper types see e Manual Basic Operations 32 How do I print data received via fax I fax on paper specified in advance You can change the paper source from Paper Drawer ...

Page 179: ...ings to print the data received from specific destinations only Printing for Specific Destinations Only 1 Press Settings Registration 2 Press Function Settings Receive Forward Common Settings 3 Press Forwarding Settings Register specify the destinations in Conditions 4 Set Store Print Received File to On press OK Close Forwarding to the Confidential Fax Inbox for Other Destinations 1 Press Setting...

Page 180: ...1 and Inner Finisher D1 Staple Cartridge D2 For the Booklet Finisher G1 Additional Information For information on replacing the staple cartridges and stamp cartridges see Chapter 3 Routine Maintenance 37 A paper jam has occurred How do I solve this problem The procedure for clearing a paper jam is displayed on the touch panel display Follow the instructions to clear the paper jam Main Unit Feeder ...

Page 181: ...n on Department ID Management settings contact your System Manager t remove the toner cartridge after the toner replacement cover is opened 38 Numbers such as 751 and 801 are displayed on the touch panel display What do they mean These are error codes indicating that a job or operation did not complete successfully They are displayed on the Details screen from Log on the Status Monitor Cancel scre...

Page 182: ...Saver mode see e Manual Basic Operations Follow the procedure below to change the Auto Sleep Time 1 Press Settings Registration 2 Press Preferences Timer Energy Settings Auto Sleep Time 3 Specify the time press OK 40 It seems as though turning OFF the machine is different from the previous imageRUNNER I am afraid that this may be a wrong operation For the previous imageRUNNER you needed to press a...

Page 183: ... and Set Page Limits specify the page limit settings press OK 42 I have just sent an important document via facsimile Can I check to make sure that it was sent correctly You can check the send job status from the Status Monitor Cancel screen or receive notification of the sending result via e mail To check from the Status Monitor Cancel screen 1 Press Status Monitor Cancel 2 Press Send Log To rece...

Page 184: ...tch 4 Select the language to display press OK Additional Information You can follow the procedure below to display a shortcut to the language switch on the Main Menu screen 1 Press Other Main Menu Settings On for Display Language Keyboard Switch 2 Press OK For more information see e Manual Basic Operations 45 Can I change the screen or the order that the functions are displayed on the touch panel ...

Page 185: ...e Remote UI Run the Web browser for the computer enter http IP address of the machine in the address bar Setting the Default Display That Appears after the Machine Is Turned ON 1 Press Settings Registration 2 Press Preferences Display Settings Default Screen after Startup Restoration 3 Select the settings press OK Changing the Displayed Function 1 Press 2 Press Main Menu Button Display Settings 3 ...

Page 186: ... Panel Printer 2 Right click the printer icon click Printing Preferences specify the printer settings 3 Click OK Additional Information To perform this procedure you must have administrator privileges For more information see e Manual Security If you cannot start the Remote UI specify the following settings 1 Press Settings Registration 2 Press Management Settings License Other Remote UI 3 Press O...

Page 187: ... Printer The name of your printer 3 Click the Settings drop down list Save As Default OK Print Settings 1 Click Print from the File menu in the application software 2 Click the Printer drop down list select the name of your printer 3 Click the Presets drop down list Save As 4 Specify Save Preset As click OK 5 Click the Presets drop down list select the saved preset name click Print ...

Page 188: ... a software platform for the Canon multitasking machines You can expand the functions or customize them by installing the MEAP application from the computer to the multitasking machine Workflow Composer The Workflow Composer is an application that increases the efficiency of operations that use multiple functions of the machine By creating and registering combinations of functions that are frequen...

Page 189: ......

Page 190: ...egional dealer CANON LATIN AMERICA INC 703 Waterford Way Suite 400 Miami Florida 33126 U S A CANON AUSTRALIA PTY LTD 1 Thomas Holt Drive North Ryde Sydney N S W 2113 Australia CANON CHINA CO LTD 15F Jinbao Building No 89 Jinbao Street Dongcheng District Beijing 100005 China CANON SINGAPORE PTE LTD 1 HarbourFront Avenue 04 01 Keppel Bay Tower Singapore 098632 CANON HONGKONG CO LTD 19 F The Metropol...

Reviews: