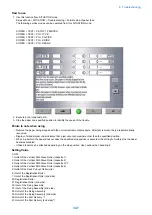
Debug Log
Overview
■ Function Overview
The debug log is a log that analyzes the program behavior of the machine to enable developers to identify problems.
This machine is embedded with this function to collect the history for the behavior of each software module in the debug log and
output it as an integrated log for analyzing problems.
Since the frequency of outputting the debug log and the content of the log can be changed, the settings need to be changed
according to the trouble that occurs and the situation.
However, the on-site service technician does not need to make such decisions because instructions are sent from the Support
Dept. of your sales company.
■ Conditions for Obtaining Logs
● Cases where Logs Cannot Be Obtained
In the following cases, the procedure for obtaining logs is not required because logs cannot be obtained.
• When the background of the Control Panel is solid black and an error code is displayed in text
• When the device is frozen on the startup screen
• When the device repeats the startup process and does not become available
● Prerequisites for Obtaining Logs
• If a problem has occurred, suspend operations where possible. If operations are continued or jobs are executed even after
a problem has occurred, the log of the problem may not be able to be obtained because it is overwritten.
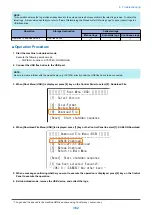
• While the problem is occurring or quickly after the problem occurs, save the debug log to a backup area before turning OFF
and then ON the power (refer to
Saving to a USB Device with Counter Key + Numeric Key
).
• Ask the user to make a note of the date and time when the problem occurred and the procedure.
• If the user notifies the log has been saved, collect the log.
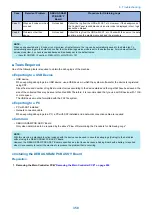
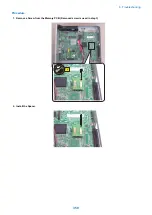
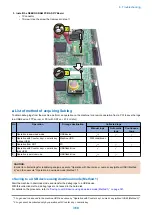
• The DEBUG PCB ASS'Y Board may need to be installed to obtain the log, depending on the problem (refer to
Determining the Procedure for Obtaining Logs ” on page 357
NOTE:
The DEBUG SRAM PCB ASS'Y Board is required when the following problems occur.
• Problems relating to restart
• Problems that cause the Control Panel to become inoperable
• Problems relating to recovery from deep sleep
• When an unexpected error, E code error, or problem relating to restart occurs, the log can be automatically saved to the hard
disk. To automatically save the log to the hard disk, confirm that the following service mode is set to "101".
• (Level2) COPIER > Function > CBG-LOG > LOG-TRIG
● Collecting Logs Saved to the Hard Disk
If more than the above number of logs is generated, the oldest archive log is deleted.
When logs are retrieved from the machine, the saved log files are erased.
When a problem occurs, it is necessary to collect the log for the problem before it is overwritten.
6. Troubleshooting
356
Summary of Contents for imagerunner advance 4551i
Page 19: ...Product Overview 1 Product Lineup 7 Features 13 Specifications 16 Name of Parts 26 ...
Page 155: ...Periodical Service 3 Consumable Parts List 143 Cleaning Check Adjustment Locations 146 ...
Page 392: ...Error Jam Alarm 7 Overview 380 Error Code 383 Jam Code 509 Alarm Code 520 ...
Page 545: ...Service Mode 8 Overview 533 COPIER 549 FEEDER 845 SORTER 851 BOARD 871 ...
Page 892: ...Unpacking 1 2 1200 mm 840 mm 769 mm 1230 mm 2430 mm 3 9 Installation 879 ...
Page 895: ...3 4 NOTE Keep the removed screws for relocating the host machine 2x 5 6 7 9 Installation 882 ...
Page 896: ...8 9 10 1x Installing the Air Filter 1 9 Installation 883 ...
Page 897: ...2 3 Installing the Drum Unit 1 2 3 9 Installation 884 ...
Page 899: ...8 NOTE The screw removed at procedure 4 is used 1x 9 10 11 12 9 Installation 886 ...
Page 923: ...5 6 NOTE Use the screws and Rubber Caps removed in step 1 2x 7 2x 9 Installation 910 ...
Page 935: ...7 1x 8 9 6x 10 2x 9 Installation 922 ...
Page 936: ...11 Installing the NFC Kit 1 2 2x 3 TP M3x4 1x 9 Installation 923 ...
Page 938: ...4 5 1x 6 9 Installation 925 ...
Page 985: ...8 2x 2x TP M4x8 Black When installing the USB Keyboard 1 9 Installation 972 ...
Page 991: ...7 4x 8 1x 1x Lower Cover 9 1x 10 1x 1x 9 Installation 978 ...
Page 992: ...11 1x 1x 12 1x 13 TP M3x12 2x 14 4x TP M3x6 9 Installation 979 ...
Page 997: ...Installation Procedure 1 2 2x 3 2x 4 6x 5 4x 9 Installation 984 ...
Page 998: ...6 7 NOTE Do not close the Wire Saddle 1x 1x 8 9 9 Installation 985 ...
Page 1003: ...2 1x 1x 3 2x 2x 4 9 Installation 990 ...
Page 1012: ...2 1x 1x 3 2x 2x 4 9 Installation 999 ...
Page 1014: ...7 CAUTION The connector must be contacted TP㸹M3x6 3x 1x 8 4x 9 9 Installation 1001 ...
Page 1016: ...13 4x 14 15 Binding M4x16 Binding M3x16 2x M3x16 M4x16 16 Binding M4x6 1x 9 Installation 1003 ...
Page 1023: ...Installation Procedure Preparation 1 4x 2 1x 1x 3 2x 9 Installation 1010 ...
Page 1029: ...4 5 1x 1x 9 Installation 1016 ...
Page 1048: ...3 2x TP M3x8 Black 4 2x TP M3x6 5 9 Installation 1035 ...
Page 1053: ... Installing the Removable HDD Kit 1 2x 2x 2 3 1x 4 9 Installation 1040 ...
Page 1065: ...3 2x TP M3x8 Black 4 2x TP M3x6 5 9 Installation 1052 ...
Page 1071: ... Installing the Removable HDD Kit 1 2x 2x 2 3 1x 4 9 Installation 1058 ...

