background image

13

Copying Function

What You Can Do with This Machine 

(Special Features Screen)

The following is an explanation of the 
features often used when copying a 
document. For more detailed procedures, 
see the references to other guides.
The Special Features screen is divided into 
two screens. Press [ ]/[ ] on the lower left of the screen 
to switch the screens.

*  The numbers in the illustrations refer to operation steps.

Special Features screen (1/2) 

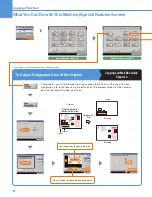
To Copy Facing Pages in a Book

Copying and Mail Box Guide 

Chapter 4

It is not necessary to reset originals when copying facing pages from a book or 
bound original, if you use this mode to copy the facing pages onto two separate 
sheets of papers.

1

1

Original

Copy

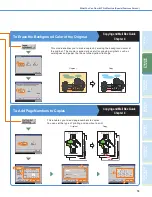
To Copy Different Size Originals Together

Copying and Mail Box Guide 

Chapter 4

This mode enables you to copy (scan) different size originals with the same 
widths (11" x 17" and LTR, or LTRR and STMT) or different widths (11" x 17" and 
STMT, or LTR and LGL), together as one group by setting them in the feeder.

11" x 17" Original

LTR Original

Direction to load 
the paper

1

2

Summary of Contents for imageRUNNER C3480

Page 1: ...mail I fax File Server 27 What You Can Do with This Machine Address Book Send Basic Features Screen 29 What You Can Do with This Machine Scan Settings Screen 31 What You Can Do with This Machine Send...

Page 2: ...al to learn about the things to take care of when using the machine and basic operations Before Using the Machine Operating the Touch Panel Display Replacing Toner Cartridges Specifications System Man...

Page 3: ...gh e Learning Other Guides Using the Machine as a Printer Installing Software Handling Prints Jobs Using the Touch Panel Display PS PCL UFR II Printer Guide Read this manual to learn how to edit the s...

Page 4: ...3 2 1 4 3 2 1 Copying Function Enables you to save costs with features such as printing a single sided document on both sides of the paper or printing two pages of a document on each sheet of paper A...

Page 5: ...To Add a Cover P 16 To Recall Commonly Used Settings P 16 To Copy a Designated Area of the Original P 17 To Erase the Background Color of the Original P 18 To Add Page Numbers to Copies P 19 To Store...

Page 6: ...Edit the Job Status System Monitor Screen Press System Monitor to display the screen on the left enabling you to confirm the job status and cancel print jobs You can also see the status of the machine...

Page 7: ...a job in progress such as a scan job or copy job Start Key Press to start an operation Press to clear entered values and characters Clear Key Numeric Keys Press to enter numeric values Log in Out Key...

Page 8: ...and Password press Log in Out on the touch panel Press Copy to switch to the Copy function If Department ID Management or the SDL or SSO login service is set it is necessary to enter an ID and passwor...

Page 9: ...tures screen When copying is complete remove your originals If the following screen is displayed follow the instructions on the screen and press Start once for each original When scanning of the origi...

Page 10: ...elect the color mode for copying You can also set the machine to detect whether an original is in color or black and white Original Type Selection You can select the original type that is the best mat...

Page 11: ...originals or make one sided copies from two sided originals Paper Selection You can set the machine to select the paper size This mode enables you to adjust the sharpness exposure and color Sharpness...

Page 12: ...or reducing 11 x 17 to LTR size Simply select the desired paper size from the displayed keys to automatically set the optimal zoom ratio To Staple Sets of Output Together Copying and Mail Box Guide C...

Page 13: ...ed originals printing on both the front and back sides of paper can help you save half of the paper costs If you press Option on the screen on the left you can select to make the front and back sides...

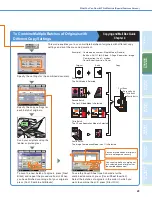
Page 14: ...2 To Copy Facing Pages in a Book Copying and Mail Box Guide Chapter 4 It is not necessary to reset originals when copying facing pages from a book or bound original if you use this mode to copy the f...

Page 15: ...anging a variety of originals on one sheet of paper for easy viewing and for saving paper and space when storing printouts 1 2 1 4 3 2 1 4 3 2 1 To Make a Booklet Copying and Mail Box Guide Chapter 4...

Page 16: ...he document You can also specify the width of the margin 1 2 3 Special Features screen 1 2 Original Left Margin Right Margin Top Margin Bottom Margin Special Features screen 2 2 To Erase the Dark Bord...

Page 17: ...a cover You can also add a back cover sheet insertions and chapter pages Original 5 Copy 3 4 Printed Front Cover 1 2 6 7 To Recall Commonly Used Settings Copying and Mail Box Guide Chapter 5 Commonly...

Page 18: ...al Copying and Mail Box Guide Chapter 4 This enables you to frame areas to copy or areas to blank out in the copy You can designate up to four areas using the edit pen on the preview screen or the num...

Page 19: ...Mail Box Guide Chapter 4 This mode enables you to make copies by erasing the background color of the original This mode is especially useful for copying originals such as catalogues and paper that hav...

Page 20: ...f the scanned originals while storing them in the User Inbox This mode enables you to embed hidden text such as CONFIDENTIAL in the background of copies prints The embedded text appears when the copie...

Page 21: ...n you have finished scanning all of your originals press Conf Combine All Blocks To use the Cover Sheet Insertion mode for the combined document press Cover Sheet Insertion Select the batches of origi...

Page 22: ...the copy size Press to return the copy ratio to 100 1 Color Selection drop down list Press to select the color mode for copying 4 Transparency Interleaving Press to insert a sheet between each transp...

Page 23: ...in one group by placing them in the feeder Press to switch between Special Features 1 2 and Special Features 2 2 12 Frame Erase see p 15 11 Job Done Notice 10 Margin see p 15 13 Scan Image Check Pres...

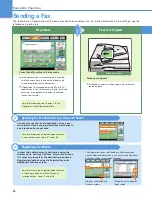
Page 24: ...the Fax Number Using a One touch Button You can also specify the fax destination using a one touch button if you have registered a fax destination in a one touch button in advance For more informatio...

Page 25: ...e number of pages which will be sent on the preview screen Press Start You can also specify destinations using one touch buttons or favorites buttons you have registered in advance For more informatio...

Page 26: ...Touch Buttons Sending and Facsimile Guide Chapter 9 Send Basic Features screen You can select the initial display of the Send Basic Features screen in TX Settings under Common Settings in Communicatio...

Page 27: ...end faxes from your computer The display may differ according to the OS operating system you are using and the fax driver For more information see the Fax Driver Guide Press Forwarding Settings from S...

Page 28: ...d reader is attached insert a control card For more information see Chapter 2 Basic Operations in the Reference Guide When placing originals on the platen glass make sure to close the feeder platen co...

Page 29: ...is complete remove your originals If the following screen is displayed follow the instructions on the screen press Start once for each original When scanning of the originals is complete press Done P...

Page 30: ...s For more information see the references to the corresponding guides The numbers in the illustrations refer to operation steps To Register Commonly Used Destinations Sending and Facsimile Guide Chapt...

Page 31: ...it can be extracted and used in Adobe Illustrator Enables you to send files containing text originals or text photo originals using a high compression ratio Enables you to make the text of a scanned d...

Page 32: ...orrectly try selecting the original type from the Image Quality drop down list Photos can be scanned clearly If a shimmering wavy pattern the Moir effect appears on your originals use the Sharpness se...

Page 33: ...d Images Clearly Sending and Facsimile Guide Chapter 3 You can send fine text in documents more clearly by changing from a 200 x 200 dpi resolution to a high resolution of 300 x 300 dpi or 400 x 400 d...

Page 34: ...to send a document and the settings to use when sending and set to send notification when sending is complete The following is an explanation of the useful functions you can utilize when sending a doc...

Page 35: ...e Chapter 5 Use the Job Done Notice feature to notify yourself if you want to confirm that a job is complete When sending is complete you will be notified via e mail 1 2 To Edit a Destination from a C...

Page 36: ...bed here see the Sending and Facsimile Guide Setting the Scan Settings Sending and Facsimile Guide Chapters 3 and 4 Details Press to check or change the destination information selected from the desti...

Page 37: ...2 Resolution drop down list see p 32 Press to specify the resolution for the document to be sent 6 Adjust Contrast Press to manually control the copy exposure Press A to select or cancel the automatic...

Page 38: ...gister Favorites Button see p 69 Register in Communications Settings from the Additional Functions screen Register One touch Button see p 76 Register in Address Book Settings from the Additional Funct...

Page 39: ...e see p 34 Press to send notification of job completion to the specified e mail address 5 Edit Press to edit a destination from the address book 4 Register Edit Erase Press to erase a registered one t...

Page 40: ...the two basic storing operations is shown For more information see the corresponding section Stored documents are displayed with See p 44 Stored documents are displayed with See p 44 Mail Box Select...

Page 41: ...see p 49 and p 50 When scanning is complete remove your originals Press Start The stored data will be automatically deleted after 3 days default setting This setting can be deactivated or changed to a...

Page 42: ...l as printed Documents scanned and stored from the Scan screen of the Mail Box function documents stored in User Inboxes from the Copy Basic Features screen or the Send Basic Features screen and docum...

Page 43: ...res you can set from the Print screen and Change Pr Settings screen see p 51 and p 52 Press Start Print You can select the file format for the document to send by pressing File Format Specify the dest...

Page 44: ...Features to access the Special Features screen The numbers in the illustrations refer to operation steps To Add a Name to a Document and Save It Copying and Mail Box Guide Chapter 2 Scan screen When...

Page 45: ...changes to the Documents with Print Settings icon Documents without Print Settings Black or Black and White Color or Mixed RGB Black CMYK Color or Mixed CMYK Black or Black and White Color or Mixed R...

Page 46: ...ion steps To Print a Sample Print Copying and Mail Box Guide Chapter 2 Change Pr Settings screen To print one set press All Pages To print only the specified pages press Specified Pages The set or spe...

Page 47: ...nt document data does not remain in the machine by automatically deleting it after it is printed To Print Multiple Documents Together Copying and Mail Box Guide Chapter 3 When distributing materials t...

Page 48: ...reen Copying and Mail Box Guide Chapter 2 Clear Selection Press to cancel your selection and select another document Changes to Select All Max 100 doc if you have not selected any documents Print Pres...

Page 49: ...t Press to check information about the document Press to send a received document Press to cancel your selection and select another document Changes to Select All Max 32 doc if you have not selected a...

Page 50: ...ocument to scan 2 Copy Ratio Press to reduce or enlarge the copy size 3 Different Size Originals Press to scan different size originals Booklet Scanning Press to scan originals in such a way that when...

Page 51: ...Press to manually control the scan exposure Press A to select or cancel the automatic exposure control 7 Original Type drop down list Press to manually select the original type according to the type...

Page 52: ...nt is selected 1 2 Booklet Press to make copies of several originals to form a booklet Form Composition Press to superimpose an image stored in memory onto the original image for printing 3 Mail Box F...

Page 53: ...ns to the Standard Printing mode 10 Special Features Press to select a Special Features mode 11 Pg Copy Set Numbering Press to include page and copy set numbering on prints 9 Watermark Print Date Pres...

Page 54: ...nter into the Sleep mode Additional Functions Common Settings Press to specify the settings that are common to the Copy Mail Box Send and Fax functions 1 See p 59 Adjustment Cleaning Press to make fin...

Page 55: ...e PS PCL UFR II Printer Guide Communications Settings Press to register or edit the default Communications Settings according to your needs Control Panel Copy Settings Press to edit settings for the C...

Page 56: ...for all the different functions of the machine and is especially useful when you want to use different paper sources for different purposes Audible Tones Enables you to set whether to sound audible to...

Page 57: ...racters for Page No Watermark see p 78 Enables you to register text for the Page Copy Set Numbering or Print Watermark Date mode This is useful when you often print the same text or watermark when usi...

Page 58: ...at it takes to complete an operation in units of one minute on the touch panel display Number of Copies Job Duration Status Display Enables you to display the number of copies specified and the approx...

Page 59: ...o temporally limit the use of the finishing mode if a problem frequently occurs when using the finisher mode Gamma Value for Remote Scans Enables you to set the gamma value that is used for scanning c...

Page 60: ...return to the Basic Features screen of the selected function when it has been idle for a certain period of time after the last print job or a key operation is performed Auto Sleep Time Enables you to...

Page 61: ...o recalibrate the machine when you notice irregularities in the color of the copies or prints such as when copies turn out to be different from the original in gradation density or color Zoom Fine Adj...

Page 62: ...main unit may be dirty Enables you to clean the rollers of the feeder by repeatedly feeding blank sheets of paper through it 2 Displayed only if the optional Feeder DADF L1 standard equipped for the C...

Page 63: ...nd TX Report only when a transmission error occurs Confidential Fax Inbox RX Report Enables you to check the reception of documents in Confidential Fax Inboxes Fax RX Report Enables you to check wheth...

Page 64: ...0 departments can be registered Use Department ID Management to keep track of the copy scan and print totals for each department See the Reference Guide Chapter 6 See the Reference Guide Chapter 6 Ena...

Page 65: ...nction If a received document matches the forwarding conditions it is forwarded to the specified destination See the Sending and Facsimile Guide Chapter 11 Network Settings Enables you to make the nec...

Page 66: ...Lightweight Directory Access Protocol server which allows searching for e mail addresses and fax numbers See the Sending and Facsimile Guide Chapter 11 Date Time Settings See the Reference Guide Chapt...

Page 67: ...er Error Message Enables you to set the machine to display the warning screen indicating that the remaining toner is becoming low See the Reference Guide Chapter 6 Initialize All Data Settings Enables...

Page 68: ...DL Selection PnP Enables you to specify functions suitable for the fax board or printer kit installed in the machine Enables you to detect and install drivers from your computer that are compatible wi...

Page 69: ...he Copy Settings to their defaults Copying and Mail Box Guide Chapter 7 2 Displayed only if the optional Feeder DADF L1 standard equipped for the Color imageRUNNER C3480i C3080i is attached Standard K...

Page 70: ...ng and Facsimile Guide Chapter 1 Unit Name Enables you to register your name or your company s name as the unit s name a department name is optional When you send a document via e mail fax or I fax th...

Page 71: ...the Sending and Facsimile Guide Chapter 9 Enables you to change the standard settings for the Send function including the scan mode Edit Standard Send Settings See the Sending and Facsimile Guide Chap...

Page 72: ...is activated and you are logged in to the machine using the SDL or SSO login service 3 5 TX Settings Check Device Signature Certificate Enables you to verify the certificate and key pair required for...

Page 73: ...in chunks of a known length when sending a file of unknown size with WebDAV If this mode is used transmission time is reduced as it is not necessary to calculated the file size before sending it See t...

Page 74: ...is printed within the printable area of the paper See the Sending and Facsimile Guide Chapter 9 2 Sided Print see p 81 See the Sending and Facsimile Guide Chapter 9 Enables you to print received docum...

Page 75: ...tings TX Settings 5 Displayed only if the optional Super G3 FAX Board or Super G3 Multi Line Fax Board is installed Check Dial Tone Before Sending Enables you to set whether to check for a dial tone b...

Page 76: ...ent that you fax to the receiving party See the Sending and Facsimile Guide Chapter 9 12 Displayed only if the optional Super G3 Multi Line Fax Board is installed TX Line Selection Enables you to regi...

Page 77: ...ndard Scan Settings Enables you to change the standard settings for the scan mode of the Mail Box function 1 1 One touch Buttons You can store up to 200 destinations in the one touch buttons Register...

Page 78: ...ouch panel display This is useful if you want to check the remaining time when printing large documents The remaining time will not be displayed when you have set certain features however Reference Gu...

Page 79: ...No Watermark To Set Heavy Paper or Transparencies in a Paper Source Reference Guide Chapter 4 3 You can select registered characters when using the Page Copy Set Numbering or Watermark Print Date mode...

Page 80: ...position You can store image forms and superimpose them on the output using the Form Composition mode in the Copy and Mail Box functions The image forms can be registered in Additional Functions Refer...

Page 81: ...e up to two Standard keys Set the second Standard key using Standard Key 2 Copy Settings Copying and Mail Box Guide Chapter 8 1 2 Standard Key 1 Settings To Change the Initial Settings for the Copy Fu...

Page 82: ...can register the sender s name section or department in Sender s Names TTI This name is displayed on the recipient s machine and printed on sent documents Sending and Facsimile Guide Chapter 1 1 2 Sen...

Page 83: ...Inbox Enables you to set and store a name and password for a User Inbox so that other people will not be able to view its contents You can set Time Until Document Auto Erase to prevent documents from...

Page 84: ...ettings all from your PC s Web browser For more information see the Remote UI Guide Enter the IP address of the machine into the Web browser on your computer to access the Remote UI The IP address in...

Page 85: ...Remote UI are stored in the Address Book of the machine For more information see the Remote UI Guide Press to display the screen for registering destinations Enter the destination in E Mail Address e...

Page 86: ...o print on Output Size Enables you to print multiple pages onto one sheet of paper or one page onto multiple sheets of paper Page Layout Enables you to select the size of a document you have created i...

Page 87: ...ffset is selected Number of Copies for Offset Enables you to specify the gutter width Gutter Enables you to rotate the image 180 degrees when printing When printing on tab paper this setting makes it...

Page 88: ...a booklet Different for Cover and Others Enables you to set all pages to use the same paper type You can still select the paper sources Same Paper for All Pages Enables you to set a different paper t...

Page 89: ...htness and contrast Enables you to set or edit the matching mode and matching method minimize color difference make colors more vibrant and adjust colors to your monitor Matching Color Settings Detail...

Page 90: ...cannot receive When communications are slow Other trouble When the power does not turn ON When the message contact your service representative with the error code below is displayed Support 3 Referenc...

Page 91: ......
Page 92: ...ess NY 11042 U S A CANON CANADA INC 6390 Dixie Road Mississauga Ontario L5T 1P7 Canada CANON EUROPA N V Bovenkerkerweg 59 61 1185 XB Amstelveen The Netherlands See http www canon europe com for detail...

Reviews: