Chapter 3
3-5
b. LEVEL 1
Moving the printer on a floor with difference in grade or by truck
T-3-2
Transportation procedure
1) If there is a message instructing to replace the maintenance cartridge or check the remaining ink, replace the maintenance cartridge.
2) Remove the paper and roll holder.
3) From [Main menu] > [Maintenance] > [MOVE PRINTER], select [LEVEL 1].
4) Press the [OK] key and perform [LEVEL 1] MOVE PRINTER.
5) If the consumable parts counter is checked and a message to replace consumable parts appear, check the consumable parts counter from service mode and replace
the necessary consumable part.
See "d. Replacing consumable parts during transportation."
Repeat [LEVEL 1] after replacing consumable parts and resetting the counter.
6) When MOVE PRINTER completed message appears, turn off the power, and remove the power cord and interface cable.
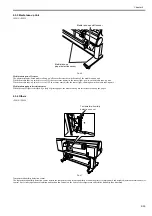
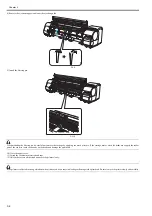
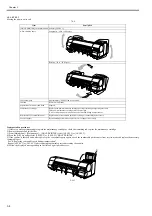
7) Open the upper cover and raise the ejection guide.
F-3-8
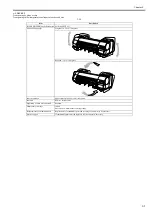
Item
Description
[MOVE PRINTER] on the Main menu Perform [LEVEL 1].
Allowed tilting angle
Lengthwise: -30 to +30 degrees
Rotation: -10 to +10 degrees
Ink consumption
No ink is consumed.
Ink tank
It may be installed or removed.
Separation of main unit and stand
They do not need to be separated.
Maintenance cartridge
Install.
There is no need to open a new maintenance cartridge.
However, if there is a message instructing to replace the maintenance cartridge or check the remaining ink,
replace with new maintenance cartridge before transporting.
Replacement of consumable parts
Replacement of consumable parts and resetting of counter may be necessary.
Service support
If consumable parts must be replaced, service support is necessary.
Summary of Contents for iPF800 Series
Page 1: ...Aug 13 2008 Service Manual iPF800 series ...
Page 2: ......
Page 6: ......
Page 11: ...Chapter 1 PRODUCT DESCRIPTION ...
Page 12: ......
Page 14: ......
Page 38: ...Chapter 1 1 24 Hold this lever to pull out the lower roll unit ...
Page 100: ...Chapter 1 1 86 ...
Page 101: ...Chapter 2 TECHNICAL REFERENCE ...
Page 102: ......
Page 158: ......
Page 159: ...Chapter 3 INSTALLATION ...
Page 160: ......
Page 162: ......
Page 176: ...Chapter 3 3 14 ...
Page 177: ...Chapter 4 DISASSEMBLY REASSEMBLY ...
Page 178: ......
Page 180: ......
Page 238: ...Chapter 4 4 58 ...
Page 239: ...Chapter 5 MAINTENANCE ...
Page 240: ......
Page 242: ......
Page 246: ...Chapter 5 5 4 5 Close upper cover 1 F 5 6 1 ...
Page 247: ...Chapter 5 5 5 ...
Page 248: ......
Page 249: ...Chapter 6 TROUBLESHOOTING ...
Page 250: ......
Page 252: ......
Page 274: ......
Page 275: ...Chapter 7 SERVICE MODE ...
Page 276: ......
Page 278: ......
Page 301: ......
Page 302: ......
Page 303: ...Chapter 8 ERROR CODE ...
Page 304: ......
Page 306: ......
Page 318: ...Chapter 8 8 12 ...
Page 319: ...Aug 13 2008 ...
Page 320: ......


