Chapter 4
4-20
4.3.7 Ink Tube Unit
0014-8966
a) Removing ink tube unit
1) Drain the ink. See Disassembly/Reassembly > Points to Note on Disassembly/Reassembly >Draining the ink.
2) Remove the carriage unit. See Disassembly/Reassembly > Points to Note on Disassembly/Reassembly > Carriage Unit.
3) Disconnect five flexible cables from the main controller PCB.
4) Remove the flexible cable leading to the carriage PCB cover from the guide.
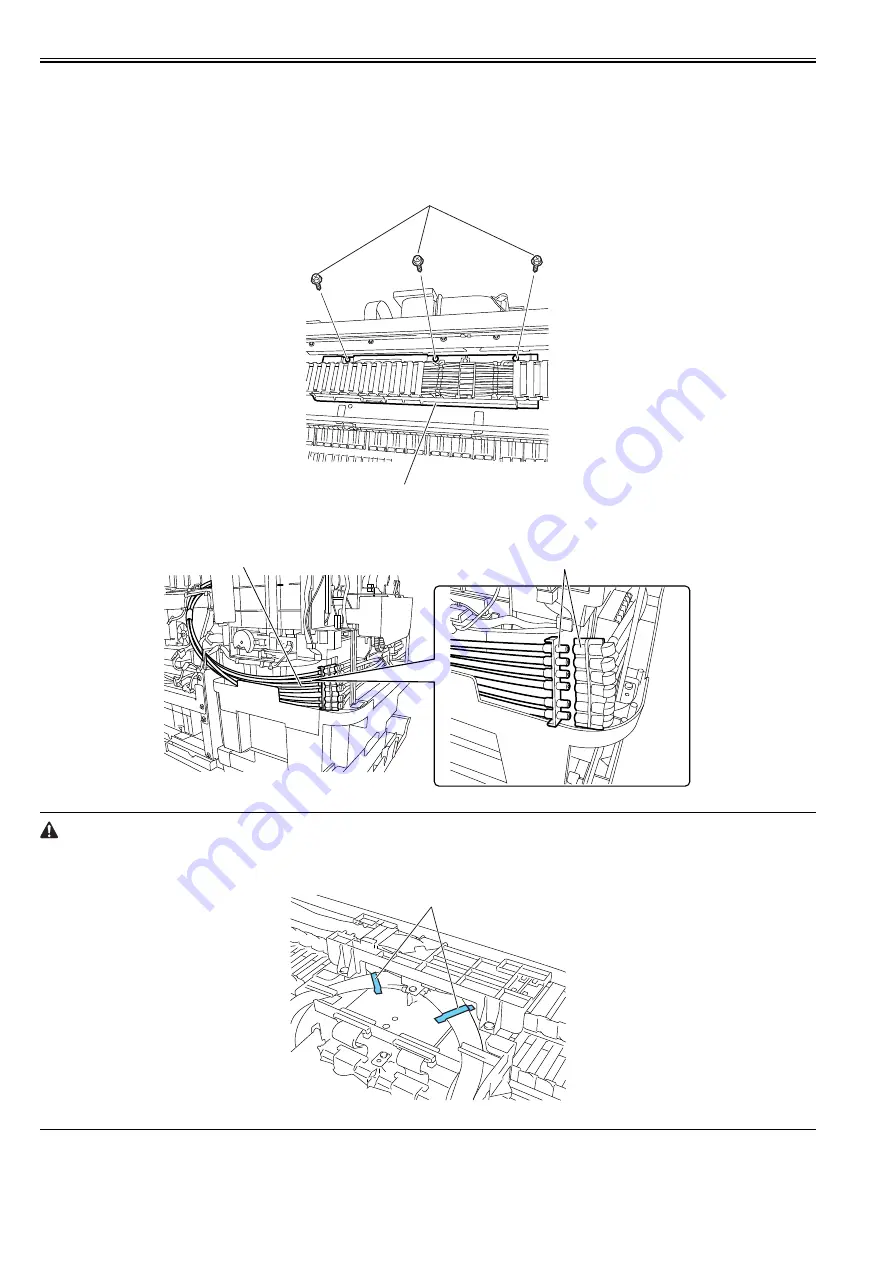
5) Remove three screws [1] and release ink tube fixer base [2] from the frame.
F-4-34
6) Remove joint [1] of the ink tube unit from left and right ink tank unit to remove ink tube unit [2].
F-4-35
Never peel off tape [1] that fixes the ink tube when detaching the joints of the ink tube on the upper part of the carriage or when removing the joint base from the
carriage.
When replacing the ink tube unit, be sure that the tapes [1] are posted to the new ink tube unit.
F-4-36
[1]
[2]
[1]
[2]
[1]
Summary of Contents for iPF8400S Series
Page 1: ...Feb 27 2017 Service Manual iPF8000 series iPF8400S ...
Page 2: ......
Page 6: ......
Page 11: ...Chapter 1 PRODUCT DESCRIPTION ...
Page 12: ......
Page 14: ......
Page 63: ...Chapter 2 TECHNICAL REFERENCE ...
Page 64: ......
Page 106: ......
Page 107: ...Chapter 3 INSTALLATION ...
Page 108: ......
Page 110: ......
Page 123: ...Chapter 3 3 13 F 3 22 6 FAN UNIT A ...
Page 125: ...Chapter 3 3 15 ...
Page 126: ......
Page 127: ...Chapter 4 DISASSEMBLY REASSEMBLY ...
Page 128: ......
Page 130: ......
Page 167: ...Chapter 4 4 37 ...
Page 168: ......
Page 169: ...Chapter 5 MAINTENANCE ...
Page 170: ......
Page 172: ......
Page 177: ...Chapter 6 TROUBLESHOOTING ...
Page 178: ......
Page 180: ......
Page 215: ...Chapter 7 SERVICE MODE ...
Page 216: ......
Page 218: ......
Page 272: ...Chapter 7 7 54 ...
Page 273: ...Chapter 8 ERROR CODE ...
Page 274: ......
Page 276: ......
Page 311: ...Feb 27 2017 ...
Page 312: ......


