Chapter 1
1-32
T-1-17
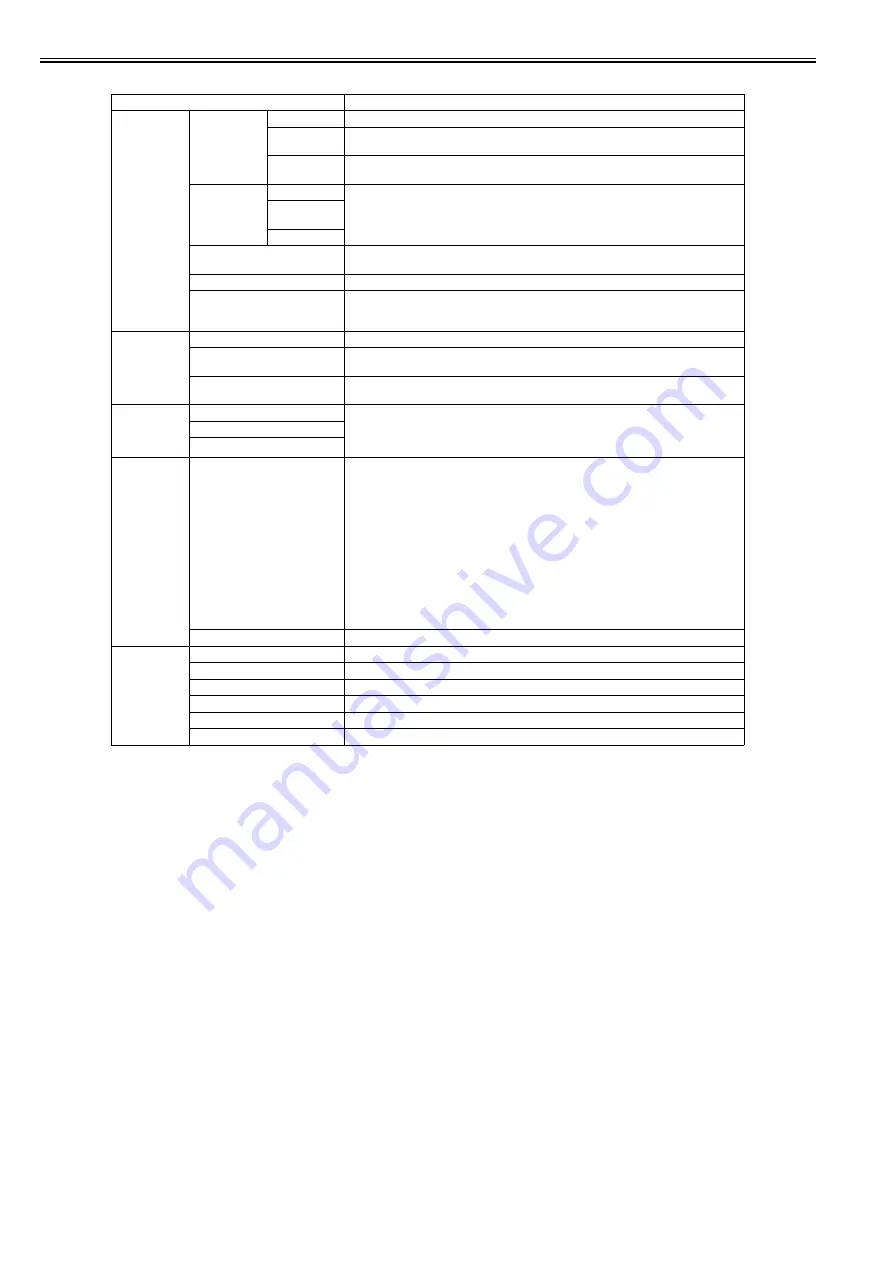
Setting Item
Description/Instructions
[System Setup]
[Erase HDD
Data]
[High Speed]
Delete the file management information of the saved data in the HDD.
[Secure High
Spd.]
Overwrite the random data in the whole of the hard disk drive.
[Secure]
Overwrite 00 and FF and random data in the whole of the hard disk drive once at a time.
Execute the verify check whether the data has written correctly to the hard disk drive.
[Output Method] [Print]
Select the output method of jobs sent from software other than the printer driver. This can be
set from the printer if you are using a printer driver.
Select [Print] to print normally. Select [Print (AutoDel)] to print and delete the data in hard
disk. Select [Save: Box XX] to save to box without printing.
[Print (Auto
Del)]
[Save: Box XX]
[Print After Recv]
Setting of jobs sent from software other than the printer driver. This can be set from the printer
if you are using a printer driver. Select [On] to print after saving.
[Common Box Set.]
Select [Print(AutoDel)] to print without saving to a common box.
[Show Job Log]
Selecting Off prevents display of the log in Job Menu > Job Log. Additionally, the log is not
printed if you choose Job Menu > Print Job Log. Note that because job logs are not collected,
the Status Monitor accounting functions will not work correctly.
[Take-up Reel]
[Use Take-up Reel]
Choose Enable to use the Media Take-up Unit.
[Auto Feed]
This command is available only if Take-up Reel is set to Enable. Choose Yes to advance roll
paper automatically on the Rewind Spool, up to the fastening position.
[Skip Take-Up Err]
Choose On to continue with printing even if an error occurs with the Media Take-up Unit.
Choose Off to have the printer pause before printing if a rewinding error occurs.
[Prep.MovePrint
er]
[Level 1]
Select when moving the printer. Follow the instruction on the screen and perform the necessary
process.
This is not displayed when displaying a warning message about the amount remaining
maintenance cartridge.
[Level 2]
[Level 3]
[Admin. Menu]
[Change Password]
Set a password to restrict displaying/setting of menus as follows. Allowed value is from 0 to
9999999.
- Allow only administrator to display/set
[IPv4]
[Change Password]
[Init.Admin.Pswd]
- Allow administrator to display/set and non-administrator to display only
[Interface Setup](exclude [IPv4])
[Date & Time]
[Date Format]
[Time Zone]
[Use RemoteUI]
[Reset PaprSetngs]
[Save: Shared Box]
[Init.Admin.Pswd]
Press [OK] to return the [Administrator Menu] password to factory default.
[Printer Info]
[Paper Info]
Indicates the current paper size, type, and related printer settings.
[Ink Info]
Indicates ink levels and maintenance cartridge capacity.
[Head Info]
Indicates information about the printhead.
[System Info]
Indicates the firmware version, serial number, and interface information.
[Error Log]
Indicates the most recent error messages (up to five).
[Other Counter]
Indicates the total printing volume of the printer.
Summary of Contents for iPF8400S Series
Page 1: ...Feb 27 2017 Service Manual iPF8000 series iPF8400S ...
Page 2: ......
Page 6: ......
Page 11: ...Chapter 1 PRODUCT DESCRIPTION ...
Page 12: ......
Page 14: ......
Page 63: ...Chapter 2 TECHNICAL REFERENCE ...
Page 64: ......
Page 106: ......
Page 107: ...Chapter 3 INSTALLATION ...
Page 108: ......
Page 110: ......
Page 123: ...Chapter 3 3 13 F 3 22 6 FAN UNIT A ...
Page 125: ...Chapter 3 3 15 ...
Page 126: ......
Page 127: ...Chapter 4 DISASSEMBLY REASSEMBLY ...
Page 128: ......
Page 130: ......
Page 167: ...Chapter 4 4 37 ...
Page 168: ......
Page 169: ...Chapter 5 MAINTENANCE ...
Page 170: ......
Page 172: ......
Page 177: ...Chapter 6 TROUBLESHOOTING ...
Page 178: ......
Page 180: ......
Page 215: ...Chapter 7 SERVICE MODE ...
Page 216: ......
Page 218: ......
Page 272: ...Chapter 7 7 54 ...
Page 273: ...Chapter 8 ERROR CODE ...
Page 274: ......
Page 276: ......
Page 311: ...Feb 27 2017 ...
Page 312: ......


