Chapter 5
5-10
5.3.4 Controlling the Scanning Lamp
5.3.4.1 Scanning Lamp
0013-8584
/ / / / iR C3380i / iR C3380 / iR C2880i / iR C2880
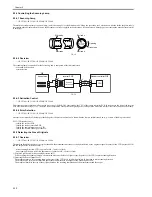
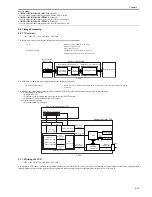
The machine's scanning lamp is a xenon lamp, in which xenon gas is sealed inside a tube. Along the glass tube are 2 electrodes, while the inside the glass tube is
coated with phosphorous material. When a high-frequency voltage is applied to the electrodes, electrons occur within the gas, thus causing the phosphorous material
to emit light.
F-5-15
5.3.4.2 Overview
0013-8586
/ / / / iR C3380i / iR C3380 / iR C2880i / iR C2880
The scanning lamp is controlled for the following, and is composed of the items indicated:
- activation/de-activation
- error detection
F-5-16
5.3.4.3 Activation Control
0013-8587
/ / / / iR C3380i / iR C3380 / iR C2880i / iR C2880
The scanning lamp is turned on/off using the drive signal (LAMP_ON) generated by the CPU of the reader controller PCB. In response to the signal, the inverter
PCB uses the drive voltage (+16 V) from the reader controller PCB to generate high-frequency voltage in the activation control circuit to turn on the xenon lamp.
5.3.4.4 Error Detection
0013-8588
/ / / / iR C3380i / iR C3380 / iR C2880i / iR C2880
An error in the intensity of the lamp is checked against the presence/absence of a fault when the lamp is initially tuned on (e.g., at time of shading correction).
E225 (CIS intensity error)
- fault in the inverter PCB
- fault in the reader controller PCB
- fault in the contact image sensor (CIS)
- fault in the flexible cable (poor contact)
5.3.5 Detecting the Size of Originals
5.3.5.1 Overview
0013-8589
/ / / / iR C3380i / iR C3380 / iR C2880i / iR C2880
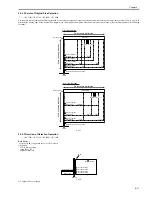
The machine identifies the size of an original based on the measurements it takes of the light reflected by the original at specific points of the CCD (inside the CIS)
and the output of the reflection sensor.
- main scanning direction: CCD (4 points for AB; 3 points for Inch)
- sub scanning direction: reflection photosensor (1 point for AB; 1 point for Inch)
1) External Light Search (main scanning direction only)
While keeping the scanning lamp on, the machine measures the level of light at specific points of the CCD for main scanning direction.
2) Detecting the Sensor Output Level
The machine turns on the scanning lamp, and measures the CCD levels at individual points of detection in main scanning direction.
The machine also turns on the reflection photosensor and measures its output for sub scanning direction.
The machine identifies the size of the original based on the resulting combination of the measurement and the output.
Fluorescent
medium
Electrode
Opening
Electrode
Electrode
Electrode
Glass tube
1
2
3
3
2
1
1
2
3
1
2
3
4
Inverter PCB
Activation
control circuit
Reader controller PCB
CPU
GND
LANP_ON
14.5V
J5015
J5018
J512
Xenon tube
CIS
Summary of Contents for iR C3380 series
Page 1: ...Aug 29 2006 Service Manual iR C3380 2880 Series...
Page 2: ......
Page 6: ......
Page 23: ...Chapter 1 Introduction...
Page 24: ......
Page 26: ......
Page 52: ......
Page 53: ...Chapter 2 Installation...
Page 54: ......
Page 127: ...Chapter 3 Basic Operation...
Page 128: ......
Page 130: ......
Page 136: ......
Page 137: ...Chapter 4 Main Controller...
Page 138: ......
Page 160: ......
Page 161: ...Chapter 5 Original Exposure System...
Page 162: ......
Page 188: ...Chapter 5 5 24 F 5 68 4 Remove the original sensor 2 hook 1 F 5 69...
Page 189: ...Chapter 6 Laser Exposure...
Page 190: ......
Page 192: ......
Page 206: ......
Page 207: ...Chapter 7 Image Formation...
Page 208: ......
Page 256: ......
Page 257: ...Chapter 8 Pickup Feeding System...
Page 258: ......
Page 262: ......
Page 303: ...Chapter 9 Fixing System...
Page 304: ......
Page 306: ......
Page 321: ...Chapter 10 Externals and Controls...
Page 322: ......
Page 326: ......
Page 336: ...Chapter 10 10 10 F 10 10 2 Remove the check mark from SNMP Status Enabled...
Page 337: ...Chapter 10 10 11 F 10 11...
Page 359: ...Chapter 11 MEAP...
Page 360: ......
Page 362: ......
Page 401: ...Chapter 12 RDS...
Page 402: ......
Page 404: ......
Page 411: ...Chapter 13 Maintenance and Inspection...
Page 412: ......
Page 414: ......
Page 416: ...Chapter 13 13 2 F 13 1 8 9 1 2 3 3 5 6 7 10 11 12 13 14 4...
Page 421: ...Chapter 14 Standards and Adjustments...
Page 422: ......
Page 424: ......
Page 431: ...Chapter 15 Correcting Faulty Images...
Page 432: ......
Page 434: ......
Page 459: ...Chapter 16 Self Diagnosis...
Page 460: ......
Page 462: ......
Page 481: ...Chapter 17 Service Mode...
Page 482: ......
Page 484: ......
Page 571: ...Chapter 18 Upgrading...
Page 572: ......
Page 574: ......
Page 603: ...Chapter 19 Service Tools...
Page 604: ......
Page 606: ......
Page 609: ...Aug 29 2006...
Page 610: ......


