Chapter 11
11-26
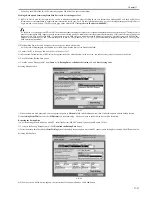
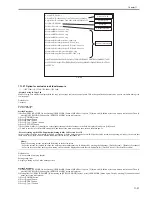
F-11-50
4) Check the screen to make sure that what is shown is the application you want to uninstall; then, click
OK
button.
In response, the system runs an uninstall sessions.
Important:
- The status of the license must be 'Not Installed' or 'Unnecessary' for its application to be uninstalled. As necessary, go to License File Management page, and
disable the license file before starting to remove it.
- A license file may be invalidated only when its application is not active.
- If the application you are uninstalling is associated with another application, a message will appear to indicate that the package exported by the application will
no loner be available. Uninstalling such an application may also disable its associated applications.
11.1.20 Changing Login Services
0014-8085
/ / / / iR C3380i / iR C3380 / iR C2880i / iR C2880
Login Service Overview
The login service is used to authenticate users who logs in to a MEAP device. You can change login services or uninstall them using System Management site.
At time of shipment, the login service offers the following 3 modes of authentication:
- Default authentication
- SDL (Simple Device Login)
- SSO (Single Sign-On)
Important:
- To set SDL, the registered information in SDL and the registered user data (Department ID and Password) in Department ID Management of the machine have
to match.
- To set up SDL or SSO, Department ID Management must be set to Off in advance. To use SDL and Department ID Management simultaneously, set
Department ID Management to On after switching the login service to SDL.
- If SSO is set as the login service, NetSpot Accountant is necessary for using Department ID Management.
- If SSO is set, you cannot use an optional card reader.
- To set to SSO, first adjust the current time for the PC where Active Directory is running, the iR, and the PC where users log on. If there is more than a 30-
minute difference among them, an error occurs at logon.
- If SSO or SDL is set as login service, it takes time until the iR is ready to start up.
- When the SEND function is used in the environment of SDL and SSO, it is necessary to set each user's mail address to transmit E-mail. When the mail address
is not set, E-mail cannot be transmitted. However, when i-Fax is transmitted, the mail address set to the device is used.
Outline of Default Authentication
In this mode of authentication, you will be using Department ID Management or you will not be using any authentication mechanism. If you enable the Department
ID Management in the MEAP device's Additional Functions mode, the user can use the device only when he/she enters an ID number (a 7-character ID and pass-
word) that has been registered from the device's touch panel display or through Remote UI.
Outline of SDL (Simple Device Login)
In this mode of authentication, you will be operating on a MEAP device on its own. You will store user information to the MEAP device's memory by accessing
the device through a Web browser. SDL offers the following functions:
a. it brings up the Login screen on the MEAP device's touch panel display for user authentication.
b. it brings up the Login page when you access the MEAP device from Web browser to manage the numbers of printed and scanned sheets for each department ID
working with the department ID management function. it operates in conjunction with the group ID control mechanisms to keep track of the number of print
pages or scan pages according to group IDs.
c. it enables register/editing of user authentication information through a Web browser.
Summary of Contents for iR C3380 series
Page 1: ...Aug 29 2006 Service Manual iR C3380 2880 Series...
Page 2: ......
Page 6: ......
Page 23: ...Chapter 1 Introduction...
Page 24: ......
Page 26: ......
Page 52: ......
Page 53: ...Chapter 2 Installation...
Page 54: ......
Page 127: ...Chapter 3 Basic Operation...
Page 128: ......
Page 130: ......
Page 136: ......
Page 137: ...Chapter 4 Main Controller...
Page 138: ......
Page 160: ......
Page 161: ...Chapter 5 Original Exposure System...
Page 162: ......
Page 188: ...Chapter 5 5 24 F 5 68 4 Remove the original sensor 2 hook 1 F 5 69...
Page 189: ...Chapter 6 Laser Exposure...
Page 190: ......
Page 192: ......
Page 206: ......
Page 207: ...Chapter 7 Image Formation...
Page 208: ......
Page 256: ......
Page 257: ...Chapter 8 Pickup Feeding System...
Page 258: ......
Page 262: ......
Page 303: ...Chapter 9 Fixing System...
Page 304: ......
Page 306: ......
Page 321: ...Chapter 10 Externals and Controls...
Page 322: ......
Page 326: ......
Page 336: ...Chapter 10 10 10 F 10 10 2 Remove the check mark from SNMP Status Enabled...
Page 337: ...Chapter 10 10 11 F 10 11...
Page 359: ...Chapter 11 MEAP...
Page 360: ......
Page 362: ......
Page 401: ...Chapter 12 RDS...
Page 402: ......
Page 404: ......
Page 411: ...Chapter 13 Maintenance and Inspection...
Page 412: ......
Page 414: ......
Page 416: ...Chapter 13 13 2 F 13 1 8 9 1 2 3 3 5 6 7 10 11 12 13 14 4...
Page 421: ...Chapter 14 Standards and Adjustments...
Page 422: ......
Page 424: ......
Page 431: ...Chapter 15 Correcting Faulty Images...
Page 432: ......
Page 434: ......
Page 459: ...Chapter 16 Self Diagnosis...
Page 460: ......
Page 462: ......
Page 481: ...Chapter 17 Service Mode...
Page 482: ......
Page 484: ......
Page 571: ...Chapter 18 Upgrading...
Page 572: ......
Page 574: ......
Page 603: ...Chapter 19 Service Tools...
Page 604: ......
Page 606: ......
Page 609: ...Aug 29 2006...
Page 610: ......


