COPYRIGHT© 2001 CANON INC.
2000 2000 2000 2000
CANON iR105 REV.0 JULY 2001
CHAPTER 6 TROUBLESHOOTING
6-7
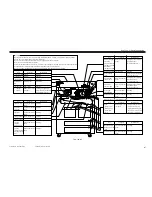
F06-101-05
Part
Copyboard glass
Tool/agent
Work/remarks
Part
Tool/agent
Work/remarks
Part
Tool/agent
Work/remarks
Part
Tool/agent
Work/remarks
Part
Tool/agent
Work/remarks
Cleaning
Alcohol
Alcohol
Standard white
plate
Reflecting plate
Lint-free paper
Blower brush
Dry wiping
Scanning lamp
Lint-free paper
Dry wiping
Cleaning
No. 1 through
No. 3 mirrors
Blower brush or lint-
free paper
Cleaning or using blower
brush; if dirt is excessive, dry
wiping with lint-free paper
Cleaning
Separation claw
Upper roller,
Lower roller
Feeding assembly
Re-pickup
assembly,
Reversing roller
Re-pickup
assembly, Pickup
roller, Registration
roller
Solvent and lint-free
paper
Cleaning oil, lint-free
paper
Moist cloth (Note 1)
Cleaning
Feeding assembly
Alcohol and lint-free
paper
Paper guide
Solvent and lint-free
paper
Alcohol and lint-free
paper
Cleaning
Cleaning
Cleaning
Cleaning
Cleaning
Manual feed tray,
Pickup roller, Feed
roller
Vertical path roller
Alcohol and lint-free
paper
Alcohol and lint-free
paper
Cleaning
Cleaning
Pre-exposure map
Primary charging
assembly.
Transfer/separation
charging assembly,
Pre-transfer
charging assembly
Dust-proofing glass
Dust-collecting
roller
Developing
assembly base
Registration roller
Moist cloth (Note 1)
Alcohol and lint-free
paper
Lint-free paper
Alcohol and lint-free
paper
Alcohol and lint-free
paper
Alcohol and lint-free
paper
Cleaning
Dry wiping; then, cleaning
with lit-free paper
moistened with alcohol
Dry wiping; then, cleaning
with lint-free paper
moistened with alcohol
Dry wiping; then, cleaning
with lint-free paper
moistened with alcohol
Disposing of toner trapped
dust-collecting roller
Cleaning
Cleaning
Note 1: Be sure not to leave droplets of water.
Prism
(pickup sensor)
(feeding sensor)
(vertical path
sensor)
Blower brush or lint-
free paper
• Cleaning with lower brush
• If dirt is excessive, dry
wiping with lint-free paper
(Do not use solvents other
than the one indicated.)
Cleaning
Note 1: Be sure not to leave any droplets of water.
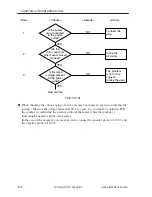
• Be sure to check the block (front, rear) for melting, thermal deformation, cracking, or discoloration caused by leakage.
If found, be sure to replace it with a new one without delay.
• Be sure to check and clean the block (front, rear) thoroughly (all the way to its inside).
• Never use a cloth carrying any metal powder.
• Unless specifically indicated, do not use a moist cloth. Use lint-free paper to dry wipe, and use alcohol thereafter. Be sure
that the alcohol has completely evaporated before fitting the part back into the machine.
• Be sure to provide scheduled servicing and replace periodically replaced parts at specific intervals.
Caution:
Transfer guide
(upper, lower)
Pre-transfer
exposure lamp
Summary of Contents for iR105 Series
Page 547: ...COPYRIGHT 2001 CANON INC 2000 2000 2000 2000 CANON iR105 REV 0 JULY 2001 APPENDIX ...
Page 561: ...Service Mode COPYRIGHT 2001 CANON INC 2000 CANON iR105 REV 0 JULY 2001 ...
Page 691: ...Error Code COPYRIGHT 2001 CANON INC 2000 CANON iR105 REV 0 JULY 2001 ...
Page 727: ......
Page 731: ......
Page 737: ......
Page 739: ......
Page 745: ......
Page 749: ......
Page 757: ......
Page 761: ......
Page 765: ......
Page 769: ......
Page 775: ......
Page 799: ......
Page 817: ......
Page 827: ......
Page 833: ......
Page 839: ......
Page 845: ......
Page 873: ......
Page 877: ......
Page 887: ......
Page 891: ......
Page 901: ......
Page 905: ......
Page 909: ......
Page 917: ......
Page 921: ......
Page 925: ......
Page 931: ......
Page 939: ......
Page 943: ......
Page 951: ......
Page 1002: ......
Page 1012: ...C 10 COPYRIGHT C 2001 CANON INC STANDARD FASTENERS REV 0 FEB 1992 ...
Page 1029: ...PRINTED IN U S A IMPRIME AU U S A This publication is printed on 100 recycled paper ...

