Chapter 2
2-3
2.1.3 Before Starting the Work (120V TW)
0020-4249
1-1 Points to Make Before Installation
Be sure to go through the following before starting the work:
1) If you are installing the machine after moving it from a cold to warm location, be sure to leave the machine unpacked for at least 2 hours so that the machine is
fully used to the site temperature, thus avoiding image faults caused by condensation. (The term "condensation" refers to the formation of droplets of water on
the surface of a metal object brought in from a cold to warm place, i.e., as the result of the rapid cooling of the moisture (vapor) around the object.)
2) The machine weighs a maximum of about 37.9 kg. Be sure to work in a group of 2 persons when lifting it.
3) The machine is manufactured considering that it would be connected to IT Power Distribution System in Norway.
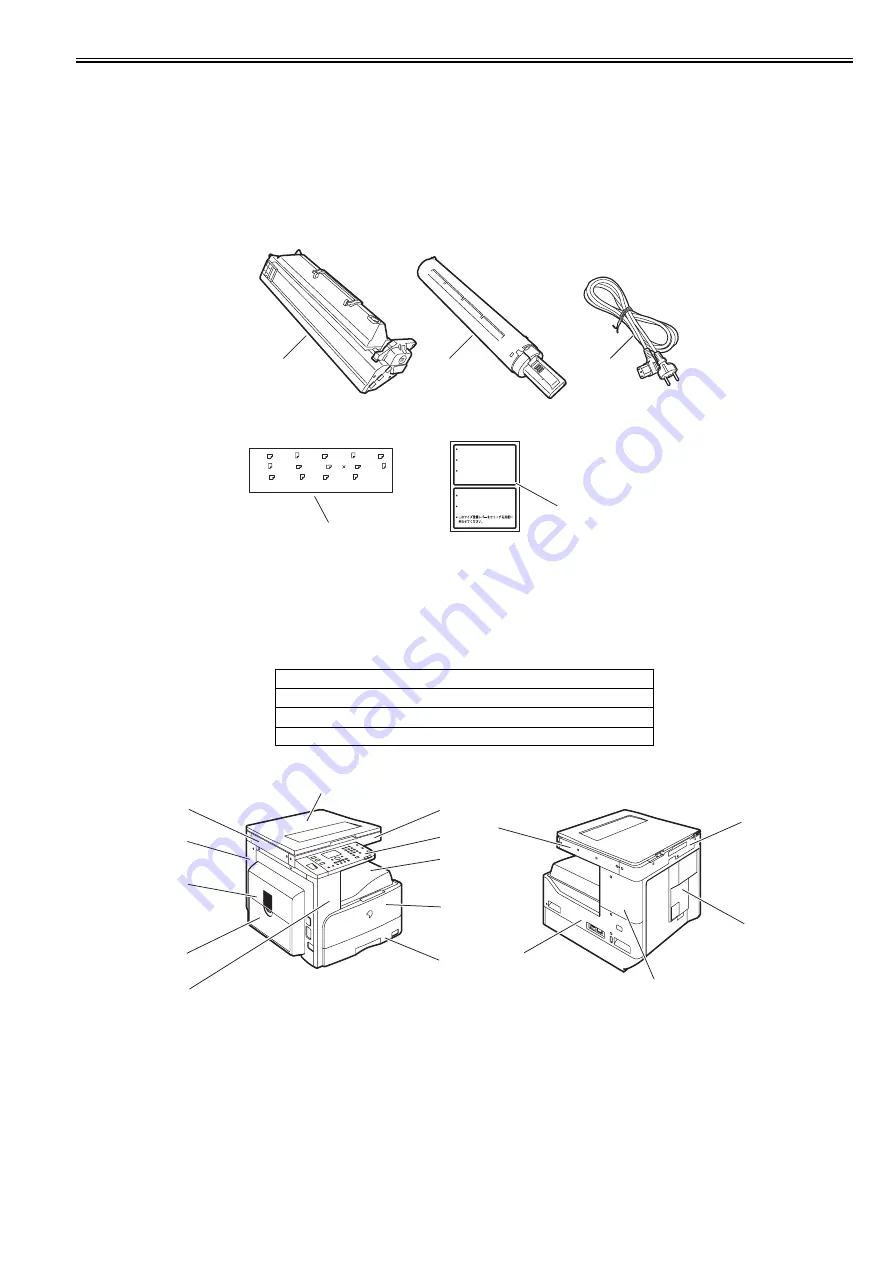
1-2 Checking the Contents
Check to be sure that none of the following contents is missing:
F-2-5
Check the documentation and CD against the following table:
1-3 Names of Parts
F-2-6
[1]
Drum unit
---1
[4]
Cassette size label
---1
[2]
Black toner
---1
[5]
Caution sheet
---1
[3]
Power cable
---1
Driver/Utility CD-ROM
User Manual CD-ROM
Operators manual: Users Guide
Operators manual: Easy Operation Guide
[1]
Copyboard cover
[9]
Left door
[2]
Reader front cover
[10]
Left cover (rear)
[3]
Control panel
[11]
Reader left cover
[4]
Delivery tray
[12]
Reader right cover
[5]
Front cover
[13]
Reader rear cover
[6]
Cassette 1
[14]
Rear cover
A3
B5
LTR
A4
LGL
8K
B4
LTR
A4
B5
STMT
A5
11 17
16K
[4]
[3]
[1]
[2]
[5]
Bitte stellen Sie den Hebel zum
Erkennen des Papierformats auf
das neue Format ein.
Set the size detector lever to the
new paper size.
Placer I’indicateur de format sur
le nouveau format.
Set the size detector lever to the
new paper size.
Placer I’indicateur de format sur
le nouveau format.
[9]
[10]
[11]
[2]
[1]
[3]
[4]
[5]
[6]
[7]
[8]
[12]
[13]
[14]
[15]
[16]
Summary of Contents for iR2422 series
Page 1: ...May 12 2014 Service Manual iR2422 2420 2320 2318 Series...
Page 2: ......
Page 6: ......
Page 16: ...Contents...
Page 17: ...Chapter 1 Introduction...
Page 18: ......
Page 20: ......
Page 50: ......
Page 51: ...Chapter 2 Installation...
Page 52: ......
Page 54: ......
Page 58: ...Chapter 2 2 4 7 Left cover front 15 Right cover upper 8 Manual feed tray 16 Right cover lower...
Page 62: ...Chapter 2 2 8 8 Manual feed tray 16 Right cover lower...
Page 64: ...Chapter 2 2 10 8 Manual feed tray 16 Right cover lower...
Page 89: ...Chapter 2 2 35...
Page 90: ......
Page 91: ...Chapter 3 Main Controller...
Page 92: ......
Page 94: ......
Page 102: ......
Page 103: ...Chapter 4 Original Exposure System...
Page 104: ......
Page 135: ...9 Remove the reader heater left 1 Connector 2 1 pc Screw 3 1 pc F 4 73 2 3 1...
Page 136: ......
Page 137: ...Chapter 5 Laser Exposure...
Page 138: ......
Page 140: ......
Page 148: ...Chapter 5 5 8...
Page 149: ...Chapter 6 Image Formation...
Page 150: ......
Page 152: ......
Page 165: ...Chapter 7 Pickup Feeding System...
Page 166: ......
Page 192: ...Chapter 7 7 24...
Page 193: ...Chapter 8 Fixing System...
Page 194: ......
Page 196: ......
Page 207: ...Chapter 9 External and Controls...
Page 208: ......
Page 229: ...Chapter 10 Maintenance and Inspection...
Page 230: ......
Page 232: ......
Page 235: ...Chapter 11 Standards and Adjustments...
Page 236: ......
Page 238: ......
Page 240: ...Chapter 11 11 2...
Page 241: ...Chapter 12 Correcting Faulty Images...
Page 242: ......
Page 244: ......
Page 256: ......
Page 257: ...Chapter 13 Self Diagnosis...
Page 258: ......
Page 260: ......
Page 269: ...Chapter 14 Service Mode...
Page 270: ......
Page 272: ......
Page 287: ...Chapter 15 Upgrading...
Page 288: ......
Page 290: ......
Page 295: ...Chapter 16 Service Tools...
Page 296: ......
Page 298: ......
Page 300: ......
Page 301: ...Chapter 17 Backup Data...
Page 302: ......
Page 303: ...Contents Contents 17 1 Backup Data 17 1...
Page 304: ......
Page 306: ......
Page 307: ...May 12 2014...
Page 308: ......


