Chapter 2
2-41
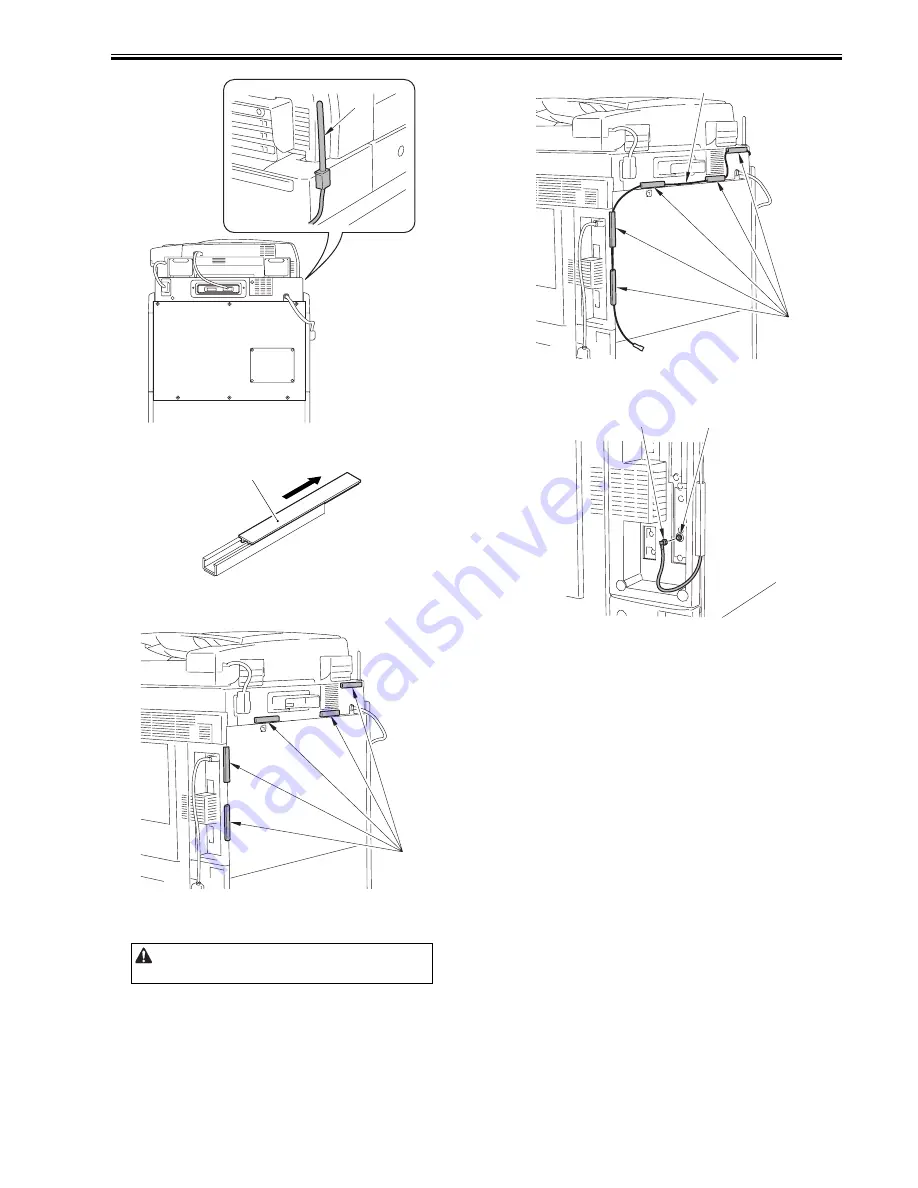
F-2-151
10) Detach the 5 covers of the cord guide [1].
F-2-152
11) Remove the sheet of the 5 cord guides [1] and put them on the indicated
position at the rear side of the host machine.
F-2-153
12) Put the MFP antenna cable [1] through the 5 cord guides [2] and attach
the cord guide cover.
F-2-154
13) Connect the MFP antenna cable [1] with the wireless LAN board termi-
nal [2].
F-2-155
14) Insert the reader communication cable and secure it with the wire saddle.
15) Put the power plug into the outlet.
16) Turn ON the main power switch.
17) Check if the wireless LAN board is recognized.
Enter service mode.
Select COPIER > DISPLAY > ACC-STS > PCI.
If "Wireless LAN Board" is displayed, that means that the wireless LAN
board is correctly recognized.
2. Output the user data list
Output the user data list in order to check that the wireless LAN has been rec-
ognised.
1) Select: [Additional Functions] > [Report Settings] > [Extension Card] in
the Print List > [User Data List].
2) After a message is displayed, select 'Yes' to output the user data list.
2.14.5 Affixing the Label
0018-6192
iR5065 / iR 5055 / iR5075 / iR5075N / iR5065N / iR5055N
1) Affix the wireless LAN display label [2] on the indicated position [1] of
the rear upper cover.
Make sure to route the cable without cable loosening.
[1]
[1]
[1]
[2]
[1]
[1]
[2]
Summary of Contents for iR5055
Page 1: ...Feb 29 2008 Service Manual iR5075 5065 5055 Series ...
Page 2: ......
Page 6: ......
Page 27: ...Contents 19 1 2 List of Solvents Oils 19 2 ...
Page 28: ...Contents ...
Page 29: ...Chapter 1 Introduction ...
Page 30: ......
Page 32: ......
Page 59: ...Chapter 2 Installation ...
Page 60: ......
Page 104: ...Chapter 2 2 42 F 2 156 2 1 ...
Page 105: ...Chapter 3 Basic Operation ...
Page 106: ......
Page 108: ......
Page 115: ...Chapter 4 Main Controller ...
Page 116: ......
Page 118: ......
Page 135: ...Chapter 5 Original Exposure System ...
Page 136: ......
Page 169: ...Chapter 6 Laser Exposure ...
Page 170: ......
Page 172: ......
Page 178: ......
Page 179: ...Chapter 7 Image Formation ...
Page 180: ......
Page 184: ......
Page 217: ...Chapter 8 Pickup Feeding System ...
Page 218: ......
Page 274: ......
Page 275: ...Chapter 9 Fixing System ...
Page 276: ......
Page 280: ......
Page 320: ......
Page 321: ...Chapter 10 External and Controls ...
Page 322: ......
Page 326: ......
Page 336: ...Chapter 10 10 10 F 10 7 2 Remove the check mark from SNMP Status Enabled ...
Page 337: ...Chapter 10 10 11 F 10 8 ...
Page 361: ...Chapter 11 MEAP ...
Page 362: ......
Page 364: ......
Page 409: ...Chapter 12 e maintenance imageWARE Remote ...
Page 410: ......
Page 412: ......
Page 421: ...Chapter 13 Maintenance and Inspection ...
Page 422: ......
Page 424: ......
Page 433: ...Chapter 14 Standards and Adjustments ...
Page 434: ......
Page 464: ......
Page 465: ...Chapter 15 Correcting Faulty Images ...
Page 466: ......
Page 468: ......
Page 496: ......
Page 497: ...Chapter 16 Self Diagnosis ...
Page 498: ......
Page 500: ......
Page 528: ......
Page 529: ...Chapter 17 Service Mode ...
Page 530: ......
Page 532: ......
Page 600: ......
Page 601: ...Chapter 18 Upgrading ...
Page 602: ......
Page 604: ......
Page 636: ...Chapter 18 18 32 F 18 59 2 Select the data to download F 18 60 3 Click Start ...
Page 638: ......
Page 639: ...Chapter 19 Service Tools ...
Page 640: ......
Page 642: ......
Page 645: ...Feb 29 2008 ...
Page 646: ......


