Chapter 15
15-14
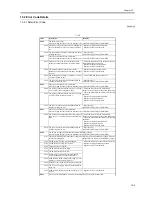
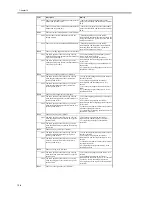
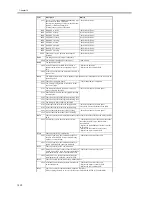
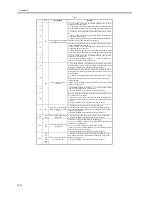
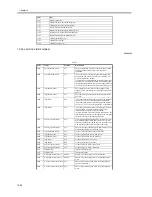
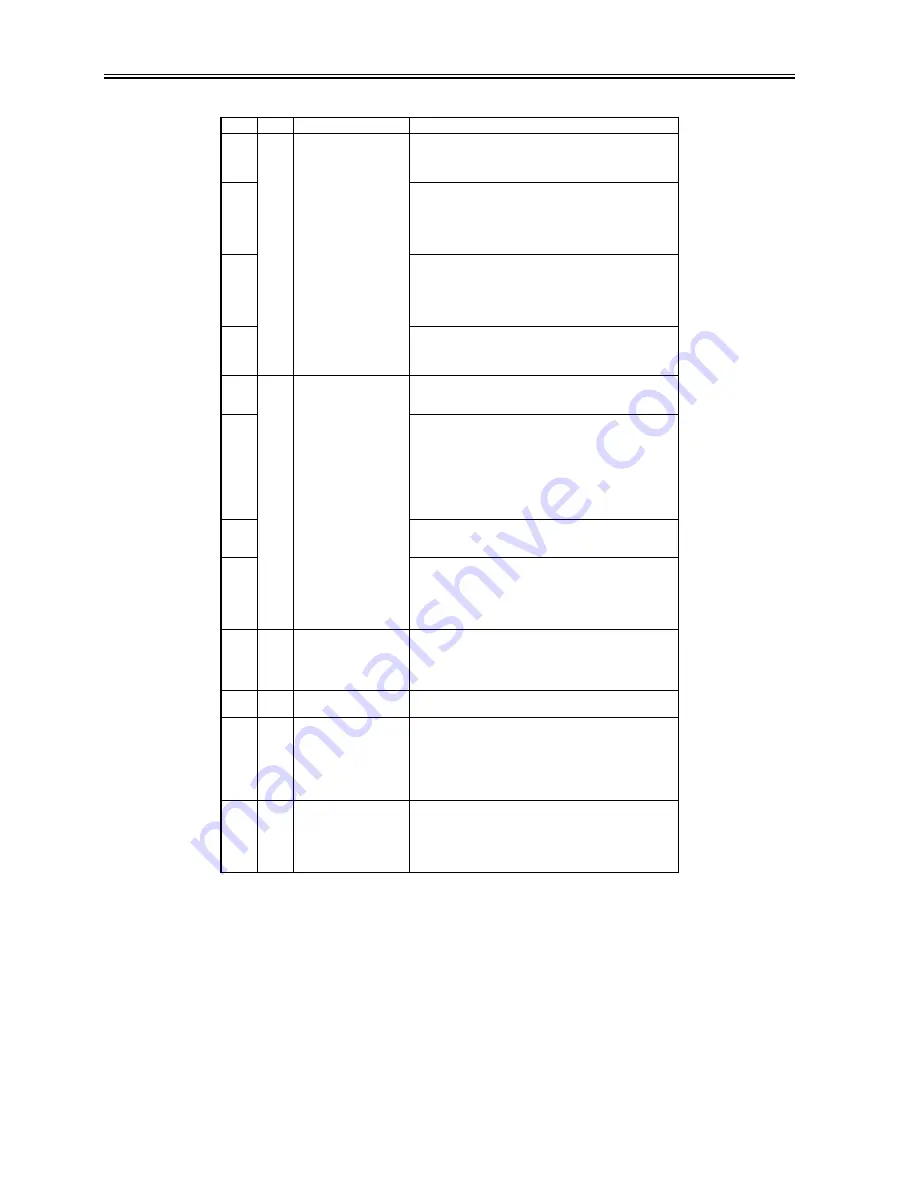
T-15-5
YY
Description
Remedy
*1
01
An ongoing write operation
is interrupted (at start-up).
1. Set '0' to CHK-TYPE, and execute HD-CHECK; then, turn off
and then back on the power.
2. Type in CHK-TYPE that corresponds to the partition in question,
and execute HD-CLEAR; then, turn off and then back on the power.
*2
1. Ask the user to download the address book data using a remote
UI.
2. Set '0' to CHK-TYPE, and execute HD-CHECK; thereafter, turn
off and then on the power.
3. Start download mode, and execute full formatting using the SST;
thereafter, turn off and then back on the power.
*3
The recovery operation for the boot partition necessarily requires
the use of the SST in safe mode.
1. Set '0' for CHK-TYPE, and execute HD-CHECK; thereafter, turn
off and then back on the power.
2. Start download mode, and execute full formatting and re-install
the system software; thereafter, turn off and then back on the power.
*4
1. Set '0' to CHK-TYPE, and execute HD-CHECK; then, turn off
and then back on the power.
2. Execute HD-CLEAR by setting '1', '2', '3', and '5' to CHK-type;
then, turn off and then back on the power.
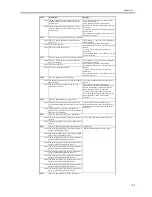
*5
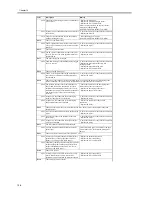
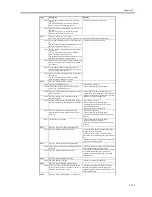
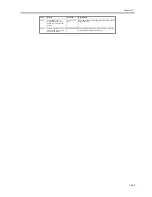
02
A file system error has
occurred.
1. Type in CHK-TYPE corresponding to the partition in question,
and execute HD-CLEAR; then, turn off and then back on the power.
2. Replace the HDD, and re-install the system software.
*6
The machine does not permit execution of HD-CLEAR in service
mode (to prevent loss of partition information such as address book
and filter data).
1. Ask the user to download the address book data using a remote
UI.
2. Start download mode from service mode; then, execute full
formatting using
the SST, and re-install the system software. Thereafter, turn off and
then back on the power.
*7
1. Execute HD-CLEAR by setting "1', '2', '3', and '5' to CHK-TYPE;
then, turn off and then back on the power.
2. Replace the HDD, and re-install the system software.
*8
Recovery operation for the Boot partition necessarily requires the
use of the SST in safe mode.
1. Start in safe mode, and execute full formatting in the SST, and
re-install the system software. Thereafter, turn off and then on the
power.
2. Replace the HDD, and re-install the system software.
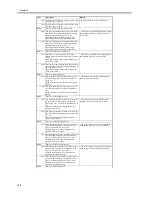
*9
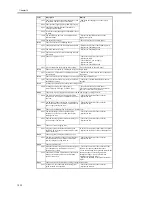
03
There is poor contact for the
HDD, or there is a system
error.
1. Check the cables and power cord for disconnection.
2. Start up in safe mode; then, execute full formatting using the
SST, and re-install the system software. Thereafter, turn off and
then back on the power.
3. Replace the HDD, and re-install the system software.
*10
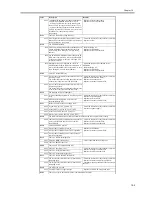
11
21
There is poor connection of
the HDD.
1. Check the cable and the power connectors for disconnection.
2. Replace the HDD, and re-install the system software.
*11
13
25
A write operation has been
suspended.
File data as of Box on the HDD may be damaged.
1. Set '0' for CHK-TYPE, and execute HD-CHECK; then, turn off
and then back on the power.
2. Set '1' for CHK-TYPE, and execute HD-CLEAR.
(In the case of APL_SEND or BOOTDEV, reformat using the SST
and re-install the system software.)
3. Replace the HDD, and re-install the system software.
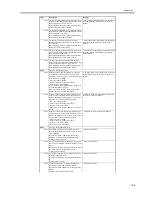
*12
10
12
14
22
23
24
There is a system error or a
packet data error.
1. Start up in safe mode; then, execute full formatting using the
SST, and re-install the system software. Thereafter, turn off and
then back on the power.
2. Replace the HDD, and re-install the system software.
Summary of Contents for iR5570 Series
Page 1: ...Mar 29 2005 Service Manual iR6570 5570 Series ...
Page 2: ......
Page 6: ......
Page 26: ...Contents ...
Page 27: ...Chapter 1 Introduction ...
Page 28: ......
Page 30: ......
Page 55: ...Chapter 2 Installation ...
Page 56: ......
Page 58: ...Contents 2 9 3 Mounting the Cassette Heater 2 34 ...
Page 98: ......
Page 99: ...Chapter 3 Basic Operation ...
Page 100: ......
Page 102: ......
Page 110: ......
Page 111: ...Chapter 4 Main Controller ...
Page 112: ......
Page 114: ......
Page 135: ...Chapter 5 Original Exposure System ...
Page 136: ......
Page 181: ...Chapter 6 Laser Exposure ...
Page 182: ......
Page 184: ......
Page 192: ......
Page 193: ...Chapter 7 Image Formation ...
Page 194: ......
Page 198: ......
Page 259: ...Chapter 8 Pickup Feeding System ...
Page 260: ......
Page 350: ......
Page 351: ...Chapter 9 Fixing System ...
Page 352: ......
Page 401: ...Chapter 10 External and Controls ...
Page 402: ......
Page 406: ......
Page 448: ......
Page 449: ...Chapter 11 MEAP ...
Page 450: ......
Page 452: ......
Page 455: ...Chapter 12 Maintenance and Inspection ...
Page 456: ......
Page 458: ......
Page 468: ......
Page 469: ...Chapter 13 Standards and Adjustments ...
Page 470: ......
Page 505: ...Chapter 14 Correcting Faulty Images ...
Page 506: ......
Page 508: ......
Page 537: ...Chapter 15 Self Diagnosis ...
Page 538: ......
Page 540: ......
Page 565: ...Chapter 16 Service Mode ...
Page 566: ......
Page 568: ......
Page 633: ...Chapter 17 Upgrading ...
Page 634: ......
Page 636: ......
Page 641: ...Chapter 17 17 5 F 17 4 HDD Boot ROM Flash ROM System Software ...
Page 646: ...Chapter 17 17 10 F 17 11 8 Click START F 17 12 ...
Page 675: ...Chapter 17 17 39 F 17 59 2 Select the data to download F 17 60 3 Click Start ...
Page 677: ...Chapter 18 Service Tools ...
Page 678: ......
Page 680: ......
Page 683: ...Mar 29 2005 ...
Page 684: ......


