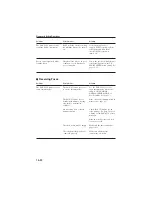
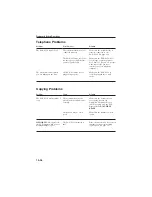
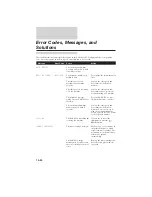
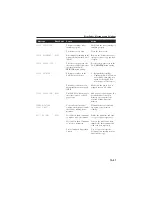
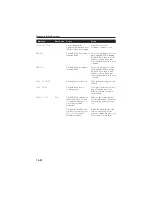
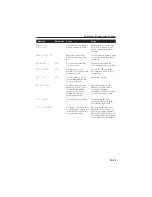
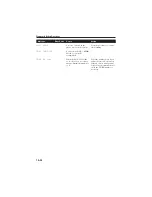
background image

Problem

Possible cause

Solution

The FAX-L250 will not switch

between telephone and fax calls

automatically?

The FAX-L250 may not be in

Fax/Tel Mode.

For the FAX-L250 to switch

automatically between

telephone and fax calls, it must

be in Fax/Tel Mode. See page

6-3.

The FAX-L250 may have a

document in memory.

Print out any documents stored in

memory. See page 6-17.

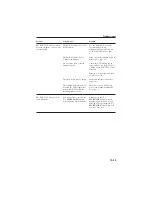
An error may have occurred

during reception.

Check the LCD display for an

error message. See page 10-30 for

a listing of the FAX-L250’s error

messages.

Print an activity report and look

for an error code.

The sheet feeder may be empty.

Make sure the sheet feeder has

paper in it.

The sending fax machine may

not send the CNG signal that

tells the FAX-L250 that the

incoming signal is a fax.

In such cases, you will have to

receive the document manually.

See page 6-9.

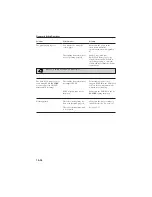
The FAX-L250 will not receive

faxes manually?

You may not have pressed the

START/COPY) button

before hanging up the handset.

Always press the

(

START/COPY

) button before

hanging up the handset. If you

hang up before pressing the

(

START/COPY

) button you will

disconnect the call.

Problems Index

10-23

Summary of Contents for L250

Page 1: ...FAX L250 User s Guide...

Page 2: ...This CE Marking shows compliance of this equipment with Directive 73 23 EEC and Directive 89 336 EEC as amended by Directive 92 31 EEC both as amended by Directive 93 68 EEC Canon Inc Canon Europa N...

Page 3: ...rk of Canon Inc Other brand and product names may be trademarks or registered trademarks of their respective companies As an Energy Star Partner Canon has determined that the FAX L250 meets the Energy...

Page 4: ...nnected If required a suitable adaptor approved under Approval Number NS G 23 L 100005 for connections between the fax machine and any piece of approved telecommunications apparatus is available from...

Page 5: ...accessible The fact that the equipment operates satisfactorily does not imply that the power point is earthed and the installation is completely safe For your safety if in any doubt about the effectiv...

Page 6: ...e power source 3 Reconnect the equipment to the power source 4 Reconnect the equipment to the Telecom connection 5 If the supply cord of this equipment is damaged it must be replaced by the special co...

Page 7: ...ser no radiation can leak from the machine This fax is classified as Class 1 laser product under IEC 825 and as for the USA is classified as Class 1 under the Code of Federal Regulation 1040 10 of Tit...

Page 8: ...Have Everything 2 5 Lifting the FAX L250 2 7 Removing Shipping Materials 2 8 Replaceable Parts 2 10 Assembling the FAX L250 2 11 Attaching Components 2 11 Attaching the Paper Rest 2 11 Attaching the P...

Page 9: ...nu System 3 6 Personalising Your FAX L250 3 8 Identifying Your Documents 3 9 Entering the Date and Time 3 9 Registering Your Fax Number and Name 3 10 Setting the Telephone Line 3 12 Chapter 4 SPEED DI...

Page 10: ...Document Feeder ADF 5 20 Cancelling Sending 5 21 Removing the Document from the Automatic Document Feeder ADF 5 22 Redialling 5 24 Manual Redialling 5 24 Automatic Redialling with Memory Sending 5 24...

Page 11: ...tem Operation 6 15 Documents Received in Memory 6 16 Messages Displayed When Documents are Received in Memory 6 16 Printing Documents Received in Memory 6 17 Receiving while Registering Copying or Pri...

Page 12: ...LY ASKED QUESTIONS 10 1 If You Cannot Solve the Problem 10 2 Problems Index 10 3 Paper Jams 10 5 Jams in the Automatic Document Feeder ADF 10 5 Jams in the Output Slots 10 8 Jams Inside the Unit 10 9...

Page 13: ...R SETTINGS Menu 12 4 Accessing the REPORT SETTINGS Menu 12 6 Accessing the TX SETTINGS Menu 12 8 Accessing the RX SETTINGS Menu 12 10 Accessing the FAX PRINTER Menu 12 12 Accessing the SYSTEM SETTINGS...

Page 14: ...This page is intentionally blank...

Page 15: ...of the documentation that comes with the unit and gives important safety instructions Welcome 1 2 The Main Features of the FAX L250 1 3 Plain Paper Fax Features 1 4 Copier Features 1 5 Telephone Featu...

Page 16: ...he FAX L250 is a G3 facsimile unit that allows you to send documents at high speed in the shortest time possible We are sure that your FAX L250 will help meet your fax and phone requirements easily an...

Page 17: ...ges per minute allows you to work more effectively Simple maintenance The FX 3 toner cartridge for the FAX L250 contains both the toner and the drum making installation and replacement simple Convenie...

Page 18: ...250 uses G3 data encoding methods that increase transmission speed to approximately 6 seconds per page Memory sending receiving The FAX L250 can store up to 90 fax pages either received or to be sent...

Page 19: ...Telephone Features Automatic dialling The FAX L250 s three automatic dialling methods one touch speed dialling coded speed dialling and group dialling can be used to store phone numbers and fax numbe...

Page 20: ...faxes and making copies and to learn more about its special features such as restricting use of the unit and special dialling features If your FAX L250 begins operating improperly use Chapter 10 Freq...

Page 21: ...50 Notes provide advice for using your FAX L250 more effectively describe operating restrictions and tell how to avoid minor operating difficulties In addition this user s guide uses bold capital lett...

Page 22: ...e free operation If you have a problem with the unit s operation try to solve it by using the information in Chapter 10 Frequently Asked Questions If you cannot solve the problem or if you think your...

Page 23: ...entilation To keep the FAX L250 from overheating which can cause it to operate abnormally and create a fire risk take care not to block or cover these openings Do not operate the unit on a bed sofa ru...

Page 24: ...r supply UPS Always unplug the FAX L250 before moving or cleaning it Whenever you unplug the FAX L250 wait at least five seconds before you plug it back in Keep the FAX L250 away from direct sunlight...

Page 25: ...t If the FAX L250 does not operate normally when you follow the operating instructions Adjust only those controls that are covered by the operating instructions in this user s guide or you can damage...

Page 26: ...This page is intentionally blank...

Page 27: ...FAX L250 2 11 Attaching Components 2 11 Attaching the Paper Rest 2 11 Attaching the Paper Loading Label 2 12 Attaching the Extension Tray 2 12 Attaching the Support Trays 2 13 Making Connections 2 14...

Page 28: ...Loading Recording Paper 2 33 Testing the FAX L250 2 36 The Paper Path 2 37 Selecting Paper Delivery 2 38 Face Down Delivery 2 39 Face Up Delivery 2 40 2 2...

Page 29: ...y is always between 20 and 85 Keep the FAX L250 away from direct sunlight If possible place the FAX L250 near an existing telephone outlet to allow for an easy connection of the telephone line to the...

Page 30: ...o allow paper to flow freely into and out of the unit The figure below shows the minimum space required for the unit If you need help installing your FAX L250 or have any questions about it please con...

Page 31: ...he carton and packing material in case you want to move or ship the unit in the future 1 Carefully remove all items from the box You should have someone help by holding the box while you lift the FAX...

Page 32: ...of the power cord varies depending on the country of purchase The shape of the telephone line varies depending on the country of purchase FAX L250 UNIT PAPER REST SUPPORT TRAYS POWER CORD TELEPHONE L...

Page 33: ...never you plan to move the FAX L250 be sure to Hold the unit firmly and keep it level Always grip the sides of the unit The recessed areas on each side of the unit serve as handles Unpacking Your FAX...

Page 34: ...has been packed with protective material that you must remove before using Follow these steps 1 Remove all pieces of shipping tape from the outside of the FAX L250 2 Open the operation panel by grasp...

Page 35: ...om the Automatic Document Feeder ADF then gently close the operation panel by pressing it down from the centre until it clicks 4 Peel the clear protective sheet off the LCD display Unpacking Your FAX...

Page 36: ...replacement is the FX 3 toner cartridge Although Canon manufactures many types of toner cartridges the FX 3 toner cartridge is the only one designed to be used with your FAX L250 The FX 3 toner cartr...

Page 37: ...led see Getting Acquainted with Your FAX L250 on page 2 18 Attaching Components j Attaching the Paper Rest The paper rest helps keep paper or other media straight in the sheet feeder To attach the pap...

Page 38: ...s included with your FAX L250 unit Attach the label to the left of the sheet feeder as shown below j Attaching the Extension Tray Lift the FAX L250 unit as shown and slide the extension tray into the...

Page 39: ...the face down delivery slot making sure that the smaller tab is on the left The other support tray holds documents as they are fed into the Automatic Document Feeder ADF To install this support insert...

Page 40: ...Telephone Line Connect the FAX L250 to a telephone line as follows 1 Connect one end of the supplied telephone line to the jack marked on the back of the FAX L250 2 Connect the other end of the line...

Page 41: ...e optional handset telephone or answering machine to the jack marked on the back of the FAX L250 If you connect an answering machine to the FAX L250 be sure to read Using an Answering Machine ANS MACH...

Page 42: ...with an appliance such as an air conditioner computer electric typewriter or copier These devices generate electrical noise which can interfere with the operation of the FAX L250 Make sure nothing is...

Page 43: ...the FAX L250 is warming up the message PLEASE WAIT appears in the LCD display When the time and receive mode appear the FAX L250 is in standby mode and ready for use If the toner cartridge has not bee...

Page 44: ...s to become familiar with the unit s components and their functions Front View SUPPORT TRAYS AUTOMATIC DOCUMENT FEEDER ADF DOCUMENT GUIDES OPERATION PANEL PAPER DELIVERY SELECTOR PAPER REST SHEET FEED...

Page 45: ...Inside View FIXING ASSEMBLY PAPER RELEASE LEVER FX 3 TONER CARTRIDGE COMPARTMENT TRANSFER CHARGING ROLLER FRONT COVER Getting Acquainted with Your FAX L250 2 2 2 2 19...

Page 46: ...View The Handset Option For details on the optional handset see Appendix B POWER CONNECTOR RELEASE LATCH OPTIONAL HANDSET TELEPHONE ANSWERING MACHINE JACK TELEPHONE LINE JACK Setting Up Your FAX L250...

Page 47: ...lay The LCD display shows messages and prompts during operation and displays selections text numbers and names when registering information ALARM lamp This lamp flashes when an error occurs or when th...

Page 48: ...lls ANS MACHINE MODE or to automatically switch between telephone and fax receiving depending on the type of call Fax Tel Mode START COPY button Press this button to begin sending receiving scanning c...

Page 49: ...to send a document using a password and subaddress based on the ITU T standard MEMORY REF button 03 Use this button to delete or resend documents stored in memory or to print a list of documents in me...

Page 50: ...ialling temporarily when your unit is set for pulse dialling Press also to enter a sign when registering your fax telephone number Arrow buttons 10 and 12 Use these buttons to scroll through menu sele...

Page 51: ...t even by shaking the cartridge Keep the cartridge away from computer screens disc drives and floppy discs The magnet inside the cartridge may harm these items Never touch the drum protective shutter...

Page 52: ...ctive bag You may need to repack and transport the cartridge at a later date Do not store the cartridge in salty air or where there are corrosive gases such as from aerosol sprays Do not remove the ca...

Page 53: ...stribute the toner If after doing this the message remains displayed or the print quality is low replace the cartridge as described below Canon makes numerous cartridges The FX 3 toner cartridge has b...

Page 54: ...e front cover without pressing the release latches as this may cause damage to your unit 4 If replacing a used cartridge hold the cartridge by its handle and remove it as shown HANDLE Setting Up Your...

Page 55: ...in You may need to repack the cartridge later 6 Gently rock the cartridge from side to side several times to distribute the toner evenly inside the cartridge Poor print quality may result if the tone...

Page 56: ...d Remove the seal by gently pulling on the plastic tab with your other hand Use a firm even pull to remove the plastic seal To avoid breaking the seal do not jerk on it unevenly SIDE VIEW TOP VIEW PUL...

Page 57: ...e with the guides inside the unit Slide the unit into position Always hold the cartridge by its handle when inserting it in the unit 9 Gently press the cartridge into the unit as far as it will go Pre...

Page 58: ...10 Close the front cover Use both hands to lift the cover back into the closed position Setting Up Your FAX L250 2 32...

Page 59: ...y textured or extremely smooth or shiny paper does not print well The laser printing process uses high temperatures to fuse toner to the paper Use paper that will not melt vaporise discolour or emit d...

Page 60: ...er Let the paper run out before you refill the sheet feeder 1 Before loading paper stack it so that the leading edge and sides of the paper are even 2 Open the paper guides to the approximate width of...

Page 61: ...t the paper guides to the width of the paper Make sure there is no space between the paper guides and the stack of paper Your FAX L250 is now ready to print Let the paper run out before you refill the...

Page 62: ...ake sure the FAX L250 is printing properly by making several copies of a document For instructions see Chapter 8 Making Copies Note the following If the printed sheets are curled as they exit the FAX...

Page 63: ...rom the front or top When you are printing follow these guidelines Always set the paper delivery selector before starting to print Do not switch the paper delivery selector until the printout complete...

Page 64: ...Delivery Received faxes and copies can be delivered through the face up or face down delivery slots Choose paper delivery according to the job the FAX L250 is performing and the type of print media yo...

Page 65: ...plain paper only 64 to 90 g m2 Printed pages are stacked in the order printed in the face down delivery slot This slot holds up to 50 sheets of plain paper 75 g m2 Move the paper delivery selector up...

Page 66: ...dge of a table so that printed pages can come out without blocking the face up delivery slot 1 Move the paper delivery selector down to the mark When using face up delivery make sure that the unit is...

Page 67: ...rmation 3 2 Entering Numbers Letters and Symbols 3 3 Editing Information 3 5 Using the One Touch Speed Dial Special Function Buttons 3 6 Using the Menu System 3 6 Personalising Your FAX L250 3 8 Ident...

Page 68: ...0 rings while you are entering information press the STOP button and lift the handset The FAX L250 will automatically save all the information you have entered up to the last time you pressed the STAR...

Page 69: ...When you are in number mode 1 appears on the right of the LCD display When you are in uppercase letter mode A appears on the right of the LCD display When you are in lowercase mode a appears on the ri...

Page 70: ...same group To enter two letters from the same group you have to use the right arrow button For example you would enter AA like this 1 Press until an A appears on the right of the LCD display 2 Press 2...

Page 71: ...Use the button to scroll to the incorrect character 2 Press the button once to erase the character above the cursor The cursor moves one space to the left 3 Press the button to move back to the empty...

Page 72: ...ION button that allows you to select operation settings and to enter user information The system includes these items TEL REGISTRATION Lets you register numbers for one touch speed dialling coded spee...

Page 73: ...ter 12 The Menu System You ll use the arrow buttons to display and select items from the menu system as follows 1 Press FUNCTION 2 Use or to change the menu display Press the button to display the nex...

Page 74: ...ents you send the receiving party can recognise your fax messages at a glance Here is a sample document with the identifying information If you send a fax using speed dialling the top line also includ...

Page 75: ...e correct date and time Use the DD MM YY format for the date and use the 24 hour clock for the time so 2 30 p m would be 14 30 for example 5 Press START COPY to save the date and time 6 Press STOP to...

Page 76: ...3 Press START COPY 4 Use or to select UNIT TELEPHONE 5 Press START COPY then enter your fax telephone number using the numeric buttons You can enter up to 20 digits for your fax number You can enter s...

Page 77: ...siness name For more details on entering letters see page 3 3 You can enter up to 24 characters for your name or business name 8 Press START COPY to save the name 9 Press STOP to return to standby mod...

Page 78: ...INE TYPE 5 Press START COPY then use or to select the correct telephone line type 6 Press START COPY to save the telephone line type 7 Press STOP to return to standby mode The factory default setting...

Page 79: ...uch Speed Dialling 4 3 Changing a Number Name Stored under a One Touch Speed Dialling Button 4 6 Using One Touch Speed Dialling 4 9 Coded Speed Dialling 4 11 Storing Numbers for Coded Speed Dialling 4...

Page 80: ...pressing the one touch speed dialling button that the number is assigned to Coded speed dialling Dial a fax telephone number by pressing the CODED DIAL button followed by a two digit code assigned to...

Page 81: ...ct a one touch speed dialling button between 01 and 16 If a number is already stored under the button you select that number appears If the button you select is registered for group dialling GROUP DIA...

Page 82: ...taken entry press the button To enter a pause in the number press the REDIAL PAUSE button one or more times 7 Press START COPY 8 Press START COPY again then use the numeric buttons to store the name t...

Page 83: ...ontinue registering numbers and names repeat steps 4 to 9 or If you have finished registering numbers and names press STOP to return to standby mode 05 14 30 FaxOnly One Touch Speed Dialling 4 4 4 4 4...

Page 84: ...e or to select the one touch speed dialling button you want to change between 01 and 16 If the button you select is registered for group dialling GROUP DIAL appears 5 Press START COPY twice Users in t...

Page 85: ...r name 6 To change the number use the numeric buttons to enter the new number over the previous number The telephone fax number can be up to 120 digits long If you only want to change the name ignore...

Page 86: ...for the name If you want to keep the same name do not enter a new name and go to step 9 9 Press START COPY twice to display the registered name 10 To change additional numbers and or names repeat ste...

Page 87: ...l be displayed If you mistakenly press the wrong one touch speed dialling button press the STOP button then press the correct button If no fax number is assigned to the one touch dialling button you p...

Page 88: ...You can also use one touch speed dialling to send a document to more than one location at a time For details see Sequential Broadcasting on page 5 29 Speed Dialling 4 10...

Page 89: ...TRATION 3 Press START COPY then use or to select CODED SPEED DIAL 4 Press START COPY 5 Use or to select a two digit code 00 99 in the display If a number is already registered under the code you selec...

Page 90: ...ress the button To enter a pause in the number press the REDIAL PAUSE button one or more times 8 Press START COPY 9 Press START COPY again then use the numeric buttons to store the name that goes with...

Page 91: ...ntinue registering numbers and names repeat steps 5 to 10 or If you have finished registering numbers and names press STOP to return to the standby mode 02 14 30 FaxOnly Coded Speed Dialling 4 4 4 4 4...

Page 92: ...NCTION 2 Use or to select TEL REGISTRATION 3 Press START COPY then use or to select CODED SPEED DIAL 4 Press START COPY 5 Use or to select the coded speed dialling code you want to change between 00 a...

Page 93: ...name 7 To change the number use the numeric buttons to enter the new number over the previous number The telephone fax number can be up to 120 digits long If you only want to change the name ignore t...

Page 94: ...to 16 characters for the name If you want to keep the same name do not enter a new name and go to step 10 10 Press START COPY 11 To change additional numbers and or names repeat steps 5 to 10 or If yo...

Page 95: ...o digit code assigned to the fax number The name registered under that coded speed dialling code is displayed If no name is registered the number registered under that code will be displayed If you mi...

Page 96: ...automatically If an error occurs during sending the FAX L250 will print an error report If this happens try sending the fax again See Faxing Problems on page 10 20 for details about errors You can als...

Page 97: ...s 1 Press FUNCTION 2 Use or to select TEL REGISTRATION 3 Press START COPY then use or to select GROUP DIAL 4 Press START COPY To store a group under a one touch speed dialling button 5 Use or to selec...

Page 98: ...es when creating and registering groups If you wish to register a group under a one touch speed dialling button or coded speed dialling code already registered for speed dialling or if you want to re...

Page 99: ...to add a number to the group press the one touch speed dialling button or coded speed dialling code the number is registered under and then press the START COPYbutton The number will be added to the g...

Page 100: ...a mistake when selecting a group press the STOP button and start again If you press a one touch speed dialling button or coded speed dialling code that has no group or fax number registered under it...

Page 101: ...3 When you finish entering groups press START COPY The FAX L250 then scans the document into memory and begins dialling the numbers in the groups Group Dialling 4 4 4 4 4 4 4 4 4 23...

Page 102: ...This page is intentionally blank...

Page 103: ...tion 5 13 Setting the Scanning Contrast 5 14 Sending Methods 5 15 Manual Sending via the Handset 5 15 Memory Sending 5 15 Dialling Methods 5 15 Sending Documents 5 16 Manual Sending via the Handset 5...

Page 104: ...ng 5 32 Sending Other Documents While the FAX L250 is Set for Delayed Sending 5 34 Documents Stored in Memory 5 35 Printing a List of Documents Stored in Memory 5 35 Deleting a Document Stored in Memo...

Page 105: ...355 9 mm Minimum 105 148 mm Quantity Up to 20 A4 size 20 letter size or 10 legal size pages 1 page for sizes other than these Thickness 0 07 0 13 mm For pages thicker than this load one page at a time...

Page 106: ...ent Feeder ADF Make sure any glue ink or correction fluid on the paper is completely dry before loading the document into the Automatic Document Feeder ADF If you have a document that will not feed in...

Page 107: ...he maximum margins of 3 0 mm on either side of the sheet and 4 0 mm on the top and bottom Make sure your document s text and graphics do not extend into these margins MAX 4 0 mm MAX 4 0 mm MAX 3 0 mm...

Page 108: ...s photos business cards or documents on other special types of paper Manual document feed will allow you to scan your document with minimum damage to the surface of the document When using manual feed...

Page 109: ...r Automatic Feed 1 Make sure the document feed lever is set to automatic document feed 2 If the document has multiple pages tap it on a flat surface to even the edges Preparing to Send a Fax 5 5 5 5 5...

Page 110: ...3 Adjust the document guides to the width of the document 4 Gently insert the document face down top of the document towards you into the Automatic Document Feeder ADF until it stops Sending Faxes 5 8...

Page 111: ...ck Wait until your document has been scanned completely before inserting a new document Trouble With Multipage Documents If you have trouble feeding a multipage document do the following 1 Remove the...

Page 112: ...ams while feeding see Jams in the Automatic Document Feeder ADF on page 10 5 You cannot feed a multipage document of thick media such as postcards or business cards Use manual feed instead to feed one...

Page 113: ...et to manual document feed When using manual feed use a carrier sheet to avoid scratching the surface of important documents photographs for example 2 Adjust the document guides to the width of the do...

Page 114: ...omatic Document Feeder ADF until it stops The document is now ready for scanning Wait until your document has been scanned completely before inserting a new document The length of the document is slig...

Page 115: ...s is for documents that contain photographs With this setting areas of the document that contain photos are automatically scanned with 64 levels of grey rather than just two black and white This gives...

Page 116: ...s FUNCTION 2 Use or to select USER SETTINGS 3 Press START COPY then use or to select SCAN CONTRAST 4 Press START COPY The currently set scanning contrast is displayed 5 Press or to select the scanning...

Page 117: ...fax number and press the START COPY button See page 5 18 for more details on memory sending Since the FAX L250 is multitasking you can even scan a document into the memory while sending a document re...

Page 118: ...fax transmissions Be sure to adjust the document feed lever before loading your document See page 5 6 for details 1 Prepare the document and load it face down into the Automatic Document Feeder ADF O...

Page 119: ...their fax machine or set their fax machine to receive then press START COPY on the FAX L250 and hang up The LCD displays TX and the transmission number TX RX NO Be sure to press the START COPY button...

Page 120: ...before loading your document See page 5 6 for details 1 Prepare the document and load it face down into the Automatic Document Feeder ADF Once the document is loaded the LCD display shows the followi...

Page 121: ...he document in transaction reports The display continues to show these three displays in order while the fax is sending When the FAX L250 finishes sending the fax the display shows the TRANSMITTING OK...

Page 122: ...tomatic document feed If your document has more pages than this you can add pages while the FAX L250 is scanning 1 Wait until the last sheet in the Automatic Document Feeder ADF starts feeding 2 Load...

Page 123: ...ay 2 To cancel sending press If you change your mind and want the unit to continue sending press the button The FAX L250 will continue sending normally After you cancel a fax you may need to open the...

Page 124: ...nt Feeder ADF 1 Open the operation panel by gently pulling towards you 2 Remove the document by pulling it out from the top or bottom Do not pull the document without opening the operation panel other...

Page 125: ...the operation panel by pressing it down from the centre as shown Be sure to close the operation panel until it locks into place Otherwise the unit will not function properly Cancelling Sending 5 5 5...

Page 126: ...0 will redial the number how long it will wait between dialling attempts and how much of the fax the FAX L250 will resend if an error occurs See Setting Up Automatic Redialling on page 5 26 for more d...

Page 127: ...begins redialling While the FAX L250 is waiting to redial the LCD displays AUTO REDIAL 2 Press STOP The FAX L250 asks you to confirm that you want to cancel 3 To cancel the redialling press The FAX L...

Page 128: ...for the auto redial feature are The FAX L250 redials twice The FAX L250 waits two minutes before redialling If an error occurs during transmission the FAX L250 resends the first page of the document a...

Page 129: ...START COPY again then use the numeric buttons to enter the time interval between rediallings 2 to 99 minutes The default setting is two minutes 9 Press START COPY UK and Hong Kong 1 3 times Australia...

Page 130: ...ess START COPY again then if you selected ON in step 10 use or to select which pages are sent when an error occurs Resends the first page of the document and the page where the error occurred Resends...

Page 131: ...n any order You can also include one destination that you dial manually using the numeric buttons To send a fax to more than one location do the following Be sure to adjust the document feed lever bef...

Page 132: ...ending automatically If you have entered more than one speed dialling button or code the FAX L250 waits for 10 seconds before it begins sending If you want to review the numbers you entered press the...

Page 133: ...n divide the document into several sections and send each section individually Sending a Document Using Group Dialling If you frequently send faxes to the same group of people you can create a group G...

Page 134: ...Prepare the document and load it face down into the Automatic Document Feeder ADF If necessary you can adjust the resolution and contrast See page 5 13 for more details 2 Press FUNCTION then DELAYED...

Page 135: ...e numeric buttons Be sure to press CODED DIAL before each code Regular dialling Enter the number using the numeric buttons then press START COPY You can only enter one number with the numeric buttons...

Page 136: ...nding operation at a time When the set time comes the FAX L250 dials and sends the document Sending Other Documents While the FAX L250 is Set for Delayed Sending The FAX L250 is a multitasking unit so...

Page 137: ...memory along with the transaction TX RX number of each Once you know the transaction number of a document in memory you can resend it or delete it These procedures are described later in this chapter...

Page 138: ...MEMORY LIST TX RX NO MODE CONNECTION TEL ID PGS SET TIME ST TIME 0001 0002 0003 B CAST DELAYED TX TRANSMIT 01 Canon TOKYO 00 CANON ESPA A 01 Canon TOKYO 3 2 1 19 02 13 50 19 02 13 52 19 02 14 23 18 0...

Page 139: ...document you want to delete print the list of documents stored in memory See page 5 35 for details 4 Press START COPY 5 Press to delete the fax or to cancel deleting If you press the unit returns to s...

Page 140: ...AL setting in the TX SETTINGS is set to OFF a document that failed to be sent is also considered an error document 1 Press FUNCTION then MEMORY REF 2 Use or to select MEM RETRANSMIT 3 Press START COPY...

Page 141: ...5 Press START COPY The document is erased from memory after it is successfully sent DIALLING Documents Stored in Memory 5 5 5 5 5 5 5 5 5 5 5 5 39...

Page 142: ...re you have the other party s password and subaddress The password and subaddress you enter must be identical to those of the receiving fax To send a document with a password and subaddress follow thi...

Page 143: ...password In this case use the or button to select SELECT LOCATIONS press the START COPY button and go to step 7 5 Press START COPY again then use the numeric buttons to enter the password The passwor...

Page 144: ...D DIAL then enter the two digit code 00 99 using the numeric buttons Be sure to press CODED DIAL before each code Regular dialling Enter the number using the numeric buttons then press START COPY You...

Page 145: ...st of the lost documents when power is restored Because of this you should be sure to print documents stored in memory or resend them as soon as possible While power is out you can only use the FAX L2...

Page 146: ...This page is intentionally blank...

Page 147: ...MACHINE MODE 6 11 Using the FAX L250 with an Answering Machine 6 11 Network FAX TEL Switching Australia Only 6 12 Setting the FAX L250 for Network Switch 6 12 Network Switch System Operation 6 13 Netw...

Page 148: ...ly how it handles incoming calls For details see page 6 4 MANUAL MODE Use this mode if you will frequently use the FAX L250 as a telephone and want to answer every call yourself including fax calls Th...

Page 149: ...ess RECEIVE MODE until the mode you want appears After about five seconds the FAX L250 returns to standby mode and displays the time and the new receive mode RECEIVE MODE FAX ONLY MODE RECEIVE MODE AN...

Page 150: ...to increase the time the unit takes to check whether a call is from a fax machine or a telephone You can select a time between 0 and 30 seconds the default is 8 seconds F T RING TIME When your unit is...

Page 151: ...receive the document If no document comes in it disconnects the call after approximately 35 seconds The factory default setting is RECEIVE 2 If you set the F T SWITCH ACTION to DISCONNECT the unit wil...

Page 152: ...ng FAX L250 listens for FAX TONE For 8 sec FAX TONE detected FAX TONE is not detected FAX L250 starts ringing If you don t pick up the handset within 22 sec F T SW ACTION Choose between RECEIVE factor...

Page 153: ...Y 6 Press START COPY again then use the numeric buttons to enter a time between 0 and 30 seconds This setting determines how many seconds the unit waits before ringing when it receives a call The fact...

Page 154: ...ng is 22 seconds 9 Press START COPY 10 Press START COPY again then use or to select RECEIVE or DISCONNECT This setting tells the unit what to do if no one picks up the handset within the specified rin...

Page 155: ...o press the start button on their fax machine When you hear a slow beep press START COPY to begin receiving the document If you hear a slow beep or silence 2 A fax machine is trying to send you a docu...

Page 156: ...machine s security code See page 12 11 for more details Receiving Faxes Automatically FAX ONLY MODE When the FAX L250 is set up for a dedicated line set FAX ONLY MODE to automatically receive document...

Page 157: ...t to dedicate a separate line for fax communication only and connect that line to the FAX L250 j Using the FAX L250 with an Answering Machine Follow these guidelines when using the FAX L250 with an an...

Page 158: ...at the caller s end Triple ring short short short for fax receiving Three short rings at regular intervals Any ring except triple ring depending on your switchboard for telephone conversation When yo...

Page 159: ...eep it means the call is from a fax machine trying to send a document Press the START COPY button to receive the document If you do not pick up the handset the unit continues to ring until the other p...

Page 160: ...so that the call is handled as a voice call This means that there is no switching delay at the caller s end When you select NET SWITCH from the RX MODE setting in the RX SETTINGS menu the receive mode...

Page 161: ...eep it means the call is from a fax machine trying to send a document Press the START COPY button to receive the document If you do not pick up the handset the unit continues to ring until the other p...

Page 162: ...eives a document into its memory the LCD displays one of the following messages These messages show the action you must take to correct the problem Cause The toner cartridge ran out of toner or is not...

Page 163: ...le Registering Copying or Printing Since the FAX L250 is a multitasking device it can receive faxes and phone calls while you are entering your user information making copies or printing a report If y...

Page 164: ...Cancelling an Incoming Fax To cancel an incoming fax follow this procedure 1 Press STOP 2 Press to stop receiving or to resume receiving the fax CANCEL YES NO 6 18...

Page 165: ...re attempting to poll a fax machine make sure that fax machine supports polling Your FAX L250 cannot be polled by another fax machine 1 Lift the handset and dial the fax number of the fax machine you...

Page 166: ...This page is intentionally blank...

Page 167: ...r the R Button 7 2 Long Distance Dialling 7 4 How to Enter Pauses 7 4 Confirming a Dial Tone 7 5 Using Tone Dialling on a Pulse Line 7 6 Restricting Use of the FAX L250 7 7 Using Alternative Telephone...

Page 168: ...register the type of access and the outside line access number under the R button so that you only have to press the FUNCTION and R buttons before dialling the number you wish to reach Follow the ins...

Page 169: ...ons to enter the outside line access number up to 20 digits 8 Press REDIAL PAUSE 9 Press START COPY then press STOP to return to standby mode If you selected EARTH CONNECTION or HOOKING in step 5 7 Pr...

Page 170: ...he number 2 To enter a pause within a number press REDIAL PAUSE To enter a pause at the end of a number press the REDIAL PAUSE button and then press the START COPY button A pause entered within a numb...

Page 171: ...t part of the number until dial tone detection is required 2 When a dial tone detection is required press FUNCTION then press D T Where the dial tone is inserted you will see a small dot During dialli...

Page 172: ...utton is pressed T is displayed in the LCD Numbers entered after pressing the TONE button will be dialled using tone dialling 3 When you have finished hang up the handset When registering one touch sp...

Page 173: ...ollows 1 Press FUNCTION 2 Use or to select SYSTEM SETTINGS 3 Press START COPY twice If a password has already been registered enter it now then press the START COPY button 4 Press START COPY If a pass...

Page 174: ...ess START COPY then use or to set LOCK PHONE on or off The default setting is OFF Anyone can send documents or dial normally When set to ON no one can make calls or send documents Does not restrict in...

Page 175: ...national communications The procedures described in this section show you how to use your unit with the 2300 Service of Mercury Communications Limited For details on using your unit with alternative t...

Page 176: ...hen use or to select M KEY SETTING 4 Press START COPY then use or to select ON 5 Press START COPY 6 Press START COPY again then use or to select the access code You can select 132 default or 131P P st...

Page 177: ...to 20 digits long pauses are unnecessary If an ID code is already registered you will see a string of asterisks on the display 9 Press START COPY then press STOP to return to standby mode If you selec...

Page 178: ...phone number of the party you are calling 4 Press START COPY The FAX L250 automatically dials the access code and ID code registered under the M button Next the unit dials the number of the party you...

Page 179: ...numbers 1 While you are registering a number for one touch or coded speed dialling and you come to a step that asks you to enter the number of the other party press FUNCTION then press M 2 Use the nu...

Page 180: ...This page is intentionally blank...

Page 181: ...8 Making Copies This chapter describes how to make copies with your FAX L250 Making Copies 8 2...

Page 182: ...Automatic Document Feeder ADF Once the document is loaded the LCD display shows the following 2 Press START COPY The display now shows COPY the reduction size the copy will be printed at the default i...

Page 183: ...select the reduction percentage you want You can select 70 80 90 or 100 5 If you want to make multiple copies use the numeric buttons to enter the number of copies You can make up to 99 copies The FA...

Page 184: ...L appears in the display while you are making multiple copies of a document you will not be able to use the multiple copy feature for copying the document Instead make single copies of the document as...

Page 185: ...numbers list of user s data registered in the FAX L250 and the memory clear list Activity Report 9 2 Transmission TX Reports 9 3 Error TX Report 9 3 TX Report 9 4 Multi TX RX Report 9 5 Reception RX R...

Page 186: ...4 36 14 41 14 45 14 53 14 57 14 59 905 795 1111 905 795 1111 1 49 39 25 25 2131 1250 905 795 1111 516 488 6700 20 545 8545 20 545 8545 03 3756 6112 2131 1250 1 538 4500 456 123 Canon Canada Canon Cana...

Page 187: ...nt using memory you can also select whether the first page of the document is printed with the report See page 12 7 for details on setting these options Error TX Report See the next page for an explan...

Page 188: ...TX REPORT with a transaction number in the ACTIVITY REPORT you can find out exactly how many attempts were made to send the document how many pages were sent in each attempt as well as the usage time...

Page 189: ...es were transmitted after two retries The default which is two retries can be changed See page 12 9 for more details Multi TX RX Report If you used sequential broadcasting to send a document the Multi...

Page 190: ...the RX Report every time you receive a document or only if an error occurs during receiving See page 12 7 for details on setting this option 07 09 98 MON 14 38 FAX 81 733 3173 CANON U K 001 RX REPORT...

Page 191: ...emory Clear Report You will be unable to send documents or receive faxes in memory until you do this If you have no paper available and you urgently need to send a document or receive a fax in memory...

Page 192: ...data information you may have entered such as your name and number the date and time and all other settings currently selected Follow this procedure to print the User s Data List 1 Press FUNCTION 2 U...

Page 193: ...LARM VOLUME CONTROL CALLING VOLUME KEYPAD VOLUME ALARM VOLUME RX CALL LEVEL TEL LINE TYPE SYSTEM SETTINGS UN LOCK PHONE LOCK PHONE RX RESTRICTION DATA FORMAT DISPLAY LANGUAGE TX START SPEED RX START S...

Page 194: ...mbers and names registered under one touch speed dialling buttons and coded speed dialling codes Follow this procedure to print the lists 1 Press FUNCTION 2 Use or to select TEL REGISTRATION 3 Press S...

Page 195: ...ROUP 1 07 09 98 MON 13 39 FAX 81 733 3173 CANON U K 001 CODED SPEED DIAL LIST NO 00 11 60 61 1 538 4500 7390802 63 9399 03 3756 6112 CONNECTION TEL CANON ESPA A CANON HONG KONG Mr G Robert Ms A Smith...

Page 196: ...This page is intentionally blank...

Page 197: ...c Document Feeder ADF 10 5 Jams in the Output Slots 10 8 Jams Inside the Unit 10 9 Jams in the Front Area of the Unit 10 14 After Clearing a Paper Jam 10 17 Problems Feeding Paper Into the FAX L250 Sh...

Page 198: ...centre Do not attempt to disassemble or repair the unit yourself Attempting to repair the FAX L250 yourself may void the limited warranty Before contacting your local authorised Canon dealer or servic...

Page 199: ...cannot send a fax using ECM 10 21 Errors occur frequently while sending faxes 10 22 The FAX L250 cannot receive faxes automatically 10 22 The FAX L250 will not switch between telephone and fax calls a...

Page 200: ...Nothing prints 10 27 Printout does not match paper size 10 27 The printout curls 10 27 Print Quality Problems Print is not clear 10 28 The printout has vertical white streaks 10 28 General Problems Th...

Page 201: ...g the FAX L250 while clearing paper jams j Jams in the Automatic Document Feeder ADF Use this procedure if the document in the FAX L250 s Automatic Document Feeder ADF jams or misfeeds If this occurs...

Page 202: ...orce it Contact your local authorised Canon dealer or service centre 4 When you are finished close the operation panel by pressing it down from the centre as shown Be sure to close the operation panel...

Page 203: ...5 Press STOP to clear the error message 6 If you have a multi page document remove the entire document from the Automatic Document Feeder ADF and reload it Problems Index 10 7...

Page 204: ...CD display 1 Gently pull any jammed paper out of the unit as shown 2 Remove the paper stack from the sheet feeder and reload it following the instructions in Loading Recording Paper on page 2 33 If th...

Page 205: ...ont cover by pressing the release latches on the sides of the unit Lift the cover forward to its open position Do not open the front cover without pressing on the release latches as this may cause dam...

Page 206: ...the cartridge by its handle and remove it from the unit Cover the cartridge to protect it from the light 3 Move the paper release lever towards the back of the unit HANDLE Frequently Asked Questions...

Page 207: ...piece of paper First check the inside of the unit and then the front area The fixing assembly shaded becomes extremely hot when the unit is in use Be very careful not to touch it as injury may result...

Page 208: ...emove all of the paper scraps from the unit Be careful not to spill the toner that is on the jammed sheet of paper The toner has not been fused to the paper yet and toner spilled inside the unit may a...

Page 209: ...If the top edge of the paper is in the fixing assembly First move the jammed paper towards the unit 1 then pull it towards you to remove it 2 Problems Index 10 13...

Page 210: ...ssembly 1 Pass the paper under the roller as shown 2 Use both hands to carefully pull the jammed paper Be sure to pull gently otherwise the paper may tear and remain inside the unit Be sure to remove...

Page 211: ...up delivery slot Hold the front cover and gently pull the sheet through the exit slot Do not close the front cover while removing a jammed sheet of paper This will return the paper release lever to it...

Page 212: ...ot to touch it as injury may result When removing the jammed paper be careful not to touch the transfer charging roller as its surface is very delicate and susceptible to finger oil and scratches whic...

Page 213: ...e front 3 Close the front cover to reset the unit 4 Load paper in the sheet feeder If you are experiencing repeated paper jams it may be due to the paper you are using Tap the paper on a flat surface...

Page 214: ...Possible cause Solution Paper does not feed into the FAX L250 The sheet feeder may contain too many sheets Make sure the sheet feeder is not filled past the limit See page 2 33 Paper may not be inser...

Page 215: ...Do not force the stack into the sheet feeder The sheet feeder may contain more than one type of paper Load only one type of paper at a time Make sure the paper you use meets the specifications for me...

Page 216: ...ot sure what type of line you have contact your local telephone company The document may not have been set in the Automatic Document Feeder ADF properly Remove the document stack it and feed it into t...

Page 217: ...act your local authorised Canon dealer or service centre Please note that any documents stored in memory wil be erased when the FAX L250 is unplugged Images on faxes received from the FAX L250 are spo...

Page 218: ...annot receive faxes automatically The FAX L250 may not be set to receive automatically For the FAX L250 to receive faxes automatically it must be in FAX ONLY MODE ANS MACHINE MODE or Fax Tel Mode See...

Page 219: ...10 30 for a listing of the FAX L250 s error messages Print an activity report and look for an error code The sheet feeder may be empty Make sure the sheet feeder has paper in it The sending fax machi...

Page 220: ...ing Problems on page 10 27 The FAX L250 cannot receive faxes using ECM ECM RX does not appear in the LCD display when receiving The sending fax machine may not support ECM If the sending fax does not...

Page 221: ...the fax sent again The sending fax machine may not be functioning properly The sending fax machine usually determines the fax s quality Call the sender and have them make sure the top cover and scann...

Page 222: ...n the line The FAX L250 may not be plugged in properly Make sure the FAX L250 is correctly plugged into a wall outlet Copying Problems Problem Cause Solution The FAX L250 will not make a copy The docu...

Page 223: ...ceiving mode standby mode If the ALARM lamp stays on call your local authorised Canon dealer or service centre Nothing prints The power cord may not be plugged in securely Make sure the power cord is...

Page 224: ...per has no obvious correct side try turning the paper over and printing on the other side The printout has vertical white streaks Toner may be low or be unevenly distributed Follow these steps 1 Open...

Page 225: ...n The power cord may not be supplying power Check the power cord by substituting another or by using a voltametre to test it for continuity Nothing appears in the LCD display The FAX L250 may not be r...

Page 226: ...ent using a G3 machine The telephone line type setting on your FAX L250 is incorrect Set your FAX L250 for your telephone line tone or pulse The receiving fax machine did not answer within 35 seconds...

Page 227: ...vice The unit is connected to an uninterruptible power supply UPS Make sure the power cord is plugged into an AC outlet CLEAR PAPER JAM 009 The FAX L250 has no paper in its sheet feeder or has a paper...

Page 228: ...local telephone lines are in good condition HANG UP PHONE The handset is off its hook Place the handset properly onto its hook LOAD PAPER The FAX L250 is out of recording paper Load paper in the sheet...

Page 229: ...ch or coded speed dialling number has not been registered Register the number NOT AVAILABLE In manual sending via the handset you tried to use a one touchspeed dialling button or a coded speed diallin...

Page 230: ...ED You pressed the STOP button to cancel the transmission TX RX NO nnnn When the FAX L250 sends or receives a fax it assigns a unique identification number to it Write the number down if you will need...

Page 231: ...n periodic cleaning and replacing of the toner cartridges as needed Cleaning the FAX L250 11 2 Cleaning the FAX L250 Exterior 11 2 Cleaning the Inside of the FAX L250 11 3 Cleaning the Scanner Compone...

Page 232: ...aper towels or similar materials for cleaning they can stick to the components or generate static charges Cleaning the FAX L250 Exterior Clean the FAX L250 outer casing as follows 1 Disconnect the pow...

Page 233: ...y as follows When you unplug the unit any faxes stored in memory will be erased Be sure to print out any documents stored in memory before unplugging the unit See Printing Documents Received in Memory...

Page 234: ...ag to avoid exposure to light 4 Use a clean soft dry lint free cloth to remove any toner or paper debris from the shaded area Do not touch the transfer charging roller at the back as this may affect t...

Page 235: ...oner cartridge Gently press the cartridge into the unit as far as it will go Press down and back on the cartridge s handle 6 Close the front cover Use both hands to lift the cover back into the closed...

Page 236: ...ging the unit See Printing Documents Received in Memory on page 6 17 1 Unplug the FAX L250 2 Open the operation panel 3 Use a soft dry clean cloth to clean the scanning glass and rollers shaded areas...

Page 237: ...el and the unit Dirt and dust particles that collect on the underside of the operation panel also affect the quality of documents you copy and send 5 Use a soft dry clean cloth to wipe up paper dust a...

Page 238: ...3 toner cartridge contains enough toner to print approximately 2 700 pages of A4 size paper about 4 paper coverage The actual amount varies according to how much toner is used for each page If you ca...

Page 239: ...clicks into position 5 Disconnect the telephone or answering machine if you have connected one to the unit 6 Disconnect the power cord from the unit 7 Remove the paper rest and support trays from the...

Page 240: ...This page is intentionally blank...

Page 241: ...tions your unit performs Understanding the Menu System 12 2 Accessing the TEL REGISTRATION Menu 12 2 Accessing the USER SETTINGS Menu 12 4 Accessing the REPORT SETTINGS Menu 12 6 Accessing the TX SETT...

Page 242: ...functions of your FAX L250 This chapter outlines the various menus and shows you how to use them The factory default settings in the following tables are shown in bold type Accessing the TEL REGISTRA...

Page 243: ...CH SPD DIAL See page 4 3 One Touch Speed Dialling TELEPHONE NUMBER NAME CODED SPEED DIAL See page 4 11 Coded Speed Dialling TELEPHONE NUMBER NAME GROUP DIAL See page 4 19 Group Dialling TELEPHONE NUMB...

Page 244: ...em you want to set or change See the following table for a list of the items you can select 4 Press START COPY then use or to select a setting or the sub item you want to set or change See the followi...

Page 245: ...N OFF VOLUME CONTROL Set the audio level of the calling signal alarm and buttons on the operation panel CALLING VOLUME Set the volume of the ring produced when the FAX L250 detects a voice call during...

Page 246: ...tem you want to set or change See the following table for a list of the items you can select 4 Press START COPY then use or to select a setting or the sub item you want to set or change See the follow...

Page 247: ...NLY OUTPUT YES OUTPUT NO TX CONFIRM REP If you choose OUTPUT YES or PRINT ERROR ONLY set whether the first page of the fax also prints ON OFF RX REPORT Enable disable automatic printing of the recepti...

Page 248: ...em you want to set or change See the following table for a list of the items you can select 4 Press START COPY then use or to select a setting or the sub item you want to set or change See the followi...

Page 249: ...ich pages to resend if TX ERROR RESEND is on ERROR 1ST PG ERROR PAGE ALL PAGES ERASE FAILED TX Set whether the fax in memory is erased if an error occurs during sending but then it is resent successfu...

Page 250: ...em you want to set or change See the following table for a list of the items you can select 4 Press START COPY then use or to select a setting or the sub item you want to set or change See the followi...

Page 251: ...1 to 99 ANS FAX SWITCH Enable disable whether the FAX L250 automatically switches to fax receive mode if a period of silence is detected after answering the call ON OFF ANS FAX SW TIME Set the durati...

Page 252: ...you want to set or change See the following table for a list of the items you can select 4 Press START COPY then use or to select a setting or the sub item you want to set or change See the following...

Page 253: ...le disable economy printing toner saving feature By enabling TONER SAVING toner consumption can be decreased by as much as fifty percent resulting in a longer effective cartridge life ON OFF TONER SUP...

Page 254: ...you want to set or change See the following table for a list of the items you can select 4 Press START COPY then use or to select a setting or the sub item you want to set or change See the following...

Page 255: ...n faxes you send DD MM YY MM DD YY YY MM DD DISPLAY LANGUAGE Set the language of the LCD messages ENGLISH FRENCH SPANISH ITALIAN FINNISH GERMAN DANISH SWEDISH DUTCH NORWEGIAN PORTUGUESE SLOVENE HUNGAR...

Page 256: ...This page is intentionally blank...

Page 257: ...Appendix A Specifications The specifications for the FAX L250 are listed in this section General A 2 Plain Paper Fax A 4 Copier A 6 Telephone A 6 Document Sizes A 7 Printing Area A 8 A 1...

Page 258: ...isplays memory used Uses direct transmission when memory is full Liquid crystal display 16 1 Display languages English French Spanish Italian Finnish German Danish Swedish Dutch Norwegian Portuguese S...

Page 259: ...Environmental requirements Temperature 10 32 5 C Humidity 20 85 RH Applicable standards Electrical safety GS FIMKO Radiation CISPR Pub22 Class B PTT Energy Star compliant General A 3...

Page 260: ...Document thickness Automatic document feed 0 07 0 13 mm Manual document feed 0 06 0 3 mm Document weight Automatic document feed 50 90 g m2 Manual document feed 40 340 g m2 Effective scanning width 20...

Page 261: ...edialling including error redialling Manual redialling Pause button Networking Delayed transmission up to 117 locations at a single pre set time Sequential broadcast up to 117 locations Automatic rece...

Page 262: ...al copy 45 seconds Subsequent copies 20 seconds Multiple copies Up to 99 copies of a document Telephone Automatic FAX TEL switchover Answering machine connection CNG detecting signal no sound Telephon...

Page 263: ...eed lever is set to Manual document feed Note that the scanning length may be shorter than the length of the actual document Maximum Document Size Minimum Document Size 216 mm 105 mm 148 mm UP TO A MA...

Page 264: ...e top and bottom are outside the FAX L250 s scanning area Printing Area Note that the unit cannot print completely from the edge of one border to another The size of the margin differs slightly with t...

Page 265: ...section describes the optional equipment available for use with the FAX L250 Optional Handset B 2 Package Contents B 2 Attaching the Handset to Your Unit B 3 Control Panel and Functions B 6 Maintaini...

Page 266: ...Package Contents Make sure you have the following items If anything is damaged or missing notify your Canon dealer immediately The two screws with a plastic white head are not for use with the FAX L2...

Page 267: ...the screws from the plugs and insert the plugs in the holes on the handset cradle 3 Insert the plugs with the handset cradle in the holes on the unit If you have difficulty inserting the plugs turn th...

Page 268: ...h the screws in with your finger use a phillips screwdriver to push them in Do not screw them in as the screws may break Make sure the screws are inserted all the way into the plugs 5 Connect the hand...

Page 269: ...ying the unit do not lift it by the handset cradle as it may break If you need to remove the handset cradle after it is installed use a small phillips screwdriver to remove the two screws Optional Han...

Page 270: ...4 Your Canon unit has a R E N value of 1 unless otherwise stated and this handset also has a R E N value of 1 You can therefore use additional equipment with a total R E N value of up to 2 If the R E...

Page 271: ...te on both Multi Frequency Tone and Loop Disconnect Pulse telephone lines The Tone Pulse switch enables you to switch from tone dialling to pulse dialling or vice versa Contact your service provider f...

Page 272: ...condition Do not leave your handset exposed to direct sunlight Do not install your handset in hot or humid conditions Do not spray aerosol polishes on your handset as they may enter the holes on your...

Page 273: ...ion through the FAX L250 s memory C CCITT ITU T Formerly known as CCITT Consultative Committee for International Telegraph and Telephone CCITT has been replaced by the International Telecommunications...

Page 274: ...n pick up the handset With this feature one telephone line can be shared by both the telephone and the fax FINE The resolution setting for documents with very small characters and lines G G3 Group 3 f...

Page 275: ...sending or copying documents with intermediate tones such as photographs Polling One fax machine requesting another to send a document The receiving party calls the fax machine holding the document to...

Page 276: ...t produces output with 600 600 dpi precision Rotary pulse A telephone dialling system where a dial is rotated to send pulses to the telephone switching system When you pulse dial you hear clicks When...

Page 277: ...ed by as much as fifty percent resulting in a longer effective cartridge life Transaction number A unique number assigned to each fax document sent TX NO or received RX NO by the FAX L250 and used to...

Page 278: ...er components 11 6 to 11 7 CLEAR PAPER JAM message 6 17 10 31 CODED DIAL button explanation 2 22 coded speed dialling changing names 4 14 changing numbers 4 14 description 4 2 list 9 11 storing number...

Page 279: ...ttaching 7 9 manual redialling 5 24 sending via the handset 5 15 5 16 manual document feed 5 3 loading documents 5 11 selecting 5 6 MANUAL MODE description 6 2 selecting 6 3 using 6 9 6 10 memory dele...

Page 280: ...loading 2 33 REDIAL PAUSE button explanation 2 21 redialling 5 24 to 5 28 automatic 5 24 cancelling 5 24 5 25 manual 5 24 replaceable parts 2 10 replacing cartridge 2 27 11 8 report 9 2 to 9 7 activi...

Page 281: ...type 3 12 testing unit 2 36 TONE button explanation 2 24 using 7 6 toner cartridge handling 2 25 storing 2 25 installing 2 27 replacing 2 27 11 8 touch tone setting 3 12 using on a pulse line 7 6 TX...

Page 282: ......

Reviews: