1-13
Bef
ore Y
ou
Star
t
1
Connecting to a Computer
Connecting to a Computer
This section describes how to connect the printer to a computer.
As this printer is equipped with a USB connector, you can use a USB cable to
connect to a computer. By installing the optional network board, the printer can be
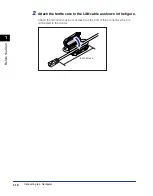
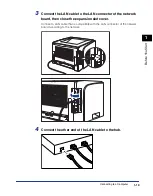
connected directly to the network using a LAN cable.
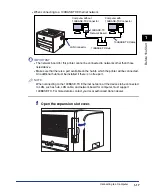
Using a USB Cable
Connect the printer to a computer equipped with a USB port using a USB cable.
WARNING
When plugging or unplugging the USB cable when the power plug is plugged in
an AC power outlet, do not touch the metal part of the connector, as this may
result in electrical shock.
IMPORTANT
•
Do not plug or unplug the USB cable while the computer and printer are ON, as this may
result in damage to the printer.
•
This printer uses bi-directional communication. Operation of the printer when connected
via unidirectional communication equipment has not been tested, and as a result, Canon
cannot guarantee printer operation when the printer is connected using unidirectional
print servers, USB hubs or switching devices.
NOTE
•
The appropriate USB interface varies depending on the operating system of the
connected computer as follows. For more details, contact your local authorized Canon
dealer.
- Windows 98/Me: USB Full-Speed (USB1.1 equivalent)
- Windows 2000/XP/Server 2003: USB 2.0 Hi-Speed/USB Full-Speed (USB1.1
equivalent)
•
When you connect this printer to a computer with a USB cable, use a computer with
manufacturer's guarantee of USB proper operation.
•
A USB cable is only supplied with 220 - 240 V model for countries and regions of Asia. In
other countries and regions, prepare according to the specifications of your computer.
Use a USB cable with the following symbol.
Summary of Contents for laser Shot LBP 3300
Page 2: ...LBP3300 Laser Printer User s Guide ...
Page 25: ...xxii ...
Page 45: ...1 20 Before You Start 1 Connecting to a Computer ...
Page 99: ...2 sided Printing 2 54 Loading and Outputting Paper 2 12 Click OK to start printing ...
Page 105: ...2 sided Printing 2 60 Loading and Outputting Paper 2 ...
Page 305: ...5 32 Routine Maintenance 5 Handling the Printer ...
Page 391: ...7 52 Troubleshooting 7 Confirming the Printer Features ...
Page 397: ...8 6 Appendix 8 Dimensions of Each Part Paper Feeder Unit PF 35 117 4 116 6 369 7 421 1 mm ...
Page 413: ...8 22 Appendix 8 Location of the Serial Number ...
Page 414: ...R IE 700AC CANON INC 2005 ...

