background image

4-2

P

rint

ing 

fr

om

 Y

o

ur Com

put

er

4

3

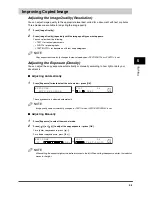
Select the command to print. 

In most cases, click [Print] in the [File] menu.

The [Print] dialog box appears.

4

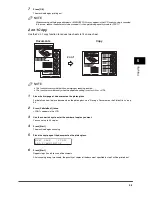
From the [Select Printer] list box or the [Name] pull-down list in the [Print] dialog box, select the printer to 
be used.

5

Click [Preference] or [Properties].

NOTE

Depending on the application you are using, select the printer to be used in the [General] tab sheet in the [Print] 
dialog box, then specify the print settings in the corresponding tab sheet. (Only for Windows 2000.)
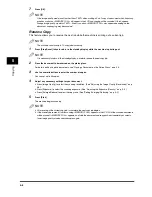
6

Specify the required settings 

 click [OK].

7

Click [Print] or [OK].

Printing starts.

NOTE

To cancel printing, click [Cancel].

Canceling Printing

1

Open the [Printers and Faxes] (Windows 98/Me/2000: [Printers]) folder.

On Windows XP:

Click [start] on the Windows task bar 

 select [Printers and Faxes].

On Windows 98/Me/2000:

Click [Start] on the Windows task bar 

 select [Settings] 

 [Printers].

2

Double-click the corresponding printer driver icon.
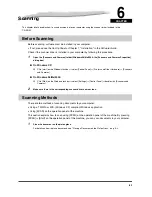
3

Right click the print job 

 click [Cancel Printing].

NOTE

You can also cancel a print job using [Status Monitor] on the operation panel of the machine. (See "Confirming and 
Deleting a Print Job," on p. 7-2.)

More Information

For detailed information on all printing features, see Chapter 2, "Printing," in the 

Software Guide

.

Summary of Contents for LASERBASE MF3110

Page 1: ...Please read this guide before operating this equipment After you finish reading this guide store it in a safe place for future reference ...

Page 2: ...eference Guide Copying and Printing Instructions Troubleshooting User s Guide This Manual CD ROM Software Installation and Instructions Printing and Scanning Instructions Troubleshooting Software Guide CD ROM To view the manual in PDF format Adobe Reader Adobe Acrobat Reader is required If Adobe Reader Adobe Acrobat Reader is not installed on your system please download it from the Adobe Systems I...

Page 3: ...ntial requirements of EC Directive 73 23 EEC and 89 336 EEC We declare that this product conforms to the EMC requirements of EC Directive 89 336 EEC at nominal mains input 230 V 50Hz although the rated input of the product is 200 240 V 50 60Hz This equipment has been tested in a typical system to comply with the technical requirements of EMC Directive Use of shielded cable is required to comply wi...

Page 4: ...ademark Microsoft and Windows are registered trademarks of Microsoft Corporation Other brand and product names may be trademarks or registered trademarks of their respective companies As an ENERGY STAR Partner Canon has determined that the machine meets the Energy Star guidelines for energy efficiency ...

Page 5: ... Printing Areas 2 2 Loading Paper 2 3 Loading Paper in the Cassette 2 3 Loading Paper in the Multi Purpose Feeder 2 6 Loading an Envelope in the Multi Purpose Feeder 2 7 Specifying the Paper Size and Type Common for Cassette and Multi Purpose Feeder 2 8 Specifying the Paper Size 2 8 Specifying the Paper Type 2 9 Orientation of the Document and the Paper Loading 2 9 Selecting the Paper Output Area ...

Page 6: ...res 5 4 Collate Copy 5 4 2 on 1 Copy 5 5 Reserve Copy 5 6 Chapter 6 Scanning Before Scanning 6 1 Scanning Methods 6 1 More Information 6 2 Chapter 7 System Monitor Checking the Status of the Jobs Stored in the Machine 7 1 Confirming and Deleting a Copy Job 7 1 Confirming and Deleting a Print Job 7 2 Chapter 8 Maintenance Periodic Cleaning 8 1 Cleaning the Exterior 8 1 Cleaning the Scanning Area 8 ...

Page 7: ...rinting Problems 9 14 Scanning Problems 9 15 General Problems 9 15 If You Cannot Solve the Problem 9 17 Chapter 10 Machine Settings Accessing the Machine Settings 10 1 Menu Descriptions 10 1 PAPER SETTINGS 10 1 COMMON SETTINGS 10 2 COPY SETTINGS 10 3 PRINTER SETTINGS 10 4 TIMER SETTINGS 10 4 Chapter 11 Appendix Specifications 11 1 Index 11 3 ...

Page 8: ... in the LCD The following are a few examples of how messages in the LCD are expressed in this manual The messages are indicated within angle brackets If MEMORY FULL is displayed the machine cannot scan the documents 2ON1 appears in the LCD WARNING Indicates a warning concerning operations that may lead to death or injury to persons if not performed correctly In order to use the machine safely alwa...

Page 9: ...not solve the problem or if you think your machine needs servicing contact your local authorized Canon dealer or the Canon help line Main Components of the Machine This section describes the main components of the machine Front View a Platen glass cover Open it when you place documents on the platen glass for copying or scanning b Platen glass Place documents c Operation panel Controls the machine...

Page 10: ... Connect the USB Universal Serial Bus cable b Face up cover Open it when you output paper face up or remove jammed paper c Power socket Connect the power cord d Extension cover Protects paper supply in the cassette from dirt and dust b c d a ...

Page 11: ...tarts copying i Stop Reset key Cancels copying and other operations and returns to the standby display j Energy Saver key Sets or cancels the energy saver mode manually The key lights green when the energy saver mode is set and goes off when the mode is canceled k Collate 2on1 key Sorts copies in order of pages or reduces two documents to fit on a single sheet l Image Quality key Adjusts the quali...

Page 12: ...on which mode is selected The standby display in the Copy or Scan mode is as follows Copy Mode Scan Mode NOTE When the machine is plugged in the LCD displays INITIALIZING for a while then the standby display appears Copy ratio Exposure Copy quantity Paper size Image quality ...

Page 13: ...nctions are operating or when the Memory indicator lights up When paper jams occur When an error code appears and the Alarm indicator flashes When no paper is loaded in the cassette When paper is loaded in the multi purpose feeder The machine will be restored from the energy saver mode when receiving print jobs from your computer Setting the Energy Saver Mode Manually 1 Press Energy Saver The LCD ...

Page 14: ...at not upright If the paper is curled uncurl it before loading it in the cassette or multi purpose feeder Failure to do so will cause paper creases and a paper jam Unacceptable Paper Do not copy on the following types of copy stock Doing so may result in paper jams Severely curled or wrinkled paper Transparencies designed for full color copiers or printers Paper which has already been copied using...

Page 15: ...e cassette or the multi purpose feeder Printing Areas Please note that the term printing area represents both the recommended area for optimum print quality and the entire area where the machine can technically print from your computer Printing area light shade Canon recommends that you print within this area Paper Envelope NOTE Copying areas are a little larger than printing areas MAX 5 mm MAX 5 ...

Page 16: ...ORTANT Do not load paper from the back of the machine with the cassette in place Doing so may damage the paper feeding assembly inside the machine NOTE The paper in the multi purpose feeder is fed prior to the paper in the cassette The cassette holds up to approximately 250 sheets of 64 g m2 paper Loading Paper in the Cassette 1 Fan the paper stack first then tap the edges on a flat surface to eve...

Page 17: ...ing the desired paper size IMPORTANT If the paper guide is not adjusted correctly for the size of the paper the quality of your printouts may be adversely affected 4 Load the paper stack in the cassette with the print side down When you load paper with a logo on position the paper with the print side down logo side and load it so that the top of the paper feeds first in the cassette ...

Page 18: ... of paper at the same time Do not load extra paper when there is still paper left in the cassette If you load extra paper while making copies remove the loaded paper first Then put it together with the extra paper and tap the edges After that reload it in the cassette 6 Insert the cassette into the machine NOTE If you do not completely insert the cassette into the machine paper jams may occur 7 Sp...

Page 19: ... in the multi purpose feeder NOTE The paper in the multi purpose feeder is fed prior to the paper in the cassette 1 Slide the paper guides to the mark of the desired paper size IMPORTANT If the paper guides are not adjusted correctly for the size of the paper the quality of your printouts may be adversely affected 2 Insert the paper square into the multi purpose feeder with the print side up ...

Page 20: ...e Feeder on p 2 8 Loading an Envelope in the Multi Purpose Feeder Use the multi purpose feeder when you want to copy or print an envelope one by one IMPORTANT The recommended envelopes are COM10 MONARCH DL and ISO C5 Using other envelopes may affect the quality of the printout NOTE The envelope in the multi purpose feeder is fed prior to the paper in the cassette 1 Slide the paper guides to fit th...

Page 21: ...and Type Common for Cassette and Multi Purpose Feeder Specifying the Paper Size At the factory the paper size has already been set to A4 Each time you change the paper size you load in the cassette or the multi purpose feeder it is necessary to specify the paper size according to the following 1 Press Menu 2 Press or to select PAPER SETTINGS press OK 3 Press or to select CASSETTE or MP TRAY press ...

Page 22: ...llowing paper types Plain paper 64 g m2 to 90 g m2 PLAIN PAPER PLAIN PAPER L 1 Heavy paper 91 g m2 to 128 g m2 HEAVY PAPER HEAVY PAPER H 2 Transparency TRANSPARENCY Envelope HEAVY PAPER HEAVY PAPER H 2 1 If paper curls excessively when printed with PLAIN PAPER selected select PLAIN PAPER L 2 If print fixing is not sufficient when printed with HEAVY PAPER selected select HEAVY PAPER H 6 Press Stop ...

Page 23: ...tray for face down paper output IMPORTANT Do not open or close the face up cover while copying and printing Paper Type and Paper Output Area Select the suitable paper output area depending on the paper type and your purpose Paper Type Paper Output Area The Number of Output Sheets Plain Paper face up 1 sheet face down approx 60 sheets 64 g m2 to 75 g m2 Recycled Paper face up 1 sheet face down appr...

Page 24: ...may result in paper jams Face Up Paper Output Area The paper is delivered with the printed side up from the face up paper output at the rear of the machine This way is convenient for printing on transparencies or envelopes which tend to curl because the paper is delivered straight through out of the machine Open the face up cover Remove the delivered paper one by one IMPORTANT Do not pull the pape...

Page 25: ...s tracing paper or transparencies place a piece of plain white paper behind the document NOTE When making copies of a small size document the copy speed may be slightly slower than usual Make sure any glue ink or correction fluid on the document is completely dry before placing it on the platen glass Platen Glass Type of Document Plain paper Thick documents Photographs Small documents e g index ca...

Page 26: ...your document face down on the platen glass Use the paper size marks on the left side of the platen glass to position a document If your document conforms to a standard paper size e g A4 or A5 align the document between the appropriate paper size marks If you do not know the size of your document or if your document does not match any of the paper size marks align the center of your document with ...

Page 27: ...3 3 Document Handling 3 The illustration below shows how to place an A4 size document on the platen glass 3 Gently lower the platen glass cover The document is now ready for scanning ...

Page 28: ...machine is selected in the printer box See the next page for details Follow this procedure if it is not selected 1 Open the Printers and Faxes Windows 98 Me 2000 Printers folder On Windows XP Click start on the Windows task bar select Printers and Faxes On Windows 98 Me 2000 Click Start on the Windows task bar select Settings Printers 2 Click the corresponding printer driver icon 3 From the File m...

Page 29: ... the required settings click OK 7 Click Print or OK Printing starts NOTE To cancel printing click Cancel Canceling Printing 1 Open the Printers and Faxes Windows 98 Me 2000 Printers folder On Windows XP Click start on the Windows task bar select Printers and Faxes On Windows 98 Me 2000 Click Start on the Windows task bar select Settings Printers 2 Double click the corresponding printer driver icon...

Page 30: ...st Failure to do so may make copies dirty or cause a paper jam When copying onto transparencies remove each transparency from the output tray as it is output 1 Place the document on the platen glass For details on how to place documents see Placing a Document on the Platen Glass on p 3 2 2 Press COPY 3 Use the numeric keys to enter the number of copies You can set up to 99 copies 4 Adjust any nece...

Page 31: ...everal times to display DIRECT 100 ratio press OK You can also return the ratio to 100 using a custom copy ratio See Enlarging Reducing Using Custom Copy Ratios below Enlarging Reducing Using Custom Copy Ratios 1 Press Enlarge Reduce twice 2 Use the numeric buttons to enter the copy ratio press OK You can enter the copy ratio from 50 to 200 selectable in 1 increments Even after entering the copy r...

Page 32: ... set Adjusting the Exposure Density You can adjust the copy exposure automatically or manually according to how light or dark your document is Adjusting Automatically 1 Press Exposure twice to select the auto mode press OK The copy exposure is adjusted automatically NOTE Image quality mode automatically changes to TEXT when AUTO EXPOSURE is set Adjusting Manually 1 Press Exposure to select the man...

Page 33: ...f a document on the platen glass For details on how to place documents on the platen glass see Placing a Document on the Platen Glass on p 3 2 2 Press Collate 2on1 COL appears in the LCD NOTE If AUTO SORT in COPY SETTINGS of the Menu is set to ON the collate copy feature is automatically set See 5 AUTO SORT of Menu Descriptions on p 10 3 3 Use the numeric keys to enter the number of copies you wan...

Page 34: ...s set to A4 or LTR 1 Place the first page of a document on the platen glass For details on how to place documents on the platen glass see Placing a Document on the Platen Glass on p 3 2 2 Press Collate 2on1 twice 2ON1 appears in the LCD 3 Use the numeric keys to enter the number of copies you want You can set up to 99 copies 4 Press Start The machine begins scanning 5 Place the next page of the do...

Page 35: ... document to be reserved on the platen glass For details on how to place documents see Placing a Document on the Platen Glass on p 3 2 3 Use the numeric buttons to enter the number of copies You can set up to 99 copies 4 Adjust any necessary settings for your document Press Image Quality to select the scanning resolution See Adjusting the Image Quality Resolution on p 5 3 Press Exposure to select ...

Page 36: ...ntrol Panel Printers and Other Hardware Scanners and Cameras On Windows 98 Me 2000 Click Start on the Windows task bar select Settings Control Panel double click Scanners and Cameras 2 Make sure there is the corresponding scanner driver name or icon Scanning Methods There are two methods of scanning documents to your computer Using a TWAIN or WIA Windows XP compliant Windows application Using SCAN...

Page 37: ...rocessed according to your settings When you use Start for the first time a folder with the scanning date will be created in the My Pictures folder in the My Documents folder and your document will be saved in this folder If there is no My Pictures folder the folder with the scanning date will be created in the My Documents folder and your document will be saved in this folder More Information For...

Page 38: ...e following order COPY STATUS PRINT STATUS NOTE Status Monitor is disabled in the Scan mode Confirming and Deleting a Copy Job 1 Press Status Monitor 2 Press or to select COPY STATUS press OK NOTE If there is no job NO COPY JOBS EXIST is displayed If there is only one copy job go to step 4 3 Press or to confirm the job number and the quantity of copies 4 If you want to delete the copy job press OK...

Page 39: ...nly one print job go to step 4 3 Press or to confirm the file name 4 If you want to delete the print job press OK 5 If you decide to delete the job press for YES NOTE To cancel deleting the job press for NO Once the job is deleted the job cannot be restored The LCD can display characters in ASCII cord Using characters other than those in ASCII cord may have the LCD display garbled characters ...

Page 40: ...imilar materials for cleaning they can stick to the components or generate static charges Use a soft cloth to avoid scratching the components Never use volatile liquids such as thinner benzene acetone or any other chemical cleaner to clean the interior of the machine these can damage the machine s components Cleaning the Exterior Wipe the machine s exterior with a clean soft lint free cloth moiste...

Page 41: ...ing the Cartridge on p 8 3 1 Remove the cartridge from the machine 2 Rock the cartridge 5 or 6 times to distribute the toner evenly 3 Reinstall the cartridge in the machine 4 Make a few test copies If the copies appear normal You can keep using the cartridge However a new one will be needed soon If white streaks or light bands are still present Replace the cartridge with a new one For details on h...

Page 42: ... extended period of time Handling and Storing the Cartridge This section describes the precautions to ensure optimum copy quality Handling Precautions WARNING Do not throw the cartridge into open flames as this may cause the toner to ignite and result in burns or a fire The cartridge emits low level magnetic flux If you use a cardiac pacemaker and feel abnormalities please move away from the cartr...

Page 43: ...hat the side with the written instructions faces up Then place the bagged cartridge into its shipping box Store the unused cartridge out of direct sunlight For partially used opened cartridges place the cartridge in its protective bag so that the side with the written instructions faces up Then place the bagged cartridge into its shipping box and store it away from direct sunlight Avoid storing th...

Page 44: ...ore the cartridge in a dark location Recycling Used Cartridges In order to make effective use of the earth s natural resources and protect the environment we urge you to recycle used cartridges by returning them to the place of purchase Replacing the Cartridge This section describes how to remove the used cartridge and replace it with a new one Before replacing the cartridge be sure to read the se...

Page 45: ... the cartridge 5 or 6 times to distribute the toner evenly 5 Place the cartridge on a flat and stable surface Fold the tab A on the sealing tape B as shown below and pull it out straight while supporting the cartridge Make sure that the tab itself is detached from the cartridge IMPORTANT To avoid breaking the tape do not pull out the tape at an upward or downward angle A B ...

Page 46: ...in the machine then gently slide the cartridge into the machine as far as it will go Be sure to position the arrow mark C on the cartridge towards the inside of the machine 7 Close the front cover NOTE If the LCD displays INSTALL CARTRIDGE reset the machine by opening the front cover and then closing it C B A A B B ...

Page 47: ...ove it from the machine In order to avoid direct sunlight place the cartridge in the protective bag that the cartridge came in when you purchased it 5 Close the front cover 6 Pull out the cassette completely and remove the extension cover from the machine 7 Detach the cassette extension from the cassette 8 Insert the cassette in the machine 9 Detach the output tray Carrying the Machine by the Side...

Page 48: ... the machine inside a car for a long period of time the temperature can become very high or low Avoid rough roads excessive vibration may damage the machine or adversely affect the quality of your printouts Place a cover over the machine Do not leave the machine in direct sunlight When moving the machine use the original shipping box that it was packed in when you purchased it ...

Page 49: ... some areas inside the machine and cartridge which are subject to high voltages and high temperatures Take adequate precaution when performing internal inspections to avoid burns or electrical shock NOTE When removing jammed paper from inside the machine take care not to allow the toner on the jammed paper to come into contact with your hands or clothing If they become dirty wash them immediately ...

Page 50: ...ot touch the transfer roller as its surface is very delicate and susceptible to finger oil and scratches which may lead to print deterioration NOTE Do not expose the cartridge to light for more than 5 minutes If necessary put the cartridge in its original protective bag or wrap it with a thick cloth to prevent exposure to light 3 Open the face up cover A and push down the green paper release lever...

Page 51: ...paper out of the machine If the leading edge of the paper is visible but has not entered the imaging area Pull the paper forwards and roll it inwards IMPORTANT Do not pull the jammed paper forward from the cassette It may cause a machine malfunction ...

Page 52: ...toner on the paper will stain the machine and cause a permanent reduction in print quality 6 Gently pull the jammed paper between the output rollers until the leading edge emerges from the machine 7 Carefully pull the jammed paper straight out through the rollers ...

Page 53: ...se the jammed paper loose and then pull it out of the machine 8 Close the front cover 9 Pull out the cassette completely 10 Hold both sides of the jammed paper and slowly pull it out in the direction of the arrow When Feeding Paper from the Cassette When Feeding Paper from the Multi Purpose Feeder ...

Page 54: ...sembly 12 Insert the cartridge back into the machine then close the front cover For details see Replacing the Cartridge on p 8 5 IMPORTANT After you replace the cartridge and close the front cover the machine should be ready for operating If the machine returns to the ready state for operating troubleshooting has been successful If the machine does not return to the ready state for operating confi...

Page 55: ...losing it If the message persists unplug the machine from the power supply and contact your local authorized Canon dealer or the Canon help line CHECK PRINTER COVER Cause The front cover is not closed completely Remedy Check the front cover and make sure that it is completely closed INSTALL CARTRIDGE Cause The cartridge is not installed or not installed correctly Remedy Install the cartridge corre...

Page 56: ...m Remedy Clear the paper jam See Clearing Jams on p 9 1 and reload paper in the cassette or multi purpose feeder Then reset the machine by opening the front cover and then closing it SUPPLY REC PAPER Cause No paper is loaded in the cassette or multi purpose feeder Remedy Load paper in the cassette or multi purpose feeder See Loading Paper on p 2 3 Make sure the paper stack in the cassette does not...

Page 57: ... machine as far as it will go and make sure the cassette is not tilted or inserted at an angle Paper feeds skewed Printing is skewed Q Is paper loaded correctly A Make sure the paper stack in the cassette or the paper in the multi purpose feeder is loaded properly and that the paper guides are adjusted correctly See Loading Paper on p 2 3 A Make sure the paper exit path is clear Multiple sheets fe...

Page 58: ...tly Q Are the transparencies loaded correctly A Make sure the transparencies in the cassette or the transparency in the multi purpose feeder is loaded properly and that the paper guides are adjusted correctly See Loading Paper on p 2 3 Q Is the proper transparency loaded in the multi purpose feeder A Do not use any transparencies designed for color copiers They will cause a paper jam Please use tr...

Page 59: ...ay See Face Down Paper Output Area on p 2 11 Q Is the machine installed in a proper location A Check that the machine is installed in the proper location For information about specifications of the machine see Specifications on p 11 1 For safety warnings and cautions see Chapter 1 Safety Instructions in the Quick Reference Guide Envelopes do not feed correctly Q Are the envelopes loaded correctly ...

Page 60: ...the energy saver mode off A The machine does not scan documents if it is in the energy saver mode To restore the machine from the energy saver mode press Energy Saver Print Quality Problems The print quality is not what you expect print is not clear has missing dots or white streaks Q Are the size thickness and type of the paper you are using within the specifications of the machine A Check that t...

Page 61: ...r the machine to adjust to room temperature before attempting to use it Q Is the machine installed in a stable location A Install the machine in a proper location See Chapter 1 Safety Instructions in the Quick Reference Guide Copies are too dark or too light Q Is the exposure adjusted correctly A Adjust the exposure correctly using Exposure See Adjusting the Exposure Density on p 5 3 Q Is the mach...

Page 62: ...in the cassette or multi purpose feeder A Clear the paper jam or load paper in the cassette or multi purpose feeder For instructions on clearing paper jam see Clearing Jams on p 9 1 For instructions on loading paper see Loading Paper on p 2 3 A If the machine has no paper jam or paper is loaded in the cassette or multi purpose feeder unplug the machine and wait approximately 3 minutes to 5 minutes...

Page 63: ...he platen glass cover See Cleaning the Scanning Area on p 8 1 White streaks appear on the left side of the image Q Is the document placed on the platen glass correctly A Place the document approximately 3 mm from the edge of the platen glass General Problems The machine has no power Q Is the power cord plugged in securely A Check that the power cord is plugged securely into the machine and into th...

Page 64: ...ot turn on If this happens disconnect the power cord and reconnect it correctly after a minute or more See the Set Up Sheet If the LCD remains blank unplug the machine and wait approximately 3 minutes to 5 minutes until the temperature inside the machine lowers then plug it in again If the LCD remains blank unplug the machine and contact your local authorized Canon dealer or the Canon help line Q ...

Page 65: ...ntact your local authorized Canon dealer or the Canon help line Do not attempt to disassemble or repair the machine yourself IMPORTANT Attempting to repair the machine yourself may void the limited warranty If you need to contact your local authorized Canon dealer or the Canon help line make sure you have the following information Product name MF3110 Serial number The serial number is on the label...

Page 66: ...turns to the previous screen The settings changed in the Menu do not return automatically to the settings you set previously Change to the previous settings again if necessary Menu Descriptions PAPER SETTINGS The factory default setting is in bold face Name Descriptions 1 PAPER SETTINGS Sets the paper size and paper type 1 CASSETTE 1 PAPER SIZE Selects the paper size for the paper cassette A4 B5 A...

Page 67: ...tion activates the standby display of the selected mode appears COPY The Copy mode is selected as default SCAN The Scan mode is selected as default 2 TONER SAVER MODE Sets the toner saver mode OFF The toner saver mode is turned off ON The toner saver mode is turned on 3 DISPLAY LANGUAGE Shows the language displayed in the LCD ENGLISH FRENCH SPANISH GERMAN ITALIAN DUTCH FINNISH PORTUGUESE NORWEGIAN...

Page 68: ...tio The preset copy ratios will change when the paper size group is changed 4 STANDARD COPY QTY Selects the copy quantity 1 to 99 1 5 AUTO SORT Sets the auto sort function OFF The auto sort function is turned off ON The auto sort function is turned on 6 PAPER SIZE GROUP The paper size group can be selected If the paper size group is changed the preset copy ratios will also change A Preset copy rat...

Page 69: ...he time out period 5SEC to 300SEC 15SEC OFF The error time out is off Name Descriptions 1 AUTO CLEAR Sets the auto clear function If the machine remains idle for a set amount of time the display returns to the standby mode ON Sets the time until the machine returns to the standby mode 1MIN to 9MIN 1MIN OFF The auto clear function is turned off 2 ENERGY SAVER Sets the energy saver mode ON Sets the ...

Page 70: ...rostatic Transfer System Developing System Toner Projection System Fixing System Canon s RAPID Fusing System Resolution Approx 600 dpi x 600 dpi Number of Tones 256 Acceptable Documents Up to A4 size Sheets books and three dimensional objects up to 2 kg Acceptable Copy Stock Cassette Feeding 64 g m2 to 128 g m2 Multi Purpose Feeder 64 g m2 to 128 g m2 Plain paper recycled paper transparencies enve...

Page 71: ...y display appears Warm up time may differ depending on the condition and environment of the machine First Copy Time Approx 13 8 sec A4 or LTR size direct Manual Exposure Control Cassette Feeding except just after being restored from energy saver mode Copy Speed Direct A4 20 cpm LTR 21 cpm Magnification 1 1 1 0 1 2 000 1 1 294 1 0 786 1 0 647 1 0 500 Zoom 0 500 2 000 in 1 increments Paper Feeding S...

Page 72: ...e paper size 2 8 specifying the paper type 2 9 Customer support 1 1 D DEFAULT SETTINGS setting 10 2 DISPLAY LANGUAGE settings 10 2 Document orientation 2 9 placing 3 2 printing 4 1 quantity 3 1 requirements 3 1 scanned area 3 2 scanning 6 1 size 3 1 type 3 1 weight 3 1 Document feed platen glass 1 1 3 2 E Energy Saver key 1 3 restoring 1 5 setting 1 5 ENERGY SVR TIME setting 10 4 Enlarge Reduce ke...

Page 73: ...t media requirements 2 1 size 2 1 type 2 1 weight 2 1 Print quality problems 9 12 Print yield 8 3 PRINTER DATA ERROR message 9 8 Printing areas 2 2 beforehand 4 1 canceling 4 2 documents 4 1 problems 9 14 Problems cannot solve 9 17 copying 9 12 general 9 15 paper feeding 9 9 print quality 9 12 printing 9 14 scanning 9 15 Q Quality adjusting the image 5 3 print problems 9 12 Quantity document 3 1 R...

Page 74: ... monitor 7 1 T Toner in the cartridge 8 2 TONER SAVER MODE setting 10 2 Transporting 8 8 Tray output 1 1 Troubleshooting 9 1 U USB port 1 2 W Weight document 3 1 machine 11 2 print media 2 1 Z Zoom 5 2 ZOOM RATIO setting 10 3 ...

Page 75: ...x France CANON U K LTD Woodhatch Reigate Surrey RH2 8BF United Kingdom CANON DEUTSCHLAND GmbH Europark Fichtenhain A10 47807 Krefeld Germany CANON ITALIA S p A Via Milano 8 20097 San Donato Milanese MI Italy CANON LATIN AMERICA INC 703 Waterford Way Suite 400 Miami Florida 33126 U S A CANON AUSTRALIA PTY LTD 1 Thomas Holt Drive North Ryde Sydney N S W 2113 Australia CANON SINGAPORE PTE LTD 1 Harbo...

Reviews: