Canon LASERBASE MF5700 Series, User Manual
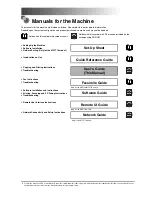
The Canon LASERBASE MF5700 Series is a versatile all-in-one printer, scanner, and copier that offers exceptional performance for home or office use. With its comprehensive "Basic manual" detailing setup and operation, users can easily harness the full potential of this reliable device. Download the free manual from 88.208.23.73:8080 to get started.
Share
Download
Reviews:
No comments
Related manuals for LASERBASE MF5700 Series

2000 Series
Brand: Qls Pages: 53

C910
Brand: Oki Pages: 52

3130
Brand: IBM Pages: 112

All in One Printer
Brand: Xerox Pages: 3

Color imageCLASS MF8170c
Brand: Canon Pages: 8

Color imageCLASS MF8170c
Brand: Canon Pages: 2

Color imageCLASS MF8050Cn
Brand: Canon Pages: 32

Color imageCLASS MF8580Cdw
Brand: Canon Pages: 20

Color imageCLASS MF8080Cw
Brand: Canon Pages: 39

C3000 - MultiPASS Color Inkjet Printer
Brand: Canon Pages: 41

Color imageCLASS MF8170c
Brand: Canon Pages: 98

GP200
Brand: Canon Pages: 4

ImageCLASS 2300
Brand: Canon Pages: 8

CFX-B380 IF
Brand: Canon Pages: 49

imageCLASS D1120
Brand: Canon Pages: 36

ImageCLASS 2300
Brand: Canon Pages: 44

Color imageCLASS 8180c
Brand: Canon Pages: 95

ImageCLASS 2300
Brand: Canon Pages: 156


