background image

(2) Click [Start].

4

Read the contents of License Agreement, and then click [Yes].

ĺ

The installation starts.
Wait a moment until the installation is complete. (It may take a long time to install the e-Manual.)

5

Click [Exit].

㻝㻢㻌㻛㻌㻡㻝㻠

Summary of Contents for LBP7100Cn

Page 1: ......

Page 2: ...y Information LBP7110Cw Only 42 About This Printer 46 Printer Specifications 47 System Requirements for Printing 50 Names and Dimensions of Each Part 51 Control Panel 53 Printer Status Window 56 Intro...

Page 3: ...Driver 127 Basic Printer Operations 133 Usable Paper 134 Precautions for Paper 137 Printable Area 139 Paper Loading and Output 140 Loading Paper 141 Attention Paper Loading 144 Registering the Paper...

Page 4: ...ing a Profile 219 Configuring the Network Settings Sharing the Printer 220 Checking Your Printing Environment 221 If You Use the Printer by Direct Connection 222 Basic Network Settings 224 Switching B...

Page 5: ...365 Checking Keys and Certificates CA Certificates 373 Deleting Keys and Certificates CA Certificates 379 Initializing Keys and Certificates CA Certificates 383 Setting the SSL Encrypted Communicatio...

Page 6: ...Is Not Printed in the Correct Color Specified Color Due to Color Mismatches 479 Thin Lines or Fill Patterns Are Not Printed with the Specified Colors or Do Not Appear At All 481 Shaded Patterns Are N...

Page 7: ...For Windows 8 Server 2012 Users 512 For Macintosh Users 513 Office Locations 514...

Page 8: ...0F40 000 Legal Notices Legal Limitations on the Usage of Your Product and the Use of Images Using the e Manual Before You Start...

Page 9: ...nder IEC60825 1 2007 and EN60825 1 2007 This means that the product does not produce hazardous laser radiation Since radiation emitted inside the product is completely confined within protective housi...

Page 10: ...irective 2012 19 EU and national legislation This product should be handed over to a designated collection point e g on an authorized one for one basis when you buy a new similar product or to an auth...

Page 11: ...use of the images scanned printed or otherwise reproduced you should consult in advance with your legal advisor for guidance Paper Money Travelers Checks Money Orders Food Stamps Certificates of Depos...

Page 12: ...Site Map Search Method Viewing the e Manual To find the desired content Selecting between the category icons From the top page select a category icon you want Top Page Searching from the site map On...

Page 13: ...ck the following links to see the system requirements to use the e Manual and how to install uninstall the e Manual Operating Environment Installing the e Manual Uninstalling the e Manual How to Use t...

Page 14: ...is guaranteed Internet Explorer 6 0 7 0 8 0 9 0 10 0 Firefox 2 x 3 x 4 x 5 x 6 x 7 x 8 x 9 x 10 x 11 x 13 x 14 x 15 x 16 x 17 x 18 x 19 x NOTE Enabling the script function and cookies Enable the scri...

Page 15: ...the CD ROM drive of your computer 2 Click Custom Installation If the above screen does not appear Basic Operations Various Information for Windows If the AutoPlay dialog box appears Click Run AUTORUN...

Page 16: ...lick Start 4 Read the contents of License Agreement and then click Yes The installation starts Wait a moment until the installation is complete It may take a long time to install the e Manual 5 Click...

Page 17: ...6 Click Next 7 Click Exit When the following screen appears you can remove the CD ROM Displaying the e Manual Double click LBP7100C 7110C e Manual created on the desktop...

Page 18: ...l directly from the CD ROM You can also display the e Manual directly from the CD ROM without installing it in the computer you are using 1 Insert the supplied CD ROM User Software into the CD ROM dri...

Page 19: ...ion is not supported for Macintosh 1 Insert the supplied CD ROM User Software into the CD ROM drive of your computer 2 Click Additional Software Programs If the above screen does not appear Basic Oper...

Page 20: ...4 Click Uninstall to start the uninstallation Please wait a moment until the uninstallation is complete It may take a long time to uninstall the e Manual 5 Click Exit 6 Click Back...

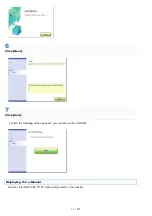
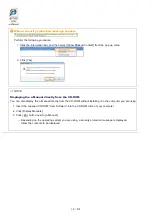
Page 21: ...7 Click Exit When the following screen appears you can remove the CD ROM...

Page 22: ...ion is called Topic Page in this section Site map is displayed from Site map which is located on the upper right of the e Manual The search panel is used to make search through the e Manual The screen...

Page 23: ...tails on the solutions for the other problems see Troubleshooting 5 Installation This section describes how to install this printer how to install the printer driver and so on 6 Search The search pane...

Page 24: ...of copyrights is displayed 14 Trademarks The trademarks are displayed 15 Third Party Software The information about the third party software is displayed 16 Office Locations Inquiries for this printe...

Page 25: ...e displayed topic is displayed at the upper left of the topic page Click a link to move to a higher level 3 Chapter menu You can select a different chapter from the pull down menu 4 Contents tab Click...

Page 26: ...ategories Shows the chapters of the e Manual Click an item to view the detailed list of the chapter 2 Whole contents Shows the all chapters and sections of the e Manual Click an item to view the conte...

Page 27: ...ment if you want to display pages which include words Toner and Replacement 2 Search result The search results for a keyword are displayed If there are more than 10 search results you can see the othe...

Page 28: ...ions for a procedure Reading these notes is highly recommended Indicates an operation that must not be performed Read these items carefully and make sure not to perform the described operations Keys a...

Page 29: ...ROM please take each mention of the supplied CD ROM or the supplied CD ROMs in this manual as referring to the supplied DVD ROM Abbreviations Used in the e Manual Abbreviations of Operating Systems I...

Page 30: ...MPLIED EXCEPT AS PROVIDED HEREIN INCLUDING WITHOUT LIMITATION THEREOF WARRANTIES AS TO MARKETABILITY MERCHANTABILITY FITNESS FOR A PARTICULAR PURPOSE OF USE OR AGAINST INFRINGEMENT OF ANY PATENT CANON...

Page 31: ...part of this publication may be reproduced or transmitted in any form or by any means electronic or mechanical including photocopying and recording or by any information storage or retrieval system w...

Page 32: ...OS X and Macintosh are trademarks of Apple Inc Microsoft Windows Windows Vista Windows Server and Internet Explorer are either registered trademarks or trademarks of Microsoft Corporation in the Unit...

Page 33: ...these instructions Also as it may result in unexpected accidents or injuries do not perform any operation unless otherwise specified in the manual Improper operation or use of this machine could resul...

Page 34: ...0F40 00R Read the following precautions thoroughly before operating the printer Installation Power Supply Handling Maintenance and Inspections Consumables Important Safety Instructions...

Page 35: ...e the printer on a soft surface such as a bed sofa or rug Blocking the slots can cause the printer to overheat resulting in a fire Do not install the printer in the following locations as this may res...

Page 36: ...do so can result in a fire or electrical shock If excessive stress is applied to the connection part of the power cord it may damage the power cord or the wires inside the machine may disconnect This...

Page 37: ...FF the power switch and disconnect the interface cables if they are connected Then unplug the power plug from the AC power outlet and contact your local authorized Canon dealer When plugging or unplug...

Page 38: ...If the laser beam should escape and enter your eyes exposure may cause damage to your eyes...

Page 39: ...does not have safeguards against dust explosions to clean up spilled toner Doing so may cause a malfunction in the vacuum cleaner or result in a dust explosion due to static discharge Confirm that the...

Page 40: ...cold water Washing with warm water sets the toner making it impossible to remove the toner stains When removing jammed paper be careful not to allow the toner on the paper to scatter The toner may ge...

Page 41: ...malfunction in the vacuum cleaner or result in a dust explosion due to static discharge CAUTION Keep the toner cartridges and other consumables out of the reach of small children If the toner or othe...

Page 42: ...sente CANON INC dichiara che FM48944 conforme ai requisiti essenziali ed alle altre disposizioni pertinenti stabilite dalla direttiva 1999 5 CE Latviski Latvian U R 121 1 GHNODU ND 0 DWELOVW LUHNW YDV...

Page 43: ...landic H r me l sir CANON INC v yfir a FM48944 s samr mi vi grunnkr fur og a rar kr fur sem ger ar eru tilskipun 1999 5 EC Norsk Norwegian CANON INC erkl rer herved at utstyret FM48944 er i samsvar me...

Page 44: ...RMXPX GU NVW OLHWRW 7 6 5 5 8 IE IS IT LI LT LU LV MT NL NO PL PT RO SE SI SK 3LH PHV SDU L VWU G MXPD OLHWR DQX UDQFLMD R L VWU G MXPX QHGU NVW OLHWRW USXV WHOS P LHWXYL LWKXDQLDQ UHQJLQ JDOLPD HNVSO...

Page 45: ...ULRU Bulgarian 7 6 5 GB GR HU IE IS IT LI LT LU LV MT NL NO PL PT RO SE SI SK slenska Icelandic Vi ger essu t ki m annast AT BE BG CH CY CZ DE DK EE ES FI FR GB GR HU IE IS IT LI LT LU LV MT NL NO PL...

Page 46: ...cations System Requirements for Printing Names and Dimensions of Each Part Control Panel Printer Status Window Introduction of the Utilities Energy saving Mode Cautions for Handling the Printer Consum...

Page 47: ...Color printing 18 seconds May vary depending on the output environment Paper size Standard sizes A4 B5 A5 Legal Letter Executive Statement Foolscap 16K Index Card Envelope DL Envelope No 10 COM10 Enve...

Page 48: ...ring operation Approx 340 W During standby Approx 10 W During the sleep mode USB connection Wired LAN connection Approx 0 9 W During the sleep mode Wireless LAN connection Approx 4 W When the power of...

Page 49: ...5 5 11 Mbps IEEE 802 11g 6 9 12 18 24 36 48 54 Mbps IEEE 802 11n SGI Invalidated 20 MHz 6 5 13 19 5 26 39 52 58 5 65 Mbps SGI Validated 20 MHz 7 2 14 4 21 7 28 9 43 3 57 8 72 2 Mbps SGI Invalidated 40...

Page 50: ...Canon Web site http www canon com Computer A computer on which any one of the above operating systems can run Interface When connecting with USB Hi Speed USB USB When connecting with wired LAN Connect...

Page 51: ...2 Lift Handle 5 Front Cover 7 Paper Drawer 3 Drawer Top Cover Rear View 1 Ventilation Slot 4 LNK Indicator Green 7 Rating Label 2 ACT Indicator Yellow 5 USB Connector 8 Rear Cover 3 LAN Connector 6 L...

Page 52: ...Toner Cartridge Slot 4 K Black Toner Cartridge Slot 2 M Magenta Toner Cartridge Slot 5 Toner Cartridge Tray 3 C Cyan Toner Cartridge Slot Paper Drawer 1 Paper Guide 2 Lock Release Lever Dimensions of...

Page 53: ...eached the end of their life Solve the problem following the message displayed in the Printer Status Window 1 A Message Appears in the Printer Status Window 3 Ready Indicator On The printer is ready t...

Page 54: ...or occurred but you can ignore the error and continue printing To skip the error and continue printing press the Go key 2 1 For details on the procedure for displaying the Printer Status Window see Pr...

Page 55: ...e Ready indicator is on or blinking to print the User Data List 3 1 For details see Initializing Using the Reset Button 2 For details see Canceling a Print Job Being Printed Using the Cancel Job Key 3...

Page 56: ...ys the print queue a function of Windows For details on the print queue see Windows Help Refresh Obtains the printer status and refreshes the Printer Status Window display Consumables Information Allo...

Page 57: ...ation Area Displays information about the job 10 Cancel Job Cancels the current job being printed 11 Resolve Error You can resume a job when it is paused during printing for some reason 12 Status Bar...

Page 58: ...inting When the consumables need to be replaced soon during printing When the consumables have reached the end of their life during printing You can change the display settings in the Preferences User...

Page 59: ...te the Remote UI Central management of all the printer settings with the manager password PIN Only the manager can configure the settings or perform the operations related to the printer management by...

Page 60: ...certain time Sleep Mode You can configure the printer to enter the standby mode for low power consumption when data is not sent from the computer or the printer does not operate for a specified time...

Page 61: ...lect the Enter Sleep Mode after Fixed Period check box 2 Specify the time until the printer enters the sleep mode in Enter Sleep Mode After 3 Click OK NOTE About the setting for the time to enter the...

Page 62: ...ically after entering sleep mode in Auto Shutdown After 3 Click OK NOTE About the setting for the time to execute auto shutdown When Auto Shutdown After is changed during sleep mode the specified time...

Page 63: ...osing the printer to direct sunlight or strong light may result in deterioration in print quality Do not open the covers on the printer during printing This may result in damage to the printer Handle...

Page 64: ...by ISO International Organization for Standardization 2 When the toner cartridges need to be replaced soon a message will appear in the Printer Status Window Also you can check the toner cartridges st...

Page 65: ...r cartridge We recommend that you replace the toner cartridge before printing a large amount of data Replace Cartridge The toner cartridge has reached the end of its life Replace the toner cartridge P...

Page 66: ...Storing Toner Cartridges Moving the Printer Cleaning the Printer Adjusting Colors and Correcting Color Mismatches Calibration Color Mismatch Correction Cleaning the Inside of the Printer Cleaning the...

Page 67: ...you replace the toner cartridges of the displayed colors Replacing the Toner Cartridge You can continue printing as is however as this may result in damage to the printer It is recommended that you r...

Page 68: ...targeted for messages Multiple colors of the toner cartridges may be displayed In cases such as where you do not immediately replace the toner cartridge with a replacement toner cartridge after purch...

Page 69: ...ine performance Canon is not responsible for any malfunction accident or damage caused by the use of counterfeit toner cartridge For more information see http www canon com counterfeit Hold the toner...

Page 70: ...tridges when they are brought into an environment with a sudden change in temperature or humidity When moving a new toner cartridge to a location with change in temperature leave the cartridge in the...

Page 71: ...er Status Window Checking the Consumables Status Before replacing the toner cartridge see Attention Toner Cartridge 1 Open the front cover 2 Press the lever and pull out the toner cartridge tray 3 Hol...

Page 72: ...er cartridge for printer maintenance or other purposes 5 Shake the toner cartridge five or six times as shown in the figure to evenly distribute the toner inside the cartridge Do not remove the drum p...

Page 73: ...removed sealing tape according to local regulations 8 Remove the drum protective cover A Keep the drum protective cover Do not discard it You will need it when you remove the toner cartridge for print...

Page 74: ...If you cannot close the front cover Make sure that the toner cartridge tray is closed Do not try to forcefully close the front cover as this may damage the printer...

Page 75: ...or where a considerable amount of salt is contained in the air or where there is a lot of dust Keep toner cartridges out of the reach of small children Store toner cartridges in the same orientation...

Page 76: ...tructions also 1 Turn the printer OFF then disconnect the cables or cords from the printer How to disconnect the cable or cord USB cable 2 Turn the computer off 3 Disconnect the cable from the printer...

Page 77: ...printer Power cord 1 Plug the power cord to the power socket on the printer 2 Plug the power plug into the AC power outlet Whether the cable is connected or not varies depending on your environment Wh...

Page 78: ...ed in the correct colors specified colors Cleaning the Inside of the Printer If the printed paper has smudge marks or the print quality has deteriorated clean the inside of the printer Cleaning the in...

Page 79: ...d the data is not printed in the correct colors specified colors NOTE Performing calibration or color mismatch correction at the designated time or immediately after the printer is turned ON You can s...

Page 80: ...tridges status of each color in the Consumables Information dialog box in the Printer Status Window Checking the Consumables Status If you perform calibration in the state where the toner cartridges h...

Page 81: ......

Page 82: ...tridges status of each color in the Consumables Information dialog box in the Printer Status Window Checking the Consumables Status If you perform color mismatch correction in the state where the tone...

Page 83: ...It takes approximately 60 seconds...

Page 84: ...designated time everyday 1 Select the Use Periodical Calibration Timer check box 2 Specify the time to perform calibration in Time If calibration is not automatically performed When the printer is un...

Page 85: ...sleep mode until the time the sleep mode was canceled calibration or color mismatch correction will be performed according to the Image Quality Adjustment at Startup setting when the sleep mode is can...

Page 86: ...per has smudge marks clean the fixing roller of the printer Cleaning the Transfer Belt of the Printer If the transfer belt of the printer has dirt this may result in deterioration in print quality In...

Page 87: ...tray and then select the printer name 3 4 Click OK The paper is fed into the printer and the printer starts cleaning the fixing roller NOTE Cleaning time It takes approximately 30 seconds Cleaning th...

Page 88: ......

Page 89: ...OK The message Cleaning appears in the Printer Status Window and the printer starts cleaning the transfer belt NOTE Cleaning time It takes approximately 50 seconds Cleaning the transfer belt cannot be...

Page 90: ...the printer LAN cable 4 Disconnect the cable from the printer Power cord 5 Disconnect the power plug from the AC power outlet 6 Disconnect the cable from the printer Whether the cable is connected or...

Page 91: ...rd USB cable Connect to the USB connector on the printer LAN cable Connect to the LAN connector on the printer Power cord 1 Plug the power cord to the power socket on the printer 2 Plug the power plug...

Page 92: ...gent diluted with water as this may deform or crack the plastic materials in the printer When using a mild detergent be sure to dilute it with water Also if you use a mild detergent for cleaning be su...

Page 93: ...ing maintenance service You can find the serial number at the location shown in the following figure Do not remove the labels on which the serial number is indicated Rear of the printer Outside view o...

Page 94: ...llation Location 2 Removing the Packing Materials Removing the Packing Materials 3 Installing the Printer Carrying the Printer to the Installation Location Connecting the Power Cord Installing the Pri...

Page 95: ...large amount of printing in a poorly ventilated room the ozone or other odors generated by the printer may create an uncomfortable working environment In addition chemical particles are dispersed duri...

Page 96: ...Magenta and C Cyan toner cartridges 800 pages The average yield is on the basis of ISO IEC 19798 when printing A4 size paper with the default print density setting ISO IEC 19798 is the global standard...

Page 97: ...her than USB connection have an appropriate interface cable available for the computer you are using or the connecting method Use a USB cable with the following symbol About the Supplied Manuals The m...

Page 98: ...o use this printer in a safe and trouble free manner install the printer in a place that fulfills the following conditions Temperature and Humidity Conditions Temperature range 10 to 30 C 50 to 86 F H...

Page 99: ...or relocation or maintenance About the packing materials The packing materials may be changed in form or placement or may be added or removed without notice Remove all the orange tape if it is attache...

Page 100: ...Open the front cover 5 Press the lever and pull out the toner cartridge tray 6 Hold down the toner cartridge as shown in the figure 7 Remove the tab and then pull out the sealing tape approx 50 cm...

Page 101: ...local regulations 8 Pull out the sealing tapes of all the toner cartridges Make sure that all four pieces of sealing tape have been removed 9 Push in the toner cartridge tray 10 Close the front cover...

Page 102: ...Close the covers and insert the paper drawer after you finish checking Next install the printer Installing the Printer...

Page 103: ...rinter unit to the installation location Carry the printer by holding it by the lift handles from the front side Check the weight of the printer and carry the printer carefully Printer Specifications...

Page 104: ...tion Next perform the following procedures 1 Loading Paper Loading Paper 2 Installing the Printer Driver Installing the Printer Driver 3 Registering the Paper Size and Type Registering the Paper Size...

Page 105: ...0F40 02E Installing the Printer Driver Uninstalling the Printer Driver Driver Installation...

Page 106: ...erations The e Manual is also installed simultaneously Easy Installation NOTE Installing the printer driver with Plug and Play USB connection See Basic Operations Various Information for Windows If yo...

Page 107: ...NOTE Precautions when downloading and installing the printer driver If a 64 bit operating system is running on the print server the download installation for a client computer on which any of the fol...

Page 108: ...If a screen appears through the Plug and Play automatic setup USB connection Click Cancel turn OFF the printer and then use this procedure to install the printer driver 2 Insert the supplied CD ROM U...

Page 109: ...ntrol dialog box appears Click Yes or Continue 4 Click Start 5 Read the contents of License Agreement and then click Yes 6 Specify the printer connection settings as needed Before specifying the setti...

Page 110: ...creen and see the help contents 7 Install the printer driver after specifying the printer connection settings 1 Click Display Readme File 2 Read the contents of the Readme file and then close the file...

Page 111: ...Even if the IP address of the printer changes the port does not have to be changed because a new IP address is detected automatically when the printer and computer are on the same subnet MFNP Port onl...

Page 112: ...but the printer is not automatically recognized USB connection The Printer Is Not Recognized Automatically 8 After the printer driver is installed installation of the e Manual starts Please wait a mom...

Page 113: ...Now check box 2 Click Restart When the following screen appears you can remove the CD ROM When the installation is complete an icon and folder for this printer will be created After Installation If yo...

Page 114: ...printer performs bi directional communication Operation of the printer when connected via unidirectional communication equipment is not tested and as a result Canon cannot guarantee printer operation...

Page 115: ...AN Connection See Attention Wired LAN Connection before connecting the printer to a wired LAN 1 Connect the LAN cable 2 Turn the printer ON 3 Make sure that the LNK indicator A on the network interfac...

Page 116: ...n LBP7110Cw Only See Attention Wireless LAN Connection LBP7110Cw Only before connecting the printer to a wireless LAN 1 Follow the instructions of MF LBP Network Setup Tool to specify the connection s...

Page 117: ...t network all the devices to be connected to the LAN hub LAN cable and network board for computer must support 100BASE TX For details see the instruction manual of each device or contact the manufactu...

Page 118: ...ts at your discretion LAN device and you are responsible for all actions should you choose not to configure the security settings IMPORTANT About security Connecting to an unsecured network environmen...

Page 119: ......

Page 120: ...in Printer List The Printer Cannot Be Searched for NOTE About IPv6 Devices tab This tab is displayed only when Standard TCP IP Port is used You can select the port to use from the Detailed Settings d...

Page 121: ...2 Click Next Proceed to the Printer Information Screen...

Page 122: ...specify 2 Printer Name and 4 Use as Shared Printer below 2 Printer Name Enter a new name if you want to change the printer name 3 Set as Default Select the check box if you want to use this printer as...

Page 123: ...inter via the Print Server Specify the port using the following procedure 1 Click Add Port 2 Select a port to be added 1 Select Network 2 Click OK 3 Select a shared printer 1 Select a shared printer o...

Page 124: ......

Page 125: ...estart your computer after the printer driver installation All Programs under the Start menu Canon Printer Uninstaller Canon LBP7100C 7110C Uninstaller Use this option when uninstalling the printer dr...

Page 126: ...n does not appear if you install the printer driver using a method other than Easy Installation If the icons and folders are not added The installation is not completed properly See You Cannot Install...

Page 127: ...g on to Windows as a user with administrative rights 3 Close the following files and programs if open Help files Printer Status Window Control Panel Other applications 4 Start the uninstaller URP WKH...

Page 128: ...ed driver Normally uninstall the printer driver using Delete If this printer is not displayed Click Cleanup 6 Click Yes to start the uninstallation Please wait a moment until the uninstallation is com...

Page 129: ...n for this printer is displayed 1 Right click the icon and then select Remove device or Delete from the pop up menu 2 Click Yes If the User Account Control dialog box appears click Yes 10 Restart Wind...

Page 130: ...2 Click Additional Software Programs If the above screen does not appear Basic Operations Various Information for Windows If the AutoPlay dialog box appears Click Run AUTORUN EXE If the User Account C...

Page 131: ...14 Click Uninstall to start the uninstallation Please wait a moment until the uninstallation is complete It may take a long time to uninstall the e Manual 15 Click Exit 16 Click Back...

Page 132: ...17 Click Exit When the following screen appears you can remove the CD ROM...

Page 133: ...02X Usable Paper Precautions for Paper Printable Area Paper Loading and Output Loading Paper Basic Printing Procedure How to Use Help Canceling a Job Checking the Printer Status Basic Printer Operati...

Page 134: ...Plain 1 3 Default A4 B5 A5 Legal Letter Executive Statement Foolscap 16K Custom Paper Size 4 Plain paper 2 75 to 90 g m Plain 2 3 5 A4 B5 A5 Legal Letter Executive Statement Foolscap 16K Custom Paper...

Page 135: ...4 Transparency black and white printing only Transparency A4 Letter Label Labels A4 B5 A5 Legal Letter Executive Statement Foolscap 16K Custom Paper Size 4 Index Card Heavy 2 Index Card Envelope Envel...

Page 136: ...printed with Envelope selected select Envelope H 8 Specify the setting as follows for coated paper 100 to 110 g m Coated 1 111 to 130 g m Coated 2 131 to 160 g m Coated 3 161 to 220 g m Coated 4 9 If...

Page 137: ...mooth surface Paper that is thicker or thinner than the specified usable paper Usable Paper IMPORTANT About paper with staples clips ribbons or tape This kind of paper may result in the printer malfun...

Page 138: ...itted from the printer output area Because moisture in the paper is evaporating due to the heat generated when toner fixes this is not a malfunction This is likely to occur when the room temperature i...

Page 139: ...during printing or may blot during color printing If you are using Macintosh select the paper that Print Area Large or Borderless appears in the pull down menu Plain Paper Heavy Paper Transparency La...

Page 140: ...ut Tray Plain paper Ex 90 g m Approx 150 sheets Approx 125 sheets Heavy paper Ex 120 g m Approx 120 sheets Approx 50 sheets Heavy paper Ex 163 g m Approx 100 sheets Approx 30 sheets Transparency Appro...

Page 141: ...the front center while holding the lock release lever A When loading paper whose length is longer than A4 Pull out the paper drawer while holding the lock release lever B at the front right 3 Load th...

Page 142: ...ng on Envelopes and load the paper in the correct orientation NOTE When loading paper with a letterhead or logo See Paper Loading Orientation and load the paper in the correct orientation 4 Align the...

Page 143: ...ay result in misfeeds 6 Insert the paper drawer in the printer NOTE When loading paper whose length is longer than A4 Although the front side of the paper drawer is not flush with the front surface of...

Page 144: ...in misfeeds Do not pull out the paper drawer during printing This may result in paper jams or damage to the printer When using paper that is poorly cut Multiple sheets of paper may be fed at a time In...

Page 145: ...aper size and type while printing is in progress make sure that the printer is idle before registering the paper size and type You can register paper size and type only while one of the following mess...

Page 146: ...r Paper Type Select the type of the paper loaded in the paper drawer When Free is specified printing is performed without checking the paper type When Free is specified be sure to check that the paper...

Page 147: ...ore printing see Attention Basic Printing 1 Load paper in the paper drawer Loading Paper 2 Open the PDF file to be printed using Adobe Reader 3 Select Print from the File menu 4 Configure the printing...

Page 148: ...he settings for Page Size and Output Size 1 Display the Page Setup sheet 2 Select the page size of the document created by an application 3 Select if the size of the paper to be printed is different f...

Page 149: ...eavy 1 2 Heavy paper 121 to 163 g m Heavy 2 Transparency black and white printing only Transparency Label Labels Index Card Heavy 2 Envelope Envelope Monarch Envelope No 10 COM10 and Envelope DL Envel...

Page 150: ...ring the Paper Size and Type When Apply Device Settings is selected with the Paper Type setting set to Free in the Paper Source Settings dialog box the job is printed as Plain 1 8 Specify the other pr...

Page 151: ...inter driver Installing the Printer Driver When printing on custom size paper You need to register the custom paper size in the printer driver previously Registering a Custom Paper Size About the cont...

Page 152: ...icular word or phrase included in the description Enter the word or phrase in Type in the word s to search for and click List Topics Double click the title of the desired topic to display its descript...

Page 153: ......

Page 154: ...ted with one click or select and cancel a job waiting to be printed from the Printer Status Window If the printer and computer are connected over a network you can also cancel a print job using the Re...

Page 155: ...one click Click Cancel Job When selecting and canceling a job waiting to be printed 1 Select Job Status from the Job menu 2 Select the job you want to cancel 1 Select the job you want to cancel from J...

Page 156: ...3 Click OK If you cannot cancel a job You cannot cancel the job whose pages are in the process of printing...

Page 157: ...or Cancel Job Key dialog box in the Printer Status Window you may not be able to cancel printing NOTE The meanings of the Job indicator green The Job indicator green blinks while the printer is cancel...

Page 158: ...ndow shows the current printer status with messages animations and icons If you find any problems with the printer check the Printer Status Window NOTE If the printer and computer are connected via a...

Page 159: ...vy Paper or Index Card Printing on Transparencies Black and White Printing Only Printing on Labels Printing on Envelopes Printing on Coated Paper Printing on Custom Size Paper Paper Loading Orientatio...

Page 160: ...mm Length Height 127 0 to 215 9 mm Recycled paper can be also used NOTE When using custom paper sizes You need to register the custom paper sizes in the printer driver previously Registering a Custom...

Page 161: ...they are not fanned enough multiple sheets of paper may be fed at once causing paper jams When fanning or aligning the transparencies try to hold the edges to avoid touching the printing surface Take...

Page 162: ...eeled off from the backing sheet Labels with uneven adhesive NOTE When using custom paper sizes You need to register the custom paper sizes in the printer driver previously Registering a Custom Paper...

Page 163: ...s in which the glued parts are uneven Irregularly shaped envelopes Loading envelopes Load envelopes in the paper drawer Loading Paper Precautions when loading envelopes Load envelopes in the correct o...

Page 164: ...tion After loading envelopes perform printing Basic Printing Procedure Do not print on the reverse side glued side of envelopes The print speed drops when printing on envelopes When envelopes are prin...

Page 165: ...Custom Paper Size Loading coated paper Load coated paper in the paper drawer Loading Paper Precautions when loading coated paper Fan the paper stack thoroughly and then align the edges before loading...

Page 166: ...oad paper in the paper drawer Loading Paper Registering a custom paper size If printing custom size paper you need to register the custom paper size in the printer driver previously Registering a Cust...

Page 167: ...Information for Windows 2 Right click the icon for this printer then select Printing Preferences from the pop up menu 3 Display the Custom Paper Size Settings dialog box 1 Display the Page Setup shee...

Page 168: ...ight and width of the custom paper size Height Width Specify the custom paper size in portrait orientation Height Width within user definable sizes 5 Register the custom paper size 1 Click Register Th...

Page 169: ...printing side facing up NOTE When loading in landscape orientation The following paper can also be loaded in landscape orientation A5 paper Statement paper Custom size paper with a width and length he...

Page 170: ...Larger than A4 Poster Printing Adding a Watermark to a Document to Be Printed Watermark Printing Printing Borders the Printing Date and so on Printing a Color Document in Black and White Combining Dat...

Page 171: ...ion you are using 1 Select Print from the File menu in the application 2 Select this printer and then click Properties or Preferences Displaying from the printer folder Basic Operations Various Inform...

Page 172: ...ttings See Help How to Use Help About the sheets displayed by Windows The following sheets are displayed by Windows For more details see Windows Help General sheet Sharing sheet Ports sheet Advanced s...

Page 173: ...ording to the paper size 1 Display the Page Setup sheet 2 Select the page size of the document created by an application 3 Select the size of the paper loaded in the paper source If you select a diffe...

Page 174: ...3 Click OK For details on the basic printing procedure see Basic Printing Procedure...

Page 175: ...rint a document as a collated set of copies Do not use this function when printing multiple pages on one sheet The document may not be printed properly 1 Display the setting screen of the printer driv...

Page 176: ...page layout by clicking within the document image on Preview when is selected Using Preview to be able to specify is 2 on 1 and 4 on 1 only 3 Specify the page order layout on paper 4 Click OK For deta...

Page 177: ...uts together 1 Display the setting screen of the printer driver Displaying the Setting Screen 2 Specify the setting for poster printing 1 Display the Page Setup sheet 2 Select Poster N x N N 2 3 4 fro...

Page 178: ...For details on the basic printing procedure see Basic Printing Procedure...

Page 179: ...er driver Displaying the Setting Screen 2 Select a watermark 1 Display the Page Setup sheet 2 Select the Watermark check box 3 Select the character string to be printed as a watermark When adding edit...

Page 180: ...Click OK For details on the basic printing procedure see Basic Printing Procedure...

Page 181: ...box 3 Click Edit Watermark If you cannot select the Watermark check box The Printer Driver Settings Cannot Be Changed 2 Add edit or delete a watermark When adding a watermark 1 Click Add 2 Specify ea...

Page 182: ...dit the default watermarks For more details on each setting see Help How to Use Help When deleting a watermark 1 Select a watermark you want to delete from Watermark List 2 Click Delete You cannot del...

Page 183: ...3 Click OK Then the Page Setup sheet reappears...

Page 184: ...etting Screen 2 Display the Page Options dialog box 1 Display the Page Setup sheet 2 Click Page Options If you cannot click Page Options The Printer Driver Settings Cannot Be Changed 3 Specify the set...

Page 185: ...How to Use Help 2 Click OK Then the Page Setup sheet reappears 4 Click OK For details on the basic printing procedure see Basic Printing Procedure...

Page 186: ...f the printer driver Displaying the Setting Screen 2 Specify the setting for Color Mode 1 Display the Quality sheet 2 Select Black and White NOTE Using Preview to specify the setting You can also spec...

Page 187: ...Color 3 Click OK For details on the basic printing procedure see Basic Printing Procedure...

Page 188: ...ations You can also preview the print data 1 Display the setting screen of the printer driver from an application Displaying the Setting Screen 2 Select Edit and Preview from Output Method If you cann...

Page 189: ...ialog box when performing printing Set Output Method to Edit and Preview as a default value for printing preferences and then select the Lock check box For details on the procedure for changing the de...

Page 190: ...nts and then click OK 8 Perform the following procedure 1 Enter the name of the combined print data 2 Click Combine 9 Print the combined print data 1 Select the combined print data 2 Select Print from...

Page 191: ...inted the print data is deleted from Canon PageComposer The print data is also deleted if Canon PageComposer is closed without printing the print data For more details on Canon PageComposer See Help f...

Page 192: ...0F40 048 Printing with a Gutter Selecting the Paper Output Method Printing with the Page 180 Degrees Rotated Changing the Output Method According to the Print Data or Number of Copies...

Page 193: ...Setting Screen 2 Specify the setting for Binding Location 1 Display the Finishing sheet 2 Select an edge on which the gutter is to be located NOTE Using Preview to specify the setting You can also spe...

Page 194: ...the gutter width 3 Click OK Then the Finishing sheet reappears If you cannot specify the setting The Printer Driver Settings Cannot Be Changed 4 Click OK For details on the basic printing procedure se...

Page 195: ...Display the setting screen of the printer driver Displaying the Setting Screen 2 Specify the setting for Finishing 1 Display the Finishing sheet 2 Select a paper output method If you cannot specify t...

Page 196: ...3 Click OK For details on the basic printing procedure see Basic Printing Procedure...

Page 197: ...rd that can be fed only in specific orientations 1 Display the setting screen of the printer driver Displaying the Setting Screen 2 Display the Advanced Settings dialog box 1 Display the Finishing she...

Page 198: ...4 Click OK For details on the basic printing procedure see Basic Printing Procedure...

Page 199: ...ng Printing Appropriate for Particular Print Data Adjusting the Toner Density Printing with Brightness and Contrast Adjusted Adjusting the Color Matching the Color with the Screen Adjusting the Image...

Page 200: ...creen of the printer driver Displaying the Setting Screen 2 Specify the setting for Objective 1 Display the Quality sheet 2 Select the appropriate mode for the contents of the document Selecting each...

Page 201: ...of the printer driver Displaying the Setting Screen 2 Display the Advanced Settings dialog box 1 Display the Quality sheet 2 Click Advanced Settings 3 Display the Toner Density Details dialog box 1 S...

Page 202: ...djust the toner density of each color for each density range Adjusting the Toner Density of Each Color for Each Density Range 2 Click OK Then the Advanced Settings dialog box reappears 5 Click OK Then...

Page 203: ...sheet of the colors that you want to adjust 2 Adjust the density by dragging the slider of each density range horizontally 3 Click OK Then the Toner Density Details dialog box reappears Adjusting exam...

Page 204: ...Low...

Page 205: ...n 2 Display the Color Settings dialog box 1 Display the Quality sheet 2 Select the Manual Color Settings check box 3 Click Color Settings 3 Adjust the brightness and contrast 1 Display the Color Adjus...

Page 206: ...4 Click OK Then the Quality sheet reappears 5 Click OK For details on the basic printing procedure see Basic Printing Procedure...

Page 207: ...ve changed and the data is not printed in the correct colors specified colors Adjusting Color Calibration 1 Display the setting screen of the printer driver Displaying the Setting Screen 2 Display the...

Page 208: ...around the Adjustment Grid the color is deepened by one increment Click any desired color on the Adjustment Grid Preview Image is moved to the position you clicked Drag Preview Image onto the desired...

Page 209: ...e closely match the color you see on the screen You can also correct the colors by adjusting brightness without performing matching 1 Display the setting screen of the printer driver Displaying the Se...

Page 210: ...ge data Use this option when the printout result is brighter than the original image or when you want to change the brightness of the image Using the Matching Function to Correct Color 1 Specify the s...

Page 211: ...k OK For details on the basic printing procedure see Basic Printing Procedure Correcting Color by Adjusting Brightness Gamma Adjustment 1 Specify the setting for Matching Mode 1 Display the Matching s...

Page 212: ...each time you print by changing the default values for Page Layout Saving Frequently Used Printing Preferences Adding Editing Deleting a Profile You can save frequently used multiple printing prefere...

Page 213: ...e printing preferences in the Page Setup Finishing Paper Source and Quality sheets The settings changed here become the default values For more details on the settings see Help How to Use Help IMPORTA...

Page 214: ...changed 4 Confirm the settings then click OK The printer folder reappears...

Page 215: ...n the settings see Help How to Use Help IMPORTANT The setting options that are not adding to a Profile The settings for the following options are not added to a Profile Sheet Dialog Box Option Quality...

Page 216: ...g box You can check the current printer driver settings 5 Click OK to register the Profile The setting screen of the printer driver reappears Make sure that the name of the added Profile is in Profile...

Page 217: ...r more details on the settings see Help How to Use Help 4 Click OK The setting screen of the printer driver reappears Deleting an Added Profile 1 Display the setting screen of the printer driver Displ...

Page 218: ...file you want to delete 2 Click Delete You cannot delete the default Profiles or a Profile which is being selected in the setting screen of the printer driver 3 Click Yes 4 Click OK The setting screen...

Page 219: ...If you cannot select a Profile Profiles Cannot Be Selected or Edited NOTE When selecting Default Settings Reset all the settings to the default values other than the following options Sheet Dialog Bo...

Page 220: ...or the Printer Checking the IP Address of the Printer Checking the MAC Address of the Printer Checking the Wireless LAN Information LBP7110Cw Only Configuring and Changing the Port If You Use the Prin...

Page 221: ...in the Print Server Environment About the print server environment If you set one of the computers on a network as the print server you can manage the printer efficiently as follows You can manage the...

Page 222: ...cking the Wireless LAN Information LBP7110Cw Only Checking the MAC Address of the Printer Configuring and Changing the Port Changing the Port Configuration NOTE When installing the printer driver It i...

Page 223: ...If you do not know which port you are using see Basic Operations Various Information for Windows...

Page 224: ...a wired LAN connection For use in an office consult your network administrator Switching Between Wireless LAN and Wired LAN for the Connection LBP7110Cw Only Specifying the Connection Settings Setting...

Page 225: ...ter This may result in malfunction Switching from Wireless LAN to Wired LAN Perform the following procedure 1 If the printer driver is installed uninstall it Uninstalling the Printer Driver 2 Using Ea...

Page 226: ...n Before specifying the settings see Connecting the Printer and Computer The setting procedure varies depending on your environment Follow the instructions on the screen to specify the settings If you...

Page 227: ...gs and install the printer driver using Easy Installation as a series of operations The e Manual is also installed simultaneously Easy Installation Windows Vista 7 and Server 2008 1 Make sure that the...

Page 228: ...ddress or name of the printer 1 Select Autodetect or TCP IP Device 2 Enter the IP address or name of the printer in Hostname or IP address The DNS name to be registered on the DNS server up to 78 char...

Page 229: ...rious Information for Windows or ask your network administrator If the printer is not detected Follow the on screen instructions and search again for the printer or see Basic Operations Various Inform...

Page 230: ...sh 32bit Driver For a 64 bit operating system Open the folders in the supplied CD ROM English x64 Driver If you are not sure whether you are using a 32 bit operating system or 64 bit operating system...

Page 231: ...hen Set as the default printer is displayed select whether or not to use the printer as the default printer Windows Vista and Server 2008 2 Click Next The installation starts Wait until the following...

Page 232: ...are the printer specify Share Name Location or Comment as needed 2 Click Next 16 Click Finish If you want to print a test page click Print a test page When Set as the default printer is displayed sele...

Page 233: ...er driver should be changed Configuring and Changing the Port Windows XP and Server 2003 1 Make sure that the printer and computer are connected properly and the printer is turned ON Connecting the Pr...

Page 234: ...1 Select Local printer attached to this computer 2 Clear the Automatically detect and install my Plug and Play printer check box 3 Click Next 7 Create a port 1 Select Create a new port 2 Select Standa...

Page 235: ...value to be entered in Printer Name or IP Address The value to be entered varies depending on how the IP address of the printer was set For more details see Basic Operations Various Information for Wi...

Page 236: ...n click Browse If CD ROM Setup appears click Exit 13 Open the folder in which the printer driver is included For a 32 bit operating system Open the folders in the supplied CD ROM English 32bit Driver...

Page 237: ...k Open 15 Click OK 16 Click Next 17 Specify the printer name 1 Enter a new name if you want to change the printer name When the message Do you want to use this printer as the default printer appears s...

Page 238: ...rint server environment see If You Use the Printer in the Print Server Environment Perform the following procedure 1 Select Share name and enter a name for the shared printer 2 Click Next 3 The window...

Page 239: ...f you want to change the network settings for the printer see Changing the Network Settings for the Printer NOTE If you changed the IP address after installing the printer driver When you install the...

Page 240: ...N Communication Mode and Transmission Speed NOTE When setting the items for the printer management such as setting the manager password Managing the Printer When setting the items for security such as...

Page 241: ...ion Protocol Settings 1 Start the Remote UI and then log in as Management Mode Starting the Remote UI 2 Click Settings Registration 3 Display the TCP IP Settings page 1 Select Network Settings 2 Click...

Page 242: ...4 Configure the protocol settings The setting procedure varies depending on the settings See the appropriate procedure according to settings IPv4 Settings IPv6 Settings Other Protocol Settings...

Page 243: ...ging the Port or consult your network administrator and specify either of the following settings Specifying the DNS Dynamic Update function Specifying the settings so that the same IP address is alway...

Page 244: ...ic DNS server is being used When using the DNS Dynamic Update function You need to set the IP address host name and domain name of the DNS server For details on the procedure for setting a port when u...

Page 245: ...IP Settings page the procedure before Step 1 see Configuring the Protocol Settings 1 Click Edit in IPv4 Settings 2 Set the IP address When obtaining the IP address automatically Use DHCP BOOTP RARP o...

Page 246: ...y When setting the IP address manually Allows you to directly set the IP address manually Select Protocol Select Off Auto IP IP Address Enter the IP address of the printer Subnet Mask Enter the subnet...

Page 247: ...ic Update To use the DNS Dynamic Update function select the check box DNS Dynamic Update Time Specify the interval at which to perform the dynamic update 4 Specify the mDNS Proceed to Step 5 when not...

Page 248: ...ic Update To dynamically update the obtained host name select the check box 6 Click OK 7 Restart the printer Turn the printer OFF make sure that the Main Power indicator is off wait for 10 seconds or...

Page 249: ......

Page 250: ...s after specifying the IPv4 settings For details on the procedure before selecting the settings the procedure before Step 1 see Configuring the Protocol Settings 1 Click Edit in IPv6 Settings 2 Select...

Page 251: ...eless address select the check box 4 Specify the manual address Proceed to Step 5 when not using a manual address Manual Address To use a manual address select the check box IP Address Enter the IP ad...

Page 252: ...ddress and Default Router Address Addresses that begin with ff multicast address 1 loopback address 5 Specify DHCPv6 Proceed to Step 6 when not using DHCPv6 Use DHCPv6 To use DHCPv6 select the check b...

Page 253: ...inter belongs You can enter up to 47 single byte alphanumeric characters Input Example example com DNS Dynamic Update To use the DNS Dynamic Update function select the check box Register Manual Addres...

Page 254: ...check box mDNS Name Enter the mDNS name when not selecting the Use IPv4 name for mDNS check box 8 Click OK 9 Restart the printer Turn the printer OFF make sure that the Main Power indicator is off wa...

Page 255: ......

Page 256: ...s see Setting the SSL Encrypted Communication Function 1 Click Edit for the option you want to specify 2 Specify each setting WINS Configuration LPD Print Settings NetBIOS Settings RAW Print Settings...

Page 257: ...of devices and the computer It references the scope ID regardless of the WINS resolution setting Leave Scope ID blank when not specifying the scope ID on computers of your network environment To regi...

Page 258: ...ions NetBIOS Settings 1 Specify the settings for NetBIOS 2 Click OK NetBIOS Name Enter the NetBIOS name of the printer Workgroup Name Enter the workgroup to which the printer belongs Proceed to Step 3...

Page 259: ...th a network connection use MFNP Port or Standard TCP IP Port to perform printing 1 Specify the settings for WSD 2 Click OK Use WSD Printing To use WSD printing select the check box Use WSD Browsing T...

Page 260: ...gs 2 Click OK Respond to Discovery To allow a response to multicast discovery select the check box Scope Name Enter the scope name to be used when searching for certain devices from utility software b...

Page 261: ...ry Enter the WSD multicast discovery port number Multicast Discovery Enter the multicast discovery SLP port number Proceed to Step 3 if you do not specify the settings for the other options MTU Size S...

Page 262: ...the NTP server If you have not specified the DNS settings enter the IP address of the NTP server Polling Interval Specify the interval at which to request the time information from the NTP server If...

Page 263: ...fully communicate with the NTP server Error Unable to communicate with the NTP server due to incorrect setting or communication error Proceed to Step 3 if you do not specify the settings for the other...

Page 264: ...cating with the computer 1 Start the Remote UI and then log in as Management Mode Starting the Remote UI 2 Click Settings Registration 3 Display the Dedicated Port Settings page 1 Select Network Setti...

Page 265: ...4 Click Edit 5 Specify the dedicated port settings 1 Specify the dedicated port settings 2 Click OK...

Page 266: ...he printer information cannot be obtained when you use the printer driver or Printer Status Window with a network connection 6 Restart the printer Turn the printer OFF make sure that the Main Power in...

Page 267: ...after connecting the two devices due to the spanning tree process between the devices In this case you must have the printer waiting to start the network connection For details on the spanning tree pr...

Page 268: ...4 Click Edit 5 Specify the waiting time until connected to the network 1 Specify the waiting time 2 Click OK...

Page 269: ...urned ON to when the printer is connected to the network 6 Restart the printer Turn the printer OFF make sure that the Main Power indicator is off wait for 10 seconds or longer and then turn it ON aga...

Page 270: ...wired LAN 1 Start the Remote UI and then log in as Management Mode Starting the Remote UI 2 Click Settings Registration 3 Display the Ethernet Driver Settings page 1 Select Network Settings 2 Click Et...

Page 271: ...4 Click Edit 5 Specify the communication mode and transmission speed Ethernet type of wired LAN 1 Specify the Ethernet driver settings 2 Click OK...

Page 272: ...ding and receiving are alternated and are not performed at the same time Full Duplex Sending and receiving are performed at the same time Ethernet Type Select the transmission speed that corresponds t...

Page 273: ...to automatically obtain the IP address using DHCP or the Auto IP function Checking and configuring the subnet Use the following procedure to make sure that the computer and printer are on the same su...

Page 274: ...ecking with the following page When checking the MAC address of the wired LAN Settings Registration Network Settings Ethernet Driver Settings page When checking the MAC address of the wireless LAN LBP...

Page 275: ...int from the Printer Status Window Checking the Printer Settings Printing the User Data List using the Go key on the printer Printing the User Data List 1 Start the Remote UI and then log in as Manage...

Page 276: ...ection status signal strength of the wireless LAN Latest Error Information Displays the latest error information when the wireless LAN connection fails Channel Displays the wireless LAN channel that i...

Page 277: ...WPA WPA2 PSK Settings Displays the WPA WPA2 PSK setting WEP Settings Displays the WEP setting...

Page 278: ...ee Changing the Port Configuration 1 Open the printer folder Basic Operations Various Information for Windows 2 Right click the icon for this printer and then select Printer properties or Properties f...

Page 279: ...es not appear if you install the printer driver using a method other than Easy Installation You cannot specify MFNP Port Standard TCP IP Port TCP IP Port that is standard with Windows If the IP addres...

Page 280: ...ddress or MAC address of the printer see Checking the IP Address of the Printer or Checking the MAC Address of the Printer 2 Click Next 3 Click Add 4 Click Finish 5 Proceed to Step 6 When configuring...

Page 281: ...Printer Name or IP Address The value to be entered varies depending on how the IP address of the printer was set For more details see Basic Operations Various Information for Windows or ask your netwo...

Page 282: ...6 Click Close 7 Click Apply 8 Click OK NOTE...

Page 283: ...hen changing the port configuration printing protocol Changing the Port Configuration When deleting an unnecessary port Select the port you want to delete on the Ports sheet and then click Delete Port...

Page 284: ...sic Operations Various Information for Windows 2 Right click the icon for this printer and then select Printer properties or Properties from the pop up menu 3 Perform the following procedure 1 Display...

Page 285: ...printing protocol RAW or LPR Raw Settings Enter the port number for RAW configured on the printer in Port Number LPR Settings Enter lp in Queue Name NOTE About printing protocols RAW RAW printing Pri...

Page 286: ......

Page 287: ...1 Install the printer driver Installing the Printer Driver If the printer driver is already installed you do not need to install it You can connect the printer and the print server via USB or the net...

Page 288: ...ent computer on which any of the following 32 bit operating systems is running is not supported due to the Windows restriction Windows XP on which no service pack or SP1 is installed Windows Server 20...

Page 289: ...d then select Sharing from the pop up menu 1 Right click the icon for this printer and then select Printer properties from the pop up menu 2 Display the Sharing sheet 3 Perform the following procedure...

Page 290: ...en click Additional Drivers If CD ROM Setup appears click Exit NOTE When updating an additional driver replacement driver Perform the following procedure 1 Uninstall the printer driver on the print se...

Page 291: ...ta 7 and Server 2008 Select the check box for x86 in the Processor column If you are not sure whether you are using a 32 bit operating system or 64 bit operating system Windows Vista 7 and Server 2008...

Page 292: ...he additional driver Wait a moment until the Sharing sheet automatically reappears It may take a long time to install the additional driver If the User Account Control dialog box appears Click Yes 10...

Page 293: ...r sharing settings Clear it using the following procedure Select Do not share this printer in the Sharing sheet Clear the Share this printer check box in the Sharing sheet If Change sharing options ap...

Page 294: ...P WKH 6WDUW PHQX VHOHFW RQWURO 3DQHO DQG WKHQ FOLFN 9LHZ QHWZRUN VWDWXV DQG WDVNV KDQJH DGDSWHU VHWWLQJV URP WKH 6WDUW PHQX VHOHFW RQWURO 3DQHO 1HWZRUN RQQHFWLRQV RFDO UHD RQQHFWLRQ From the Start men...

Page 295: ...s selected If the check box is not selected select it 2 Click OK NOTE If you are using Windows XP You cannot configure the print server with the operating system default settings the settings immediat...

Page 296: ...the printer driver Installing from the Printer Folder Installing from Windows Explorer NOTE Precautions when downloading and installing the printer driver If a 64 bit operating system is running on t...

Page 297: ...to your operating system Windows Vista 7 and Server 2008 Windows XP and Server 2003 Windows Vista 7 and Server 2008 1 Turn the computer on and then log on to Windows 2 Open the printer folder Basic O...

Page 298: ...5 Click The printer that I want isn t listed 6 Perform the following procedure 1 Select Select a shared printer by name 2 Click Next 7 Select a shared printer...

Page 299: ...th as the print server name the computer name of the print server the printer name 8 Click Install driver If the User Account Control dialog box appears Click Yes or Continue 9 Click Next When Set as...

Page 300: ...select whether or not to use the printer as the default printer Windows 7 and Server 2008 R2 Windows XP and Server 2003 1 Turn the computer on and then log on to Windows 2 Open the printer folder Basi...

Page 301: ...4 Click Next 5 Select a printer type 1 Select A network printer or a printer attached to another computer 2 Click Next 6 Perform the following procedure 1 Select Connect to this printer 2 Click Next...

Page 302: ...ions in the message NOTE Specifying the network path directly Specify the network path as the print server name the computer name of the print server the printer name 8 When the following screen appea...

Page 303: ...9 Click Finish...

Page 304: ...3URJUDPV FFHVVRULHV LQGRZV SORUHU 3 Perform the following procedure 1 Select the print server from My Network Places or Network 2 Double click the shared printer icon or drag and drop the icon into th...

Page 305: ...ter Settings Printing the User Data List Specifying the System Manager Information Specifying the Device Name and Installation Location Specifying the Time Zone and Daylight Saving Time Settings of th...

Page 306: ...anaged Can be managed partly Management Item Printer Status Window Remote UI MF LBP Network Setup Tool Managing Print Jobs Checking the Printer Settings Specifying the System Manager Information Speci...

Page 307: ...ns such as checking the current printer status or job logs and specifying various network settings in the Remote UI Central management of all the printer settings with the manager password PIN Only th...

Page 308: ...UI see Attention Remote UI Starting the Remote UI from the Printer Status Window 1 Click in the Windows task tray and then select the printer name 2 Click Remote UI If you cannot click Remote UI Check...

Page 309: ...ser You can check the printer status manage print jobs and so on Starting the Remote UI Directly from a Web Browser 1 Start the Web browser 2 Enter http the IP address of the printer in the address fi...

Page 310: ...login mode 2 Click Log In Management Mode Select this mode when logging in as manager You can perform all operations and specify all settings of the Remote UI System Manager PIN When selecting Managem...

Page 311: ...the network connection settings Specifying the Connection Settings 3 Create the key and certificate again and specify the SSL settings using the Remote UI Specifying Keys and Certificates CA Certifica...

Page 312: ...emaining toner 4 Displays the support link specified with Device Information Displaying or Changing the Support Link 5 Logs out and displays the top page login screen of the Remote UI 6 Creates an e m...

Page 313: ...occurs Device Features page Displays information such as the maximum print speed of the printer A4 or Letter Device Information page Displays information related to the printer such as the printer na...

Page 314: ...rint and Specify Settings Specifying Keys and Certificates CA Certificates Network Settings page Displays changes the information about the network settings such as the protocol settings Changing the...

Page 315: ...ded If you logged in as Management Mode you can change the link settings Displaying the Support Link 1 Start the Remote UI and then log in Starting the Remote UI 2 Click a specified link from Support...

Page 316: ...2 Click Settings Registration 3 Display the Edit System Settings page 1 Select System Settings 2 Click Edit 4 Change the link 1 Enter the URL of the link in Support Link in Device Information...

Page 317: ...2 Click OK...

Page 318: ...layed language of the Remote UI 1 Start the Remote UI and then log in as Management Mode Starting the Remote UI 2 Click Settings Registration 3 Display the Edit Display Settings page 1 Select Display...

Page 319: ...4 Change the display language 1 Select a display language 2 Click OK...

Page 320: ...ROM without installing it Directly Starting the MF LBP Network Setup Tool When you install the printer driver using Easy Installation MF LBP Network Setup Tool starts automatically Easy Installation S...

Page 321: ...64 Editions Windows Server 2008 32 bit or 64 bit version For details on the latest MF LBP Network Setup Tool see the Canon Web site http www canon com Computer A computer on which any one of the above...

Page 322: ...ve of your computer 3 Click Additional Software Programs If the above screen does not appear Basic Operations Various Information for Windows If the AutoPlay dialog box appears Click Run AUTORUN EXE I...

Page 323: ......

Page 324: ...cel print jobs using a method other than the Remote UI Canceling a Job Checking Canceling the Job Currently Being Printed or Waiting to Be Printed 1 Start the Remote UI and then log in Starting the Re...

Page 325: ...lick Cancel for the job you want to cancel If you cannot cancel a job You cannot cancel the job whose pages are in the process of printing Checking Print Logs 1 Start the Remote UI and then log in Sta...

Page 326: ...Click Status Monitor Cancel 3 Select Job History NOTE Print logs Up to 50 jobs can be displayed When the number of jobs exceeds 50 the print logs are automatically deleted starting from the oldest on...

Page 327: ...g the Remote UI Starting the Remote UI logging in as Management Mode and checking with the Settings Registration Network Settings page 1 Load A4 paper in the paper drawer Loading Paper 2 Click in the...

Page 328: ...t printed Printing Cannot Be Performed USB Connection Printing Cannot Be Performed Wired LAN Connection Printing Cannot Be Performed Wireless LAN Connection LBP7110Cw Only Printing Cannot Be Performed...

Page 329: ...o be printed on A4 paper Be sure to use A4 paper 1 Load A4 paper in the paper drawer Loading Paper 2 Check that the indicators on the printer are as follows The Job indicator is off The Ready indicato...

Page 330: ...nformation of the printer 1 Start the Remote UI and then log in as Management Mode Starting the Remote UI 2 Click Settings Registration 3 Display the Edit System Settings page 1 Select System Settings...

Page 331: ...a PIN select the check box PIN Enter a new desired PIN Confirm To confirm the PIN enter the PIN again System Manager Enter the name of the system manager Contact Information Enter the contact informat...

Page 332: ...u can set up to a 7 digit number If you enter less than 7 digits Example RX HQWHU LV VHW If you enter a number beginning with 0 Example RX HQWHU RU LV VHW You cannot register a PIN consisting of a ser...

Page 333: ...on and so on 1 Start the Remote UI and then log in as Management Mode Starting the Remote UI 2 Click Settings Registration 3 Display the Edit System Settings page 1 Select System Settings 2 Click Edit...

Page 334: ...allation location and so on 2 Click OK Device Name Enter the printer name Location Enter the installation location of the printer Support Link Enter the URL of the link of the support link For details...

Page 335: ...p to 12 hours from the Coordinated Universal Time UTC A time zone is a region throughout which the standard time is the same 1 Start the Remote UI and then log in as Management Mode Starting the Remot...

Page 336: ...ing time 2 Click OK Time Zone Settings Select the time zone of the region where the printer is being used For the time zone select the time difference from the Coordinated Universal Time UTC Use Dayli...

Page 337: ...nd initialize the system settings all at once Initializing Using the Reset Button You can initialize the system settings all at once using the reset button on the printer IMPORTANT Precautions when in...

Page 338: ...Information Device Information Security Settings Network Settings 1 Start the Remote UI and then log in as Management Mode Starting the Remote UI 2 Click Settings Registration 3 Display the Initializ...

Page 339: ...4 Initialize the system settings 1 Select the setting information to initialize 2 Click Initialize 5 Clicking OK initializes the selected setting information...

Page 340: ...ter initializing the network settings Turn the printer OFF make sure that the Main Power indicator is off wait for 10 seconds or longer and then turn it ON again After the printer is restarted the ini...

Page 341: ...ngs Network Settings 1 System Manager is not initialized 2 Device Name and Location are not initialized 1 Turn the printer OFF Check that the Main Power indicator is off 2 Turning ON the printer while...

Page 342: ...cifying Keys and Certificates CA Certificates Creating Keys and Certificates Installing Keys and Certificates CA Certificates Checking Keys and Certificates CA Certificates Deleting Keys and Certifica...

Page 343: ...dresses NOTE If restricted users try to print The message Network Communication Error appears in the Printer Status Window Restricting Based on IP Addresses 1 Start the Remote UI and then log in as Ma...

Page 344: ...a reception to the printer based on the specified IPv4 addresses IPv6 Address TX Filter Restricts data transmission from the printer based on the specified IPv6 addresses IPv6 Address RX Filter Restri...

Page 345: ...tion Addresses are available for transmission or reception Allow Allows data transmission to or data reception from IP addresses other than those specified in Exception Addresses Only the IP addresses...

Page 346: ...2 168 0 10 24 Up to 16 addresses or 16 ranges of addresses can be specified for the single address multiple addresses and prefix address combined An address consisting of only zeros cannot be specifie...

Page 347: ...an be specified for the single address multiple addresses and prefix address combined An address consisting of only zeros cannot be specified NOTE When deleting a set IP address 1 Select an IP address...

Page 348: ...s or longer and then turn it ON again After the printer is restarted the settings become effective Restricting Based on MAC Addresses 1 Start the Remote UI and then log in as Management Mode Starting...

Page 349: ...filter which you want to specify TX Filter Restricts data transmission from the printer RX Filter Restricts data reception to the printer The following describes the procedure for the TX Filter screen...

Page 350: ...n Allow Allows data transmission to or data reception from MAC addresses other than those specified in Exception Addresses Only the MAC addresses specified in Exception Addresses are restricted IMPORT...

Page 351: ...ception MAC address for Default Policy 1 Enter the exception MAC address for the policy selected in Default Policy at Step 6 Enter the MAC address without the hyphens for example AABBCCDDEEFF 2 Click...

Page 352: ...K 9 Restart the printer Turn the printer OFF make sure that the Main Power indicator is off wait for 10 seconds or longer and then turn it ON again After the printer is restarted the settings become e...

Page 353: ......

Page 354: ...nter supports SNMPv1 and SNMPv3 with enhanced security and authentication features 1 Start the Remote UI and then log in as Management Mode Starting the Remote UI 2 Click Settings Registration 3 Displ...

Page 355: ...4 Click Edit 5 Configure the SNMPv1 protocol...

Page 356: ...community name You can enter up to 32 single byte alphanumeric characters MIB Access Permission 2 Specifies the MIB access authority of Community Name 2 When both reading and writing are permitted you...

Page 357: ...the MIB access authority When both reading and writing are permitted a user can access the printer from a computer on the network and change settings Read Write Both reading and writing are permitted...

Page 358: ...x and then enter the password to Encryption Password and Confirm You can enter 6 to 16 single byte alphanumeric characters Context Settings Context Name 1 Enter a context name to be used in the SNMPv3...

Page 359: ...estart the printer Turn the printer OFF make sure that the Main Power indicator is off wait for 10 seconds or longer and then turn it ON again After the printer is restarted the settings become effect...

Page 360: ...icates CA Certificates To use the key and certificate CA certificate saved in the computer on the printer When using a key and certificate file CA certificate file to install register in the printer p...

Page 361: ...on the printer 1 Start the Remote UI and then log in as Management Mode Starting the Remote UI 2 Click Settings Registration 3 Display the Key and Certificate Settings page 1 Select Security Settings...

Page 362: ...4 Click Generate Key 5 Specify a key to be created...

Page 363: ...the key algorithm NOTE About the key generation algorithm The algorithm for generating a new key on this printer is RSA About the key length As the key is longer it is more difficult to decrypt the e...

Page 364: ...check box and then enter the Internet country code State Enter the state name You can enter up to 24 single byte alphanumeric characters City Enter the city name You can enter up to 24 single byte alp...

Page 365: ...y default Installing Keys and Certificates Installing CA Certificates Installing Keys and Certificates 1 Start the Remote UI and then log in as Management Mode Starting the Remote UI 2 Click Settings...

Page 366: ...4 Click Register Key and Certificate 5 Click Install...

Page 367: ...les that can be installed Only one file can be installed If a key and certificate file is already installed click Delete and then delete the installed file 6 Click Browse and then select a key and cer...

Page 368: ...8 Click Register 9 Enter the private key password of the installed key and certificate file 1 Enter Key Name and Password Up to 24 alphanumeric characters can be entered 2 Click OK...

Page 369: ...Installing CA Certificates 1 Start the Remote UI and then log in as Management Mode Starting the Remote UI 2 Click Settings Registration 3 Display the CA Certificate Settings page...

Page 370: ...1 Select Security Settings 2 Click CA Certificate Settings 4 Click Register CA Certificate 5 Click Install...

Page 371: ...files that can be installed Only one file can be installed If a CA certificate file is already installed click Delete and then delete the installed file 6 Click Browse and then select a CA certificat...

Page 372: ...8 Click Register...

Page 373: ...eys and Certificates Checking CA Certificates Checking Keys and Certificates 1 Start the Remote UI and then log in as Management Mode Starting the Remote UI 2 Click Settings Registration 3 Display the...

Page 374: ...4 Click Certificate of the key which you want to check 5 If you want to verify the certificate click Certificate Verification...

Page 375: ...ck the verification result and then click Back to Certificate Details Checking CA Certificates 1 Start the Remote UI and then log in as Management Mode Starting the Remote UI 2 Click Settings Registra...

Page 376: ...3 Display the CA Certificate Settings page 1 Select Security Settings 2 Click CA Certificate Settings 4 Click Certificate of the CA certificate which you want to check...

Page 377: ...5 If you want to verify the certificate click Certificate Verification 6 Check the verification result and then click Back to Certificate Details...

Page 378: ......

Page 379: ...he keys and certificates as well as CA certificates to the default state Initializing Keys and Certificates CA Certificates Deleting Keys and Certificates 1 Start the Remote UI and then log in as Mana...

Page 380: ...rtificate which you want to delete Delete is not displayed Delete is not displayed for the keys and certificates which are used in SSL encrypted communication or IEEE 802 1X authentication 5 Click OK...

Page 381: ...icates 1 Start the Remote UI and then log in as Management Mode Starting the Remote UI 2 Click Settings Registration 3 Display the CA Certificate Settings page 1 Select Security Settings 2 Click CA Ce...

Page 382: ...lete for the CA certificate which you want to delete Delete is not displayed Delete is not displayed for the CA certificates which are used in IEEE 802 1X authentication 5 Click OK to delete the CA ce...

Page 383: ...ation Initializing the key and certificate CA certificate sets the following items to off Security Settings Remote UI Settings Use SSL Network Settings IEEE 802 1X Settings Use IEEE 802 1X 1 Start the...

Page 384: ...4 Click Initialize 5 Click OK to initialize the key and certificate CA certificate...

Page 385: ...ing the SSL encrypted communication function Selecting Keys and Certificates Select the key and certificate to be used for the SSL encrypted communication function 1 Start the Remote UI and then log i...

Page 386: ...be used for SSL encrypted communication 1 Select the key to use from a list of registered keys and certificates When you click Certificate you can check and verify detailed information of certificate...

Page 387: ...on function Specify the settings to enable the SSL encrypted communication function to be used for example when you use the remote UI 1 Display the Remote UI Settings page 1 Select Security Settings 2...

Page 388: ...ing the check box disables the SSL encrypted communication function 2 Click OK 4 Restart the printer Turn the printer OFF make sure that the Main Power indicator is off wait for 10 seconds or longer a...

Page 389: ......

Page 390: ...elect Preferences Administrators from the Options menu 3 Select the Notify the Printer of the Time check box NOTE SSL encrypted communication function This function encrypts data between the printer a...

Page 391: ...pecify authentication information for using TLS during IEEE 802 1X authentication IMPORTANT To specify TLS authentication You need to specify keys and their certificates or CA certificates to be used...

Page 392: ...2 Click IEEE 802 1X Settings 4 Click Edit 5 Select the Use IEEE 802 1X check box...

Page 393: ...6 Enter a login name 7 Select the Use TLS check box...

Page 394: ...be used for authentication 1 Select the key to use from a list of registered keys and certificates When you click Certificate you can check and verify detailed information of certificates Checking Key...

Page 395: ...K 11 Restart the printer Turn the printer OFF make sure that the Main Power indicator is off wait for 10 seconds or longer and then turn it ON again After the printer is restarted the settings become...

Page 396: ...specify TTLS PEAP authentication You need to specify the SSL encrypted communication function Setting the SSL Encrypted Communication Function 1 Start the Remote UI and then log in as Management Mode...

Page 397: ...4 Click Edit 5 Select the Use IEEE 802 1X check box...

Page 398: ...6 Enter a login name 7 Select the Use TTLS or Use PEAP check box To use TTLS select the TTLS internal protocol MSCHAPv2 or PAP...

Page 399: ...e User Name Password To use the login name entered to the user name at Step 6 select the Use Login Name as User Name check box 9 Specify the user name and the password 1 Enter a user name and a passwo...

Page 400: ...rd Enter a password You can enter up to 24 single byte alphanumeric characters Confirm To confirm the Password you entered enter it again 10 Click OK 11 Restart the printer Turn the printer OFF make s...

Page 401: ......

Page 402: ...er using the following procedure 1 Display the Printer Status Window Printer Status Window 2 Select Preferences Administrators from the Options menu 3 Select the Notify the Printer of the Time check b...

Page 403: ...Interface Are Off Driver Problems You Cannot Install the Printer Driver You Cannot Uninstall the Printer Driver The Printer Driver Settings Cannot Be Changed Profiles Cannot Be Selected or Edited Pape...

Page 404: ...s connected by USB Printing Cannot Be Performed USB Connection If the printer is connected by wired LAN Printing Cannot Be Performed Wired LAN Connection If the printer is connected by wireless LAN LB...

Page 405: ...Question 2 Check the indicators on the printer unit 1 The Ready indicator is on To Question 3 1 The Ready indicator is blinking The printer is operating Please wait a moment 2 The Toner indicator is...

Page 406: ...Question 4 Unconnected Connect the cable properly Connecting the Printer and Computer Question 4 Can you print a test page in Windows Basic Operations Various Information for Windows Printable There i...

Page 407: ...y USB connection disconnect those unneeded If drivers or software of any other devices USB connection is installed on your computer uninstall those unneeded Connect the USB cable to another USB port o...

Page 408: ...Check the indicators on the printer unit 1 The Ready indicator is on To Question 3 1 The Ready indicator is blinking The printer is operating Please wait a moment 2 The Toner indicator is on or blink...

Page 409: ...nect the power cord or LAN cable of the router or other connected device Turn on the router or other connected device If the computer still cannot connect to the Internet restart all equipment wait fo...

Page 410: ...Operations Various Information for Windows Printable There is no problem with the printer and driver Check the printing preferences in the application Not printable To Question 8 Question 8 Is the IP...

Page 411: ...printer The TCP IP protocol is running The users who can print are not restricted Restricting the Users Who Can Print and Specify Settings If printing does not work proceed to Question 11 Question 11...

Page 412: ...Printable Make resident software invalid including security software Not printable Contact your local authorized Canon dealer...

Page 413: ...e Printer ON Question 2 Check the indicators on the printer unit 1 The Ready indicator is on To Question 3 1 The Ready indicator is blinking The printer is operating Please wait a moment 2 The Toner i...

Page 414: ...connect to the Internet restart all equipment wait for a while and then try connecting to the Internet again For details on the connection method or the procedure for restarting the equipment see the...

Page 415: ...gth Poor signal strength Try the following points Change the channel of the wireless LAN access point If there are multiple wireless LAN access points separate the channels by at least five channels B...

Page 416: ...ss point with the same SSID as that of the computer Question 8 Can you print a test page in Windows Basic Operations Various Information for Windows Printable There is no problem with the printer and...

Page 417: ...Question 11 Check the following points The printer is specified as the default printer The TCP IP protocol is running The users who can print are not restricted Restricting the Users Who Can Print an...

Page 418: ...he indicators on the printer unit 1 The Ready indicator is on To Question 3 1 The Ready indicator is blinking The printer is operating Please wait a moment 2 The Toner indicator is on or blinking Indi...

Page 419: ...essed Question 5 Check the following points The print server is connected to the network properly The additional driver alternate driver is updated properly Configuring the Print Server Printing can b...

Page 420: ...performed the local installation installing the printer driver with the CD ROM KDQJH WKH LQVWDOODWLRQ PHWKRG WR WKH GRZQORDG LQVWDOODWLRQ LQVWDOOLQJ WKH SULQWHU GULYHU ZLWKRXW WKH 520 If you performe...

Page 421: ...ccess the print server or printer Solution Ask your network administrator to change the user permissions Cause 5 Network discovery is not enabled Windows Vista 7 and Server 2008 Solution Perform the f...

Page 422: ...Information for Windows If the icon for this printer is not displayed Ask your network administrator about the problem If the icon for this printer is displayed You can install the printer driver by p...

Page 423: ...own printing resumes If the internal temperature of the printer has not decreased sufficiently the safety mechanism is reactivated and printing is paused temporarily When the inside temperature cools...

Page 424: ...extension cord or multiple power strip Solution Plug the power plug directly into an AC power outlet Cause 3 The breakers have tripped Solution Reset the breakers on the switch board Cause 4 There is...

Page 425: ...switch switch to the side Cause 4 Cannot communicate with the hub Solution 1 Make sure that the power of the hub is on Solution 2 Specify the transmission speed and transfer mode of the printer to ma...

Page 426: ...tion Cannot Be Found The Shared Printer Cannot Be Accessed If the printer driver is not installed properly Perform the following procedure Solution 1 Install the printer driver again Uninstalling the...

Page 427: ...ver was installed Solution Perform the following procedure 1 Turn the printer OFF 2 Disconnect the USB cable 3 Connect the USB cable again 4 While the following screen appears turn the printer ON Caus...

Page 428: ...rinter on the network again If the printer cannot be searched for no devices are displayed even by performing the above procedure Solution 1 Only when IPv4 Devices is selected 1 Click Manual Search by...

Page 429: ...3 Click Next 4 Manually specify the port using Port Printer Information Screen...

Page 430: ...without administrative rights installed the printer driver You may not be able to uninstall the printer driver successfully depending on your operating system In this case uninstall the printer driver...

Page 431: ...creen appears click Exit If the AutoPlay dialog box appears Select Open folder to view files and then proceed to Step 4 2 Display Computer or My Computer Basic Operations Various Information for Windo...

Page 432: ...the folder in which the uninstaller is included For a 32 bit operating system Open the English 32bit MISC folders For a 64 bit operating system Open the English x64 MISC folders 5 Double click UNINST...

Page 433: ...If the User Account Control dialog box appears Click Yes or Continue For details on the uninstallation see Uninstalling the Printer Driver...

Page 434: ...lled again by USB connection Deleting the USB class driver is not supported for Macintosh 1 Check the following The printer and computer are connected using a USB cable The printer is turned ON 2 Disp...

Page 435: ...ndows may not operate properly If the USB class driver is not installed properly USB Printing Support is not displayed Then click to close the Device Manager dialog box If the USB class driver is unde...

Page 436: ...7 Disconnect the USB cable from the computer then restart Windows...

Page 437: ...icon for this printer and then select Printer properties or Properties from the pop up menu 3 Change the setting for Spooling at Host 1 Display the Device Settings sheet 2 Select Auto or Enabled for...

Page 438: ...If you cannot change the setting You need administrative rights to change the setting Contact your system administrator 4 Click OK...

Page 439: ...following procedure 1 Open the printer folder Basic Operations Various Information for Windows 2 Right click the icon for this printer and then select Printer properties or Properties from the pop up...

Page 440: ...If you cannot change the setting You need administrator rights to change the setting Contact your system administrator 4 Click OK...

Page 441: ...rinter Status Window Remove paper jammed in each area in the order of the displayed areas in the message Message and Clearance Procedure Paper Jam Area 1 Clearing Paper Jams Paper Drawer 2 Clearing Pa...

Page 442: ...printed will be deleted Do not remove the jammed paper forcefully Removing jammed paper with excess force may cause the paper to tear or damage the inside of the printer Remove the paper by pulling i...

Page 443: ...the paper by pulling it gently If you cannot remove the paper easily do not try to remove it forcefully but proceed to Step 4 and perform the clearing procedure for another area which is displayed in...

Page 444: ...wer in the printer Next proceed to the clearing procedure for another area which is displayed in the message 1 Clearing Paper Jams Paper Drawer 2 Clearing Paper Jams Output Area 3 Clearing Paper Jams...

Page 445: ...rform a procedure for another area which is displayed in a message Next proceed to the procedure for clearing the paper jam which is occurred in another area displayed in the message 1 Clearing Paper...

Page 446: ...jammed paper 1 Hold both sides of the paper and slowly pull them down 2 Remove the paper by pulling it gently 3 Close the rear cover The paper jam message disappears and the printer is ready to print...

Page 447: ...life Solve the problem following the message displayed in the Printer Status Window 1 A Message Appears in the Printer Status Window 2 Ready Indicator On The printer is ready to print Blinking The pri...

Page 448: ...occurring Remove the paper jam Paper Jams 8 Load Paper Indicator Blinking Paper needs to be checked Such as when paper runs out and when paper cannot be fed properly Load the paper properly Loading P...

Page 449: ...aper Different from Set Paper No Toner Cartridge Toner Cartridge Replacement Recommended Out of Paper Updating Firmware Packing Material on Toner Cartridges Wrong Color Toner Cartridges Service Error...

Page 450: ...sed Solution Connect to the supported printer Incorrect Port Cause The printer is connected to a port which the printer does not support Solution Check the port Basic Operations Various Information fo...

Page 451: ...ndicator is off wait for 10 seconds or longer and then turn it ON again Cause 2 The toner cartridges of the indicated colors are damaged Solution Replace the toner cartridges with new ones Replacing t...

Page 452: ...colors have reached the end of their life Solution Replace the toner cartridges with new ones Replacing the Toner Cartridge You can continue printing as is by clicking Resolve Error however this may r...

Page 453: ...idge You can continue printing as is by clicking Resolve Error however print quality may deteriorate Updating Firmware Cause The firmware is being updated Solution Please wait a moment Wrong Color Ton...

Page 454: ...onds or longer and then turn it ON again If the message does not reappear the printer is ready If the message reappears you need to request service Follow the procedure below and then contact your loc...

Page 455: ...r plug from the AC power outlet 6 Disconnect the cable from the printer Whether the cable is connected or not varies depending on your environment 4 Contact your local authorized Canon dealer to reque...

Page 456: ...ted Transparencies Printing is faint is faded has a problem with color and so on The Overall Print Result Is Faint Printing Is Faded Colored Text Appears Blurred Data Is Not Printed in the Correct Col...

Page 457: ...tput Nothing Is Printed on the Paper The Overall Surface of the Paper Is Printed in a Particular Color The Flap of the Printed Envelope Sticks Multiple Sheets of Paper Are Fed at a Time Printed Bar Co...

Page 458: ...rinter driver 1 Display the Paper Source sheet 2 Set Paper Type to Thin 2 Cause 4 When 60 to 74 g m paper is printed depending on the operating environment especially in a high humidity environment th...

Page 459: ...HQX VHOHFW HYLFH 6HWWLQJV VVLVWLQJ 3ULQW 6HWWLQJV 3 Select the Perform Curl Correction for Output Paper check box Perform Curl Correction for Output Paper is enabled only when Paper Type in the Paper...

Page 460: ...ed depending on the operating environment especially in a high humidity environment the paper may be creased Solution 1 Perform the following procedure in the printer driver 1 Display the Paper Source...

Page 461: ...ronment especially in a high humidity environment Solution Perform the following procedure in the Printer Status Window 1 Display the Printer Status Window Printer Status Window 2 URP WKH 2SWLRQV PHQX...

Page 462: ...8K Perform the following procedure Cause The drum in any of the toner cartridges has deteriorated Solution Replace the toner cartridges with new ones Replacing the Toner Cartridge White Streaks Lines...

Page 463: ...is applied to the gray color portions of the streaks lines in the diagram Solution Perform the following procedure in the printer driver 1 Display the Quality sheet 2 Click Advanced Settings 3 Set Gra...

Page 464: ...procedure in the Printer Status Window 1 Display the Printer Status Window Printer Status Window 2 URP WKH 2SWLRQV PHQX VHOHFW HYLFH 6HWWLQJV VVLVWLQJ 3ULQW 6HWWLQJV 3 Select the Prevent Poor Quality...

Page 465: ...e 2 The toner cartridges are almost out of toner Solution Check the toner cartridges status and replace the toner cartridges of the colors are nearing the end of their life Checking the Consumables St...

Page 466: ...that which can be used with this printer Usable Paper Cause 2 Damp paper is used Solution Replace the paper with new paper in an unopened package Precautions for Paper Cause 3 The drum in any of the t...

Page 467: ...r when Mode 1 is selected select any setting between Mode 2 and Mode 6 When the inside of dense graphics large characters or thick lines are not printed smoothly Select Mode 2 When Mode 2 is selected...

Page 468: ...is selected color unevenness may be found in light areas When strip shaped unevenness appears on images photographic images graphics gradations and shaded patterns Select Mode 5 When Mode 5 is select...

Page 469: ...ith that which can be used with this printer Usable Paper Cause 3 Depending on the paper type toner fixation may deteriorate Solution Perform the following procedure in the printer driver 1 Display th...

Page 470: ...0F40 08Y Perform the following procedure Cause The fixing roller is dirty Solution Clean the fixing roller Cleaning the Fixing Roller of the Printer The Printed Paper Has Smudge Marks...

Page 471: ...he following procedure Cause Appropriate paper is not being used Solution Replace the paper with that which can be used with this printer Usable Paper Smudge Marks of Spattering Toner Appear around th...

Page 472: ...following procedure Cause The size of the print data was larger than that of the loaded paper Solution Check if the size of the print data matches that of the loaded paper The Back of the Printed Pap...

Page 473: ...ting for the toner density is not appropriate Solution Adjust the toner density for printing to a lighter setting Adjusting the Toner Density Cause 2 The printer is exposed to direct sunlight or stron...

Page 474: ...hange the settings the toner may not fix onto paper well and the printing may come out faint Solution 2 Perform the following procedure in the Printer Status Window 1 Display the Printer Status Window...

Page 475: ...ollowing procedure Cause You print transparencies after printing paper other than transparency continuously Solution Wipe and remove the chipped paper with a soft cloth White Dust Is Attached to the P...

Page 476: ...not appropriate Solution Adjust the toner density for printing to a darker setting Adjusting the Toner Density Cause 2 Toner Save is enabled Solution Perform the following procedure in the printer dri...

Page 477: ...the toner cartridges of the colors have reached the end of their life Checking the Consumables Status Replacing the Toner Cartridge Cause 4 When coarse paper is used the toner does not fix onto paper...

Page 478: ...splay the Quality sheet 2 Select the Manual Color Settings check box 3 Click Color Settings 4 Display the Matching sheet 5 Set Matching Method to Perceptual Monitor Color Matched Cause 2 Colored text...

Page 479: ...hecking the Consumables Status Replacing the Toner Cartridge Cause 4 The drum in any of the toner cartridges has deteriorated Solution Replace the toner cartridges with new ones Replacing the Toner Ca...

Page 480: ...depending on the print image Please note that this is due to the structure of laser printers and is not a printer malfunction...

Page 481: ...cation Solution 2 Change the patterns in the application and print again See the instruction manual supplied with the application Cause 2 The colors may appear different depending on the halftone patt...

Page 482: ...Solution 1 Print again without specifying a shaded pattern in the application See the instruction manual supplied with the application Solution 2 Perform the following procedure in the printer driver...

Page 483: ...s check box 3 Click Color Settings 4 Display the Matching sheet 5 Set Matching Method to Perceptual Monitor Color Matched Solution 2 Perform the following procedure in the printer driver 1 Display the...

Page 484: ...printer driver 1 Display the Quality sheet 2 Select the Manual Color Settings check box 3 Click Color Settings 4 Display the Matching sheet 5 Select Gamma Adjustment in Matching Mode 6 Change the gam...

Page 485: ...e in the printer driver 1 Display the Quality sheet 2 Click Advanced Settings 3 Set Gray Compensation to Always or Never Solution 2 Perform the following procedure in the printer driver 1 Display the...

Page 486: ...nts and corrections Adjusting the Toner Density Printing with Brightness and Contrast Adjusted Adjusting the Color Matching the Color with the Screen Adjusting Colors and Correcting Color Mismatches C...

Page 487: ...e printer driver 1 Display the Finishing sheet 2 Click Gutter 3 Set Gutter to 0 Cause 2 Top Margin and Paper Position in the application are not specified properly Solution Specify the settings for To...

Page 488: ...ctor according to the paper size to be used Cause 2 The position of the paper is incorrect Solution Load the paper properly Loading Paper Cause 3 A document with no margins was printed Solution 1 Data...

Page 489: ...with an orientation feed direction that differs from that of the paper drawer or the paper setting for the job A5 paper Statement paper Custom size paper with a width and length height between 127 0...

Page 490: ...lear the Manual Scaling check box If the Manual Scaling check box is cleared the scale factor will be set according to Page Size and Output Size automatically Solution 2 Perform the following procedur...

Page 491: ...ation is not specified properly Solution Specify the settings for Line Spacing or Lines Page in the application so that the data fits in one page and then print again See the instruction manual suppli...

Page 492: ...olution Take the toner cartridges out of the printer pull out the sealing tape and reinstall the toner cartridges Replacing the Toner Cartridge Cause 2 Multiple sheets of paper are fed at a time Solut...

Page 493: ...tion Replace the toner cartridges with new ones Replacing the Toner Cartridge Cause 2 A problem is occurring inside the printer Solution When Service Error is displayed in the Printer Status Window pe...

Page 494: ...envelopes or the operating environment especially in a high humidity environment the flaps may stick to the body of the envelopes Solution Perform the following procedure in the Printer Status Window...

Page 495: ...llowing procedure Cause You are using paper which tends to be fed at a time Solution Fan the paper thoroughly and then align the edges of the stack properly on a hard flat surface Multiple Sheets of P...

Page 496: ...t the color used to print a bar code When printing with a lighter toner density the print may come out faint Solution 2 Perform the following procedure in the printer driver 1 Display the Finishing sh...

Page 497: ...find the location of the serial number Place of purchase Nature of the problem Steps you have taken to solve the problem and the results WARNING If the machine makes strange noises or emits smoke or a...

Page 498: ...0F40 0A1 Points to Make Full Use of the Printer Basic Operations Various Information for Windows For Windows 8 Server 2012 Users For Macintosh Users Appendix...

Page 499: ...cument to Be Printed Watermark Printing Being Particular About the Image Quality or Colors Adjusting the Image Quality or Colors Printer Status Window The Printer Status Window is software allows you...

Page 500: ...the printer management and so on Because the items you can manage differ depending on the software use the software according to your environment or the item you want to manage Introduction of the Ut...

Page 501: ...menu select Computer Setting the IP Address Using the ARP PING Command 1 Make sure that the printer and computer are connected properly and the printer is turned ON Connecting the Printer and Compute...

Page 502: ...to 0 0 0 0 6 Enter exit then press the ENTER key on your keyboard Command Prompt closes Displaying the CD ROM Top Page If the CD ROM top page does not appear even after inserting the CD ROM perform t...

Page 503: ...loss is displayed Ask your network administrator about the problem 4 Enter exit and then press ENTER on the keyboard to exit Command Prompt NOTE Checking and configuring the subnet Enter ipconfig as a...

Page 504: ...operating system 64 bit Operating System is displayed Printing a Test Page in Windows You can check the operations of the printer driver by printing a test page in Windows 1 Load A4 paper in the paper...

Page 505: ...Click Print Test Page to print a test page Checking the Bi directional Communication 1 Open the printer folder Displaying the Printer Folder 2 Right click the icon for this printer and then select Pri...

Page 506: ...eck box If the check box is cleared you cannot perform printing Installing with Plug and Play If you are using Windows 7 or Server 2008 R2 install the printer driver in Easy Installation You may not b...

Page 507: ...update the printer driver or want to install it manually install the printer driver after uninstalling it once Uninstalling the Printer Driver If the following screen appears You may not be able to i...

Page 508: ...7 or Server 2008 If the screen for selecting the printer driver appears Even if which printer driver is selected there is no problem with the installation because the same printer driver is installed...

Page 509: ...O 3URJUDPV FFHVVRULHV LQGRZV SORUHU 2 Check printers in the print server 1 Select the print server from Network or My Network Places 2 Check the icon for this printer is displayed Checking the Port 1...

Page 510: ...address of the printer the value to be entered in Printer Name or IP Address on the following screen displayed in the process of port setting varies If you want to set the IP address to be assigned to...

Page 511: ...nter For more details see If you want to set the IP address to be assigned to the printer manually above If a different IP address is assigned to the printer each time the printer starts specify the D...

Page 512: ...printer with Windows 8 Server 2012 Read this section carefully before using the printer Precautions Use the desktop mode when performing the followings Installing Uninstalling the printer driver Disp...

Page 513: ...d uninstalling the e Manual Installing the e Manual Uninstalling the e Manual Printer Status Window 1 Printer Status Window Parts of the print setting items 2 Useful Printing Functions Changing the de...

Page 514: ...A CANON EUROPA N V Bovenkerkerweg 59 1185 XB Amstelveen The Netherlands CANON CHINA CO LTD 15F Jinbao Building No 89 Jinbao Street Dongcheng District Beijing 100005 PRC CANON SINGAPORE PTE LTD 1 Harb...

Reviews: