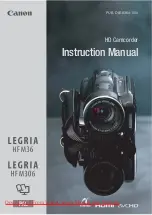
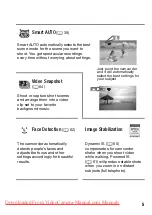
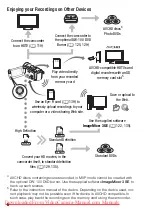
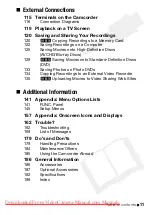
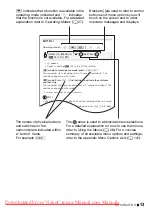
background image

PUB. DIE-0364-000

HD Camcorder

Instruction Manual

Downloaded From VideoCamera-Manual.com Manuals

Summary of Contents for LEGRIA HF M36

Page 1: ...PUB DIE 0364 000 HD Camcorder Instruction Manual Downloaded From VideoCamera Manual com Manuals ...

Page 2: ...LY SOCKET WHEN NOT IN USE To reduce the risk of electric shock do not expose this product to dripping or splashing The Mains plug is used as the disconnect device The Mains plug shall remain readily operable to disconnect the plug in case of an accident While using the compact power adapter do not wrap it or cover it with a piece of cloth and do not place it in confined narrow spaces Heat may buil...

Page 3: ...tries Macintosh and Mac OS are trademarks of Apple Inc registered in the U S and other countries x v Colour and the x v Colour logo are trademarks HDMI the HDMI logo and High Definition Multimedia Interface are trademarks or registered trademarks of HDMI Licensing LLC AVCHD and the AVCHD logo are trademarks of Panasonic Corporation and Sony Corporation Manufactured under license from Dolby Laborat...

Page 4: ...ally available memory cards 0 33 The built in memory almost full Use the memory card slot to keep on recording video without interruption 0 35 1 1 080 lines 3g 1 Full HD 1080 refers to Canon camcorders compliant with high definition video composed of 1 080 vertical pixels scanning lines 2 Video is recorded at this resolution only when the recording mode is set to MXP or FXP mode In other recording...

Page 5: ...und music Face Detection 0 62 Image Stabilization The camcorder automatically detects people s faces and adjusts the focus and other settings accordingly for beautiful results Dynamic IS 0 60 compensates for camcorder shake when you shoot video while walking Powered IS 0 61 will produce stable shots when you zoom in on distant subjects full telephoto Just point the camcorder and it will automatica...

Page 6: ...to the Web Standard Definition Convert your HD movies in the camcorder itself to standard definition files 0 129 135 High Definition Standard DVDs Use the supplied software ImageMixer 3 SE 0 122 135 4 AVCHD discs containing scenes recorded in MXP mode cannot be created with the optional DW 100 DVD burner Use the supplied software ImageMixer 3 SE to back up such scenes 5 Refer to the instruction ma...

Page 7: ...7 Downloaded From VideoCamera Manual com Manuals ...

Page 8: ...creen 26 Basic Operation of the Camcorder 26 Using the Touch Screen 27 Operating Modes 28 Using the Menus 31 First Time Settings 31 Setting the Date and Time 32 Changing the Language 32 Changing the Time Zone 33 Using a Memory Card 33 Memory Cards Compatible for Use with the Camcorder 34 Inserting and Removing a Memory Card 34 b Selecting the Memory for the Recordings 35 b Relay Recording of Movie...

Page 9: ...s 54 Shooting Video in y Manual Mode 55 Selecting the Video Quality Recording Mode 56 Special Scene Recording Programs 59 Cinema Mode Giving a Cinematic Look to your Recordings 60 Advanced Image Stabilization 61 Pre Recording 62 Face Detection 64 Touch Track 64 Video Snapshot 65 Digital Effects 66 Manually Setting the Shutter Speed or Aperture 69 Manual Exposure Adjustment 70 Automatic Gain Contro...

Page 10: ...nes from a Movie 93 Dividing Scenes Photos 95 Basic Playback 95 Viewing Photos 97 Deleting Photos 99 Additional Functions 99 Taking Photos in y Manual Mode 100 Selecting Photo Size and Quality 102 Flash 103 Drive Mode Continuous Shooting and Exposure Bracketing 105 Taking Photos while Recording Movies Simultaneous Recording 106 Light Metering Mode 107 Slideshow 107 Magnifying Photos during Playbac...

Page 11: ... DVD 133 Saving Photos on Photo DVDs 134 Copying Recordings to an External Video Recorder 135 b Uploading Movies to Video Sharing Web Sites Additional Information 141 Appendix Menu Options Lists 141 FUNC Panel 145 Setup Menus 157 Appendix Onscreen Icons and Displays 162 Trouble 162 Troubleshooting 169 List of Messages 179 Do s and Don ts 179 Handling Precautions 184 Maintenance Others 185 Using th...

Page 12: ...n the icon The following terms are used in this manual When not specified as memory card or built in memory the term memory by itself refers to both Scene refers to one movie unit from the point you press the g button to start recording until you press again to pause the recording The photos included in this manual are simulated pictures taken with a still camera Unless indicated otherwise illustr...

Page 13: ...ing off the camcorder Operating modes FUNC 8 MENU 8 8 8 Self Timer 8 A On n 8 a Brackets are used to refer to control buttons and menu options you will touch on the screen and to other onscreen messages and displays indicates that a function is available in the operating mode indicated and indicates that the function is not available For a detailed explanation refer to Operating Modes 0 27 The nam...

Page 14: ...the camcorder XCA 570 Compact Power Adapter incl power cord BP 808 Battery PackW XWL D89 Wireless Controller incl CR2025 lithium button battery STV 250N Stereo Video CableW Yellow Red White plugs XCTC 100 S Component Cable Red Green Blue plugs IFC 300PCU USB CableW XQuick Guide Downloaded From VideoCamera Manual com Manuals ...

Page 15: ...usic Data Disc CD ROM referred in the manual as the Camcorder Supplemental Disc Contains the following components Full version instruction manual of the camcorder this PDF file Photo Applications Software for saving managing and printing photos Music files that can be used as background music during playback The CD ROM includes the instruction manual of the software on PDF file These music files a...

Page 16: ...17 X headphones terminal 0 78 7 BATTERY RELEASE switch 0 20 8 ACCESS indicator 0 38 54 99 9 Strap mount 0 23 A q COMPONENT OUT terminal 0 115 117 A a USB terminal 0 115 118 A s HDMI OUT terminal 0 115 116 A d Grip belt 0 23 A f Instant AF sensor 0 146 A g Stereo microphone 0 77 A h Mini video light 0 74 A j Flash 0 102 Left side view Front view Right side view Downloaded From VideoCamera Manual co...

Page 17: ...POWER button S f ON OFF CHG charge indicator Green ON Orange Standby 0 43 Red Charging 0 19 S g Remote sensor 0 22 S h LCD touch screen 0 24 26 S j POWERED IS button 0 61 WEB button 0 135 S k Battery attachment unit 0 19 S l START STOP button 0 38 54 D q DC IN terminal 0 19 b only LCD panel Top view Back view Downloaded From VideoCamera Manual com Manuals ...

Page 18: ... 48 Press and hold for more than 2 seconds to switch between shooting and playback mode 3 MENU button 0 29 145 4 DISP onscreen display button 0 88 5 SET button 6 B stop button 0 45 7 PHOTO button 0 38 99 8 Zoom buttons 0 42 9 Navigation buttons Z O y A A q A C play pause button 0 45 Bottom view Downloaded From VideoCamera Manual com Manuals ...

Page 19: ...before use For approximate charging times and recording playback times with a fully charged battery pack refer to Charging Times 0 188 and Recording and Playback Times 0 188 1 Connect the power cord to the compact power adapter 2 Plug the power cord into a power outlet 3 Connect the compact power adapter to the camcorder s DC IN terminal 4 Attach the battery pack to the camcorder Press the battery...

Page 20: ...lide the battery pack down and then pull it out IMPORTANT Turn off the camcorder before connecting or disconnecting the com pact power adapter After pressing x to turn off the camcorder important data is updated in the memory Be sure to wait until the green ON OFF CHG indicator goes out We recommend charging the battery pack in temperatures between 10 C and 30 C Outside the temperature range of 0 ...

Page 21: ...ill be charged only when the camcorder is off If remaining battery time is an issue you can power the camcorder using the compact power adapter so the battery pack will not be con sumed Charged battery packs continue to discharge naturally Therefore charge them on the day of use or the day before to ensure a full charge We recommend that you prepare battery packs to last 2 to 3 times longer than y...

Page 22: ... with the side facing up 3 Insert the battery holder To use the wireless controller Point the wireless controller at the camcorder s remote sensor when you press the buttons You can rotate the LCD panel 180 degrees to use the wireless controller from the front of the camcorder NOTES The wireless controller may not work properly when the remote sensor is situated under strong light sources or direc...

Page 23: ...g button with your thumb To remove the grip belt 1 Lift the padded handgrip s flap and detach the strap from the Velcro pad 2 Pull the strap to remove it first from the front bracket on the camcorder then to unthread it from the handgrip and finally to remove it from the rear bracket on the camcorder Downloaded From VideoCamera Manual com Manuals ...

Page 24: ...houlder strap through the strap mount on the grip belt and adjust the length of the strap Adjusting the Position and Brightness of the LCD Screen Rotating the LCD Panel Open the LCD panel 90 degrees You can rotate the panel 90 degrees downward You can rotate the panel 180 degrees toward the lens Rotating the LCD panel 180 degrees can be useful in the following cases To include yourself in the pict...

Page 25: ...urn on the LCD backlight to make it brighter With the camcorder on hold h pressed down for more than 2 seconds Repeat this action to switch the LCD backlight between off normal and on bright NOTES The LCD backlight does not affect the brightness of the recordings Using the bright setting will shorten the effective usage time of the bat tery pack You can further adjust the brightness of the LCD scr...

Page 26: ...e camcorder choose the optimal settings Drag Swipe your finger up and down or left and right across the screen to scroll menus to browse through index screen pages or to adjust slider controls for example to adjust the volume IMPORTANT The camcorder uses a pressure sensitive touch screen Press firmly when using touch operations In the following cases you may not be able to perform touch operations...

Page 27: ...e The playback mode you switch into depends on the initial recording mode You can press S when the camcorder is off to turn it on directly in playback mode Operating mode Mode switch Onscreen icon Operation Dual Shot Record video and take photos easily letting the camcorder take care of all the settings Great for beginners or if you just prefer not to bother with detailed camcorder settings Easy r...

Page 28: ... settings refer to the appendix Menu Options Lists 0 141 The FUNC Panel and Edit Panel In and mode the FUNC panel shows a convenient over view of frequently used shooting functions Touch FUNC to access the FUNC panel and then touch the function you want to set or adjust You may need to drag your finger up and down along the scroll bar to find the control button of the desired function Initial mode...

Page 29: ...u can also press u on the wireless controller to open the setup menus 3 Touch the tab of the desired menu 4 Drag your finger up and down along the scroll bar to bring the setting you want to change into the orange selection bar Menu items not available appear grayed out 5 When the desired menu item is in the orange bar touch inside the frame on the right 6 Touch the desired option and touch a You ...

Page 30: ... menu screens so you can see the options currently selected You can enlarge the font size by setting 6 8 Font Size to A Large but only the icons of the currently selected options will appear on the screen Downloaded From VideoCamera Manual com Manuals ...

Page 31: ... or D M Y to select the date format you prefer 5 Touch 24H to use 24 hour clock or leave this control unchecked to use 12 hour clock AM PM 6 Touch OK to start the clock and close the setup screen NOTES When you do not use the camcorder for about 3 months the built in rechargeable lithium battery may discharge completely and the date and time setting may be lost In such case recharge the built in l...

Page 32: ...zone to match your location The default setting is Paris 1 Open the Time Zone DST screen Only when performing the procedure in a recording mode 2 Touch S to set the home time zone or V to set the time zone of your destination when you are traveling 3 Touch Z or O to set the desired time zone If necessary touch U to adjust for daylight saving time 4 Touch a to close the menu Operating modes FUNC 8 ...

Page 33: ... transfer In case of an issue with an Eye Fi card please check with the card manufacturer Also note that an approval is required to use Eye Fi cards in many countries or regions Without approval use of the card is not permit ted If it is unclear whether the card has been approved for use in the area please check with the card manufacturer Memory card Capacity SD Speed Class Recording movies SD mem...

Page 34: ... is not correctly inserted To remove the memory card Push the memory card once to release it When the memory card springs out pull it all the way out IMPORTANT Memory cards have front and back sides that are not interchangeable Inserting a memory card facing the wrong direction can cause a mal function of the camcorder Be sure to insert the memory card as described in step 3 b Selecting the Memory...

Page 35: ...y Recording of Movies You can activate the relay recording so if the built in memory becomes full while recording movies the recording will continue uninterrupted on the memory card 1 Insert a memory card that contains no video recordings into the camcorder 2 Activate the relay recording The approximate available recording time will now reflect the combined space in the built in memory and on the ...

Page 36: ...ard or the built in memory b only to permanently delete all the recordings it contains b At the time of purchase the built in memory comes pre initial ized and contains music files for use as background music during play back 1 Power the camcorder using the compact power adapter Do not disconnect the power source or turn off the camcorder until the initialization is completed 2 Initialize the memo...

Page 37: ...isc to the card b The music files that come pre installed in the built in memory will be restored after it is initialized Windows users Use the supplied software ImageMixer 3 SE to transfer music files from the supplied Camcorder Supplemental Disc to a memory card connected to the computer For details refer to the ImageMixer 3 SE Software Guide PDF file Mac OS users Use Finder to transfer music fi...

Page 38: ...switch to 5 2 Turn on the camcorder b By default movies and photos are recorded in the built in memory You can select the memory that will be used to record movies and photos 0 34 Please read the IMPORTANT section 0 40 before using an Eye Fi card To record video Press g to begin recording Press g again to pause the recording To take photos 1 Press j halfway Once the focus is automatically adjusted...

Page 39: ...iful shots of people every time tracking the subject even if the person moves Touch Track 0 64 to track other moving subjects keeping them in focus and using the best settings to record them About the Smart AUTO mode When shooting in mode the camcorder will automatically detect certain characteristics of the subject background lighting conditions etc It will then adjust various settings focus expo...

Page 40: ...er s operating mode Smart AUTO icons The icon in parentheses appears under backlight conditions Background color of the icon Bright grey Blue skies light blue Vivid colors green red Sunsets orange Subject People stationary People moving Subjects other than people such as landscapes Close objects Background color of the icon Dark dark blue Subject Spotlight Night scene People stationary People movi...

Page 41: ...ust the brightness of the LCD screen with the 6 8 LCD Bright ness setting When taking photos If the subject is not suitable for autofocus h turns yellow Set the camcorder to mode and adjust the focus manually 0 70 When the subject is too bright Overexp will flash on the screen In such case use the optional FS H37U ND filter Under certain conditions the Smart AUTO icon that appears on the screen ma...

Page 42: ...om to magnify the image up to 18x Using the Zoom Lever or Wireless Controller Move the zoom lever toward Q wide angle to zoom out Move it toward P telephoto to zoom in By default the zoom lever operates at a variable speed press gently for a slow zoom press harder for faster zooms You can also use the zoom buttons on the wireless controller Using the Touch Screen s Zoom Controls 1 Display the zoom...

Page 43: ...n when actually recording except when pre recording 0 61 is activated See Specifications 0 194 for notes about this function when the recording program is set to r Underwater or s Surface Quick Start Function When you close the LCD panel with the camcorder on the camcorder enters the standby mode In standby mode the camcorder consumes only about 1 3 the power used when recording saving energy when...

Page 44: ...over is open or when the battery charge is too low Check that the ON OFF CHG indicator changes to orange About standby mode and auto power off The camcorder will power off automatically if left in standby mode for 10 minutes Press x to turn on the camcorder You can select the length of time until shut off or turn off the Quick Start function altogether with the 68 Power Saving Mode 8 Quick Start S...

Page 45: ...ck Playing Back the Video 1 Press S You can also press and hold B on the wireless controller for more than 2 seconds to switch between shooting and playback mode 2 Open the Original index screen if it is not displayed 3 Look for the scene you want to play back Move the zoom lever toward Q to show 15 scenes per page move it toward P to show 6 scenes per page Operating modes b 8 Original Downloaded ...

Page 46: ...x page D Drag your finger right for the previous index page E Select a different index screen to read different content or from a different memory b only 0 48 F Scene s timeline 0 83 and recording information G Narrow down the scenes shown in the index screen 0 51 While browsing through index pages a scroll bar will appear at the bottom of the screen for a few seconds When you have a large number ...

Page 47: ...kward G Jump to the next scene H Fast playback forward Touch several times to increase the playback speed to approxi mately 5x 15x 60x the normal speed During fast playback touch anywhere on the screen to return to normal playback A Resume playback B Slow playback backward C Slow playback forward Touch several times to increase the playback speed 1 8 1 4 the normal speed During slow playback touch...

Page 48: ...During fast slow playback you may notice some anomalies blocky video artifacts banding etc in the playback picture The speed indicated on the screen is approximate Slow reverse playback will look the same as continuous frame reverse The Index Selection Screen Selecting the Content to Play Back From the index selection screen you can select the content you want to play back original scenes playlist...

Page 49: ...play the photo index screen SD Scenes b Only when the memory card is selected Scenes that were converted to standard definition to upload them to the Web 0 135 or to create standard DVD discs 0 129 Touch SD Scenes and then For Web MPEG 2 or For DVD SD VIDEO as necessary Video Snapshot To display only video snapshot scenes Touch this control button first and then Original or Playlist as neces sary ...

Page 50: ...touch Q to open the Photos index screen A Drag your finger up and down to browse through the scenes recorded in the displayed date B Drag your finger left to go to the next date with record ings C Touch the scene in the front to play it back D Currently selected recording date E Drag your finger right to go to the previous date with recordings F Current scene Total number of scenes recorded on the...

Page 51: ...ch people s faces were detected 1 Open the Original index screen if it is not displayed 2 Narrow down the scenes shown o Faces appears instead of All Scenes To show all scenes again touch y o Faces and then All Scenes Showing Only Scenes Recorded on a Specific Date This will narrow down the scenes shown in the Original or Video Snapshot Original index screen leaving only scenes that were recorded ...

Page 52: ...art Day setting Deleting Scenes You can delete those scenes that you are not interested in keeping Deleting scenes allows you also to free up space on the memory See also Deleting Scenes from the Playlist 0 90 1 Open the index screen that contains the scenes you want to delete Original or Video Snapshot Original index screen To delete all the scenes recorded on a specific date narrow down the scen...

Page 53: ...vered Save copies of important scenes before deleting them 0 122 Observe the following precautions while the ACCESS indicator is on or flashing while scenes are being deleted Do not open the memory card slot cover Do not disconnect the power source or turn off the camcorder Do not change the camcorder s operating mode NOTES Deleting a scene from the Original index screen also deletes that scene fr...

Page 54: ... built in memory You can select the memory that will be used to record movies 0 34 3 Press g to begin recording Press g again to pause the recording IMPORTANT Observe the following precautions while the ACCESS indicator is on or flashing Failing to do so may result in permanent data loss or damage to the memory Do not open the memory card slot cover Do not disconnect the power source or turn off t...

Page 55: ...er recording times The following table gives approximate recording times NOTES Scenes recorded in MXP mode cannot be saved onto AVCHD discs using the optional DW 100 DVD Burner Use the supplied software ImageMixer 3 SE to back up such scenes The camcorder uses a variable bit rate VBR to encode video so the actual recording times will vary depending on the content of the scenes The camcorder retain...

Page 56: ...uilt in memory contains about 75 MB of music files Recording mode MXP1 FXP1 XP SP LP Memory 4 GB Memory card 20 min 30 min 40 min 1 hr 10 min 1 hr 30 min 8 GB Memory card b Built in memory2 40 min 1 hr 1 hr 25 min 2 hr 20 min 3 hr 16 GB Memory card 1 hr 25 min 2 hr 5 min 2 hr 50 min 4 hr 45 min 6 hr 5 min 32 GB Memory card 2 hr 55 min 4 hr 10 min 5 hr 45 min 9 hr 35 min 12 hr 15 min Operating mode...

Page 57: ...n bright ski resorts without the subject being underexposed JBeach To record on a sunny beach without the subject being underexposed KSunset To record sunsets in vibrant colors p Low Light To record in low light situations LSpotlight To record spotlit scenes MFireworks To record fireworks Downloaded From VideoCamera Manual com Manuals ...

Page 58: ...tripod In mode slower shutter speeds are used so blur is more likely to occur Stabilize the camcorder for example by mounting it on a tripod r Underwater s Surface Use these recording programs when making recordings while the camcorder is in the optional WP V2 Waterproof Case The r Underwater recording program is for making recordings underwater When using underwater lighting equipment or making r...

Page 59: ... the accessory In such case move the zoom lever toward P to focus on the subject See Specifications 0 194 for additional notes about the r Underwater and s Surface recording programs Underwater is a unique environment that is ever changing depending on factors such as the weather and water conditions In addition water absorbs red light which causes objects to appear bluer and greener Cinema Mode G...

Page 60: ...ng while walk ing and is more effective as the zoom approaches full wide angle Q Standard Q On Compensates for a lower degree of camcorder shake such as when shooting while remaining sta tionary and is suitable for shooting natural looking scenes Use this setting when recording movies with the optional Wide con verter or Tele converter j Off Use this setting when the camcorder is mounted on a trip...

Page 61: ...ful when it is difficult to predict when to start recording Powered IS When shooting video you can use Powered IS to make the image stabilization even more powerful Powered IS is most effective when you are stationary and zooming in on far subjects using high zoom ratios the more you approach the telephoto end Holding the LCD panel with your left hand will add to the stability of the shot Press an...

Page 62: ...ording function Leaving the camcorder without any operation for 5 minutes Pressing S or z Changing the position of the mode switch Changing the camcorder s operating mode Setting the camcorder to standby mode Changing any of the setup menu settings or changing the following settings in the FUNC panel Rec Programs White Balance AGC Limit Digital Effect or Image Stabilizer Face Detection The camcord...

Page 63: ...ngs for that person NOTES The camcorder may mistakenly detect the faces of non human sub jects In such case turn face detection off In certain cases faces may not be detected correctly Typical examples include Faces extremely small large dark or bright in relation to the overall picture Faces turned to the side at a diagonal or partially hidden Face detection cannot be used when the shutter speed ...

Page 64: ...ncel the tracking NOTES In certain cases Touch Track may not be able to track the subject Typical examples include Subjects extremely small or large in relation to the overall picture Subjects too similar to the background Subjects lacking sufficient contrast Fast moving subjects When shooting indoors with insufficient lighting Video Snapshot Record a series of short scenes or capture short scenes...

Page 65: ...t Length setting When the camcorder stops recording the screen will momentarily turn black as if a camera shutter had released In index screens video snapshot scenes are indicated with the Z mark NOTES Changing the camcorder s operating mode will deactivate the video snapshot mode Digital Effects You can preview the digital effect on the screen The icon of the selected digital effect appears in gr...

Page 66: ...ogram using it you can change functions like the white balance or image effects Select one of the other AE recording programs to control the shutter speed or aperture N Off Select this setting when you do not intend to use the dig ital effects 2 Black White Records movies and photos in black and white 3 Sepia Records movies and photos in sepia tones for an old look 0 Fade Trigger Once 6 Fade Trigg...

Page 67: ...ue or shutter speed is not appropri ate for the recording conditions In such case select a different value During exposure lock the aperture value shutter speed cannot be changed Set the aperture value or shutter speed before manually adjusting the exposure A Programmed AE The camcorder automatically adjusts the aperture and shutter speed to obtain the optimal exposure for the subject B Shutter Pr...

Page 68: ...ts or to isolate a single object With large aperture values every part of the image is clearly in focus Good for landscapes and architectural shots W 1 2000 1 1000 1 500 1 250 1 120 1 50 1 25 1 12 1 6 1 3 1 2 y mode mode A Low light situations Most ordinary conditions Indoor sports Fast moving subjects or shooting from a moving car or train Outdoor sports on sunny days F8 0 F6 7 F5 6 F4 8 F4 0 F3 ...

Page 69: ...E mark P will flash and the exposure will be adjusted automatically so the area you touched will be correctly exposed You have the option to further adjust the exposure manually as necessary You can touch y instead to adjust the exposure manually without activating the Touch AE function The manual adjustment dial appears and the adjustment value is set at 0 Touch y again to return the camcorder to...

Page 70: ...more noticeable video noise You can select the AGC limit to curb the amount of noise by setting the maximum gain value to be used The smaller the AGC limit the picture will be darker but will have less the noise Touch z Automatic to remove the limit for the automatic gain control The AGC limit selected appears on the screen Manual Focus Adjustment Autofocus may not work well on the following subje...

Page 71: ...or W to adjust the focus The center of the screen will be magnified to help you focus more easily You can also turn off this function with the 7 8 Focus Assistance setting The focusing distance displayed will change as you adjust the focus You can change the units used for the distance display with the 6 8 Distance Units setting If you wish to focus on faraway subjects such as mountains or firewor...

Page 72: ... will retain the custom white balance even if you turn it off Options Default value Operating modes Y Automatic The camcorder automatically sets the white bal ance for natural looking colors a Daylight To record outdoors on a bright day b Shade To record in shaded places c Cloudy To record on a cloudy day e Fluorescent To record under warm white cool white or warm white type 3 wavelength fluoresce...

Page 73: ... may not be obtained with e Fluorescent or f Fluorescent H If the color looks unnatural select Y Automatic or g Custom WB Image Effects You can use the image effects to change the color saturation and con trast to record movies and photos with special color effects POINTS TO CHECK Select a recording program other than the Special Scene recording pro grams When you select Z Custom Effect set the cu...

Page 74: ... color saturation X Low Sharpening Records subjects with softened outlines Y Soft Skin Detail Softens the details in the skin tone area for a more complimentary appearance To obtain the best effect use this setting when recording a person in close up Note that areas similar to the skin color may lack in detail Z Custom Effect Allows you to adjust the color depth bright ness contrast and sharpness ...

Page 75: ...n mini video light Attach the optional video light to the mini advanced shoe Refer to Using the Mini Advanced Shoe 0 80 appears when you turn on the optional video light ON or AUTO For details about using the optional video light refer to the instruction manual of the accessory used NOTES When an optional video light is attached to the mini advanced shoe the built in mini video light will be disab...

Page 76: ...ll record the photo after a 10 second countdown The countdown appears on the screen 2 seconds when using the wireless controller NOTES Once the countdown has begun any of the following actions will cancel the self timer Pressing g when recording movies or j fully when recording photos Turning off the camcorder Changing the camcorder s operating mode Setting the camcorder to standby mode Operating ...

Page 77: ...io recording level will appear on the screen Touch z Automatic to return the camcorder to automatic audio recording levels 2 Touch and hold y or A to adjust the audio recording level as necessary As a guideline adjust the audio recording level so that the audio level meter will go to the right of the 12 dB mark yellow area only occasionally 3 Touch a to lock the audio recording level at the curren...

Page 78: ...evel while adjusting the audio recording level or when the microphone attenuator is activated Using Headphones Use headphones for playback or to check the audio level while record ing The headphones are connected to the AV OUT X terminal which is used for both the headphones and the audio video output Before connecting the headphones follow the procedure below to change the function of the termina...

Page 79: ...pear on the screen The noise output in such case may be harmful to your hearing NOTES Use commercially available headphones with a 3 5 mm minijack and a cable no longer than 3 m Even if AV Headphones was set to J Headphones in a playback mode the function of the AV OUT X terminal will return automatically to AV output when you turn off the camcorder FUNC 8 MENU 8 6 8 AV Headphones 8 Headphones 8 T...

Page 80: ... the optional accessory to the mini advanced shoe When a compatible accessory is attached to the mini advanced shoe will appear on the screen NOTES Accessories designed for the Advanced Accessory Shoe cannot be used with this camcorder Look for video accessories bearing this logo to ensure compatibility with the mini advanced shoe Using an External Microphone When recording in very quiet surroundi...

Page 81: ...phone change the microphone s directionality mode with the 7 8 Surround Mic Directionality setting Playing back recordings made with the optional SM V1 Surround Micro phone You can enjoy 5 1ch surround sound playback on HDTVs com patible with 5 1ch surround sound connected to the camcorder using an HDMI cable Audio output from the AV OUT X terminal including headphone output will be converted to 2...

Page 82: ...ails about using the adapter refer to the instruction manual of the RA V1 For details about using the zoom remote controller refer to the instruction manual of the ZR 2000 or ZR 1000 NOTES In mode the only available functions are turning the power on off starting stopping a recording and zoom Operating modes Functions Available with the Zoom Remote Controller Using the ZR 2000 or ZR 1000 turning t...

Page 83: ...scene divided into segments every time the camcorder reg istered a change in the main subject of the scene 1 Open the Original or Playlist index screen 2 Open the scene s Timeline screen The Timeline screen appears The large thumbnail will show the first frame of the scene Below it the timeline ruler shows frames taken from the scene at fixed intervals 3 Touch the desired frame in the timeline rul...

Page 84: ...ine screen when o Faces is selected A Touch twice to return to the index screen B Previous next scene C Drag your finger left along the ruler to display the next 5 frames D Current scene Total number of scenes E Scene s recording mode and length F Recording date and time G Drag your finger right along the ruler to display the previ ous 5 frames H Currently selected interval between frames or o Fac...

Page 85: ...ansfer in advance the music tracks to the mem ory card when it is connected to a computer Windows users For details refer to the ImageMixer 3 SE Software Guide PDF file Mac OS users Use Finder to transfer music files from the MUSIC folder on the supplied Camcorder Supplemental Disc Refer to About the music files 0 195 for the folder structure on the memory card 1 Open the Playlist Video Snapshot O...

Page 86: ...copyrighted songs and music tracks in your video creations remember that music under copyright may not be used without permis sion from the copyright holder except for cases permitted under appli cable laws such as for personal use Make sure to follow applicable laws when using music files A Select the desired music track B Play back the original sound no background music C Delete the music track ...

Page 87: ...usic files from the supplied Camcorder Supplemental Disc to a memory card connected to the computer For details refer to the ImageMixer 3 SE Software Guide PDF file Mac OS users Use Finder to transfer music files from the MUSIC folder on the supplied Camcorder Supplemental Disc to a memory card connected to the computer Refer to About the music files 0 195 for the folder structure of the memory ca...

Page 88: ...meter 2 Touch the screen to display the playback controls Operating modes mode2 All displays on Only data code on All displays off mode2 All displays on Only recording date and time on All displays off About the Data Code With every scene or photo recorded the camcorder keeps a data code date time of recording information about the camera setup etc In mode this information is displayed within the ...

Page 89: ...e individual scenes you want to add to the playlist A checkmark O will appear on scenes selected Touch a selected scene again to remove the checkmark To select all the scenes at once Touch Select All instead of touching individual scenes Remove in advance any checkmarks from scenes you may have selected individually 4 Add the scenes to the playlist b Scenes are added to the playlist on the same me...

Page 90: ...p is not necessary to delete the entire playlist 3 Delete the scenes from the playlist If you selected to delete all the scenes in the playlist touch Stop to interrupt the operation while it is in progress Some scenes will be deleted nevertheless Moving Scenes in the Playlist Move the scenes in the playlist to play them back in the order of your choice 1 Open the Playlist index screen You can touc...

Page 91: ...cene 2 Play back the desired scene 3 Press g to capture the video snapshot scene The camcorder captures the video snapshot scene for about 4 seconds the blue frame serves as a visual progress bar and then enters playback pause mode You can change the length of video snapshot scene you capture with the 8 8 Video Snapshot Length setting 4 Touch B to return to the index screen A Destination icon B Mo...

Page 92: ... second from the end of the scene the video snapshot scene will be captured starting from the beginning of the following scene During the playback of video snapshot scenes captured from a previ ously recorded movie you may notice some anomalies in the picture sound at the point where the playback switches to a new scene Capturing Photos You can capture a single photo or a series of photos The size...

Page 93: ... of use See also Using an Eye Fi card 0 139 NOTES The data code of the photos will reflect the date and time of recording of the original scene Photos captured from a scene with a lot of fast movement may be blurred b Photos will be recorded on the memory selected for recording photos B Photo Sequence Up to 100 photos can be captured at a time The photo sequence capture will stop when the end of t...

Page 94: ...cing reversing frames while dividing the scenes the interval between frames is about 0 5 seconds If the scene cannot be divided at the point where you paused the play back advance reverse a frame and then divide the scene During the playback of a scene that was divided you may notice some anomalies in the picture sound at the point where the scene was cut The following scenes cannot be divided Vid...

Page 95: ... photo shooting refer to Dual Shot Mode 0 38 Basic Playback Viewing Photos 1 Press S 2 Open the Photos index screen if it is not displayed 3 Look for the photo you want to play back Move the zoom lever toward Q to show 15 photos per page move it toward P to show 6 photos per page Operating modes b 8 Photos Downloaded From VideoCamera Manual com Manuals ...

Page 96: ...of photos you can jump eas ily through the photos using the scroll bar 1 Touch the screen to display the playback controls 2 Jump through the photos using the scroll bar A Memory being read B Index screen currently displayed C Drag your finger left for the next index page D Drag your finger right for the previous index page E Select a different index screen to read different content or from a diff...

Page 97: ...corder Images not recorded with this camcorder Images edited on a computer Images whose file names have been changed Deleting Photos You can delete those photos that you are not interested in keeping Deleting a Single Photo 1 In single photo view select the photo you want to delete 2 Touch the screen to display the playback controls 3 Delete the photo 4 Drag your finger left right to select anothe...

Page 98: ...d of touching individual photos Remove in advance any checkmarks from photos you may have selected individually 4 Delete the photos Touch Stop to interrupt the operation while it is in progress Some photos will be deleted nevertheless IMPORTANT Be careful when deleting photos Deleted photos cannot be recovered Protected photos cannot be deleted Edit 8 Delete 8 Yes 8 OK Downloaded From VideoCamera ...

Page 99: ... The ACCESS indicator will flash as the photo is being recorded IMPORTANT Observe the following precautions while the ACCESS indicator is on or flashing Failing to do so may result in permanent data loss Do not open the memory card slot cover Do not disconnect the power source or turn off the camcorder Do not change the camcorder s operating mode When recording photos on an Eye Fi card photos will...

Page 100: ...ring the photo review time the photo will continue to be displayed indefinitely Press j halfway to return to normal shooting mode Selecting Photo Size and Quality Photos are recorded as JPG files As a general rule select a larger photo size for higher quality Select the K 2304x1296 size for photos with an aspect ratio of 16 9 The number displayed on the right corner indicates the approximate numbe...

Page 101: ...card size 10 x 14 8 cm N 640x480 To send photos as e mail attachments or to post on the Web K 2304x1296 H 1920x1080 S 848x480 To print photos with a 16 9 aspect ratio Wide sized photo paper is required Approximate number of photos available on a 1 GB memory card Default value 1 This size is only available for capturing photos from a movie 0 91 2 This size is only available for simultaneous recordi...

Page 102: ...e the optional VFL 2 Video Flash Light as an external flash when its POWER switch is set to n ON The procedure for setting the external flash is the same as for the built in flash Attach the optional VFL 2 Video Flash Light to the mini advanced shoe Refer to Using the Mini Advanced Shoe 0 80 Operating modes U Automatic The flash fires automatically according to the brightness of the subject V Red ...

Page 103: ...be able to focus even if the AF assist lamp is on When the recording program is set to r Underwater or s Surface AF Assist Lamp is automatically set to B Off The practical range of the flash is approx 1 to 2 m The practical range with the VFL 2 attached is approx 1 to 4 m In any case the actual range will depend on the recording conditions The range of the flash decreases in continuous shooting mo...

Page 104: ...ontinuous shooting speed will decrease to approx 1 7 photos second Continuous shooting speed will decrease also when using slow shutter speeds 1 25 or slower Operating modes A Single Records a single photo D AE Bracketing The camcorder records 3 photos using 3 dif ferent exposures dark normal light in 1 2 EV steps allowing you to choose the photo you like the best B Continuous C Hi Speed Cont Capt...

Page 105: ...to capture the photo In mode the size quality of photos taken while recording video simultaneous recording will be determined by the setting selected with this procedure the size quality of photos taken in record pause mode will be determined by the photo size set in mode 0 100 IMPORTANT When recording photos on an Eye Fi card photos will be uploaded automatically if you are within the range of a ...

Page 106: ... Depending on the subject you may want to change the way the light is measured and evaluated POINTS TO CHECK Select a recording program other than the Special Scene recording pro grams Options Default value Operating modes Q Evaluative Appropriate for standard shooting conditions including backlit scenes The camcorder divides the picture into several areas and the light is measured in all of them ...

Page 107: ...s can be magnified up to 5 times R will appear for photos that cannot be enlarged 1 Move the zoom lever toward P The photo is magnified by 2 times and a frame appears indicating the position of the magnified area To further enlarge the photo move the zoom lever toward P To reduce the magnification times move it toward Q 2 Drag your finger across the photo to display the area you want to see enlarg...

Page 108: ...he histogram as a reference to verify the correct exposure of the photo In mode the histogram will be dis played while a photo is reviewed immedi ately after having taken the photo Touch the screen to display the playback controls The histogram and Exif information panel are displayed as well Press h to hide the histogram and Exif information panel The area to the right of the histogram represents...

Page 109: ...e Index Screen 1 Open the Photos index screen 2 Touch a to open the photo selection screen 3 Touch on the individual photos you want to protect A checkmark O will appear on photos selected Touch a selected photo again to remove the checkmark To select all the photos at once Touch Select All instead of touching individual photos Remove in advance any checkmarks from photos you may have selected ind...

Page 110: ... either for shooting video or for taking photos The way to set and use them was already explained in detail so we refer you to the relevant page in the Video section Zoom 0 42 Quick Start 0 43 Recording programs 0 56 66 Face detection 0 62 Touch Track 0 64 Digital effects 0 65 Manual exposure adjustment 0 69 Manual focus adjustment 0 70 White balance 0 72 Image effects 0 73 Mini video light 0 74 S...

Page 111: ...nnection Diagrams 0 118 If the device selection screen appears touch Computer Printer V appears and changes to D IMPORTANT If V continues to flash for more than 1 minute or if D does not appear the camcorder is not correctly connected to the printer In such case disconnect the USB cable and turn off the camcorder and the printer After a short while turn them on again set the camcorder to mode and ...

Page 112: ... connected to the printer and the photo you want to print displayed in single photo view Printing starts When the printer finishes printing the photo the cam corder will return to single photo view Touch Stop 8 Yes to interrupt the printing in progress Drag your finger left right to select another photo to print To change the paper size NOTES Print setting options and the Default paper size vary d...

Page 113: ...B connection Print Orders You can mark in advance photos you want to print from those recorded on the memory card and set the desired number of copies as a print order Later you can easily print out the print orders by inserting the memory card into the SD memory card slot of DPOF compatible print ers or self serviced digital photo kiosks You can set print orders for up to 998 photos Marking Singl...

Page 114: ...tos selected Touch a selected photo again to remove the checkmark To select all the photos at once Touch Select All instead of touching individual photos Remove in advance any checkmarks from photos you may have selected individually 4 Mark the photos with print orders Options NOTES b To set print orders for photos recorded in the built in memory copy the photos to the memory card in advance One C...

Page 115: ...eo terminal is for video only When you use connection B do not forget the audio connections using the AV OUT X terminal 2USB Terminal Access Open the side terminal cover 3HDMI OUT Terminal Access Open the side terminal cover The HDMI OUT terminal offers a high quality digital connection that combines audio and video in a single convenient cable 4AV OUT X Terminal Access Open the LCD panel Sound fr...

Page 116: ...gital connection using a single cable for both video and audio When you connect the camcorder to an HDTV equipped with an HDMI terminal you can enjoy video and audio playback at the highest quality The HDMI OUT terminal on the camcorder is for output only Do not connect it to an HDMI output terminal on an external device as this may damage the camcorder While the camcorder is connected to an HDTV ...

Page 117: ...lity Standard definition Output only Connect to a standard TV or a VCR with audio video input terminals Change the following settings on the camcorder y 8 TV Type according to the TV set widescreen or 4 3 if the TV cannot automatically detect and change the aspect ratio 6 8 AV headphones to H AV White CTC 100 S Component Cable supplied STV 250N Stereo Video Cable supplied Red Green Blue Red Red Wh...

Page 118: ...RT adapter commercially available Connection D USB Type Digital data connection Output only Connect to a computer to save your recordings to the optional DW 100 DVD Burner to create DVD discs from them or to a printer to print out photos STV 250N Stereo Video Cable supplied SCART adapter commercially available Yellow White Red USB Cable supplied Downloaded From VideoCamera Manual com Manuals ...

Page 119: ... Refer to the instruction manual of the connected TV 4 Turn on the camcorder and set it to or mode Play back the movies or photos NOTES To correctly play back movies recorded with x v Colour 0 150 on an HDTV compatible with this standard additional settings may be required on the connected HDTV Refer to the TV s instruction manual We recommend powering the camcorder using the compact power adapter...

Page 120: ...c date narrow down the scenes shown to scenes recorded on that date 0 51 2 Touch a to open the scene selection screen When you copy scenes from the Playlist index screen including the playlist of video snapshot scenes you cannot select individual scenes instead the entire playlist will be copied Skip directly to step 4 3 Touch on the individual scenes you want to copy A checkmark O will appear on ...

Page 121: ...hat you have selected the f tab built in memory 2 Touch a to open the photo selection screen 3 Touch on the individual photos you want to copy A checkmark O will appear on photos selected Touch a selected photo again to remove the checkmark To select all the photos at once Touch Select All instead of touching individual photos Remove in advance any checkmarks from photos you may have selected indi...

Page 122: ...to copy recordings to the memory card If there is not enough space on the memory card as many photos as possible will be copied before stopping the operation Saving Recordings on a Computer Movies recorded with this camcorder are saved in the built in memory b only or on the memory card Because space is limited make sure to save your recordings on a computer on a regular basis Saving Movies With t...

Page 123: ...the computer you also need to select the CameraWindow auto launch setting r Refer to Starting CameraWindow Using the software 1 Power the camcorder using the compact power adapter 2 Set the camcorder to mode in single photo view 3 Connect the camcorder to the computer using the supplied USB cable Connection D Refer to Connection Diagrams 0 118 If the device type selection screen appears touch Comp...

Page 124: ...ws Vista Windows XP and Mac OS X Your cam corder is equipped with the standard Picture Transfer Protocol PTP allowing you to transfer photos JPEG only simply by connecting the camcorder to a computer using the supplied USB cable without having to install the supplied software Photo Applications If you have no intention to use the optional DW 100 DVD Burner you can set 8 8 USB Connection Type to N ...

Page 125: ...inition by creating AVCHD discs using the optional DW 100 DVD Burner Refer to this section along with the relevant sections in the instruction manual of the DW 100 Preparations on the Camcorder 1 Power the camcorder using the compact power adapter 2 Open the Original Playlist or Video Snapshot Original Playlist index screen AVCHD discs created with the optional DW 100 DVD Burner cannot contain sce...

Page 126: ... based on the disc you inserted If you inserted a DVD RW disc that already contains data The disc already contains data will be displayed To overwrite the data erasing the previous content of the disc touch OK 8 Yes 4 Press the start button on the DVD Burner A progress bar will be displayed on the screen After pressing the start button while the disc is being written the operation cannot be cancel...

Page 127: ...ion on handling your discs refer to s Cau tions on handling NOTES If a scene does not fit entirely in one disc it may be divided and con tinue on the next disc When the camcorder contains a large number of scenes to be saved on discs it may take a long time for the connection to the DVD Burner step 2 above to be completed For best performance we recommend limiting the number of scenes to be saved ...

Page 128: ... supplied USB cable Connection D Refer to Connection Diagrams 0 118 and s Connections If the device type selection screen appears touch DVD Burner 5 Insert the disc you want to play back into the DVD Burner Use the OPEN CLOSE button on the DVD Burner to open and close the disc tray After the disc is recognized the disc s content will be displayed in an index screen 6 Select the scene you want to p...

Page 129: ...ted scenes and burn them onto DVDs in your computer Installation See PIXELA Applications Installation Guide Using the software See ImageMixer 3 SE Software Guide PDF file on the Transfer Utili ties CD ROM Even without a computer you can convert your video recordings into standard definition scenes and create DVDs using the optional DW 100 DVD Burner Refer to this section along with the relevant se...

Page 130: ...k To select all the scenes at once Touch Select All instead of touching individual scenes Remove in advance any checkmarks from scenes you may have selected individually 6 Touch Edit 8 Convert HDUSD x DVD to open the HDUSD conversion screen If a copyright notice appears read it carefully and touch OK if you agree touch 5 to change the conversion settings as described below 7 Touch Yes 8 OK Touch B...

Page 131: ...n converting the scenes in the computer so we recommend you convert scenes in the camcorder Connecting to the Computer and Creating DVD Discs 1 Power the camcorder using the compact power adapter 2 Open the For DVD Burning index screen on the memory card 3 Connect the camcorder to the computer using the supplied USB cable Connection D Refer to Connection Diagrams 0 118 If the device type selection...

Page 132: ...VD Burning index screen on the memory card 3 Connect the camcorder to the DW 100 DVD Burner and create the disc The procedure is the same as that for burning AVCHD discs 0 126 To play back standard definition DVDs Standard definition DVDs are created using DVD Video specifications Play back these DVDs using standard DVD players NOTES When the camcorder contains a large number of scenes to be saved...

Page 133: ...e camcorder to the DW 100 DVD Burner and create the disc The procedure is the same as that for burning AVCHD discs 0 126 To play back Photo DVDs Photo DVDs are created using DVD Video specifications Play back these DVDs using standard DVD players If you computer has a DVD drive you can play back the slideshow as a DVD and you can also access individual photos as JPG files NOTES Photo DVDs cannot b...

Page 134: ... output will be in standard definition although the original scenes are in high defi nition Connecting Connect the camcorder to the VCR using Connection C or c Refer to Connection Diagrams 0 117 Recording 1 External device Load a blank cassette or disc and set the device to record pause mode 2 Turn on the camcorder and set it to mode Verify that 6 8 AV Headphones is set to H AV 3 Camcorder Locate ...

Page 135: ...he cam corder and then use the supplied software ImageMixer 3 SE to upload your videos to the Web Installation See PIXELA Applications Installation Guide Using the software See ImageMixer 3 SE Software Guide PDF file on the Transfer Utili ties CD ROM Converting Scenes into Standard Definition 1 Power the camcorder using the compact power adapter 2 Make sure there is a memory card in the camcorder ...

Page 136: ...checkmarks from scenes you may have selected individually 6 Press Z and touch Yes If a copyright notice appears read it carefully and touch OK if you agree Before touching Yes you can touch 5 to change the conversion settings as described below Touch B to interrupt the operation while it is in progress 7 When the conversion is completed a confirmation screen will appear Connect the camcorder to th...

Page 137: ... music 0 85 instead of the original sound When converting scenes in the Playlist All the scenes are merged into one converted scene If the converted scene is too large it will be split into smaller 10 minute long scenes When converting only part of a scene the maximum length of the converted scene will be 10 minutes from the starting playback pause point The playlist cannot be converted when its t...

Page 138: ...computer ImageMixer 3 SE will start up automatically and the startup screen ImageMixer 3 Launcher will appear 4 Click Web upload and continue the operation on the computer following the software s indications See also ImageMixer 3 SE Software Guide PDF file on the Transfer Utilities CD ROM IMPORTANT While the camcorder is connected to the computer do not open the memory card slot cover and do not ...

Page 139: ...mmunication is shown by the Eye Fi icon as follows g grayed out Communication not established g white flashing Connecting g white continuously on Wireless upload on standby g animated Wireless upload in progress i Eye Fi Communication is set to B Off h Wireless upload stopped by the camcorder 0 167 o Error reading from the Eye Fi card 0 166 IMPORTANT Using an Eye Fi Card This product is not guaran...

Page 140: ...nction will be disabled While recording audio with an external microphone the interference caused by wireless communications may result in noise being picked up and recorded with the sound We recommend turning off the wire less communication while recording This menu option will appear only when using an Eye Fi card If the LOCK switch on the Eye Fi card is set to prevent writing you will not be ab...

Page 141: ...es Underlined menu options indicate default values FUNC Panel FUNC Menu FUNC Panel Recording Modes Control Button Setting options Function 4 3 0 MENU Open the menus z z 29 Rec Programs A Programmed AE B Shutter Pri AE C Aperture Pri AE z z 66 D Cine Mode z z 59 F Portrait G Sports q Night Scene I Snow J Beach K Sunset p Low Light L Spotlight M Fireworks r Underwater s Surface z z 56 m White Balanc...

Page 142: ...z 70 Metering Mode Q Evaluative S Center Wt Avg R Spot z 106 Y Video Light A On B Off z z 74 d Pre REC A On B Off z 61 Drive Mode A Single D AE Bracketing B Continuous C Hi Speed Cont z 103 O Digital Effects N Off 2 Black White 3 Sepia 0 Fade Trigger Once 6 Fade Trigger Always 1 Wipe Once 7 Wipe Always z 65 N Off 2 Black White 3 Sepia z Image Stabilizer P Dynamic Q Standard j Off z 60 Image Stabil...

Page 143: ... z z z This Scene from the Timeline screen z z b Convert HDUSD x DVD Selected Scenes z z 129 All Scenes z z z This Scene from the Timeline screen z z Delete Selected Scenes z z 52 90 All Scenes z z z z This Scene from the Timeline screen or playback pause z z z Add to Playlist Selected Scenes All Scenes z z 89 This Scene from the Timeline screen z z Move This Scene from the Timeline screen z 90 Di...

Page 144: ...rmation Edit Panel Mode Control Button Index Screen Single Photo View 0 b Copy PUg Selected Photos All Photos z 121 Delete z 97 Protect z 109 Print Orders z 113 Rotate z 108 Downloaded From VideoCamera Manual com Manuals ...

Page 145: ...matic B Off z 103 Focus Priority U AiAF Frames W Center Frame B Off z Focus Assistance A On B Off z z Face Detection Tracking A On o B Off z z 62 Auto Backlight Correction A On B Off z z 70 Auto Slow Shutter A On B Off z Image Effects U Off V Vivid W Neutral X Low Sharpening Y Soft Skin Detail Z Custom Effect z z 73 Wind Screen O Automatic B Off Z z Microphone Attenuator A On V B Off z Surround Mi...

Page 146: ...us Priority When the focus priority is activated the camcorder records a photo only after the focus has been adjusted automatically You can also select which AF frames to use U AiAF Frames One or more AF frames out of the nine frames avail able are automatically selected and the focus is fixed on them W Center Frame A single focusing frame appears in the center of the screen and the focus is autom...

Page 147: ...me low frequency sounds will be suppressed along with the sound of wind When recording in surroundings unaffected by wind or if you want to record low frequency sounds we recommend setting the wind screen to B Off Z Microphone Attenuator Helps prevent audio distortions due to high audio recording levels Set the microphone attenuator to A On V when the audio recording level 0 77 is set correctly bu...

Page 148: ... On Off Each press of the button will turn the Powered IS function on and off 8 Recording Connections Setup Menu item Setting options 4 3 1 2 0 Self Timer A On n B Off z z 76 Video Snapshot Length i 2 sec j 4 sec l 8 sec z z 64 91 b Rec Media for Movies P built in memory g memory card z 34 Recording Mode h High Quality 24 Mbps i High Quality 17 Mbps j High Quality 12 Mbps l Standard Play 7 Mbps k ...

Page 149: ...Quality Size K 2304x1296 L 2100x1575 M 1600x1200 N 640x480 z 100 E Super Fine F Fine G Normal Photo Capture from Video A Single Photo B Photo Sequence z 92 Photo Capture Quality P Super Fine 1920x1080 Q Fine 1920x1080 R Normal 1920x1080 z 92 Memory Info P built in memory g memory card z z z z x v Colour A On F B Off z Auto Rotate A On B Off z Photo Review Time BOff i 2 sec j 4 sec k 6 sec l 8 sec ...

Page 150: ...on its side will be rotated automatically and displayed correctly during playback Photo Review Time Selects the time to display a photo after it has been recorded The review time can only be set when the drive mode is set to A Single Photo Numbering Select the photo numbering method to be used on a new memory card Photos are automatically assigned consecutive num bers from 0101 to 9900 and stored ...

Page 151: ...me when the scene was recorded L Camera Data Displays the aperture f stop and shutter speed used when recording the scene TV Type When you connect the camcorder to a TV using the supplied STV 250N Stereo Video Cable select the setting according to the type of TV in order to display the picture in full and in the correct aspect ratio F Normal TV TV sets with 4 3 aspect ratio G Wide TV TV sets with ...

Page 152: ...ortuguês Suomi Svenska Türkçe z z z z 32 LCD Brightness z z z z LCD Screen Dimmer A On B Off z z z z AV Headphones H AV J Headphones z z z 78 Volume Speaker r z z 47 78 Headphone e z z z Notification Sounds N High Volume M Low Volume B Off z z z z Wireless Remote Control A On B Off L z z z z Power Saving Mode Auto Power Off A On B Off z z z z Quick Start Standby B Off f 10 min g 20 min h 30 min k ...

Page 153: ...S home time zone or V travel time zone Paris list of world time zones U DST adjustment z z z z 32 Date Time Date Time z z z z 31 Date Format Y M D M D Y D M Y Y year M month D day 24H Toggle On x 24 hour clock or Off w 12 hour clock Calendar Start Day Saturday Sunday Monday z Battery Info z z z z Control for HDMI 2 A On B Off z z z z HDMI Status z z z z Distance Units m meters n feet z z z z Demo ...

Page 154: ...ressed down for about 2 seconds to restore the LCD screen to its previous brightness setting Dimming the LCD screen does not affect the brightness of your record ings or the brightness of the playback image on a TV When the screen dimmer is set to B Off the LCD screen will return to the brightness level that was in use before the screen was dimmed Notification Sounds A beep will accompany some ope...

Page 155: ...le HDTV using an HDMI cable the video input on the TV will automatically be set to the camcorder s video input Then you can use the up down left right buttons and the OK or SET button on the TV s remote control to play back your recordings Depending on the TV set additional settings may be required on the TV itself to activate the HDMI CEC function Refer to the TV s instruction manual Correct oper...

Page 156: ...corder is powered with the compact power adapter if you leave it turned on without a memory card for more than 5 minutes To cancel the demo mode once it has started press any button or turn off the camcorder Reset All Resets all the camcorder s settings to default values Firmware You can verify the current version of the camcorder s firm ware This menu option is usually unavailable Downloaded From...

Page 157: ...reen zoom controls 0 42 3 Operating mode 0 27 4 In record pause mode Total number of scenes 5 Memory operation 0 161 6 Remaining battery time 0 161 7 Zoom 0 42 8 Recording mode 0 55 9 Control button Start Stop video recording A q Face detection frame 0 62 A a Touch Track frame 0 64 Downloaded From VideoCamera Manual com Manuals ...

Page 158: ...recording 0 61 S s Image stabilizer 0 60 S d PF25 progressive frame rate 0 59 161 S f Remaining recording time g On the memory card f In the built in memory 3 Relay recording 0 35 b only S g x v Colour 0 150 S h Face detection 0 62 S j Photo quality size simultaneous recording 0 105 S k Wind screen off 0 147 S l Microphone attenuator 0 147 D q Audio level indicator 0 77 D a Digital effect 0 65 D s...

Page 159: ...unication 0 139 F f Number of available photos g On the memory card b f In the built in memory F g Photo quality size 0 100 F h Control button Switch to movie recording 0 54 F j AF frame 0 146 F k Focus and exposure lock 0 38 99 F l Camcorder shake warning 0 147 Playing Movies during playback G q Playback control buttons 0 45 G a Scene number G s Data code 0 88 151 G d Volume 0 45 Downloaded From ...

Page 160: ...Photo number 0 150 G k Histogram 0 108 G l Control button Photo jump 0 96 H q Date and time of recording H a Control button Slideshow 0 107 H s Control button Open the Edit panel 0 144 H d Control button Switch to Photos index screen 0 95 H f Manual focus 0 70 H g File size H h Photo size 0 100 H j Shutter speed 0 66 H k Aperture value 0 66 Downloaded From VideoCamera Manual com Manuals ...

Page 161: ...accurately When the camcorder is off press R to display the charge status of a battery pack The Intelligent System will display the charge status as a percentage and the remaining recording time in minutes for 5 seconds If the battery pack is exhausted the battery information may not be displayed S d PF25 progressive frame rate Select the PF25 progressive frame rate 0 59 to give your recordings a ...

Page 162: ...emperature of the battery pack is outside the charging range If the battery pack s tem perature is below 0 C warm it before charging it if it is above 40 C let the battery pack cool down before charging it Charge the battery pack in temperatures between 0 C and 40 C The battery pack is faulty Replace the battery pack Power supply Is the battery charged Is the compact power adapter correctly con ne...

Page 163: ...l start end of record ing This is not a malfunction The camcorder will not focus Autofocus does not work on the subject Focus manually 0 70 The lens or Instant AF sensor is dirty Clean the lens or sensor with a soft lens cleaning cloth 0 184 Never use tissue paper to clean the lens When a subject flits across in front of the lens the image appears slightly bent This is a phenomenon typical of CMOS...

Page 164: ...rded or edited using another device and then trans ferred to a memory card connected to the computer Deleting scenes takes longer than usual When the memory contains a large number of scenes some operations may take longer than usual Save your recordings 0 122 and initialize the memory 0 36 Cannot delete a photo The photo is protected Remove the protection 0 109 Cannot capture a video snapshot sce...

Page 165: ...rge the battery pack appears on the screen The camcorder cannot communicate with the battery pack attached so the remaining battery time cannot be displayed g lights up in red A memory card error occurred Turn off the camcorder Remove and reinsert the memory card Initialize the memory card if the display does not change back to normal The memory card is full Replace the memory card or delete some ...

Page 166: ...reen displays turn on and off repeatedly The battery pack is exhausted Replace or charge the battery pack Remove the battery pack and reattach it correctly Abnormal characters appear on the screen and the camcorder does not operate properly Disconnect the power source and reconnect it after a short time If the problem still persists use the 6 8 Reset All menu option to reset all the camcorder s se...

Page 167: ... 0 36 when you use it with the camcorder for the first time The LOCK switch on the memory card is set to prevent accidental erasure Change the posi tion of the LOCK switch A compatible memory card must be used to be able to record movies on a memory card 0 33 The folder and file numbers have reached their maximum value Set 88 Photo Num bering to Reset and insert a new memory card The wireless cont...

Page 168: ...nd restore the connection 68 Control for HDMI is set to Off Set it to On HDMI CEC is not activated on the connected TV Activate this function on the TV Even with TV sets compatible with HDMI CEC the range of functions available differs depend ing on the type of TV Refer to the instruction manual of the connected TV The computer does not recognize the camcorder even though the camcorder is connecte...

Page 169: ...ollowing the list of messages for the camcorder you can find separate lists for print related messages 0 177 and for messages that appear only when using the optional DW 100 DVD Burner 0 176 Accessing the memory card Do not remove the memory card You opened the memory card slot cover while the camcorder was accessing the memory card or the camcorder started accessing the memory card as you opened ...

Page 170: ...or DVD Burning index screens 0 52 b Cannot copy The total size of the scenes you selected to copy exceeds the available space on the memory card Delete some recordings on the memory card 0 52 97 or reduce the number of scenes to copy The memory card already contains the maximum number of scenes 3 999 scenes Delete some scenes 0 52 to free some space Cannot divide the scene Initialize only using th...

Page 171: ...t scenes from scenes recorded or edited using another device and then transferred to a memory card connected to the computer There is a problem with the memory If this message appears often without apparent reason contact a Canon Service Center b Cannot record Cannot access the built in memory There is a problem with the built in memory Save your recordings 0 122 and initialize the built in memory...

Page 172: ...onnect the compact power adapter When the camcorder is in mode and is connected to the computer with the supplied USB cable the camcorder cannot be operated Disconnecting the USB cable or power source while this message appears may result in permanent loss of the recordings in the camcorder Use the computer s Safely Remove Hardware function to end the connection and disconnect the USB cable before...

Page 173: ...witch on the memory card is set to prevent accidental erasure Change the posi tion of the LOCK switch Need to recover files from the memory card Change the position of the LOCK switch on the memory card This message will appear the next time you turn on the camcorder if power supply was acci dentally interrupted while the camcorder was writing on the memory card and later the posi tion of the card...

Page 174: ...ding date but different file control information This can occur for example when you edit photos and write the files back to the camcorder Select a number to display the corresponding group of scenes Some B photos could not be deleted Protected photos B cannot be deleted Remove the protection 0 109 Some scenes could not be added to the playlist You may not be able to add to the playlist scenes rec...

Page 175: ...n this memory card if the recording mode is set to MXP or FXP mode 0 55 To use this function change the camcorder s mode from 5 to y You pressed a button that cannot be used in mode Set the mode switch to y to set the camcorder to flexible recording mode Too many photos Disconnect the USB cable Disconnect the USB cable Try using a memory card reader or decrease the number of photos on the memory c...

Page 176: ... The camcorder is being powered by the battery pack Connect the compact power adapter to the camcorder Disc access failure Check the disc There was an error when reading the disc or attempting to write onto it This message can appear also if condensation has formed 0 184 Wait until the DVD burner dries completely before resuming use The disc may be dirty or not correctly loaded Try removing the di...

Page 177: ...corded with another camcorder has a different compression or was edited on a computer Hardware error Cancel printing Turn off the printer and turn it back on Check the printer status Ink tank errors have occurred Replace the ink tank Ink absorber full Touch Continue to resume printing Consult a Canon Service Center refer to the list included with the printer to replace the ink absorber Ink error T...

Page 178: ...let and contact the appropriate customer support center or service center Printer in use The printer is in use Check the printer status Printing error The printer does not support the paper size selected for Paper Settings Set Paper Settings to Default or a paper size supported by the printer used Cancel printing disconnect the USB cable and turn off the printer After a while turn the printer back...

Page 179: ...h protective film on the touch screen The touch screen s operation is based on detecting applied pressure so you may not be able to correctly operate the touch screen with an additional protective layer Do not leave the camcorder in places subject to high temperatures like the inside of a car parked under direct sunlight or high humidity Do not use the camcorder near strong electromagnetic fields ...

Page 180: ...re it in a place free of dust in low humidity and at temperatures not higher than 30 C Battery Pack Dirty terminals may cause a poor contact between the battery pack and the camcorder Wipe the terminals with a soft cloth Long term storage Store battery packs in a dry place at temperatures no higher than 30 C To extend the battery life of the battery pack discharge it completely before storing it C...

Page 181: ...u attach to the camcorder battery packs that are not genuine Canon battery packs will appear and the remaining battery time will not be displayed Memory Card We recommend backing up the recordings on the memory card onto your computer Data may be corrupted or lost due to memory card defects or exposure to static electricity Canon shall not be liable for lost or corrupted data Do not touch or expos...

Page 182: ...ot pick up the battery using tweezers or other metal tools as this will cause a short circuit Wipe the battery with a clean dry cloth to ensure proper contact LOCK switch WARNING The battery used in this device may present a fire or chemical burn hazard if mishandled Do not disassemble modify immerse in water heat above 100 C or incinerate the battery Replace with a CR2025 battery made by Panasoni...

Page 183: ...ory card for example by physically damaging it to prevent the leakage of private data If giving the camcorder or memory card to another person initialize the built in memory b only or memory card using the Complete Ini tialization option 0 36 Fill it up with unimportant recordings and then initialize it again using the same option This makes recovering the original recordings very difficult Downlo...

Page 184: ... clean soft lens cleaning cloth Condensation may form on the surface of the screen when the temper ature changes suddenly Wipe it with a soft dry cloth Condensation Moving the camcorder rapidly between hot and cold temperatures may cause condensation water droplets to form on its internal surfaces Stop using the camcorder if condensation is detected Continued use may damage the camcorder Condensat...

Page 185: ...in any country with power supply between 100 and 240 V AC 50 60 Hz Consult a Canon Service Center for information on plug adapters for overseas use Playback on a TV Screen You can only play back your recordings on TVs compatible with the PAL system PAL or the compatible SECAM system is used in the following regions countries Europe All of Europe and Russia Americas Only in Argentina Brazil Uruguay...

Page 186: ...IFC 300PCU USB Cable 2 WS 20 Wrist Strap S q Memory card 3 WL D89 Wireless Controller S s DTC 100 D Terminal Cable 6 CA 570 Compact Power Adapter S d CTC 100 Component Cable CTC 100 S Component Cable 7 DW 100 DVD Burner A j ZR 1000 Zoom Remote Controller S f STV 250N Stereo Video Cable A k ZR 2000 Zoom Remote Controller TV HDTV VCR DVD recorder Computer Card reader writer AVCHD discs Photo DVDs D ...

Page 187: ...maining usage time accurate to 1 minute You can only use and charge these battery packs with camcorders and chargers compatible with Intelligent System 5 CG 800E Battery Charger Use the battery charger to charge the battery packs Use of genuine Canon accessories is recommended This product is designed to achieve excellent performance when used with genuine Canon accessories Canon shall not be liab...

Page 188: ...BP 809 BP 819 BP 827 Charging conditions Using the camcorder 150 min 260 min 385 min Using the CG 800E Battery Charger 105 min 190 min 260 min Battery pack Usage time Recording mode MXP FXP XP SP LP BP 808 BP 809 Recording maximum 105 min 105 min 105 min 110 min 110 min Recording typical 65 min 65 min 70 min 70 min 70 min Playback 170 min 170 min 170 min 175 min 175 min BP 819 Recording maximum 21...

Page 189: ...ctor of 0 7 giving you a wide perspective for indoor shots or panoramic views When the Wide converter is attached a shadow may appear in the picture when you use the flash Battery pack Usage time Recording mode MXP FXP XP SP LP BP 808 BP 809 Recording maximum 100 min 105 min 105 min 105 min 105 min Recording typical 65 min 65 min 65 min 70 min 70 min Playback 165 min 165 min 170 min 170 min 170 mi...

Page 190: ...ou can link the surround sound to the zoom position or use the microphone as a highly directional shotgun microphone monaural A d DM 100 Directional Stereo Microphone This highly sensitive super directional microphone attaches to the camcorder s mini advanced shoe It can be used as directional microphone monaural or stereo microphone A f VL 5 Video Light This video light enables you to record brig...

Page 191: ...perating the camcorder while it is mounted on a tripod S a HTC 100 HDMI Cable Use this cable to connect the camcorder to an external device using an all digital connection allowing you to enjoy play back at the highest quality This cable sends both video and audio signals S g WP V2 Waterproof Case This case allows you to record movies and take photos underwater without get ting the camcorder wet T...

Page 192: ...25 frame rate are converted and recorded on the memory as 50i Recording Media b Built in memory 8 GB SD or SDHC SD High Capacity memory card not included Maximum Recording Time approximate figures b 8 GB built in memory MXP mode 40 min FXP mode 1 hr XP mode 1 hr 25 min SP mode 2 hr 20 min LP mode 3 hr Commercially available 16 GB memory card MXP mode 1 hr 25 min FXP mode 2 hr 5 min XP mode 2 hr 50...

Page 193: ...ter speed at 1 25 Recommended Illumination More than 100 lx Image Stabilization Optical Shift Image Stabilizer Size of Video Recordings MXP FXP mode 1920 x 1080 pixels XP SP LP mode 1440 x 1080 pixels Size of Photos mode LW 2304x1296 L 2100x1575 M 1600x1200 S 640 x 480 pixels Simultaneous recording LW 2304x1296 SW 848x480 pixels Capturing photos from a playback scene MW 1920x1080 pixels Terminals ...

Page 194: ...aster than Speed3 when Zoom Speed is set to Variable The following settings are adjusted white balance image effects light metering Minimum focusing distance from the waterproof case lens window In the water approx 75 cm at full telephoto approx 5 cm at full wide angle In the air approx 1 m at full telephoto approx 5 cm at full wide angle CA 570 Compact Power Adapter Power supply 100 240 V AC 50 6...

Page 195: ... the music files compatible with the camcorder are as follows Audio encoding Linear PCM Audio sampling 48 kHz 16 bits 2 channels Minimum length 1 second File extension WAV The music data is saved in the memory under the following folder structure b In the built in memory CANON MY_MUSIC MUSIC_01 WAV to MUSIC_99 WAV MUSIC_01 WAV to MUSIC_99 WAV CANON PRIVATE MY_MUSIC On the memory card Downloaded Fr...

Page 196: ...attery 182 C Calendar 51 Camcorder supplemental disc 15 Capturing photos video snapshot scenes from a movie 91 Cine Mode recording program 59 COMPONENT OUT terminal 115 117 Condensation 184 Connections to external devices 116 Continuous shooting 103 Copying Movies 120 Photos 121 D Data code 88 151 Date and time 31 Deleting Movies 52 90 Photos 97 100 Digital effects 65 Dividing scenes 93 Drive mode...

Page 197: ...ecording program 66 PF25 progressive frame rate 149 161 Photo numbers 150 Photo quality 100 Photo size 100 Playback Movies 45 Photos 95 Playlist 89 Portrait recording program 56 Power saving 41 Powered IS 61 Pre recording 61 Print order 113 Printing photos 111 Progressive frame rates PF24 PF30 149 Protecting photos 109 Q Quick Start 43 R Recording Movies 38 54 Photos 38 99 Recording mode 55 Record...

Page 198: ...program 58 T Telephoto 42 Time zone DST 32 Timeline 83 Touch Track 64 Touch AE 69 Touch AF 70 Tripod 180 Troubleshooting 162 Tv recording program 66 U Underwater recording program 58 Uploading movies to video sharing Web sites 135 USB terminal 115 118 V Video snapshot 64 Volume 47 79 W White balance 72 Wide angle 42 Wind screen 147 Wireless controller 22 Z Zoom 42 Digital zoom 146 Zoom speed 42 14...

Page 199: ...non New Zealand Ltd Tel 0800 222 666 within New Zealand only 64 09 489 0300 www canon co nz Canon Singapore Pte Ltd 1 HarbourFront Avenue 04 01 Keppel Bay Tower Singapore 098632 Tel 65 6799 8888 Fax 65 6799 8882 Canon Hongkong Company Ltd 19 F The Metropolis Tower 10 Metropolis Drive Hunghom Kowloon Hong Kong Tel 852 3191 2333 Fax 852 2428 3963 Canon Latin America Inc Sales Enquiries 703 Waterford...

Reviews: