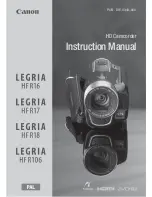
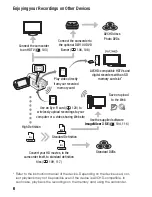
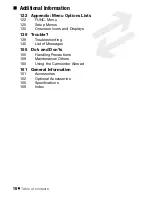
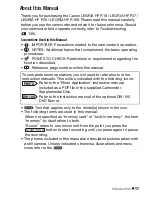
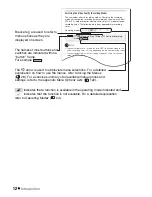
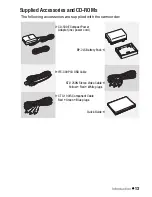
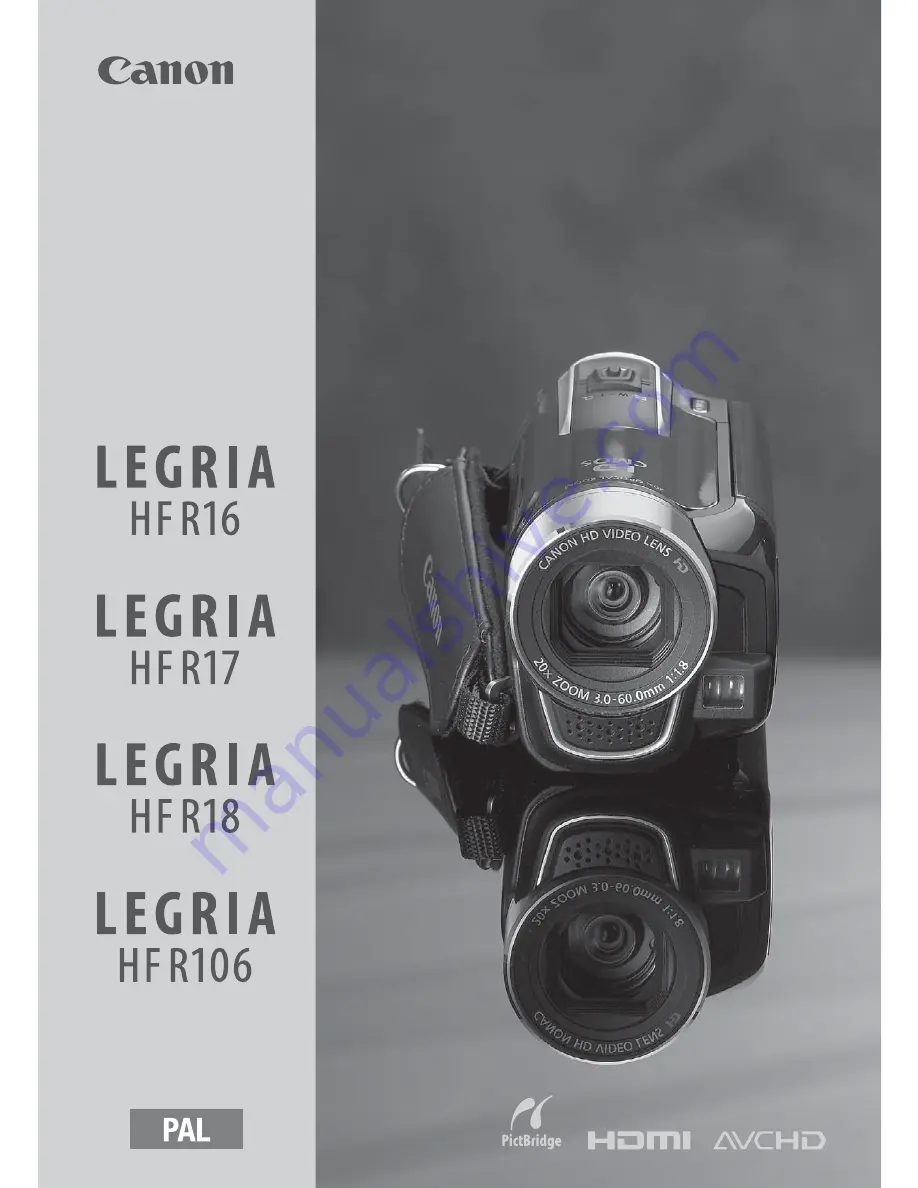
background image

PUB. DIE-0343-000

HD Camcorder

Instruction Manual

Summary of Contents for LEGRIA HF R16

Page 1: ...PUB DIE 0343 000 HD Camcorder Instruction Manual...

Page 2: ...NS PLUG FROM THE SUPPLY SOCKET WHEN NOT IN USE To reduce the risk of electric shock do not expose this product to dripping or splashing The Mains plug is used as the disconnect device The Mains plug s...

Page 3: ...ates and or other countries Macintosh and Mac OS are trademarks of Apple Inc registered in the U S and other countries x v Colour and the x v Colour logo are trademarks HDMI the HDMI logo and High Def...

Page 4: ...pre recording is activated the camcorder starts recording video continuously into a temporary 3 second memory When you press the button the scene recorded will have started 3 seconds before you starte...

Page 5: ...eo clip set to your favorite background music Face Detection 59 Image Stabilization 126 The camcorder automatically detects people s faces and adjusts the focus and other settings accordingly for beau...

Page 6: ...Eye Fi card 120 to wirelessly upload recordings to your computer or a video sharing Web site Save or upload to the Web Standard Definition Convert your HD movies in the camcorder itself to standard de...

Page 7: ...Position and Brightness of the LCD Screen 24 Basic Operation of the Camcorder 24 Operating Modes 27 Joystick and Joystick Guide 28 Using the Menus 30 First Time Settings 30 Setting the Date and Time...

Page 8: ...s 54 Cinema Mode Giving a Cinematic Look to Your Recordings 55 Video Snapshot 56 Pre recording Function 56 Self Timer 57 Manual Exposure Adjustment 58 Manual Focus Adjustment 59 Face Detection 60 Whit...

Page 9: ...y Card 93 Printing Photos 93 Printing Photos Direct Print 96 Print Orders External Connections 99 Terminals on the Camcorder 100 Connection Diagrams 103 Playback on a TV Screen 104 Saving and Sharing...

Page 10: ...5 Setup Menus 135 Onscreen Icons and Displays 139 Trouble 139 Troubleshooting 145 List of Messages 155 Do s and Don ts 155 Handling Precautions 159 Maintenance Others 160 Using the Camcorder Abroad 16...

Page 11: ...only to the model s shown in the icon The following terms are used in this manual When not specified as memory card or built in memory the term memory by itself refers to both Scene refers to one movi...

Page 12: ...etting used even if you set the cam corder to mode Operating modes Standard Play 7 Mbps Desired recording mode FUNC FUNC Brackets are used to refer to menu options as they are displayed on screen indi...

Page 13: ...CD ROMs The following accessories are supplied with the camcorder XCA 590E Compact Power Adapter incl power cord BP 2L5 Battery PackW XIFC 300PCU USB Cable STV 250N Stereo Video CableW Yellow Red Whi...

Page 14: ...truction Manual Photo Applications Ver 34 0 Music Data CD ROM referred to in this manual as Camcorder Supplemental Disc Instruction Manual The full version instruction manual of the camcorder this PDF...

Page 15: ...on 55 3 WEB button 116 4 button 24 INDEX SEL index selection button 44 PLAYLIST button 44 5 DISP on screen display button 64 6 ACCESS indicator 37 79 7 Strap mount 21 8 Speaker 42 9 Grip belt 21 A q S...

Page 16: ...icator Green On Orange Standby 40 Red Charging 18 A h LCD screen 22 A j Joystick 27 A k FUNC button 28 122 A l USB terminal 99 102 S q HDMI OUT terminal 99 100 S a COMPONENT OUT terminal 99 101 S s AV...

Page 17: ...et 155 S h Memory card slot 33 S j Battery compartment S k Battery release latch S l Battery compartment cover Memory card slot cover D q Serial number The serial number label is located on the batter...

Page 18: ...before use For approximate charging times and recording playback times with a fully charged battery pack refer to the tables on pages 162 163 1 Connect the power cord to the compact power adapter 2 Pl...

Page 19: ...over and slide it toward the lens until you hear a click 8 Charging will start when the camcorder is turned off If the camcorder was on the green ON OFF CHG indicator will go out when you turn off the...

Page 20: ...o the compact power adapter any electrical equipment that is not expressly recom mended for use with this camcorder To prevent equipment breakdowns and excessive heating do not con nect the supplied c...

Page 21: ...elt so that you can reach the zoom lever with your index finger and the button with your thumb To remove the grip belt 1 Lift the padded handgrip s flap and detach the strap from the Velcro pad 2 Pull...

Page 22: ...ptional shoulder strap Pass the ends of the shoulder strap through the strap mount on the grip belt and adjust the length of the strap Adjusting the Position and Brightness of the LCD Screen Rotating...

Page 23: ...brighter With the camcorder on hold pressed down for more than 2 seconds Repeat this action to switch the LCD backlight between off normal and on bright If LCD Screen Dimmer is set to On pressing for...

Page 24: ...on again to switch back to mode In either mode you can record movies by pressing or take photos by pressing The mode icon displayed will change according to the optimal mode selected by the Smart AUTO...

Page 25: ...oot The Smart AUTO mode icon will change to one of the following icons Smart AUTO icons The icon in parentheses appears under backlight conditions Background color of the icon Bright grey Blue skies l...

Page 26: ...e all the optimal settings to match special recording conditions Under certain conditions the Smart AUTO icon that appears on the screen may not match the actual scene Especially when shooting against...

Page 27: ...s you will need to make further adjustments mode First select a row of functions then press to operate the function in the middle or push the joystick or to operate the function on the left or right r...

Page 28: ...modes the operation varies depending on the func tion selected so refer to the relevant chapter as necessary 1 Press 2 Select the icon of the function you want to change from the left side column Men...

Page 29: ...tab of the desired menu 4 Select the setting you want to change and press The orange selection bar indicates the menu setting currently selected Menu items not available appear grayed out Move the or...

Page 30: ...S When you do not use the camcorder for about 3 months the built in rechargeable lithium battery may discharge completely and the date and time setting may be lost In such case recharge the built in l...

Page 31: ...egardless of the language selected Changing the Time Zone Change the time zone to match your location The default setting is Paris To set the home time zone When you travel select the icon and select...

Page 32: ...nctions including wireless transfer In case of an issue with an Eye Fi card please check with the card manufacturer Also note that an approval is required to use Eye Fi cards in many countries or regi...

Page 33: ...the way into the memory card slot until it clicks 4 Close the cover and slide it toward the lens until you hear a click Do not force the cover closed if the memory card is not correctly inserted To r...

Page 34: ...based on the recording mode movies or photo size quality photos currently in use NOTES Select the built in memory for recording movies if you intend to convert high definition scenes to standard defi...

Page 35: ...ou use them with this camcorder for the first time You can also initialize a memory card or the built in memory only to permanently delete all the recordings it con tains At the time of purchase the b...

Page 36: ...ns fer music files from the supplied Camcorder Supplemental Disc to the memory card again For details refer to the ImageMixer 3 SE Software Guide Mac OS users Use the Finder to transfer music files fr...

Page 37: ...Press to begin recording Press again to pause the recording When you have finished recording 1 Make sure that the ACCESS indicator is off 2 Turn off the camcorder 3 Close the LCD panel IMPORTANT Obse...

Page 38: ...he LCD backlight 23 or adjust the brightness of the LCD screen with the LCD Bright ness setting Selecting the Video Quality Recording Mode The camcorder offers 4 recording modes Changing the recording...

Page 39: ...on a subject as close as 1 cm Approximate recording times Default value 1 Recorded in 1 920 x 1 080 resolution Movies recorded using other recording modes are recorded in 1 440 x 1 080 resolution 2 A...

Page 40: ...ending on the shooting conditions 1 With the camcorder on and in a recording mode close the LCD panel A beep will sound and the green ON OFF CHG indicator will change to orange to indicate the camcord...

Page 41: ...the Power Saving Mode setting Press to turn on the camcorder You can select the length of time until shut off or turn off the Quick Start function altogether with the Quick Start setting When the cam...

Page 42: ...ve recorded a large number of scenes you can display a slidebar below the scene thumbnails and browse through index pages then return to select the desired scene 3 Press to begin the playback Playback...

Page 43: ...video or sound playback between scenes Special playback modes To enter the special playback modes use the joystick guide There is no sound during the special playback modes Fast playback Perform the...

Page 44: ...es you may notice some anomalies blocky video artifacts banding etc in the playback picture The speed indicated on the screen is approximate Selecting what Recordings to Play Back From the index scree...

Page 45: ...d W to show up to 15 items per screen Move it toward T to return to the default index screen display To open the video snapshot index screen You can open an index screen that contains only your video...

Page 46: ...ll be displayed if there are no high definition scenes on the memory card However you can still open the other index screens on the memory card Special playback modes are not available for scenes conv...

Page 47: ...scenes recorded and the total recording time for the same day You can select the year or month field and change the year or month to move faster between calendar months 4 Press to return to the index...

Page 48: ...eturn to the index screen at any time Selecting Only Scenes in which People s Faces Were Detected If you recorded movies with the Face Detection function 59 acti vated the camcorder can narrow down th...

Page 49: ...index screen mode Move the zoom lever toward W to display the index screen You can select the original movies or photos in the built in memory or on the memory card You can press to open the index sc...

Page 50: ...p space on the memory See also Deleting Scenes from the Playlist 73 1 Open the original movies index screen You can select the original movies in the built in memory or on the memory card You can pres...

Page 51: ...cover Do not disconnect the power source or turn off the camcorder Do not change the camcorder s operating mode NOTES Deleting a scene from the original index screen also deletes that scene from the...

Page 52: ...e the Programmed AE recording program the cam corder automatically adjusts the aperture and shutter speed to obtain the optimal exposure for the subject Special Scene Recording Programs Select a Speci...

Page 53: ...the subject being underexposed Beach To record on a sunny beach without the subject being underexposed Sunset To record sunsets in vibrant colors Night Scene To record nightscapes with lower noise Lo...

Page 54: ...in other modes In such case adjust the focus manually for movies only Fireworks To avoid camcorder blur blur due to the camcorder moving we recommend using a tripod When you take photos slower shutte...

Page 55: ...Press The camcorder records for about 4 seconds the blue frame serves as a visual progress bar and then automatically returns to record pause mode You can change the length of video snapshot scenes w...

Page 56: ...ssed NOTES While pre recording is activated the camcorder will not emit any notifi cation sounds The camcorder will not record the full 3 seconds prior to pressing if the button was pressed within 3 s...

Page 57: ...os Setting the camcorder to standby mode Changing the camcorder s operating mode Turning off the camcorder Manual Exposure Adjustment At times backlit subjects may appear too dark underexposed or sub...

Page 58: ...der to automatic exposure NOTES If the recording program is changed during exposure lock the cam corder will return to automatic exposure Manual Focus Adjustment Autofocus may not work well on the fol...

Page 59: ...der to autofocus Face Detection The camcorder automatically detects people s faces and uses this information to select the optimal settings for beautiful videos and pho tos When there are a number of...

Page 60: ...detected correctly Typical examples include Faces extremely small large dark or bright in relation to the overall picture Faces turned to the side at a diagonal or partially hidden Face detection can...

Page 61: ...ons or the lighting or other conditions change Depending on the light source may keep flashing The result will still be better than with Automatic Custom white balance may provide better results in th...

Page 62: ...en Operating modes Image Effect Off Records with no image enhancing effects Vivid Emphasizes the contrast and color saturation Neutral Tones down the contrast and color saturation Low Sharpening Recor...

Page 63: ...e the selected effect while recording or in record pause mode For photos Activate the selected effect and then press to record the photo NOTES When you apply a fader not only the picture but also the...

Page 64: ...histogram and information icons All displays off Pressing will turn off most of the icons and displays that appears automati cally but will not remove onscreen displays that were turned on manually f...

Page 65: ...t the audio recording level so that the audio level meter will go to the right of the 12 dB mark yellow area only occasionally 4 Hide the joystick guide The audio level selected will be locked and the...

Page 66: ...ou can display the scene divided into segments every time the camcorder registered a change in the main subject of the scene Movie Timeline 1 Open the original movies or playlist index screen You can...

Page 67: ...reen Refer to Selecting Only Scenes in which People s Faces Were Detected 48 You can select the original movies in the built in memory or on the memory card 2 Select the scene you want to view and pre...

Page 68: ...ove between segment ruler pages in the same way as in the movie timeline screen 66 NOTES For a single scene up to 100 segments changes in main subject will appear in the Timeline by Faces screen Curre...

Page 69: ...ideshow of photos recorded on the memory card you will need to transfer the music tracks to the memory card in advance For details refer to the ImageMixer 3 SE Software Guide 1 Open the playlist video...

Page 70: ...songs and music tracks in your video creations remember that music under copyright may not be used without permis sion from the copyright holder except for cases permitted under appli cable laws such...

Page 71: ...while transferring music files it may not be possible to correctly play back those music tracks Delete the music tracks from the memory and transfer the music files again Dividing Scenes You can divid...

Page 72: ...enes and other scenes that are too short less than 3 seconds Scenes that were edited using the supplied software ImageMixer 3 SE and were then written back to the memory Scenes cannot be divided withi...

Page 73: ...xer 3 SE and were then written back to the memory You can copy scenes from the built in memory to the memory card 76 to include in the memory card s playlist also scenes that were originally recorded...

Page 74: ...tion while it is in progress Some scenes will be deleted nevertheless Options Moving Scenes in the Playlist Move the scenes in the playlist to play them back in the order of your choice 1 Open the pla...

Page 75: ...to capture 2 Press at the point you want to capture The camcorder captures a video snapshot scene the blue frame serves as a visual progress bar and then automatically changes to playback pause mode...

Page 76: ...lies in the picture sound at the point where the playback switches to a new scene Copying Scenes to a Memory Card You can copy original movies or the entire playlist only from the built in memory to t...

Page 77: ...the ACCESS indicator is on or flashing Failing to do so may result in permanent data loss Do not open the memory card slot cover Do not disconnect the power source or turn off the camcorder Do not ch...

Page 78: ...78 Video NOTES If the memory card slot cover is open or the LOCK switch on the mem ory card is set to prevent writing you will not be able to copy movies to the memory card...

Page 79: ...can set the memory card as the recording media for photos 34 Please read the IMPORTANT section 80 before using an Eye Fi card 2 Press halfway Once the focus is automatically adjusted will turn green a...

Page 80: ...when digital zoom is activated light blue and dark blue area on the zoom bar When Flicker Reduction is set to 50 Hz or 60 Hz the camcorder will automatically adjust the shutter speed Selecting Photo...

Page 81: ...To print photos up to L size 9 x 13 cm or postcard size 10 x 14 8 cm S 640x480 To send photos as e mail attachments or to post on the Web Approximate number of photos available on a memory card Defaul...

Page 82: ...rd W to show 15 photos per page move it toward T to show 6 photos per page 3 Select a photo Move the orange selection frame to the photo you want to view When you have recorded a large number of photo...

Page 83: ...ot cover Do not disconnect the power source or turn off the camcorder Do not change the camcorder s operating mode The following image files may not be displayed correctly Images not recorded with thi...

Page 84: ...s or previously selected photos 3 Delete the photo s If you selected an option other than This Photo you can press to interrupt the operation while it is in progress Some photos will be deleted nevert...

Page 85: ...T The photo is magnified by 2 times and a frame appears indicating the position of the magnified area To further enlarge the photo move the zoom lever toward T To reduce the magnification times move...

Page 86: ...deshow set to the selected music track During playback push the joystick to adjust the volume Press to stop the slideshow Hide the volume controls if necessary To change the slideshow s transition eff...

Page 87: ...ge their orienta tion 1 In single photo view open the photo selection screen Rotate appears on the screen 2 Select the photo you want to rotate 3 Press to rotate the photo 4 Repeat steps 2 3 to change...

Page 88: ...1080 and it cannot be changed but you can select the photo quality POINTS TO CHECK Please read the IMPORTANT section 89 before using an Eye Fi card To select the photo capture settings The number disp...

Page 89: ...ovement may be blurred Photos will be recorded on the memory selected for recording photos Protecting Photos You can protect photos from accidental erasure Protecting Single Photos 1 In single photo v...

Page 90: ...i card Copying a Single Photo 1 Select to view the photos recorded in the built in memory In the index screen select the tab under the icon and move the zoom lever toward T to return to single photo v...

Page 91: ...rom the Index Screen 1 Open the index screen of the photos recorded in the built in memory Move the zoom lever toward W and then select the tab under the icon 2 Select the photo you want to copy This...

Page 92: ...gion of use See also Using an Eye Fi card 121 NOTES If the memory card slot cover is open or the LOCK switch on the mem ory card is set to prevent writing you will not be able to copy photos to the me...

Page 93: ...lever toward T to return to single photo view 2 Turn on the printer 3 Connect the camcorder to the printer using the supplied USB cable Connection Refer to Connection Diagrams 102 If the device select...

Page 94: ...lecting the Print Settings and Printing You can select the number of copies and other settings for printing Setting options vary depending on your printer model 1 Select the photo you wish to print 2...

Page 95: ...Number of copies Select 1 99 copies Select Paper Settings and press to change all three settings consecutively x photos sheet Printing multiple photos on the same sheet When using Canon printers you c...

Page 96: ...resume auto matically after you solved the problem select Continue and press to resume printing If that option is not available select Stop and press and then restart printing from the beginning Other...

Page 97: ...ber of copies to 0 5 Repeat steps 2 4 to mark additional photos with print orders or press twice to close the menu Setting Print Orders from the Index Screen 1 Open the photo index screen 2 Select the...

Page 98: ...o the memory card in advance Individual Photos Set print orders for individual photos Selected Photos 1 copy each Sets a print order of 1 copy of each of the photos selected in advance marked with a c...

Page 99: ...minal Access Open the left rear terminal cover The HDMI OUT terminal offers a high quality digital connection that combines audio and video in a single convenient cable AV OUT Terminal Access Open the...

Page 100: ...convenient all digital connection using a single cable for both video and audio When you connect the camcorder to an HDTV equipped with an HDMI terminal you can enjoy video and audio playback at the...

Page 101: ...according to the TV set widescreen or 4 3 if the TV cannot automatically detect and change the aspect ratio Connection In all respects exactly the same connection as connection Connect to a standard...

Page 102: ...nections Connection Type Digital data connection Connect to a computer to save your recordings to the optional DW 100 DVD Burner to create DVD discs from them or to a printer to print out photos 4 USB...

Page 103: ...onnected the camcorder Refer to the instruction manual of the connected TV 4 Turn on the camcorder and set it to or mode Play back the movies or photos NOTES We recommend powering the camcorder using...

Page 104: ...ation Installation Guide Using the software See ImageMixer 3 SE Software Guide PDF file Saving Photos With the supplied software Photo Application you can save photos to your computer and easily organ...

Page 105: ...ing precautions while the ACCESS indicator is on or flashing Failing to do so may result in permanent data loss Do not open the memory card slot cover Do not disconnect the USB cable Do not turn off t...

Page 106: ...g the software See ImageMixer 3 SE Software Guide PDF file Even without a computer you can save your video recordings in high definition by creating AVCHD discs using the optional DW 100 DVD Burner Re...

Page 107: ...re based on the disc you inserted If you inserted a DVD RW disc that already contains data The disc already contains data will be displayed To overwrite the data erasing the previous content of the di...

Page 108: ...g your discs refer to Cautions on handling NOTES If a scene does not fit entirely in one disc it may be divided and con tinue on the next disc When the camcorder contains a large number of scenes to b...

Page 109: ...tion manual of the DW 100 Converting Scenes into Standard Definition in the Camcorder Convert high definition scenes in the built in memory to standard defi nition before creating a DVD disc Converted...

Page 110: ...ons To select the bit rate Using a higher bit rate will result in better video quality for the con verted scenes To embed the recording date and time The recording date and time will always be display...

Page 111: ...index screen on the memory card press and then select For DVD SD VIDEO Connecting to the Computer and Creating DVD Discs 1 Power the camcorder using the compact power adapter 2 Open the For DVD SD VID...

Page 112: ...een on the memory card Open the original movies index screen on the memory card press then select For DVD SD VIDEO 3 Connect the camcorder to the DW 100 DVD Burner and create the disc The procedure is...

Page 113: ...ction manual of the DW 100 Photos in the slideshow advance at 3 second intervals 1 Power the camcorder using the compact power adapter 2 Open the photo index screen with the photos you want to add to...

Page 114: ...available 1 Connect the camcorder to the TV Refer to Connection Diagrams 100 Select connection or to enjoy high definition playback 2 Turn on the camcorder and set it to mode 42 3 Turn on the DVD burn...

Page 115: ...DVD Video specifications Play back these DVDs using standard DVD play ers If your computer has a DVD drive you can play back the slideshow as a DVD and you can also access individual photos as JPG fil...

Page 116: ...corder Locate the scene you wish to copy and pause the playback just before the desired scene 4 Camcorder Resume playback Push the joystick to hide the joystick guide By default on screen displays wil...

Page 117: ...e software See ImageMixer 3 SE Software Guide PDF file Converting Scenes into Standard Definition in the Camcorder 1 Power the camcorder using the compact power adapter 2 Insert a memory card with suf...

Page 118: ...en will appear Connect the camcorder to the computer at this point 100 to continue uploading the converted videos to the Web or select End Without Connecting to connect to the computer later To select...

Page 119: ...on the memory card press and then select For Web MPEG 2 Connecting to the Computer and Uploading your Videos If you are connecting the camcorder to the computer immediately after the conversion descr...

Page 120: ...our Eye Fi card and completed all the required configuration setup in advance Refer to the instruction manual of the Eye Fi card Please read the IMPORTANT section 121 before using an Eye Fi card 1 Ins...

Page 121: ...nd NOTES Depending on the amount of data to be transferred or wireless signal conditions uploading may take a long time In addition if wireless signal conditions worsen uploading may be interrupted Wi...

Page 122: ...ons without a reference page are explained after the tables Menu options in boldface indicate default values FUNC Menu FUNC Menu FUNC Menu Mode Menu item Setting options Recording programs Programmed...

Page 123: ...Recording mode High Quality 17 Mbps High Quality 12 Mbps Standard Play 7 Mbps Long Play 5 Mbps z 38 Photo size quality 1920x1080 1600x1200 640x480 z 80 Super Fine Fine Normal Menu item Setting option...

Page 124: ...1 0 99 copies 96 Individual Photos Selected Photos 1 copy each Remove All Rotate 87 Delete All Scenes All Scenes this date This Scene Selected Scenes 50 All Scenes This Scene 73 No Yes 83 All Photos...

Page 125: ...on to record video only when you intend to play back your recordings on an HDTV compatible with x v Colour connected to the camcorder using an HDMI cable If recordings made with x v Colour are played...

Page 126: ...en recording moving subjects Image Stabilizer The image stabilizer compensates for camcorder shake You can select the degree of compensation Dynamic This setting compensates for a higher degree of cam...

Page 127: ...er automatically uses slow shutter speeds to obtain brighter recordings in places with insufficient lighting Minimum shutter speed used 1 25 1 12 when the frame rate is set to PF25 The auto slow shutt...

Page 128: ...sound of wind when recording outdoors Some low frequency sounds will be suppressed along with the sound of wind When recording in surroundings unaffected by wind or if you want to record low frequency...

Page 129: ...To make the selection from a screen that appears at the time of the connection to the external device System Setup 1 1 Option not available when the camcorder is connected to an HDTV using an HDMI ca...

Page 130: ...0N Stereo Video Cable select the setting according to the type of TV in order to display the picture in full and in the correct aspect ratio Normal TV TV sets with 4 3 aspect ratio Wide TV TV sets wit...

Page 131: ...he LCD panel in a recording mode and the length of time after which the camcorder will end the standby mode and shut off auto matically Control for HDMI Activates the HDMI CEC Consumer Electronics Con...

Page 132: ...photo numbering method to be used on a new memory card Photos are automatically assigned consecutive num bers from 0101 to 9900 and stored in folders containing up to 100 pho tos Folders are numbered...

Page 133: ...Language Dansk Deutsch English Espa ol Fran ais Italiano Magyar Melayu Nederlands Polski Portugu s Suomi Svenska T rk e z z z 31 Time Zone DST List of world time zones z z z 31 Date Time z z z 30 Date...

Page 134: ...ed figures about available movie recording time and available number of photos are approximate and based on the recording mode and photo quality size settings currently in use The total space for the...

Page 135: ...l focus 58 A a Eye Fi wireless communication 120 A s Remaining battery time 138 A d While recording during playback Scene counter hours minutes seconds In record pause mode Total number of scenes A f...

Page 136: ...to quality size 80 S h Self timer 56 S j Number of available photos On the memory card In the built in memory S k Camcorder shake warning 126 S l Face detection 59 D q AF frame 79 D a Focus and exposu...

Page 137: ...wing Photos D f Histogram 87 D g Current photo Total number of photos D h Photo number 131 D j Protected photo mark 89 D k Date and time of recording D l File size F q Manual exposure 57 F a Photo siz...

Page 138: ...accurately Remaining recording time When there is no more free space on the memory End built in memory only or End memory card will be displayed and the recording will stop 25F progressive frame rate...

Page 139: ...it if it is above 40 C let the battery pack cool down before charging it Charge the battery pack in temperatures between 0 C and 40 C The battery pack is faulty Replace the battery pack A noise can b...

Page 140: ...may seem slightly warped This is not a malfunction Changing between recording record pause playback takes longer than usual When the memory contains a large number of scenes some operations may take...

Page 141: ...memory after repeatedly recording and deleting scenes fragmented memory Save your recordings 104 and initialize the memory 35 Then transfer the music files first and only then write the video files b...

Page 142: ...intervals The remaining charge of the battery pack is at least 50 of a full charge This is not a mal function The red ON OFF CHG indicator flashes very slowly one flash at 2 second intervals The temp...

Page 143: ...communications may be picked up and recorded as noise We recommend turning off the wireless communication while recording 131 Sound is distorted or is recorded at lower levels When recording near lou...

Page 144: ...hich you connected the cam corder Select the correct video input There is no sound from the TV When connecting the camcorder to an HDTV using the CTC 100 S Component Cable make sure to connect also th...

Page 145: ...ear on the screen Disconnect the USB cable and restore the connection after a short while Photos are not correctly printed You may not be able to print correctly using a PictBridge compatible printer...

Page 146: ...a Card MMC into the camcorder Use a recommended memory card 32 There was an error creating the file name Set Photo Numbering to Reset and ini tialize the memory card 35 or delete all the photos 83 and...

Page 147: ...memory card Use a recommended memory card 32 Cannot play the movies on this memory card Initialize only using the camcorder The memory card in the camcorder was initialized using a computer Initializ...

Page 148: ...laylist The playlist can contain a maximum of 999 scenes If the playlist includes scenes recorded in FXP mode the maximum number of scenes in the playlist may be less than 999 Delete some scenes from...

Page 149: ...cenes recorded in a different television system NTSC It cannot played back with this camcorder Memory card cover is open After inserting a memory card close the memory card slot cover 33 Memory card i...

Page 150: ...ed using another device cannot be divided with this camcorder Select the built in memory as the recording media for movies You attempted to set relay recording while the memory card is selected as the...

Page 151: ...rding mode Too many photos Disconnect the USB cable Disconnect the USB cable Try using a memory card reader or decrease the number of photos on the memory card to fewer than 2 500 photos for Windows a...

Page 152: ...the disc or attempting to write onto it This message can appear also if condensation has formed 159 Wait until the DVD burner dries completely before resuming use The disc may be dirty or not correct...

Page 153: ...absorber full Select Continue to resume printing Consult a Canon Service Center refer to the list included with the printer to replace the ink absorber Ink error The ink level cannot be detected corr...

Page 154: ...ropriate customer support center or service center Printer in use The printer is in use Check the printer status Printing error Cancel printing disconnect the USB cable and turn off the printer After...

Page 155: ...e of a car parked under direct sunlight or high humidity Do not use the camcorder near strong electromagnetic fields such as above TVs near plasma TVs or mobile phones Do not point the lens at strong...

Page 156: ...henever a battery pack is not in use Con tact with metallic objects may cause a short circuit and damage the bat tery pack Dirty terminals may cause a poor contact between the battery pack and the cam...

Page 157: ...o strong magnetic fields Do not leave memory cards in places subject to high humidity and high temperature Do not disassemble bend drop or subject memory cards to shocks and do not expose them to wate...

Page 158: ...for 24 hours with the camcorder off Disposal When you delete movies or initialize the memory only the file allocation table is altered and stored data is not physically erased Take the nec essary prec...

Page 159: ...D screen using a clean soft lens cleaning cloth Condensation may form on the surface of the screen when the temper ature changes suddenly Wipe it with a soft dry cloth Condensation Moving the camcorde...

Page 160: ...o charge battery packs in any country with power supply between 100 and 240 V AC 50 60 Hz Consult a Canon Service Center for information on plug adapters for overseas use Playback on a TV Screen You c...

Page 161: ...sary use a commercially available SCART adapter Availability differs from area to area SS 600 SS 650 Shoulder Strap Memory card WS 20 Wrist Strap DTC 100 D Terminal Cable CA 590E Compact Power Adapter...

Page 162: ...ode and charging recording or playback conditions The effective usage time of the battery pack may Use of genuine Canon accessories is recommended This product is designed to achieve excellent perform...

Page 163: ...y Battery pack Usage time Recording mode FXP XP SP LP BP 2L5 Recording maximum 80 min 85 min 85 min 85 min Recording typical 50 min 50 min 50 min 50 min Playback 110 min 115 min 115 min 115 min NB 2LH...

Page 164: ...Use this cable to connect the camcorder to an external device using an all digital connection allowing you to enjoy play back at the highest quality This cable sends both video and audio signals This...

Page 165: ...0 pixels XP SP LP mode 1440x1080 pixels Size of Photos mode LW 1920x1080 L 1600x1200 S 640x480 Capturing photos from a playback scene LW 1920x1080 pixels Television System 1080 50i Recordings made wit...

Page 166: ...or when set to Instant AF or Manual focus for movies only Minimum Focusing Distance 1 m 1 cm at full wide angle White Balance Auto white balance custom white balance and preset white balance settings...

Page 167: ...t Power Adapter Power input 100 240 V AC 50 60 Hz 0 14 0 08 A Rated output 8 4 V DC 0 6 A Operating temperature 0 40 C Dimensions 46 x 26 x 70 mm Weight 95 g BP 2L5 Battery Pack Battery type Rechargea...

Page 168: ...lows Audio encoding Linear PCM Audio sampling 48 kHz 16 bits 2 channels Minimum length 1 second File extension WAV The music data is saved in the memory under the following folder structure In the bui...

Page 169: ...hotos from movies 88 Capturing video snapshot scenes from movies 75 Cine Mode recording program 54 COMPONENT OUT terminal 99 101 Condensation 159 Connections to external devices 100 Copying Movies 76...

Page 170: ...s 42 Photos 82 Playlist 72 Portrait recording program 52 Power saving 38 Pre recording 56 Pre selecting recordings 49 Print order 96 Printing photos 93 Protecting photos 89 Q Quick Start function 40 R...

Page 171: ...6 Transferring recordings to a computer 104 Tripod 155 Troubleshooting 139 U Uploading movies to video sharing sites 116 USB terminal 99 102 V Video snapshot 55 Volume 42 129 W White balance 60 Wide a...

Page 172: ...canon co nz Canon Singapore Pte Ltd 1 HarbourFront Avenue 04 01 Keppel Bay Tower Singapore 098632 Tel 65 6799 8888 Fax 65 6799 8882 Canon Hongkong Company Ltd 19 F The Metropolis Tower 10 Metropolis...

Reviews: