Additional Information
179
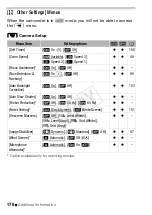
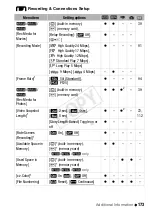
[Custom Control Button]:
On the lower right of the recording screen, a
control button that is a shortcut to one of the functions in the [
Main
Functions] panel is constantly displayed. By changing this setting, you can
change the shortcut, which will allow you to access one of your frequently
used functions quickly and conveniently.
• In
mode, the default setting is [
Ò
Decoration]. In other modes, it
is [
È
Powered IS].
[Autostart Decoration]:
When set to [
i
On], the decoration screen will
open automatically when you stow the LCD panel with the LCD screen
facing out.
[Power Saving Mode]:
Controls the camcorder’s automatic power off set-
tings.
[Auto Power Off]: In order to save power when the camcorder is powered
by a battery pack, it will automatically shut off if left without any operation
for 5 minutes.
• Approximately 30 seconds before the camcorder shuts off, [Auto Power
Off] will appear. Operating any of the camcorder's controls while the
message is displayed will prevent the camcorder from shutting off.
• In standby mode, the camcorder will shut off after the time selected for
the [Quick Start (Standby)] setting.
[Quick Start (Standby)]: Select whether to activate the Quick Start function
(
A
51) when you close the LCD panel in a recording mode and the
length of time after which the camcorder will end the standby mode and
shut off automatically.
• You can set Quick Start to [Off], for example, if the camcorder is set on
a fixed position and you want to keep recording video with the LCD
panel closed in order to conserve the battery’s power.
[Battery Info]:
When you are using an optional battery pack that is com-
patible with Intelligent System, this option displays a screen where you
can verify the battery charge (as a percentage) and the remaining record-
ing time (
,
mode) or playback time (
,
mode).
[Control for HDMI]:
Activates the HDMI-CEC (Consumer Electronics Con-
trol) function. When you connect the camcorder to an HDTV compatible
with HDMI-CEC using the supplied HDMI cable, you can control the cam-
corder’s playback using the remote control of the TV.
• If set to [
i
On], when the camcorder is connected to a compatible
HDTV using the supplied HDMI cable, the video input on the TV will
automatically be set to the camcorder’s video input. Then, you can use
the up/down/left/right buttons and the OK or SET button on the TV’s
remote control to play back your recordings.
COP
Y

