1
2
3
4
5
6
7
8
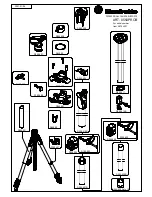
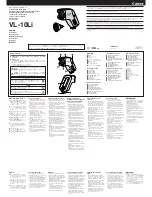
付属品
/
Accessories/Accessoires/Im Lieferumfang
q
w
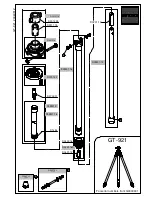
図 1/
Fig. 1/Abb. 1
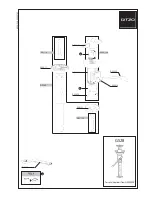
図 2/
Fig. 2/Abb. 2
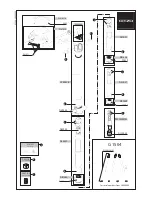
図 3/
Fig. 3/Abb. 3
図 4/
Fig. 4/Abb. 4
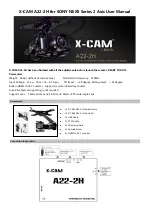
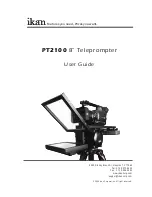
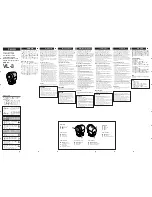
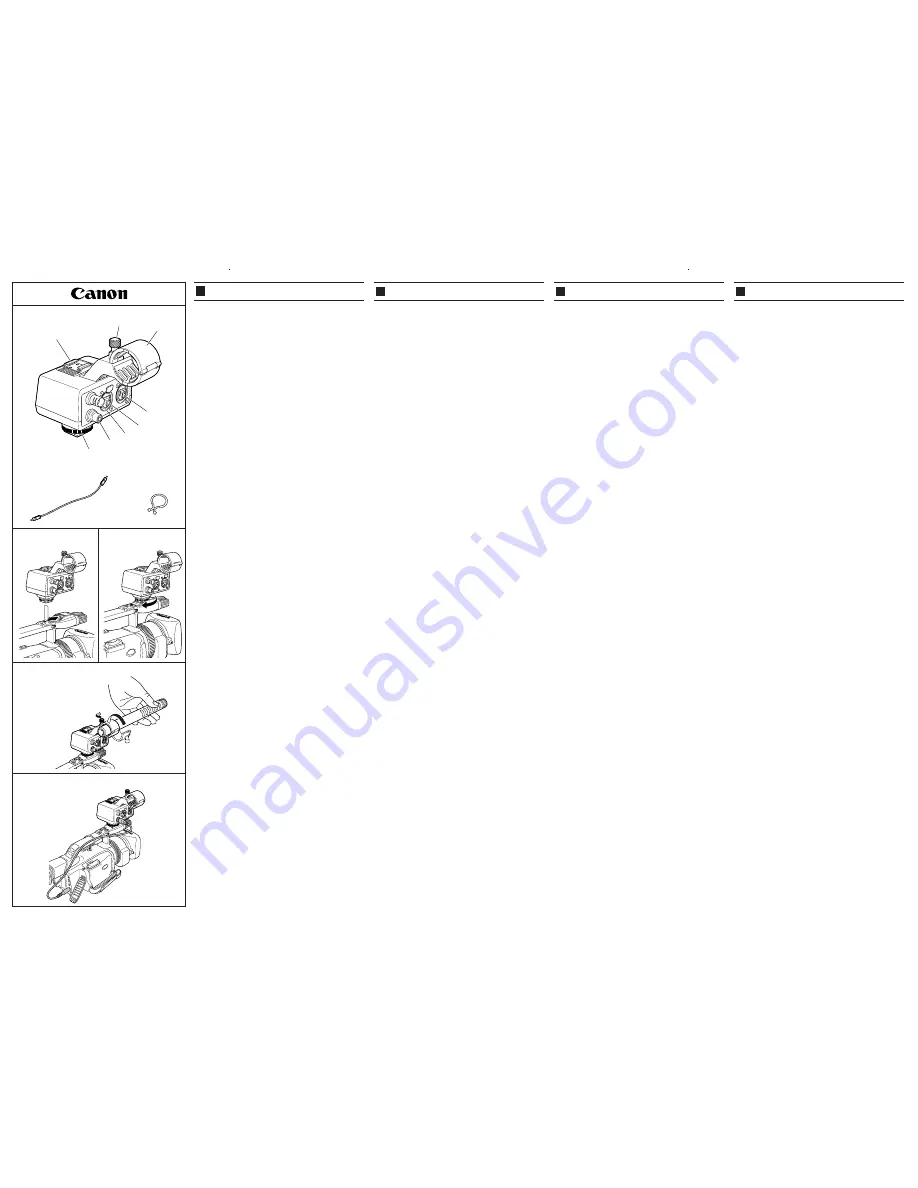
各部の名称
/
Components Guide/Guide des composants/
Bezeichnung der Teile
MA-300 Microphone Adapter
INSTRUCTIONS
MA-300 Adaptateur de microphone
INSTRUCTIONS
E
F
Mikrofonadapter mit Schultergleitschutz MA-200
GEBRAUCHSANLEITUNG
D
マイクロホンアダプター MA-300
使用説明書
J
Merci d’avoir porté votre choix sur l’adaptateur de microphone MA-300. Avant de
l’utiliser, lisez attentivement ce mode d’emploi et conservez-le pour toute
référence ultérieure.
L’adaptateur de microphone MA-300 permet :
1. l’entrée audio au camescope GL2/XM2 avec des microphones à connecteur
XLR.
2. La conversion de signaux vidéo pour le connecteur BNC.
¡
L’adaptateur de microphone MA-300 est prévu pour l’usage exclusif avec le
camescope GL2/XM2.
[Guide des composants]
q
Prise d’entrée vidéo (prise RCA)(raccorde au camescope)
w
Prise de sortie vidéo (connecteur BNC)
e
Prise d’entrée audio (connecteur XLR)
r
Prise de sortie audio (connecteur XLR)
t
Griffe porte-accessoire de microphone
y
Pince de microphone
u
Vis de pince de microphone
i
Verrou de griffe
[Accessoires]
q
Câble vidéo
w
Attache de câble pour la fixation des câbles sur la poignée
Fixation de l’adaptateur de microphone sur le camescope
Consultez le mode d’emploi du camescope.
¡
Mettez le camescope hors tension avant de fixer/détacher l’adaptateur de
microscope.
1. Glissez l’adaptateur de microphone droit sur la griffe porte-accessoire du
camescope (Fig. 1).
• Orientez l’adaptateur de microscope dans la direction indiquée par la flèche
sur le dessous et glissez-le jusqu’au déclic de mise en place.
2. Serrez le verrou de griffe dans le sens indiqué par la flèche (Fig. 2).
Fixation du microphone
¡
Les microphones à diamètre de 25 mm peuvent se monter directement.
¡
Du bruit de vibration peut être ramassé selon la méthode de fixation du
microphone.
1. Desserrez la vis de la pince de microphone et ouvrez la pince.
2. Placez le microphone dans la pince à microphone et serrez a vis de la pince
(Fig. 3).
• Placez le microphone de sorte qu’il n’apparaisse pas sur l’affichage LCD ou
l’écran du viseur du camescope.
3. Raccordez le microphone á la prise d’entrée audio.
4. Mettez le camescope sous tension.
•
Ç
(connexion) apparaît sur l’affichage LCD ou l’écran du viseur du
camescope quand le camescope enregistre ou est en mode pause
d’enregistrement.
• Le microscope intégré au camescope est automatiquement coupé.
¡
La griffe porte-accessoire est exclusivement prévue pour l’usage avec les
microphones fixés sur une monture de caméra.
¡
Pour sortir des signaux vidéo via le connecteur BNC, raccordez le câble vidéo
fourni à la prise VIDEO IN et à la prise AV du camescrope (Fig. 4).
Spécifications
Audio
Prise d’entrée:
XLR-3-31
1: Blindée, 2: active, 3: passive
Niveau d’entrée:
-60 dB (symétrique)
Impédance d’entrée:
600
Ω
Impédance de sortie:
600
Ω
Vidéo
Prise de raccordement au camescope:
prise RCA
Prise de raccordement de dispositif extérieur: connecteur BNC
Dimensions:
84
×
117
×
106 mm
Poids:
170 g
¡
Poids et dimensions approximatifs.
Sujet à modification sans préavis.
Erreurs et omissions exceptées.
Wir danken Ihnen für das Vertrauen, das Sie Canon mit dem Kauf des
Mikrofonadapters MA-300 entgegenbringen. Bitte lesen Sie vor dem ersten
Gebrauch die folgenden Hinweise sorgfältig durch und bewahren Sie die
Anleitung zum späteren Nachschlagen auf.
Der Mikrofonadapter MA-300 ermöglicht:
1. Zuleitung von Audiosignalen an einen Camcorder GL2/XM2 über Mikrofone
mit XLR-Anschluss.
2. Umwandlung von Videosignalen für den BNC-Anschluss.
¡
Der Mikrofonadapter MA-300 wurde ausschließlich für den Einsatz mit den
Camcordermodellen GL2 und XM2 entwickelt.
[Bezeichnung der Teile]
q
Videoeingang (RCA) (für Anschluss an den Camcorder)
w
Videoausgang (BNC)
e
Audio 1-Eingang (XLR)
r
Audio 2-Eingang (XLR)
t
Mikrofon-Zubehörschuh
y
Mikrofonschelle
u
Schraube für Mikrofonschelle
i
Schuhverriegelung
[Im Lieferumfang]
q
Videokabel
w
Kabelklemme für Befestigung von Kabeln an den Griff
Anbringen des Mikrofons an den Camcorder
Lesen Sie bitte ebenfalls die Bedienungsanleitung des Camcorders.
¡
Schalten Sie den Camcorder aus, bevor Sie den Mikrofonadapter anbringen
oder abtrennen.
1. Schieben Sie den Mikrofonadapter auf den Zubehörschuh des Camcorders.
(Abb. 1)
・
Richten Sie den Mikrofonadapter in Pfeilrichtung (siehe Unterseite des
Adapters) aus und schieben Sie ihn bis zum Einrasten ein.
2. Ziehen Sie die Schuhverriegelung in Richtung des Pfeil fest. (Abb. 2)
Anbringen des Mikrofons
¡
Mikrofone mit einem Durchmesser von 25 mm können direkt and den Adapter
angebracht werden.
¡
Je nach Anbringen des Mikrofons könnte es Vibrationsgeräusche auffangen.
1. Lockern Sie die Schraube der Mikrofonschelle, um die Schelle zu öffnen.
2. Setzen Sie das Mikrofon in die Schelle und ziehen Sie die Schraube fest.
(Abb. 3)
・
Positionieren Sie das Mikrofon so, dass es nicht mit ins Bild kommt bzw.
nicht im LCD-Monitor oder Sucher des Camcorders erscheint.
3. Schließen Sie das Mikrofon an den Audio-Eingang an.
4. Schalten Sie den Camcorder ein.
・
In der Betriebsart Aufnahme oder Aufnahmepause erscheint im LCD-Monitor
oder Sucher der Buchstabe
ç
, um darauf hinzuweisen, dass ein externes
Mikrofon angeschlossen ist.
・
Bei Anschluss eines externen Mikrofons wird das eingebaute Mikrofon des
Camcorders automatisch deaktiviert.
¡
Der Zubehörschuh ist exklusiv für Mikrofone vorgesehen, die an einen
Kameraaufsatz angebracht sind.
¡
Zur Ausgabe von Videosignalen über den BNC-Anschluss verbinden Sie das
mitgelieferte Videokabel mit VIDEO IN und der AV-Buchse des Camcorders.
(Abb. 4)
Technische Daten
Audio
Eingangsbuchse:
XLR-3-31
1: Abschirmung, 2: Aktiv, 3: Inaktiv
Eingangspegel:
-60 dBv (symmetrisch)
Eingangsimpedanz:
600
Ω
Ausgangsimpedanz:
600
Ω
Video
Anschluss für Camcorder:
RCA
Anschluss für externe Geräte: BNC
Abmessungen:
ca. 84
×
117
×
106 mm
Gewicht:
ca. 170 g
¡
Gewicht und Abmessungen sind Annährungswerte.
Änderungen vorbehalten.
Thank you for purchasing the Canon MA-300 Microphone Adapter. Before using
the MA-300 Microphone Adapter, read these instructions carefully and retain
them for future reference.
The MA-300 Microphone Adapter enables you to:
1. Input audio to the GL2/XM2 camcorder with XLR connector-equipped
microphones.
2. Convert video signals for the BNC connector.
¡
The MA-300 Microphone Adapter is for exclusive use with the GL2/XM2
camcorder.
[Components Guide]
q
Video Input Jack (RCA Jack) (connects to the camcorder)
w
Video Output Jack (BNC Connector)
e
Audio 1 Input Jack (XLR Connector)
r
Audio 2 Input Jack (XLR Connector)
t
Microphone Accessory Shoe
y
Microphone Clamp
u
Microphone Clamp Screw
i
Shoe Lock
[Accessories]
q
Video Cable
w
Cable Clip for fixing cables to the handle
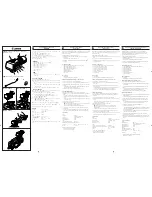
Attaching the Microphone Adapter to the Camcorder
Please refer also to the camcorder instruction manual.
¡
Turn the camcorder off before attaching/detaching the Microphone Adapter.
1. Slide the Microphone Adapter straight onto the camcorder’s accessory shoe
(Fig. 1).
• Orient the Microphone Adapter in the direction indicated with an arrow on
the bottom side and slide it in until it clicks.
2. Tighten the shoe lock in the direction of the arrow (Fig. 2)
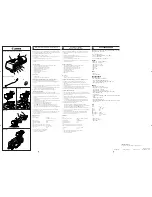
Attaching the Microphone
¡
Microphones with a diameter of 25 mm can be attached directly.
¡
Depending on how you attach the microphone, it may pick up some vibration
noise.
1. Loosen the microphone clamp screw and open the microphone clamp.
2. Place the microphone into the microphone clamp and tighten the clamp screw
(Fig. 3).
• Position the microphone so that it does not appear on the camcorder’s LCD
or viewfinder screen.
3. Connect the microphone to the audio input jack.
4. Turn the camcorder’s power on.
•
Ç
(Connection) appears on the camcorder’s LCD or viewfinder screen when
the camcorder is in record or record pause mode.
• The camcorder’s built-in microphone automatically turns off.
¡
The accessory shoe is for exclusive use with microphones attached to a
camera-mount.
¡
To output video signals via the BNC connector, connect the supplied video
cable to the VIDEO IN terminal and the camcorder’s AV terminal (Fig. 4).
Specifications
Audio
Input jack:
XLR-3-31
1: Shielded, 2: Hot, 3: Cold
Input level:
-60 dBv (balanced)
Input impedance:
600
Ω
Output impedance:
600
Ω
Video
Camcorder-connecting jack:
RCA jack
External device-connecting jack: BNC connector
Dimensions:
84
×
117
×
106 mm (3
1
/
4
×
4
5
/
8
×
4
1
/
8
in)
Weight:
170 g (6 oz)
¡
Weight and dimensions approximate.
Subject to change without notice.
Errors and omissions excepted.
このたびは、マイクロホンアダプター MA-300 をお買い上げいただきまして、誠に
ありがとうございます。
お使いになる前に、この使用説明書をお読みください。
またお読みになった後は、必ず保存してください。
MA-300 を取り付けることで下記のことが可能になります。
① デジタルビデオカメラ XV2 の音声入力を XLR タイプコネクターで行う
② 映像信号を BNC コネクターに変換する
● MA-300 は XV2 専用です。
[各部の名称]
q
VIDEO 入力端子(RCA ピンジャック)(本体接続用)
w
VIDEO 出力端子(BNC コネクター)
e
音声 L 入力端子(XLR タイプコネクター)
r
音声 R 入力端子(XLR タイプコネクター)
t
マイクロホン用アクセサリーシュー
y
マイクロホン取り付け部
u
マイクロホン固定ねじ
i
締め付けねじ
付属品
q
映像用ケーブル
w
ケーブルクリップ(ビデオカメラのハンドルにマイクケーブル/映像用ケーブル
を固定します)
ビデオカメラへの取り付け
ビデオカメラの使用説明書もあわせてご覧ください。
●マイクロホンアダプターを取り付け / 取りはずすときは、ビデオカメラの電源を
切ってください。
1. ビデオカメラのアクセサリーシューにマイクロホンアダプターをまっすぐ差し込
む(図 1)
・ マイクロホンアダプターの底面にある矢印の方向にカチッと音がするまで確実
に差し込んでください。
2. マイクロホンアダプターの締め付けねじを矢印方向に回して固定する(図 2)
マイクロホンの取り付け
●マイクロホン取り付け部には直径 25mm 以下のマイクロホンが取り付けられます。
●固定方法によっては、振動音をひろうことがあります。
1. マイクロホン固定ねじをゆるめ、マイクロホン取り付け部を開く
2. マイクロホンを取り付け部に置き、固定ねじを締める(図 3)
・ マイクロホンが画面に映らない位置にマイクロホンを固定してください。
3. マイクロホンを音声入力端子に接続する
4. ビデオカメラの電源を入れる
・ 撮影または撮影一時停止中に、液晶画面またはビューファインダーの画面下に
「
Ç
(CONNECTION)」がでる。
・ ビデオカメラの内蔵マイクは、自動的に「切」になります。
●アクセサリーシューはカメラシューホルダーに取り付けたマイクロホン専用です。
映像信号を BNC コネクターを使って、出力するときは、付属の映像用ケーブルを
VIDEO IN 端子と本体の AV 端子を接続してください(図 4)。
主な仕様
入力端子:
XLR-3-31(2 系統)
1:シールド、2:ホット、3:コールド
基準入力レベル:
-60dBV(平衡)
入力インピーダンス:
600 Ω
出力インピーダンス:
600 Ω
映像
ビデオカメラ接続用端子:RCA ピンジャック
外部機器接続用端子:
BNC コネクター
寸 法:
約 84 × 117 × 106mm
質 量:
約 170 g
本機の仕様および外観は、改良のため予告なく変更することがありますが、ご了解く
ださい。