background image

Installing Your Multifunction  

to Your Network for the First Time


MAXIFY MB5320


Mac OS


Summary of Contents for MAXIFY MB5320

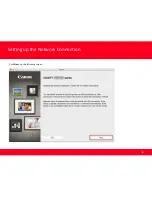
Page 1: ...Installing Your Multifunction to Your Network for the First Time MAXIFY MB5320 Mac OS 1 ...

Page 2: ...configuration of the computer and access point or router is complete and that the computer is connected to the network Wireless Connection Before connecting the machine to the network the computer needs to be connected to the network Make sure that configuration of the computer and access point or router is complete 2 ...

Page 3: ...n your system environment For details refer to your device s instruction manual or contact its manufacturer In an office setup consult your network administrator If you connect to a network that is not protected with security measures there is a risk of disclosing data such as your personal information to a third party Place the machine and computer on the same network segment ...

Page 4: ...Log on as the administrator or a member of the Administrators group Quit all running applications before installation Do not switch users during the installation process Internet connection may be required during the installation Connection fees may apply Consult the internet service provider If the firewall function of your security software is turned on a warning message may appear that Canon so...

Page 5: ...r the file has downloaded successfully double click it to start the install procedure The setup instructions presented in this document describe the Cableless Setup method which does not require the need to know the Access Point network name or network password and does not require the printer to be temporarily connected to the computer with a USB cable Click Next on the first screen If prompted e...

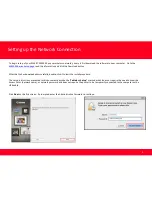
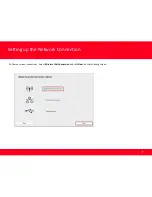
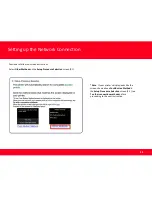
Page 6: ...Setting up the Network Connection 6 6 Click Next on the following screen ...

Page 7: ...Setting up the Network Connection 7 7 Follow on screen instructions Select Wireless LAN Connection and click Next on the following screen ...

Page 8: ...Setting up the Network Connection 8 8 Follow on screen instructions Select Access Point Connection and click Next on the following screen ...

Page 9: ...Setting up the Network Connection 9 9 Continue following on screen instructions On the Printers on Network List check the Setting printer could not be found on the list checkbox and click Next ...

Page 10: ...Setting up the Network Connection 10 10 Continue to follow on screen instructions Follow the instructions on the Printer Setup screens 1 1 and 1 2 to select Wireless LAN setup ...

Page 11: ...ructions Select Other Methods on the Setup Procedure Selection screen 2 1 Note If your printer s display looks like the screen shown above Push Button Method in the Setup Procedure Selection screen 2 1 tap To other connection methods before proceeding to the next instruction ...

Page 12: ...ting up the Network Connection 12 12 Continue to follow on screen instructions Select Other setup on the Setup Procedure Selection screen 2 2 and Cableless setup on the Setup Procedure Selection screen 2 3 ...

Page 13: ...Setting up the Network Connection 13 13 Continue to follow on screen instructions Select Other setup and Cableless setup on the Connection via Cableless setup screens 3 1 and 3 2 ...

Page 14: ...p the Network Connection 14 14 Continue to follow on screen instructions Tap OK when Follow the instructions on the computer or Smartphone appears then click Next on the Connection via Cableless setup screen 3 3 ...

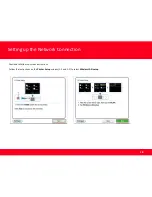
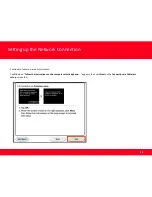
Page 15: ...Setting up the Network Connection 15 15 Click Next on the Connection Completed screen ...

Page 16: ...nstructions On the Software Installation List select software to install and click Next MP Drivers and Canon IJ Network Tool are required and cannot be deselected We recommend installing Quick Toolbox and IJ Scan Utility2 to take full advantage of the printer s features ...

Page 17: ...Adding the Printer 17 17 Continue following the on screen instructions When the Add Printer screen appears click Add Printer ...

Page 18: ...18 18 Select the Canon MB5300 series with Canon IJ Network listed in the Kind column then click Add Adding the Printer ...

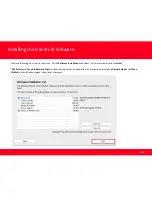
Page 19: ...19 19 Click Next on the Add Printer screen Adding the Printer ...

Page 20: ...e following on screen instructions When the Setup Complete screen appears click Next At this point setup of the printer and network is complete Continue to follow any remaining on screen instructions to finish and exit the setup program ...

Reviews: