(7) Spur unit and platen unit removal
rail, align the rail to the marks that were put in the first step of disassembly, and securely fasten the
screws.
If the carriage unit is not necessary to be replaced, parts under the purge drive system unit, etc.
can be replaced without removing the carriage rail. While holding a set of a) main chassis, b)
upper and lower carriage rails, and c) carriage unit together, just remove the screws from the
left and right plates. This way, you just have to reassemble the set of units (marking of the
carriage rail position to the main chassis is not necessary).
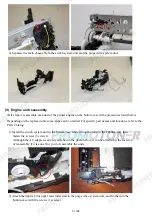
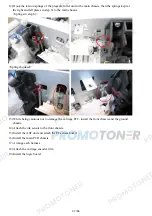
1) Remove the ink sensor and the inner cover sensor from the front chassis (1 screw each).
2) From the left and right sides of the spur unit, release the springs (2 on the left side, 1 on the right
side). Then, slowly pull the spur unit upward to separate it from the platen unit.
28 / 66
Summary of Contents for MG6110
Page 24: ...5 Remove the main case no screws 20 66...
Page 36: ...3 Attach the cassette feed guide 4 Install the cassette feed roller unit 32 66...
Page 44: ...4 Slowly lift the print unit to separate it from the bottom case 40 66...
Page 58: ...54 66...
Page 63: ...4 2 Integrated Inspection Pattern Print Print sample 59 66...
Page 64: ...4 3 Ink Absorber Counter Value Print Print sample 4 VERIFICATION AFTER REPAIR 60 66...
Page 68: ...64 66...

