background image

Setting Up Your MX320 In

Setting Up Your MX320 In 

Default Mode (Tel Priority Mode) 

Without An Answering Machine
DSL/Cable Modem Connection

DSL/Cable Modem Connection

Next

Summary of Contents for MX320

Page 1: ...Setting Up Your MX320 In Setting Up Your MX320 In Default Mode Tel Priority Mode Without An Answering Machine DSL Cable Modem Connection DSL Cable Modem Connection Next...

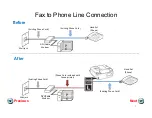
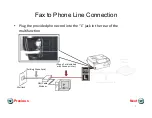
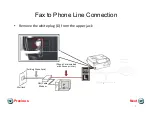
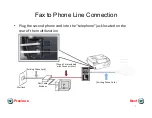
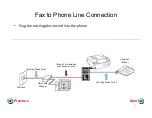
Page 2: ...Connecting The Phone Lines Connecting The Phone Lines Next Previous...

Page 3: ...and Set Phone Existing Phone Cord Existing Phone Cord Wall jack DSL Cable Modem P C After Phone Cord included with Canon printer Existing Phone Cord Hand Set Phone Existing Phone Cord DSL Cable P Next...

Page 4: ...e Connection Plug the provided phone cord into the DSL Cable Modem Hand Set Phone Phone Cord included ith C i t Existing Phone Cord with Canon printer Existing Phone Cord Wall Jack DSL Cable Modem P C...

Page 5: ...Plug the provided phone cord into the L jack in the rear of the multifunction Phone Cord included ith C i t Hand Set Phone Existing Phone Cord with Canon printer Existing Phone Cord Wall jack DSL Cab...

Page 6: ...e Line Connection Remove the white plug D from the upper jack Phone Cord included ith C i t Hand Set Phone Existing Phone Cord with Canon printer Existing Phone Cord Wall jack DSL Cable Modem P C Next...

Page 7: ...he second phone cord into the telephone jack located on the rear of the multifunction Phone Cord included ith C i t Hand Set Phone Existing Phone Cord with Canon printer Existing Phone Cord Wall jack...

Page 8: ...e Line Connection Plug the existing phone cord into the phone Phone Cord included ith C i t Hand Set Phone Existing Phone Cord with Canon printer Existing Phone Cord Wall jack DSL Cable Modem P C Next...

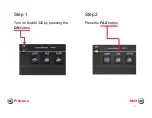
Page 9: ...Setting Up The Receive Mode Setting Up The Receive Mode Next Previous...

Page 10: ...Step 1 Step 2 Turn on the MX320 by pressing the ON button Press the FAX button Next Previous 10...

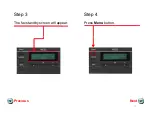
Page 11: ...Step 3 Step 4 The fax standby screen will appear Press Menu button Next Previous 11...

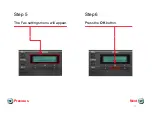
Page 12: ...Step 5 Step 6 The Fax settings menu will appear Press the OK button Next Previous 12...

Page 13: ...Step 7 Step 8 The Receive mode set screen will appear Use the LEFT or RIGHT button to select TEL priority mode Next Previous 13...

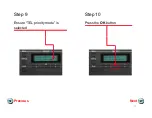
Page 14: ...Step 9 Step 10 Ensure TEL priority mode is selected Press the OK button Next Previous 14...

Page 15: ...Step 11 Your MX320 is now set to TEL priority mode Notice that the mode is listed on the fax standby screen Next Previous 15...

Page 16: ...MX320 Listen for fax tones Listen for fax tones When the tones stop hang up the handset Th MX320 ill i th f d t The MX320 will receive the fax document IMPORTANT In order to receive a fax you must pi...

Reviews: