background image

Summary of Contents for OC210

Page 1: ...Canon OC210 PUB DIM 797 DVD Camcorder I I Instruction Manual English Camescope DVD I I Manuel d instruction Fran ais Camara DVD I I Manual de Instrucciones Espafiol ...

Page 2: ...raged to try to correct the Interference by one or more of the following measures Reorient or relocate the receiving antenna Increase the separation between the equipment and receiver Connect the equipment into an outlet on a circuit different from that to which the receiver is connected Consult the dealer or an experienced radiolTV technician for help The cable with the ferrite core prOVided with...

Page 3: ...d cart iiiIJ combination to overturn 10 Power Sources The CA 570 Compact Power Adapter should be operated only from the type of power source indicated on the marking label If you are not sure of the type of power supply to your home consult your product dealer or local power company Regarding other power sources such as battery power refer to instructions in this manual 11 Polarization The CA 570 ...

Page 4: ...A DISCHARGE UNIT NEC SECTION 810 20 6 1GROUNDING I CONDUCTORS NEC SECTION 810 21 GROUND CLAMPS POWER SERVICE GROUNDING ELECTRODE SYSTEM NEG ART 250 PART H EXAMPLE OF ANTENNA GROUNDING AS PER NATIONAL ELECTRICAL CODE NEC NATIONAL ELECTRICAL CODE Fig 1 14 Lightning For added protection of this product during a lightning storm or when it is left unattended and unused for long periods of time disconne...

Page 5: ...an be recorded only once you cannot edit or delete the recordings On the other hand these discs are comparatively cheaper and they can be played back in most common DVD players DVD R DL DVD R DVD RW Best for Reusability Recordings made on a DVD RW disc can be edited or deleted Also the disc can be initialized1 allowing you to use the same disc numerous times Disc specification on DVD RWs DVD RW di...

Page 6: ... all you have to do is just pop it into a DVD player and start the playback If you record your disc in VI DEO mode you will be able to play back your disc on most tabletop DVD players and DVD devices Recommended Discs The camcorder s performance was tested with single layered discs using Hitachi Maxell HG series DVD discs and with dual layered discs using Canon DVD R DL54 discs and Verbatim DVD R ...

Page 7: ... the disc to its initial value so you can use the same disc again DVD R and DVD R DL discs cannot be initialized 2 Disc finalization is the processing of the free space the unrecorded area on the disc in order to make it playable on external DVD devices CD 61 To finalize a DVD R DL disc the camcorder has to process both layers Therefore and depending on the amount of free space on the disc this pr...

Page 8: ... the Set up Menus 25 First Time Settings Changing the Language 26 Changing the Time Zone 26 Setting the Date and Time 27 Basic Functions Recording Shooting Video 28 Selecting the Aspect Ratio of your Recordings 16 9 Widescreen or 4 3 29 Taking Photos 30 Zooming 31 Quick Start Function 31 Playback Playing Back the Video 32 Displaying the Photos 33 Magnifying Photos during Playback 35 Advanced Funct...

Page 9: ...oving Scenes in the Playlist 55 Deleting Scenes 55 Dividing a Scene 56 Managing the Disc Protecting the Disc 57 Initializing the Disc 57 Changing the Disc Title 58 Managing Photos Erasing Photos 59 Converting Photos into Photomovie Scenes 60 Playing Back the Disc on an External Device Finalizing the Disc 61 Playing Back your Disc on a DVD Player or a Computer s DVD Drive 62 Unfinalizing the Disc A...

Page 10: ... General Information System Diagram 76 Optional Accessories 77 Product Codes 78 Specifications 79 Index 81 ...

Page 11: ...manual Screen refers to the LCD and the viewfinder screen Scene refers to one movie unit from the point you press the start stop button to start recording until you press again to pause the recording The terms Photo and Still image are used interchangeably with the same meaning The photos included in the manual are simulated pictures taken with a still camera Brackets and capital letters are used ...

Page 12: ... mode To turn on the camcorder Hold the lock button pressed down and move the power switch down to ON To change the operating mode From the ON position slide down the power switch momentarily toward MODE and release it This action will toggle the operating mode between recording CAMERA red indicator and playback PLAY green indicator t Lock button About the Operating Modes The camcorder s operating...

Page 13: ...oducts not mentioned above may be trademarks or registered trademarks of their respective companies ANY USE OF THIS PRODUCT OTHER THAN CONSUMER PERSONAL USE IN ANY MANNER THAT COMPLIES WITH THE MPEG 2 STANDARD FOR ENCODING VIDEO INFORMATION FOR PACKAGED MEDIA IS EXPRESSLY PROHIBITED WITHOUT A LICENSE UNDER APPLICABLE PATENTS IN THE MPEG 2 PATENT PORTFOLIO WHICH LICENSE IS AVAILABLE FROM MPEG LA L ...

Page 14: ...help you refer to this information in the event of an insurance claim such as loss or theft Receive information on new products and promotions Upon your request we will send you information on Canon new products and promotions The serial number of this product can be found at the battery attachment unit of the camcorder Write down the number and other information here and retain this book as a per...

Page 15: ...31 AV terminal OJ 64 Terminal cover BATT battery release switch OJ 20 J RESET button OJ 66 Serial number Battery attachment unit OJ 20 Lens cover switch OJ 28 30 e open closed Disc compartment cover OJ 22 Grip belt OJ 23 DC IN terminal OJ 20 jJl Stereo microphone Names of buttons and switches other than the joystick are indicated within a button frame for example FUNC I 5 r o a t r o ...

Page 16: ...2 START STOP button OJ 28 stop button OJ 32 PLAYLIST button OJ 54 Viewfinder OJ 23 Dioptric adjustment lever OJ 23 jJ 0 movies still images switch OJ 12 DISC access indicator OJ 28 30 CHG charge indicator OJ 20 Start stop button OJ 28 Power switch OJ 12 OPEN disc cover switch OJ 22 Grip belt OJ 23 Mode switch OJ 43 Zoom lever OJ 31 PHOTO button OJ 30 Speaker OJ 33 Tripod socket OJ 29 Strap mount N...

Page 17: ...isc mark OJ 61 r o 0 c ci Manual focus OJ 46 1 III mI J Recording Still Images Image stabilizer OJ 38 Disc operation Time code hours minutes seconds Camcorder shake warning OJ 37 AF frame OJ 50 Number of still images available on the disc Remaining battery charge estimate Zoom OJ 31 Exposure 0 1 0 OJ 46 Still image quality size OJ 49 Level marker OJ 40 Wind screen off OJ 38 Recording reminder Rema...

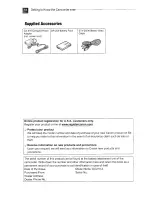
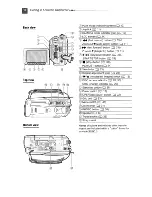
Page 18: ...Getting to Know the Camcorder ...
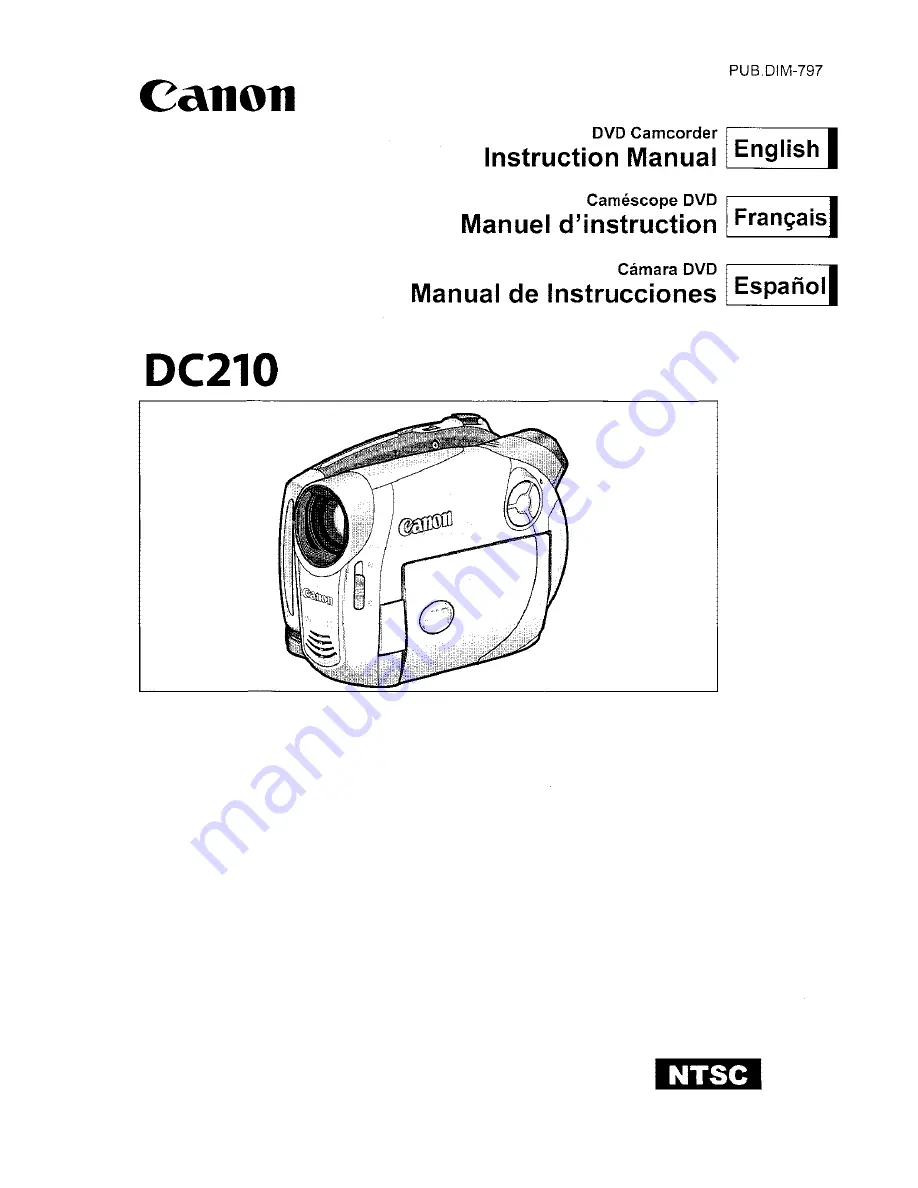
Page 19: ...ime of recording Current image Total number of images Histogram OJ 51 CD Image number OJ 41 H tiMMIL CD L 101 0107 a P 1024x768 MF SV O 44MB s f F 2 0 O OO 1 30 OCT 1 200 9 20 AM White balance OJ 47 Manual exposure OJ 46 Image size OJ 49 Image effect llJ 48 Recording program OJ 43 J Manual focus OJ 46 _ R ffi jJ iii P lU qX tits fj MF ev 0 44MB iii i F2 0 m f O 00 1 30 File size Aperture value Shu...

Page 20: ...consumed ONCE THE BATTERY IS FULLY CHARGED 1 Disconnect the compact power adapter from the camcorder 2 Unplug the power cord from the power outlet and the compact power adapter To REMOVE THE BATTERY PACK Slide down BATT to release the battery pack and pull out the battery pack holding it from the ridge on its bottom part oIMPORTANT Turn off the camcorder before connecting or disconnecting the comp...

Page 21: ...e recommend that you prepare battery packs 2 to 3 times longer than you think you might need U S A and Canada only The lithium CD ion polymer battery that powers this product is recyclable Please call N 1 800 8 BATTERY for information on how to recycle this battery Charging Recording and Playback Times with the Bp 208 Battery Pack The recording and playback times given in following tables are appr...

Page 22: ...he recording surface of the disc or the pick up lens 4 Close the disc cover Do not force the cover closed if the disc is not correctly inserted and firmly set in place WHEN USING DVD R1DVD R DL DISCS You can start recording movies once the record pause e indication appears WHEN USING A DVD RW You need to initialize new discs before you can start recording The disc initialization screen will appear...

Page 23: ...n the way of the disc cover It may take a moment after sliding OPEN for the disc cover to open 2 Grab the edge of the disc and gently pull it out Be careful not to touch the recording surface of the disc or the pick up lens 3 Close the disc cover o IMPORTANT When you slide OPEN I after making a recording important file allocation data is updated on the disc before the disc cover opens While the DI...

Page 24: ...ude yourself when recording with the self timer This is the only case where you can use the viewfinder and the LCD screen simultaneously Subject can monitor the LCD screen LCD Backlight You can adjust the brightness of the LCD screen to one of two levels Keep IDISP j pressed down for more than 2 seconds Repeat this action to toggle between the normal and bright settings This setting does not affec...

Page 25: ...ch as the _ icon small arrows etc 4 Press IFUNC I to save the settings and close the menu You can press IFUNG j to close the menu at any time 1 Press FUNC I During the playback of a disc recorded in VIDEO mode pressing FUNG j will open directly the setup menus Continue directly from step 3 2 Select the g icon and press J to open the setup menus You can also hold IFUNC I pressed down for more than ...

Page 26: ... for daylight saving time select the time zone with the mark next to the area 6 Press FUNG to close the menu FUNC FUNC OJ 25 DEUTSCH ROMANA fI1M 1 lVH I ENGLISH TORKc E fal1t x ESPANOL PYCCKV1C1 I x FRANc AIS YKPAiHCbKA E Ol ITALIANO yJ B fi POLSKI J1j ILANGUAGE ENGLISH Default value t FUNC OJ25 FUNC J 1 Press FUNG j 2 Select J T the g icon and press to open the setup menus 3 Select CJ T DISPLAY S...

Page 27: ...ted with up down arrows 5 Push the joystick T to set the date and time and to move between the fields of the date and time 6 Press to start the clock 7 Press IFUNC J to close the menu o IMPORTANT When you do not use the camcorder for about 3 months the built in rechargeable lithium battery may discharge completely and the date and time setting may be lost In such case recharge the built in lithium...

Page 28: ...k to ON again About the LCD and viewfinder screen The screens are produced using extremely high precision manufacturing techniques with more than 99 99 of the pixels operating to specification Less than 0 01 of the pixels may occasionally misfire or appear as black red blue or green dots This has no effect on the recorded image and does not constitute a malfunction Q IMPORTANT WHEN YOU HAVE FINISH...

Page 29: ...ile reviewing the scene select the J icon and press Y to return to the recording mode If you are using a OVO RW disc you can also delete the scene immediately after recording it Select the 7 icon to delete the scene while reviewing it OJ 55 Selecting the Aspect Ratio of your Recordings 16 9 Widescreen or 4 3 You can select the aspect ratio of your recording to match your TV The camcorder uses the ...

Page 30: ...mpacts Do not open the disc cover and do not remove the disc Do not disconnect the power source or turn off the camcorder Do not change the position of the 0 switch or the operating mode Q 12 I B I M E R I 11 D Taking Photos 1 Move the power switch to ON to set the camcorder in CAMERA mode The red CAMERA indicator will turn on 2 Move the lens cover switch down to e to open the lens cover 3 Move th...

Page 31: ...u press QUICK START I instead of turning off the camcorder you can get it ready to start recording within approx 1 second W T E 3 I When set to l lillJ VARIABLE the zoom speed will be faster in the record pause mode Keep at least 1 m 3 3 ft to the subject At wide angle you can focus on a subject as close as 1 cm 0 39 in Zoom out POINTS TO CHECK 35x Optical Zoom Move the zoom lever toward W to zoom...

Page 32: ...following actions while in standby mode while the standby lamp is on the camcorder will return to record pause mode Open the disc compartment cover Slide the power switch toward MODE Change the position of the O switch Playing Back the Video aJ 12 1 Move the power switch to ON then slide it down toward MODE and release it to set the camcorder in PLAY mode The green PLAY indicator will turn on 2 Mo...

Page 33: ... Slow Playback During playback pause press or on the camcorder Repeatedly press the button to increase the playback speed Slow playback 1 16 1 8 1 4 the normal speed Skipping Scenes During playback push the joystick to skip to the next scene Push the joystick to skip to the beginning of the current scene Push the joystick twice to skip to the previous scene 1 I I 1 Note that you do not have to dis...

Page 34: ... index screen closes and the selected image is displayed Image Jump Function You can also quickly locate a specific image without having to browse all of them one by one To RUN THROUGH THE STILL IMAGES Push the joystick or and hold it pressed down to run quickly through the still images To SKIP 10 OR 100 STILL IMAGES Index Screen 1 Move the zoom lever toward W The still images index screen appears...

Page 35: ...the magnified area To further enlarge the image move the zoom lever toward T To reduce the magnification to less than 2 times move the zoom lever toward W will appear for images that cannot be enlarged 2 Select the part of the image to be magnified with the joystick Move J the frame to the part of the image you want to see enlarged To cancel the magnification move the zoom lever toward W until the...

Page 36: ...ording side Recording in LP mode gives you a longer recording time however depending on the condition of the disc long usage imperfections etc the picture and sound recorded in LP mode may be distorted We recommend using the XP or SP mode for important recordings The camcorder uses a variable bit rate VBR when encoding the video data so the actual recording times will vary depending on the content...

Page 37: ...recordings in places with insufficient lighting The camcorder uses shutter speeds down to 1 30 1 15 when recording still images If a trailing afterimage appears set the slow shutter to i OFF If o camcorder shake warning appears we recommend stabilizing the camcorder for example by mounting it on a tripod Setup Menus IA SL SHUTTER Disc type VR mode Move a scene in the playlist This option is availa...

Page 38: ...O AE recording program The image stabilizer cannot be turned off when the mode switch is set to AUTO We recommend setting the image stabilizer to em OFF when using a tripod m3 ON em OFF Mode switch P BAUTO emOFF The camcorder automatically reduces the background sound of wind when recording outdoors Mode switch P rn n ON AiAF ON CENTER em OFF 11 CD 50 L 1 W_I_DE_S_CR_E_EN li CD 29 IAI III IWIND SC...

Page 39: ...the original index screen I c Q 1 c c r o fA Disc type VR mode NO YES Disc type VR mode NO YES This option is available only in the playlist index screen NO YES I CO 60 L IPHOTOMOVIE DISC OPERATIONS IDISC INFO 1 11111114 11 Displays a screen where you can verify the details regarding the disc The disc information includes the disc title the disc type DVD R DVD R DL or DVD RW the disc specification...

Page 40: ...NA TORKCE PYCCKV1 YKPAiHCbKA yJ J1j fllM lb lll J 7EiJ1 3t I Y Ol B Ei ttmJl DISPLAY SETUP 1 12 11 mJ ON lm OFF When the LCD panel is rotated 180 degrees to face the subject most screen displays will disappear and the image displayed will be as if the subject was looking at a mirror Adjusts the brightness of the LCD screen Use the joystick to adjust the brightness to your preference Changing the b...

Page 41: ...e numbers will continue from the number following that of the last image recorded with the camcorder If the disc you insert already contains an image with a larger number a new image will be assigned a number one higher than that of the last image on the disc We recommend using the CONTINUOUS setting ITV TYPE 1I Jmm 10 min 20 min 30min Select the length of time after which the camcorder will end t...

Page 42: ...rrent version of the camcorder s firmware This menu option is usually grayed out I TI_ZO_N_E _DS_T I OJ 26 1 D_AT_E_ T_IM_E I OJ 27 IDATE FORMAT Y M D 2007 1 1 AM 12 00 M D Y JAN 1 2007 12 00 AM D M Y 1 JAN 2007 12 00 AM Changes the date format for on screen displays ...

Page 43: ...t prevents the subject from while blurring other being underexposed distracting details mSPOTLIGHT Use this mode to record spotlit scenes fIISPORTS Use this mode to record sports scenes such as tennis or golf I lNIGHT Use this mode to record in dimly lit places ifJSEACH Use this mode to record on a sunny beach It prevents the subject from being underexposed C SUNSET Use this mode to record sunsets...

Page 44: ...riate for the recording conditions In such case select a different value Set the shutter speed value The camcorder automatically sets the appropriate aperture value Use a high shutter speed to record fast moving subjects or a slow shutter speed to add a certain motion blur emphasizing the feel of movement Do not change the position of the mode switch while recording as the brightness of the image ...

Page 45: ...f the mode switch while recording as the brightness of the image may change abruptly Ea PORTRAIT SPORTS iJ BEACH I SNOW The picture may not appear smooth during playback Ea PORTRAIT The blur effect of the background increases the more you zoom in 1 NIGHT Moving subjects may leave a trailing afterimage Picture quality may not be as good as in other modes White points may appear on the screen Autofo...

Page 46: ...NEXT 1 If the joystick guide does not appear on screen press to display it 2 Push the joystick toward EXP If EXP does not appear on the joystick guide repeatedly push the joystick T toward NEXT to display the joystick guide in the illustration above The exposure adjustment indicator 0 1 0 and the neutral value O appear on the screen If you operate the zoom during exposure lock the brightness of th...

Page 47: ...Default value Use the custom white balance setting to make white subjects appear white under colored lighting Co Q s CD Co TI c s o s en FUNC Icon of the currently selected White Balance 0 IFUNC j J IDesired option When you select b Ll SET do not press FUNC j and continue instead with the procedure below FUNC CD 25 OJ 12 Adjust the zoom before you start the procedure Mode switch P t FOCUS 1 l 4 J ...

Page 48: ...epending on the light source eoo LJ may keep flashing The result will still be better than with AW AUTO Reset the white balance when the lighting condition changes Turn off the digital zoom The camcorder retains the custom white balance setting even if you turn it off Custom white balance may provide better results in the following cases Changing lighting conditions Close ups Subjects in a single ...

Page 49: ...oximate numbers of still images that can be recorded on different medias by image size quality Co Q 3 CD Co TI c 3 o 3 tJ II o iJ Press o iJ IFUNC j J IDesired image quality The number displayed on the right corner indicates the approximate number of images that can be recorded with the current quality size setting CD 12 2 690 3 910 7 830 4 890 7 115 9 999 2 735 3 980 7 965 6 625 9 570 9 999 9 999...

Page 50: ...IFOCUS PRI Mode switch at AUTO The focus priority cannot be turned off Mode switch at P You can turn off the focus priority and you can also select the AF autofocus frame to be used IFUNC I J IDesired option In the II FIREWORKS recording program the focus priority is automatically set to 1D OFF Options Default value Select this option if you wish to record a still image as soon as you press Except...

Page 51: ...ning the date and time and other camera data shutter speed exposure etc registered at the time of recording You can select the data to be displayed Turning the On Screen Displays OnlOff Repeatedly press DISP to turn the on screen displays on off in the following sequence QIMERlf J DIMERI Dii5 All displays on All displays off1 PLI J All displays on Data code2 only All displays off PLlA il l All dis...

Page 52: ...halfway to activate the autofocus and then fully to record the still image The camcorder will record the still image after a 10 second countdown The countdown appears on the screen Once the countdown has begun you can press IStart Stop I when recording movies or press PHOTO I fully When recording still images to cancel the self timer The self timer will also be canceled if you turn off the camcord...

Page 53: ...If the joystick guide does not appear on screen press to display it 2 Push the joystick toward If does not appear on the joystick guide repeatedly push the joystick T toward NEXT to display the joystick guide in the illustration above The icon of the selected effect turns green Push the joystick toward again to deactivate the fader effect To FADE IN Push the joystick toward in record pause mode el...

Page 54: ... Include in your playlist only the scenes you prefer or change the order in which they will be played back without affecting your original recordings After you add scenes to the playlist you will have two types of index screens cOriginal index screen original recordings I PLAYLIST I ORIGINAL Q 12 Disc type DVD RW VR mode IFUNC j I d1 ADD TO PLAYLIST J IDesired option When the operation is complete...

Page 55: ... 2 Push the joystick toward 19 If 19 does not appear on the joystick guide repeatedly push the joystick T toward NEXT to display the joystick guide in the illustration above When the mode switch is set to AUTO only one joystick guide will appear 3 While reviewing the scene select ITD and press Deleting a Scene Just After Recording Scenes cannot be deleted when the disc is protected CO 57 You may n...

Page 56: ...cut out the rest Remember that when you divide scenes in the playlist you do not affect your original recordings Photomovie scenes OJ 60 and very short scenes 1 second or less cannot be divided POINTS TO CHECK OJ 12 Disc type DVD RW VR mode From the original index screen select A T the scene to divide To divide a scene only in the playlist press PLAYLlST first and then select the scene FUNC OJ25 F...

Page 57: ...ll the recordings on the disc or in order to change the disc specification FUNC I I MENU Initializing the disc CD 57 will permanently erase all recordings even if the disc is protected CD 12 Initializing the disc will permanently erase all recordings even if the disc is protected The lost original recordings cannot be recovered Initialize all DVD RW discs before using them with this camcorder Disc...

Page 58: ... finalized them IVR CO 12 IYES FUNC j J I_Y_E_S Close the menu only after the screen display returns to the DISC OPERATIONS menu FUNC CD 25 FUNC IDISC OPERATIONS IDISC TITLE 0 Enter the title up to 20 characters 0 ISET MENU j J I_Y_E_S _ Only when using a DVD RW recorded in VR mode With discs recorded in VIDEO mode pressing FUNC I will open the menu directly on the setup menus screen Select one ch...

Page 59: ...pe DVD RW VIDEO or VR mode CO 12 I _PO_I_N_TS_T_O_C_H_E_CK Erasing All Images The following procedure will erase all the CO 12 still images from the disc Disc type DVD RW VR mode 1 lt 1 I 1 If the joystick guide does not appear on screen press to display it 2 Push the joystick T toward u 3 Select ERASE and press Erasing a Single Image Just After Recording You can erase a still image just recorded ...

Page 60: ...e scene a slide show of all still images on the disc where each image will be displayed for approx 3 seconds OJ 12 We recommend setting TV TYPE to NORMAL TV OJ 41 before creating the Photomovie scene Converting a Single Image IFUNG I J I Y_E_S l If the disc becomes full while creating a Photomovie scene the operation will be canceled This function does not affect the original still images Select t...

Page 61: ... in permanent data loss Always power the camcorder using the II compact power adapter The operation cannot be started if the camcorder is powered only with the battery pack Avoid the following actions while the operation is in progress Failing to do so can interrupt the process and result in permanent data loss Do not move the camcorder Do not disconnect the compact power adapter Depending on the ...

Page 62: ...rnal DVD device For details about disc compatibility refer to the instruction manual of the DVD player or DVD drive ON A DVD PLAYER 1 Turn on the TV and DVD player 2 Insert a finalized disc in the DVD player 3 Select the scene you want to play from the index screen ON A COMPUTER S DVD DRIVE 1 Insert a finalized disc in the DVD drive 2 Run the DVD playback software Refer also to the instruction man...

Page 63: ...impacts for example to place it on a table or to disconnect the AV cable after the unfinalization process started may result in permanent data loss Always power the camcorder using the compact power adapter The operation cannot be started if the camcorder is powered only with the battery pack Avoid the following actions while the operation is in progress Failing to do so can interrupt the process ...

Page 64: ...l Sound from the built in speaker will be AV muted while the STV 250N stereo video cable is connected to the camcorder Terminal onthe Camcorder Connecting Cable Output connection Signal Flow to a TV or VCR with AV Terminals t Yellow Er White AV STV 250N Stereo Video Cable Red Supplied ...

Page 65: ...mcorder On a VCR Set the input selector to the external video input usually labeled LINE IN 2 Start the playback of the movies CO 32 or still images CD 33 Recording 1 Connected device Load a blank cassette or disc and set the device to record pause mode 2 This camcorder Locate the scene you wish to copy and pause playback shortly before the scene 3 This camcorder Resume the movie playback 4 Connec...

Page 66: ...ce the battery pack temperature is below 40 C 104 OF The battery pack is damaged Use a different battery pack 20 Buttons will not work Turn on the camcorder Load a disc 22 Abnormal characters appear on Disconnect the power source and reconnect it after a short time the screen The camcorder If the problem still persists disconnect the power source and does not operate properly press the RESET butto...

Page 67: ...up in red for a while before resuming operation Recording co Image will not appear on the screen SET THE TIME ZONE DATE AND TIME appears on the screen Pressing the start stop button will not start recording Even after stopping recording the disc access indicator does not go off The point where the start stop button was pressed does not match the beginning end of the recording Set the camcorder to ...

Page 68: ...e playback button Load a disc 22 does not start playback Set the camcorder to PLAY 32 You may not be able to play with this camcorder discs recorded or edited with other DVD recorders or computer DVD drives If using a single sided disc check that the disc is inserted with 22 the label side facing up The camcorder has exceeded its operational temperature Turn off the camcorder and let it cool down ...

Page 69: ... Adjust the volume with thejoystick 33 and joystick guide in Pl Ay t mode Disconnect the stereo video cable from the camcorder Playing Back the Disc in an External DVD Device External DVD device refers to DVD players DVD recorders computer s DVD drives and other digital devices Problem OJ There is a brief stop between Depending on the DVD player there might be a very short stop scenes between scen...

Page 70: ...has formed Wait 74 until the camcorder dries completely before resuming use The disc s recording surface may be dirty or scratched REACHED THE MAXIMUM The maximum number of scenes has been reached Delete some 22 NUMBER OF SCENES recordings DVD RW in VR mode to free some space or replace 55 the disc CANNOT PLAY DISC The disc is dirty or you attempted to play back a disc type not supported not DVD R...

Page 71: ...if condensation has formed Wait 74 until the camcorder dries completely before resuming use LOADING THE DISC The disc is being read Wait before you start recording AVOID MOVING THE Try not to move the camcorder while the image is being recorded CAMCORDER UNABLE TO RECOVER Could not recover a corrupted file DATA This message can also appear if condensation has formed If you 74 suspect condensation ...

Page 72: ...ct the camcorder to shocks or vibration as this may cause damage Battery Pack DANGER Treat the battery pack with care Keep it away from fire or it might explode Do not expose the battery pack to temperature higher than 60 C 140 OF Do not leave it near a heater or inside a car in hot weather Do not try to disassemble or modify it Do not drop or knock it Do not get it wet Charged battery packs conti...

Page 73: ...tch or wet the disc and do not subject it to strong shocks Do not attach any labels or stickers on the disc surfaces The disc may not rotate in a stable manner and this may cause malfunctions To protect the disc return it to its case for storage When writing on the label side of the disc avoid hard tip pens Use waterproof soft tipped felt pens instead Moving a disc rapidly between hot and cold tem...

Page 74: ...type blower brush Use a clean soft lens cleaning cloth to gently wipe the lens or viewfinder Never use tissue paper LCD Screen Clean the LCD screen using a clean soft lens cleaning cloth Condensation may form on the surface of the screen when the temperature changes suddenly Wipe it with a soft dry cloth Condensation Moving the camcorder rapidly between hot and cold temperatures may cause condensa...

Page 75: ...urs before resuming use of the camcorder Using the Camcorder Abroad Power Sources You can use the compact power adapter to operate the camcorder and to charge battery packs in any country with power supply between 100 and 240 V AC 50 60 Hz Consult the Canon Service Center for information on plug adapters for overseas use Playback on a TV Screen You can only play back your recordings on TVs compati...

Page 76: ...attery Pack CA 570 Compact Power Adapter e o q J TV VCR Computer c i 3 DVD playerl recorder c Fa DVD playerl recorder BP 208 Battery Pack C STV 250N Stereo Video Cable Mini DVD Disc DVD R DVD RW DVD R DL Canon DVD R DL54 Mini DVD Disc DVD R DVD RW1 DVD R DL Canon DVD R DL54 SC 2000 Soft Carrying Case ...

Page 77: ...on accessories e g a leakage and or explosion of a battery pack Please note that this warranty does not apply to repairs arising out of the malfunction of non genuine Canon accessories although you may request such repairs on a chargeable basis II Battery Packs When you need extra battery packs select only the BP 208 battery pack CG 300 Battery Charger Use the battery charger for charging the batt...

Page 78: ...anon video accessories When you use Canon video equipment we recommend Canon brand accessories or products bearing the same mark Product Codes Provided Accessories CA 570 Compact Power Adapter BP 208 Battery Pack STV 250N Stereo Video Cable Optional Accessories CG 300 Battery Charger WS 20 Wrist Strap SC 2000 Soft Carrying Case 8468A002AA 0802B002AA 3067A002AA 082 0590 201 0784B002AA 3118A002AA 08...

Page 79: ... approx 680 000 pixels Effective pixels 16 9 Movies Image stabilizer ON approx 360 000 pixels 16 9 Movies Image stabilizer OFF approx 450 000 pixels 4 3 Movies approx 340 000 pixels Still images approx 450 000 pixels 2 7 in wide TFT color approx 123 000 pixels 0 27 in wide TFT color approx 123 000 pixels Stereo electret condenser microphone f 2 6 91 mm F 2 0 5 0 35x power zoom 35 mm equivalent 16 ...

Page 80: ...Compact Power Adapter Power supply Rated output I consumption Operating temperature Dimensions Weight Bp 208 Battery Pack Battery type Rated voltage Operating temperature Battery capacity Dimensions Weight 100 240 V AC 50 60 Hz 8 4 V DC 1 5 A 129 VA 100 V 39 VA 240 V o 40 C 32 104 OF 52 x 29 x 90 mm 2 1 x 1 1 x 3 5 in 135 g 4 8 oz Rechargeable Lithium Ion Battery 7 4 V DC o 40 C 32 104 OF 850 mAh ...

Page 81: ...ng still images 59 Error messages 70 D File numbers 41 Finalizing the disc 61 Fireworks recording program 43 Focus priority 38 FUNC menu 25 36 D Grip belt 23 II Image effects 48 Image jump 34 Image stabilizer 38 Index screen Movies 32 Index screen Still images 34 Initialization Disc 57 II Joystick 11 Joystick guide 11 D Language 26 LCD backlight 24 LCD screen 24 LP mode 36 EI Magnifying a still im...

Page 82: ... 52 Serial number 15 Setup menus 25 37 Shoulder strap 77 Slideshow 34 Snow recording program 43 SP mode 36 Sports recording program 43 Spotlight recording program 43 Still image quality 49 Still image size 49 Sunset recording program 43 o Telephoto 31 Time zone 26 Tripod 29 Troubleshooting 66 Tv recording program 44 I I VIDEO mode disc specification 5 Viewfinder dioptric adjustment 23 Volume 33 VR...

Page 83: ...e or failure to follow operating instructions B If the equipment is defective as a result of leaking batteries sand dirt or water damage C If defects or damages are caused by the use of unauthorized parts or by service other than our authorized agent D If the equipment is used for commercial or industrial use This Limited Warranty does not cover cabinet exterior finish DVD discs nor does it apply ...

Page 84: ...r removed c The digital video equipment is used for commercial professional or industrial purposes This limited warranty does not cover the cabinet exterior finish of the DVD equipment DVD discs nor does it apply to DVD equipment purchased outside Canada TO OBTAIN WARRANTY SERVICE Ship your Canon digital video equipment in its original carton box or equivalent properly packed fully insured with sh...

Page 85: ...nformation Center toll free at 1 800 828 4040 CANADA only Si vous avez des questions veuillez telephoner sand frais au Canada 1 800 828 4040 CANADA seulement CANON MEXICANA S DE R L DE C V Periferico Sur No 4124 Col Ex Rancho de Anzaldo C P 01900 Mexico D F Mexico CANON U S A INC NEW JERSEY OFFICE 100 Jamesburg Road Jamesburg NJ 08831 USA CANON LATIN AMERICA INC 703 Waterford Way Suite 400 Miami F...

Page 86: ...oder der Wiedergabe fOhren AuBerdem ist es eventuell nicht moglich die DVD aus dem Gerat herauszunehmen Aviso importante acerca del uso de discos DVD R DL Cuando utilice discos de doble capa Ie recomendamos que utilice discos Canon DVD R DL54 0 discos Verbatim DVD R DL EI utilizar otros discos que no sean estos especificados puede resultar en una grabaci6n 0 reproducci6n incorrecta 0 en no poder e...

Page 87: ...d empfohlen Originalzubehor von Canon zu verwenden Dieses Produkt ist so konzipiert dass es eine ausgezeichnete Leistung erbringt wenn es mit Canon Originalzubehor verwendet wird Canon ist fOr Schaden am Produkt bzw Unfalle wie beispielsweise Brande o ft die durch eine Fehlfunktion von nicht originalen Zubehorteilen wie beispielsweise ein Leck oder die Explosion eines Akkus entstehen nicht haftbar...

Page 88: ...dled or stored in an incorrect manner the camcorder may stop recognizing or may not be able to play back the disc Be sure to observe the following precautions when storing handling your discs Storage Always remove the disc from the camcorder after you f nish recording Do not store the camcorder with a disc left inside To protect the disc return in to its case for storage Never expose the disc to d...

Page 89: ...rte de garantie et attachez la avolfe facture I MODEL I SERIAL NO Date of Purchase MODELE N DE SERlE Date d achat Purchaser s Name Nom d acheteur Address Adresse Dealer s Name Nom de marchand Address Adresse Model DIGITAL VIDEO CAMCORDER Modele CAMESCOPE ET LECTEUR VIDEO DIGITAL Warranty coverage is subject to the country where the unit was purchased Please read all warranty information carefully ...

Page 90: ...or this product please call toll free in Canada 1 800 828 4040 Or write to Canon Customer Relations 6390 Dixie Road Mississauga Ont rio L5T 1P7 Si vous avez besoin de support technique pour ce produit veuillez signaler notre numero sans frais au Canada 1 800 828 4040 Ou ecrivez a Service ala clientele Canon Canada Inc 6390 Dixie Road Mississauga Ontario L5T 1P7 ...

Reviews: