background image

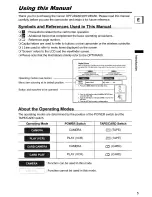
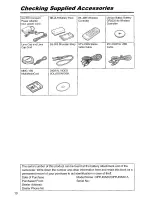
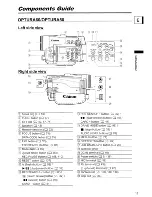
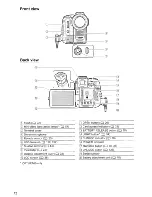
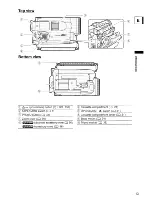
Summary of Contents for Optura 50

Page 1: ...trucciones cptura 60 cptura50 PUB DIM 678 I English IFran ais IEspanol MiniI TDigital Video Cassette rJ BUBBLE JET DIRECT DIRECT PRINT r PictBridge I Please read also the following instruction manual Veuillez lire aussi Ie manuel d instruction suivant Lea tambien el manual de instrucciones siguiente Digital Video Software 1 ...

Page 2: ...ning the equipment off and on the user is encouraged to try to correct the interference by one or more of the folloWing measures Reorient or relocate the receiving antenna Increase the separation between the equipment and receiver Connect the equipment into an outlet on a circuit different from that to which the receiver is connected Consult the dealer or an experienced radiolTV technician for hel...

Page 3: ...ces may cause the product and cart combination to overturn 10 Power Sources The CA 570 Compact Power Adapter should be operated only from the type of power source indicated on the marking label If you are not sure of the type of power supply to your home consult your product dealer or local power company Regarding other power sources such as battery power refer to instructions in this manual 11 Po...

Page 4: ...t in damage and wilt often require extensive work by a qualified technician to restore the product to its normal operation e If the product has been dropped or the cabinet has been damaged f When the product exhibits a distinct change in performance This indicates a need for service 19 Replacement Parts When replacement parts are required be sure the service technician has used replacement parts t...

Page 5: ...the screen o Screen refers to the LCD and the viewfinder screen o Please note that the illustrations mainly refer to the OPTURA60 DigitaLZPPltl in Operating modes see below Menu item showing at its default position IEII II I Button and switches to be operated _ _ _ _ _ _P _ _st_h _ME_NU_b_ull_on_ O_OP_ n_ h _m_ n_u _ 1rn 2 S rd I ct CAMERA SETUP and i 3 a SETdial to select D ZOOM and press the t 4...

Page 6: ...ed States and or other countries Macintosh and Mac as are trademarks of Apple Computer Inc registered in the United States and other countries HDV is a trademark of Sony Corporation and Victor Company of Japan Limited JVC Other names and products not mentioned above may be registered trademarks or trademarks of their respective companies ...

Page 7: ...a Tape 39 Playing Back a Memory Card 41 Adjusting the Volume 42 Playing Back on a TV Screen 43 Advanced Functions Recording Programs Using the Recording Programs 45 IiJiIm 11 P lUsing the Super Night Mode 47 seN Using the Special Scene Modes 48 P Using the Program AE Mode 49 Tv Using the Shutter Priority AE Mode 50 Av Using the Aperture Priority AE Mode 51 Recording Adjusting Exposure Manually 52 ...

Page 8: ... Still Image Right after Recording 100 Playing Back Searching Images 101 Protecting Images 103 Erasing Images 104 Formatting a Memory Card 105 Editing Recording to a VCR or Digital Video Device 106 Analog Line in Recording 108 DV Dubbing 110 Converting Analog Signals into Digital Signals Analog Digital Converter 112 Audio Dubbing 114 Recording from the Tape on a Memory Card 117 Printing Printing S...

Page 9: ...Do s Don ts Handling Precautions 144 Cleaning the Video Heads 148 Add 149 System Diagram 150 Optional Accessories 151 Specifications 154 Product Codes 156 Index 157 9 ...

Page 10: ...EO SOLUTION DISK Lithium Button Battery CR2025 for Wireless Controller IFC 300PCU USB Cable 10 The serial number of this product can be found at the battery attachment unit of the camcorder Write down the number and other information here and retain this book as a permanent record of your purchase to aid identification in case of theft Date of Purchase Model Name OPTURA60 0PTURA50 A Purchased From...

Page 11: ...tton Q 137 flash button Q 92 II play pause button Q 39 REC SEARCH button Q 32 9 record review button Q 32 rewind button Q 39 CARD button Q 41 REC SEARCH button Q 32 fast forward button OJ 40 CARD button Q 41 Q3J DRIVE MODE button Q 96 stop button Q 39 AUDIO LEVEL button Q 78 MENU button Q 71 D EFFECTS button Q 62 LCD BACKLIGHT button OJ 26 Terminal cover DC IN terminal Q 18 Power switch Q 5 136 MI...

Page 12: ...S video terminal CO 44 Viewfinder CO 23 Dioptric adjustment lever CO 23 LCD screen CO 26 OPTURA60 only j It _ II r y r l rc _ u OPEN button CO 26 Card access indicator CO 33 BATTERY RELEASE button CO 18 3 LIGHT button CO 54 CHARGE indicator CO 18 POWER indicator Start stop button CO 30 33 UNLOCK button CO 136 Serial number Battery attachment unit CO 18 ...

Page 13: ...utton ffi 120 133 g TAPE CARD switch ffi 5 Cassette compartment ffi 21 J OPEN EJECT switch ffi 21 PHOTO button ffi 33 Zoom lever ffi 36 Cassette compartment cover ffi 21 Strap mount ffi 24 Advanced accessory shoe ffi 56 Accessory shoe ffi 56 Tripod socket ffi 38 13 ...

Page 14: ... 41 DATE SEARCH buttons OJ 88 REW button OJ 39 11 button aJ 40 j PAUSE II button OJ 40 SLOW I button OJ 40 AUDIO DUB button aJ 114 ZERO SET MEMORY button aJ 87 PHOTO button aJ 33 Zoom buttons OJ 36 PLAY button OJ 39 3 FF button OJ 40 STOP button aJ 39 11 button OJ 40 x 2 button aJ 40 TV SCREEN button aJ 74 ...

Page 15: ...AE locked during still image recording CD 91 Accessory connected to the Advanced Accessory Shoe Zoom CD 36 Self timer CD 55 j Manual focus CD 53 Image stabilizer CD 72 Recording mode CD 77 Tape operation CD 16 Time code CD 31 Remaining tape CD 31 Remaining battery charge CD 31 Wind screen CD 80 Microphone attenuator CD 79 Audio mode CD 74 Widescreen mode CD 81 Headphones CD 79 Remaining card capac...

Page 16: ...k OJ 40 Fast II I 11 Frame advance playbackl forward frame reverse playback OJ 40 Rewind CARD CAMERA Mode II III Playback pause OJ 40 I Date search OJ 88 I CD Zero set memory OJ 87 1 II Audio dubbing OJ 114 D D ii t lila II p 0 01 m II e II i If rm II 0 0 IJI liD II o 1 tAo m CD Metering mode OJ 94 1 White balance OJ 59 Image effect OJ 61 Drive mode OJ 96 Digital effects OJ 62 Movie size OJ 89 j S...

Page 17: ... 7 II 1632x1224c II II o n 111111111I 14 12 00 AM II JAN 1 2005 CARD MODE 101 0103 lI3 7 ffiO 00 00 05 II 11111111111I 1 4 CD Protect mark OJ 103 g File number OJ 73 Number of images Still image size Data code OJ 85 Movie size playback time 17 ...

Page 18: ...rection of the arrow until it clicks To remove the battery pack 1 Move the viewfinder upward 2 Press the BATTERY RELEASE button and slide the battery pack upward 18 C barQb lQ tbe Battery eflck 1 Connect the power cord to the adapter 2 Plug the power cord into a power outlet 3 Connect the power adapter to the camcorder s DC IN terminal TheCHARGE indicator starts flashing It glows steadily when cha...

Page 19: ...tage occurs during charging Remove the battery pack and attach it back to the camcorder o When the power adapter or battery pack is defective the CHARGE indicator flashes rapidly at about 2 flashes second and charging stops o The CHARGE indicator informs you about the charge status 0 50 Flashes once every second More than 50 Flashes twice every second 100 Glows steadily U hJ g aJiQy gbgld Qw er SQ...

Page 20: ...90 min 200 min 245 min Approximate times for recording with repeated operations such as start stop zooming power on off o We recommend charging the battery pack in temperatures between 50 of and 86 of 10 C and 30 C Outside the temperature range of 32 of to 104 of 0 C to 40 C the CHARGE indicator flashes rapidly and charging stops a A lithium ion battery pack can be charged at any charge state Unli...

Page 21: ...mark on the cassette compartment until it clicks 4 Wait for the cassette compartment to retract automatically and close the cassette compartment cover CD o Do not interfere with the cassette compartment while it is opening or closing automatically or attempt to close the cover before the cassette compartment has fully retracted o Be careful not to get your fingers caught in the cassette compartmen...

Page 22: ...e memory card without first pushing it in 1 Turn off the camcorder Make sure that the card access indicator is not flashing before you turn off the camcorder 2 Open the cover 3 Push the memory card to release it Remove the memory card 4 Close the cover o Turn off the camcorder before inserting or removing the memory card Otherwise it may result in data damage o If you use memory cards other than t...

Page 23: ... Ul if 1 Attach the cord to the lens cap 2 Pass the grip belt through the loop on the cord Press the buttons on the lens cap when attaching removing it Hook the lens cap on the grip belt while you are recording and place it over the lens when you have finished E aslellitlg tb tGJ jg i 6glt Hold the camcorder with your right hand and adjust the belt with your left Adjust the grip belt so that you c...

Page 24: ...24 Atta b i ug jb e iiSb9Y I iex T0S1ra RjiiiU iiji ij j Pass the ends through the strap mount and adjust the length of the strap ...

Page 25: ...tbe Wlr glg i C QtllnlUet Point it at the camcorder s remote sensor when you press the buttons o The wireless controller may not work properly when the remote sensor is subjected to strong light sources or direct sunlight o If the wireless controller does not work check if the remote sensor is set to OFF I Jj CD 75 o When the camcorder cannot be operated with the wireless controller or when it can...

Page 26: ...er It is also useful if you wish to include yourself when recording with the self timer You can switch the brightness of the LCD screen between normal and bright by pressing the LCD BACKLIGHT button This is useful for outdoor recordings Press the LCD BACKLIGHT button The brightness changes with each press of the button o This setting does not affect the brightness of the recording or the viewfinde...

Page 27: ... 2 Press the MENU button 3 Turn the SET dial to select DISPLAY SETUP and press the SET dial 4 Turn the SET dial to select LANGUAGE and press the SET dial 5 Turn the SET dial to select a language and press the SET dial 6 Press the MENU button o If you have mistakenly changed the language follow the mark next to the menu item to change the setting o The displays mmI J and at the bottom of the screen...

Page 28: ...time zone and press the SET dial To adjust for daylight saving time select the time zone with the next to the area D TIME SET JAN 1 2005 12 00 AM ISYSTEM MENU OJ 71 When you do not use the camcorder for about 3 months the built in rechargeable lithium battery may become discharged and the date time setting may be canceled In such case recharge the built in lithium battery CD 146 6 Turn the SET dia...

Page 29: ...the camcorder automatically adjusts the clock No Time zone No Time zone ITl LONDON WELLGTN Wellington gJ PARIS HI SAMOA Q CAIRO ill HONOLU Honolulu GJ MOSCOW ill ANCHOR Anchorage DUBAI TIl L A Los Angeles Q KARACHI 0 DENVER I DACCA j CHICAGO ID BANGKOK NY New York mJ H KONG Hong Kong 01 CARACAS ill TOKYO RIO Rio de Janeiro j SYDNEY FERNAN Fernando de Noronha D1l SOLOMON AZORES 29 ...

Page 30: ...ounter stops completely before you start recording o When you do not remove the cassette you can record the next scene without producing any noise or blank sections between the recordings even if you turn the camcorder off o Bright light may make it difficult to use the LCD screen In such case use the viewfinder instead o When recording near loud sounds such as fireworks drums or concerts sound ma...

Page 31: ... black or green dots This has no effect on the recorded image and does not constitute a malfunction Indicates the remaining time of the tape in minutes moves during recording END flashes when the tape reaches the end When the time left is less than 15 seconds the remaining tape time may not appear Depending on the type of the tape the indication may not be displayed correctly m starts flashing in ...

Page 32: ...w button REC SEARCH button CAMERA I In record pause mode Press and release the 19 record review button I I The camcorder rewinds the tape plays back the last few seconds and returns to record pause mode Record Search CAMERA I 32 In record pause mode Press and hold the REC SEARCH button forward or button reverse Release the button at the point you wish to begin recording The camcorder returns to re...

Page 33: ...een frame appears The beep sounds When you press the PHOTO button on the wireless controller recording starts immediately 3 Press the PHOTO button fUlly 0 and focusing frame disappear and you hear a shutter sound The card access indicator flashes Re g r gln x M g yje s i UJ gJ b gl Qr t C atd c 0 2 0 1 Set the camcorder to CARD CAMERA mode Set the POWER switch to CAMERA and the TAPE CARD switch to...

Page 34: ...ges For best performance we recommend to keep the number of images on the memory card less than 100 o When recording a still image step 2 the image may appear out of focus for a moment while the camcorder is focusing o When the subject s too bright OVEREXP starts flashing In such case use the optional FS 34U NO filter o Sound for movies recorded on the memory card will be monaural o When you use a...

Page 35: ...ed flashing in red No card c g in green 6 or more images c g in yellow 1 to 5 images c g in red No more images The indication may not decrease even though a recording has been made or may decrease by 2 images at once All indicators are displayed in green when a memory card is played back appears to indicate that the camcorder is writing on the memory card Indicates the image quality and the image ...

Page 36: ...t wide angle Move it toward T to zoom in telephoto Press the zoom lever slightly for a slow zoom Press harder for a faster zoom W TP 36 a You can also use the T and W buttons on the wireless controller However you cannot control the zoom speed a The zoom speed is slightly faster in record pause mode a Keep at least 3 3 ft 1 m to the subject At wide angle you can focus on a subject as close as 0 39...

Page 37: ... the menu 2 Turn the SET dial to select CAMERA SETUP and press the SET dial 3 Turn the SET dial to select D ZOOM and press the SET dial 4 Turn the SET dial to select a setting option 5 Press the MENU button to close the menu o A zoom indicator appears for 4 seconds It extends in light blue when the digital zoom is set to 56x OPTURA60 or 40x OPTURA50 and extends further in dark blue when set to 280...

Page 38: ... the microphone or lens For More Stability Lean against a wall Put the camcorder on a table Lie on your elbow Kneel on one knee i r Use a tripod f I Lighting When recording outdoors we recommend recording with the sun at your back 38 o When using a tripod do not leave the viewfinder exposed to direct sunlight as it may melt due to concentration of the light by the lens o Do not use tripods with fa...

Page 39: ...R mode Set the POWER switch to PLAY VCR and the TAPE CARD switch to 2 Press the button to rewind the tape 3 Press the 11 button to begin playback 4 Press the button to stop playback o To use the viewfinder close the LCD panel o About the screen display During playback the time code gives the hours minutes seconds and frames The remaining tape time may not appear when the time left is less than 15 ...

Page 40: ...peatedly during playback pause Press and hold it to play back continuous frame advance frame reverse SLOW 1 Slow Forward Slow Reverse Plays back at about 1 3 normal speed Press the button on the wireless controller during normal or reverse playback Press the play button to return to normal playback x2 Forward x2 Playback Reverse x2 Playback Plays back at 2 times normal speed Press the button on th...

Page 41: ...movie r CARD iRECSEARCH button e VEMO e 0AUD O I __ 11 play pause button o Images not recorded with this camcorder uploaded from a computer except the sample images IJ 70 edited on a computer and images whose file names have been changed may not be played back correctly o Do not turn off the camcorder change the position of the TAPE CARD switch disconnect the power source open the memory card cove...

Page 42: ...ease the volume again A ctlYJ li ogi l11e rtleg fjp bQ ge lQI Y ttle 22 S L The headphones terminal also serves as AV terminal Headphones can only be used when 0 is displayed on the screen If not change the setting following the procedure below PIiAY VCRJ I CARD CAMERA CARD PLAY m IVCR SETUP I I AV PHONES I AV 1 Press the MENU button and select VCR SETUP Select AV PHONES 0 set it to PHONES 0 and p...

Page 43: ... VCR instruction manual VIDEO mIlI1IDIP I AUDIO 1 i JL IlIIIll1II II R Signal flow STV 250N Stereo Video Cable supplied AV O 1 Turn off all devices before starting the connections 2 Connect the STV 250N Stereo Video Cable to the camcorder s AV terminal and the audio video terminals on the TVNCR Connect the white plug to the white audio terminal L left the red plug to the red audio terminal R right...

Page 44: ...amcorder s AV terminal and the audio terminals of the TV VCR Connect the white plug to the white AUDIO terminal L left and the red plug to the red AUDIO terminal R right Do not connect the yellow plug 4 If connecting to a TV set the input selector to VIDEO If connecting to a VCR set the input selector to LINE o We recommend powering the camcorder from a household power source o The picture quality...

Page 45: ...or the subjects P Program AE The camcorder adjusts the camera settings automatically However you have the options of adjusting the settings manually CD 49 Tv Shutter Priority AE Use this mode to select the shutter speed The camcorder automatically sets a matching aperture setting CD 50 AvAperture Priority AE Use this mode to select the aperture size The camcorder chooses the appropriate shutter sp...

Page 46: ...e abruptly o Portrait mode The blur effect of the background increases the more you zoom to telephoto The picture may not appear smooth when played back o Landscape mode Zooming out W can result in more effective shooting o Sports mode The picture may not appear smooth when played back o Slow Shutter mode In CAMERA mode picture quality may not be as good as in other modes The camcorder may have di...

Page 47: ...1 Set the mode dial to PJ 2 Press the SET dial 3 Turn the SET dial to select PI iSUPER NIGHT and press the SET dial PS i appears The symbol of the selected mode appears on the screen CAMERA I o Moving subjects may leave a trailing afterimage o Picture quality may not be as good as in other modes o White points may appear on the screen o Autofocus may not work as well as in other modes In such case...

Page 48: ...e to record spotlit scenes IIFIREWORKS Use this mode to record fireworks I 48 1 Set the mode dial to seN 2 Press the SET dial A list of Special Scene modes appears 3 Turn the SET dial to select a Special Scene mode and press the SET dial The symbol of the selected mode appears o Snow Beach mode The subject may become overexposed on cloudy days or in shaded places Check the image on the screen The ...

Page 49: ...exposure according to the brightness of the subject In Program AE mode you can point and shoot as in Auto mode however you have the option of changing some settings Set the mode dial to P I When you cannot achieve an appropriate exposure use the flash or change the metering method 49 ...

Page 50: ...ter speed appears o The shutter speed number flashes when the selected shutter speed is not appropriate for the recording condition In such case readjust the shutter speed o When using a slow shutter speed in dark places you can record the subject brightly but the image quality may be lower and autofocus may not work well o When recording in dark places we recommend using the optional VFL 1 Video ...

Page 51: ...und for a portrait or high aperture values small aperture to achieve a broad depth of field for recording landscapes I 1 Set the mode dial to Av 2 Press the SET dial 3 Turn the SET dial to select an aperture value The shutter speed is adjusted automatically The aperture becomes smaller the bigger the aperture value _ The aperture number flashes when the selected aperture is not appropriate for the...

Page 52: ...mode dial to a mode other than flm Exposure cannot be adjusted in the Fireworks mode SeN 2 Press the EXP button O appears on the screen When you operate the zoom during exposure lock the brightness of the image may change CAMERA I 52 During exposure lock Turn the SET dial to adjust the brightness of the image The adjustment range depends on the brightness at the time you locked the exposure ...

Page 53: ...focus Turn the focus ring until the image appears focused Press the FOCUS button to return to autofocus CARD CAMERA I Zoom lever Focus ring CAMERA 0 The setting resets to autofocus when you switch the mode dial to fMIID 0 Readjust the focus when you have turned off the camcorder Use this function when you wish to focus on faraway subjects such as mountains or fireworks Press the FOCUS button more ...

Page 54: ... button 0 appears on the screen The mini video light turns on and off with each press of the button o Do not point the mini video light at persons while they are driving o Do not look at the mini video light for a long time o Do not use the mini video light close to people s eyes In Super Night mode when the mini video light turns on automatically pressing the UGHT button will not turn it off ...

Page 55: ...recording movies or the PHOTO button when recording still image to cancel the self timer o The self timer will be canceled when you turn off the camcorder CARD CAMERA I CAMERA When recording movies 1 Press the self timer button 0 appears 2 Press the start stop button The camcorder starts recording after a 10 second countdown 2 seconds when using the wireless controller The count down appears on th...

Page 56: ...lly available microphone connect it to the MIC terminal 56 o When recording in silent places the built in microphone may pick up the motor noise of the camcorder In such case we recommend using an external microphone o When using a commercially available microphone Use a microphone with built in power supply condenser microphone Almost all stereo microphones with a plug diameter of 0 14 in 3 5 mm ...

Page 57: ...ttings are displayed 2 Turn the SET dial to select a function and press the SET dial 3 Turn the SET dial to select a setting option and press the SET dial The symbol changes to the one of the selected setting For setting the white balance SET image effect CUSTOM or digital effect MULTI S function refer to the relevant pages 4 Press the FUNC button The menu disappears o Functions that are not avail...

Page 58: ...fects D EFFECT 00ii OOF FADER E EFFECT 0 Ea MULTI IMAGE SCREEN J i CARD MIX f a D EFFECT 00ii OOF FADER E EFFECT 0 62 Ea MULTI IMAGE SCREEN D EFFECT 00ii iJ BLK WHT 0 Still image tGi 0 STILL I REC OFF 5 0 FINE 640x480 0 91 recording 5 0 NORMALl640x480 Movie size 1320 320x240 1160 160x120 0 0 89 Still image 5 0 S FINE 640x480 5 0 FINE 640x480 0 117 quality 5 0 NORMALl640x480 Still image size L 0 16...

Page 59: ...ng FLUORESCENT H For recording under daylight or daylight type 3 wavelength fluorescent lighting r Ll SET Use the custom white balance setting to make white subjects appear white under colored lighting FUNC OIl 57 I AWli AUTO 0 c Q J Q co j s co c C j CD 0 g e5 j C til lo 1 Set the mode dial to mode other than fNIID or seN 2 Press the FUNC button 3 Select the white balance symbol followed by the s...

Page 60: ...use a previously made SET setting after selecting SET in step 3 press the FUNC button without pressing the SET dial o When you have set the custom white balance Depending on the light source I may keep flashing The result will still be better than with the auto setting Reset the white balance when the lighting condition changes Turn off the digital zoom o Custom white balance may provide better re...

Page 61: ...djust the brightness contrast and sharpness of the image CAMERA I CARD CAMERA FUNC I f J IMAGE EFFECT OFF I COS7 1 Set the mode dial to a mode other than 0 or seN 2 Press the FUNC button 3 Select the image effect symbol followed by the setting option The symbol of the current setting is displayed 4 When you have selected Q5 CUSTOM Select the custom setting option brightness contrast sharpness or c...

Page 62: ...tal E ects i __ t The Digital Effects functions include a fader and effects multi image screen and Card Mix OJ 68 Faders CO 64 Begin or end scenes with a fade to or from black jJ Fade Trigger FADE T Wipe WIPE 62 ...

Page 63: ...ences of still images and displays them at one time Sound will be recorded normally 4 Sequences 9 Sequences 16 Sequences 1 J 1 r r r J 1 1 l Effects III 65 Add flavor to your recordings III Black and White BLK WHT Mosaic MOSAIC IE Wave WAVE I t Sepia SEPIA n t r Ball BALL i t 1 III Art ART Ilj Cube CUBE z z 63 ...

Page 64: ... 5 Press the D EFFECTS button The symbol changes to green Pressing the D EFFECTS button again deactivates the fader 64 2 Select the digital effect symbol followed by ItlF FADER The symbol of the current setting is displayed 3 Select the fader type The selected fader shows as an animation The selected fader animates the image that appears on the screen 4 Press the FUNC button 101 The symbol of the ...

Page 65: ...ed by EEFFECn J J The symbol of the current setting is displayed _ 3 Select the effect type s 0 l The selected effect shows as an animation The selected effect animates the image that appears on the screen g rn CQo 4 Press the FUNC button 0 50 A The symbol 01 the selected effect appears 5 Press the D EFFECTS button DEFFECTS The symbol turns green and the effect is activated 0 In PLAY VCR mode play...

Page 66: ...NC button 2 Select the digital effects symbol followed by jJ BLK WHT The symbol of the current setting is displayed 3 Press the FUNC button iii appears 4 Press the D EFFECTS button The symbol turns green and the effect is activated Pressing the D EFFECTS button again deactivates the effect ...

Page 67: ...12 frames in Slow Shutter mode J g 4 Select S SPLlT and select the number of sequences tOe 5 Select SET and press the FUNC button FUNC s E a appears ll 6 Press the D EFFECTS button g to l The symbol turns green C l FAS T MODERATE SLOW The set number of images will be C captured at the set speed To cancel the multi image screen press the D EFFECTS button MANUAL Images will be captured each time you...

Page 68: ...live video recording will appear in place of the light area of the card mix image Mix level adjustment light area of the still image Camera Chroma Key CAM CHROMA Combines backgrounds with your recordings Record your subject in front of a blue curtain and the subject not blue wiJJ be superimposed on the card mix image Mix level adjustment blue area of the live video recording Card Animation C ANIMA...

Page 69: ... Memory Card in the Digital Video Software Instruction Manual 2 Set the mode dial to a mode other than fmID 3 Press the FUNC button 4 Select the digital effects symbol followed by lIt CARD MIX The symbol of the current setting is displayed 5 Select the image you wish to combine with the CARD button 6 Select MIX TYPE and select the mix type matching the sample image you have selected When you have ...

Page 70: ...nded only for the personal use with this camcorder Do not use these sample images for other purposes PhotoEssentials Royalty Free Stock Photography The PhotoEssentials suite of royalty free images on CD ROM features premium quality assignment photography and is ideally suited for use in advertising brochures reports multimedia websites books packaging and more For more information please visit the...

Page 71: ...e tiJ1Q JVlg QLY c tu LjSgUlg g t eLL 1 Press the MENU button The menu appears 2 Turn the SET dial to select a submenu and press the SET dial 3 Turn the SET dial to select a menu item and press the SET dial 4 Turn the SET dial to select a setting option and press the SET dial 5 Press the MENU button The menu disappears II 0 Pressing the MENU button at any time closes the menu Oltems that are not a...

Page 72: ... When a trailing afterimage appears set it to OFF o If Odl camcorder shake warning appears we recommend stabilizing the camcorder for example by mounting it on a tripod IMG STAB 11III The image stabilizer compensates for camcorder shake even at full telephoto o The image stabilizer is designed to compensate a normal degree of camcorder shake o The image stabilizer may not be effective when recordi...

Page 73: ...r of the last recorded image will be assigned If a higher file number already exists on the memory card the consecutive number will be assigned This is useful for organizing images on a computer a We recommend setting FILE NOS to CONTINUOUS CARD OPERATIONS PRINT NO YES ORDERS ALL ERASE g TRANS NO YES ORDERS ALL ERASE ERASE ALL NO YES IMAGES FORMAT CANCEL EXECUTE CARD OPERATIONS in index screen dis...

Page 74: ...gual Sub AUDIO MODE Switches the audio recording mode o 16bit records in high sound quality o Select 12bit if you plan to dub audio later DISPLAY SETUP BRIGHTNESS 0 0 0 0 LCD MIRROR ON OFF 0 0 TV SCREEN ON OFF 0 0 ON OFF 0 0 DISPLAYS ON OFF PLAYBK 0 0 6SEC DATE ON OFF 0 AUDIO LEVEL ON OFF 0 78 DATA CODE DATE TIME CAMERA DATA CAM D T 0 85 D TIME SEL DATE TIME DATE TIME 0 0 85 LANGUAGE DEUTSCH ENGLI...

Page 75: ...or 6 seconds when you begin playback or to indicate that date or time zone has changed o The 6 second auto date appears even if DISPLAYS is set to OFF DATE FORMAT Changes the displayed date format includes date format for printing DEMO MODE The demonstration mode displays the camcorder s main features It starts automatically when you leave the camcorder turned on without loading a recording media ...

Page 76: ...MY CAMERA 76 CREATE START UP IMAGE SEL S UP IMG OFF CANON LOGO MY IMAGE S UP SOUND OFF DEFAULT MY SOUND SHTR SOUND OPER SOUND SELF T SOUND o o o 0 0 0 82 ...

Page 77: ...d in LP mode cannot be used for audio dubbing o Depending on the nature and usage condition of the tape picture and sound recorded in LP mode may be distorted We recommend using the SP mode for important recordings o If you record inboth SP and LP modes on the same tape the playback picture may become distorted and the time code may not be written correctly o If you play back a tape that has been ...

Page 78: ...Select MIC LEVEL set it to MANUAL and press the MENU button The audio level indicator appears If a green bar showing the adjustment level is not displayed press the AUDIO LEVEL button 3 Adjust the level with the SET dial The maximum level should only slightly exceed 12 dB Sound may be distorted if the indicator for 0 dB lights up in red 4 Press the AUDIO LEVEL button The green bar disappears MENU ...

Page 79: ... when you have finished adjusting to prevent accidental changes o The microphone level resets to AUTO when you switch the mode dial to tmID o When the data code is being displayed the level indicator will not display o We recommend using headphones when manually adjusting the audio level or using the microphone attenuator o When sound is distorted even though the audio level indicator shows an app...

Page 80: ...possible CAMERA I CARD CAMERA 80 Only when AUDIO DUB is set to MIC IN IAUDID SETUP I IWIND SCREEN AUTO 1 In CAMERA mode set the mode dial to a mode other than fD 2 Press the MENU button and select AUDIO SETUP Select WIND SCREEN set it to OFF and press the MENU button fF appears when you turn the wind screen off rail The wind screen function can only be used with the built in microphone d ...

Page 81: ...N and press the MENU button appears The LCD screen switches to the Ietterbox display The picture on the viewfinder appears horizontally squeezed When playing back a widescreen recording on a TV switch the TV to widescreen mode refer to the instruction manual of your TV If you play back a widescreen recording on a normal TV the image appears horizontally squeezed TVs with 81 terminal or Video ID 1 ...

Page 82: ...D DEFAULT 1 Press the MENU button and select MY CAMERA 2 Select the menu item you wish to change When selecting a start up image set the camcorder to CARD PLAY mode 3 Select a setting option and press the MENU button I 82 m I MY CAMERA I I CREATE START UP IMAGE 1 Select a still image with the CARD buttons 2 Press the MENU button and select MY CAMERA 3 Select CREATE START UP IMAGE SET THIS AS START...

Page 83: ...ware ZoomBrowser EX for Windows or ImageBrowser for Macintosh to the setting options MY IMAGE and MY SOUND For details refer to the Digital Video Software Instruction Manual o Retain the original data of the still image you have set as the start up image on your computer or removable disk 83 ...

Page 84: ... zoom lever toward T To shrink the image below 2 times magnification move the zoom lever toward W A will display for images that cannot be enlarged 2 Select the magnified area with the SET dial Turn the SET dial to move the image to the right and left or up and down Pressing the SET dial switches between the directions To cancel the magnification move the zoom lever toward W until the frame disapp...

Page 85: ..._TU_P_ _ _ I I D TIME SEL DATE TIME I DATA CODE DATE TIME 1 Press the MENU button and select DISPLAY SETUP 2 Select D TIME SEL and select the date time display combination In CARD PLAY mode move to step 5 3 Select DATA CODE and select the data code combination 4 Press the MENU button 5 Play back a tape and press the DATA CODE button In CARD PLAY mode only date and time appear Pressing the DATA COD...

Page 86: ...tton END SEARCH appears The camcorder rewinds fast forwards the tape plays back the last few seconds of the recording and stops the tape Pressing the button again cancels the search o End search cannot be used once you unload the cassette o End search may not work properly if a blank section exists on the tape o You cannot use end search to locate the editing end of audio dubbing ...

Page 87: ...c ZEROSET _ _ STOP MEMORY button 06 0 button CAMERA PLAY VCRJ I 1 Press the ZERO SET MEMORY button at the point you wish to return to later 0 00 00 1m appears To cancel press the ZERO SET MEMORY button again 2 When you have finished playback rewind the tape m appears The tape stops automatically at 0 00 00 1m The tape counter changes to time code If the time code has not been recorded consecutivel...

Page 88: ...reless controller PJ AY VCR I 88 Press the or 1 404 button to begin searching Press more than once to search for further date changes up to 10 times Press the STOP button to stop searching r tI 0 A recording of longer than a minute per date area is required 0 Date search may not function if the data code is not correctly displayed ...

Page 89: ...follows 128MB 512MB Using a SO Memory Card Number of still images that can be recorded on a memory card No of Images File Size Image Size Image Quality Supplied 128MB 512MB per Image card 1632X1224 Super Fine 10 85 350 1360KB Fine 15 135 545 880KB Normal 25 250 1000 480KB 1280X960 Super Fine 15 140 555 850KB Fine 25 215 860 560KB Normal 45 395 1585 300KB 640X480 Super Fine 85 690 2740 176KB Fine 1...

Page 90: ...icates the approximate number of images remaining on the memory card 4 Select the still image quality 5 Press the FUNC button I CARD CAMERA 90 FUNC II32ii 320x240 I CO 57 _ 1 Press the FUNC button 2 Select the movie size symbol followed by the setting option The symbol of the current setting is displayed The number indicates the approximate recording time remaining on the memory card 3 Press the F...

Page 91: ...symbol followed by a setting option The symbol of the current setting is displayed 3 Press the FUNC button 4 While you are recording a movie press the PHOTO button The still image is recorded on the memory card while the screen continues to show the video recording o The quality of the still image is slightly lower than a still image recorded in CARD CAM ERA mode o The still image cannot be record...

Page 92: ...red eye reduction The flash always fires The flash does not fire Use this setting in places where flash photography is prohibited PHOTO button RECSEARCH e 0 VEMOU 0 0 _ flash button CAMERA I CARD CAMERA 92 1 Press the flash button Set the camcorder to a recording program other than the Fireworks mode SeN The setting changes with each press of the button The symbol of the selected flash mode appear...

Page 93: ...on in A auto or red eye reduction auto mode When recording movies When A auto or red eye reduction auto is selected and a shutter speed of 1 2000 is set in CAMERA mode During auto exposure bracketing o When J flash on is selected and a shutter speed of 1 2000 is set in CAMERA mode the shutter speed becomes set to 1 1000 and the flash fires o We recommend not using the flash when the optional Wide ...

Page 94: ...ain subject accordingly J CENT WEIGHT AVERAGE Averages the light metered from the entire screen giving more weight to the subject in the center e SPOT Meters the area within the spot AE point frame Use this setting for adjusting the exposure matching the subject in the center of the screen CARD CAMERA I FUNC I e EVALUATIVE OJ 57 1 Set the mode dial to P Tv or Av 2 Press the FUNC button 3 Select th...

Page 95: ...aking sure the focus is exactly where you want it I CARD CA MERA 1 Set the mode dial to a mode other than WlID Focusing method cannot be changed in the Fireworks mode SCN 2 Turn the SET dial to select the focusing method With Auto selection a large frame will display on the screen With Center point a frame displays in the center of the screen 3 Press the PHOTO button halfway A focusing frame appea...

Page 96: ...table on the next page AEB Auto Exposure The camcorder records a still image in three different Bracketing exposures dark normal light in 1 2 EV steps allowing you to choose the perfect exposed shot I 96 1 Set the mode dial to a mode other than fi 2 Press the DRIVE MODE button to switch between the drive modes The setting changes with each press of the button o The drive mode can also be selected ...

Page 97: ...me These figures are approximate and vary with the recording conditions and subjects Sufficient space on the memory card is required Continuous shooting stops when card is full o The number of frames per second will be lower when o J camcorder shake warning is displayed on the screen o In normal and high speed continuous shooting mode images are captured at 2 frames second when using the built in ...

Page 98: ... _ t I CARD CAMERA 98 FUNC I0 SINGLE I OJ 57 _ 1 Press the FUNC button 2 Select the drive mode symbol followed by dJlSTITCH AST The symbol of the current setting is displayed 3 Press the SET dial The Stitch Assist screen appears 4 Select the direction with the CARD button CARD button clockwise CARD button counterclockwise 5 Select the recording program and zoom on the subject Adjust focus and expo...

Page 99: ...he FUNC button after the last image For details on how to merge these images refer to the Digital Video Software Instruction Manual o Compose each image so that it overlaps 30 to 50 of the adjoining image Try to keep the vertical misalignment within 10 o Do not include a moving subject in the overlapping portion o Do not try to stitch images that include both distant and close subjects They may ap...

Page 100: ...lect REVIEW select a setting option and press the MENU button o A still image is displayed as long as you hold the PHOTO button after recording o You can erase OJ 104 or protect OJ 103 the image when you press the FUNC button while you are reviewing the image or when you press the FUNC button right after recording o REVIEW cannot be selected when continuous shooting high speed continuous shooting ...

Page 101: ...by START 3 Press the SET dial Images are played back one after another Press the button to stop the slide show FUNC Il 57 1_ _f _S_L_ID_E_S_HO_W 1 I 1 Move the zoom lever toward W Up to 6 images appear With movies the index screen can only be started when the first scene is displayed as a still image 2 Turn the SET dial to select an image Move the jj to the image you wish to view You can switch be...

Page 102: ...one The number in the upper right f the screen indicates the image number of the current image by the total number of images I CAR Pl AY 102 Press and hold the CARD or CARD button When you release the button the image of the displayed image number appears ...

Page 103: ...MERA mode press the FUNC button while reviewing an image or right after recording 2 Select Om PROTECT followed by ON and press the SET dial 3 Press the FUNC button On appears and now the image cannot be erased To cancel the protection select OFF in step 2 CARD PLAY MENU I II OJ 71 CARD OPERATIONS On PROTECT 1 Move the zoom lever toward W Up to 6 images appear Select the image you wish to protect 2...

Page 104: ... 57 I_ _ _I_MA_G_E_E_R_A_SE I 1 Press the FUNC button In CARD CAMERA mode press the FUNC button while reviewing an image or right after recording 2 Select j IMAGE ERASE followed by ERASE and press the SET dial 3 Press the FUNC button CARD PLAY I ICARD OPERATIONS I IERASE ALL IMAGES 1 Press the MENU button and select CARD OPERATIONS 2 Select ERASE ALL IMAGES 3 Select YES and press the MENU button A...

Page 105: ... protected images o Images erased by formatting cannot be recovered o If you use a memory card other than the supplied one format it with the camcorder I CARD PLAY ICARD DPERATIONS 1 I_F_OR_M_AT _ 1 Press the MENU button and select CARD OPERATIONS 2 Select FORMAT CANCEL and EXECUTE appears 3 Select EXECUTE ALL DATA WILL BE ERASED FORMAT THIS CARD NO and YES appears 4 Select YES and press the MENU ...

Page 106: ...43 Connecting a Digital Video Device Refer also to the instruction manual of the digital video device I 106 1 Set the camcorder to PLAY VCR mode and load a recorded cassette If you are connecting via AV terminal check the setting OJ 43 2 Connected device Load a blank cassette and set the device to record pause mode 3 Locate the scene you wish to copy and pause playback shortly before the scene 4 P...

Page 107: ...ly lower than that of the original o When connecting a digital video device If the picture does not appear reconnect the DV cable or turn the camcorder off and back on again Proper operation cannot be guaranteed for all digital video devices equipped with a DV terminal If operation does not work use the S video or AV terminal m 5 cc 107 ...

Page 108: ...assette 2 Connected device Load the recorded cassette 3 Press the REC PAUSE button In record pause mode and during recording you can check the picture on the screen 4 Connected device Play back the tape 5 Press the 11 button when the scene you wish to record appears Recording starts 6 Press the button to stop recording Press the 11 button to pause recording Press the 11 button again to restart rec...

Page 109: ...information appear When you press the PHOTO button on the wireless controller recording starts immediately 6 Press the PHOTO button fully The card access indicator flashes When recording a movie 5 Press the startlstop button when the scene you wish to record appears Pressing the start stop button again stops recording o Headphones cannot be used during analog line in recording o Depending on the s...

Page 110: ...utton You can check the picture on the screen 4 Connected Device Play back the tape 5 Press the 11 button when the scene you wish to record appears Recording starts 6 Press the button to stop recording Press the 11 button to pause recording Press the III button again to restart recording 7 Connected Device Stop playback iRe Q dit19iii1bie iJng Yit l decC ii9l1c aiJ emory cCca r t The size of the s...

Page 111: ... o Blank sections may be recorded as anomalous picture o If the picture does not appear reconnect the DV cable or turn the camcorder off and back on again o Do not connect any devices to the camcorder s USB terminal o You can only record signals from devices with the W logo recording in SO system in SP or LP format Note that signals from identically shaped terminals may be of different format CD 1...

Page 112: ...s via the DV terminal The DV terminal serves as output terminal only Turn off all devices before starting the connections Unload the tape from the camcorder Refer also to the instruction manual of the connected device You can also connect a VCR with S S1 VIDEO terminal OJ 44 f a S goalflow a o 11 STV 250N Stereo Video Cable 1 supplied Digital video device Signal flow q EiJ I r l Il l_ El m CD3 I C...

Page 113: ...right protective signals or anomalous signals such as ghost signals o For normal use set AV DV la OPTURA60 or AV DV OPTURA50 to OFF If it is set to ON digital signals cannot be input via the camcorder s DV terminal o Depending on the software and the specifications of your computer you may not be able to transfer converted signals via the DV terminal riB 0 We recommend powering the camcorder from ...

Page 114: ...UDIO DUB AUDIO IN 1 Set the camcorder to PLAY VCR mode and load a recorded cassette Use a tape recorded in SP 12 bit mode with this camcorder 2 Press the MENU button and select AUDIO SETUP Select AUDIO DUB set it to AUDIO IN or MIC IN and press the MENU button 3 Locate the scene you wish to start audio dubbing 4 Press the PAUSE II button on the wireless controller 5 Press the AUDIO DUB button on t...

Page 115: ...r sound quality may decrease o Sound quality may decrease when you add sound to the same scene for more than 3 times a You can check the picture on the LCD screen a When you connect an audio device check the sound via built in speaker or audio device You can also connect a TV via S video terminal o When you use a microphone you can check the picture on a TV connected via the AV terminal and the so...

Page 116: ... Plays back the added sound MIX FIXED Plays back stereo 1 and stereo 2 in the same level MIXIVARI Plays back stereo 1 and stereo 2 The mix balance can be adjusted 2 If you have selected MIXNARI adjust the mix level Press the MENU button and select AUDIO SETUP Select MIX BALANCE adjust the balance with the SET dial and press the MENU button Turn the SET dial down to increase the volume of Stereo 1 ...

Page 117: ...f the still image recorded on the memory card will be 640 x 480 The still image quality can be selected o The data code of the movie will reflect the date and time it has been recorded on the memory card a An image recorded from an image in widescreen mode will be vertically compressed m c i to I FUNC I s 0 FINE 640x480 CD 57 1 Selecting the still images quality Press the FUNC button Select the st...

Page 118: ...so record a still image by pressing the PHOTO button fUlly when the tape is in playback pause mode o An image recorded from an image in widescreen mode will be vertically compressed o The data code of the image will reflect the date and time it has been recorded on the memory card ...

Page 119: ...urn off the camcorder and insert a memory card that contains still images 2 Turn on the printer 3 Set the camcorder to CARD PLAY mode 4 Connect the camcorder to the printer using the cable appears and changes to m j or J Does not appear with movies or still images that cannot be played back with the camcorder The print share button lights up and the current print setting will be displayed for appr...

Page 120: ...nt share button I CA RD PL AY 1 Select the still image you wish to print with the CARD button 120 2 Press the roN print share button JtV Printing starts The JtV button flashes and glows steadily when printing is complete If you wish to continue printing select another still image with the CARD button eXJnligg after Sg l e ting ll lei J rl lt S ettins You can select the number of copies and other s...

Page 121: ...progress cannot be stopped Printing stops when the current print is finished and the remaining prints are canceled a Printing Errors If an error occurs during the printing process an error message appears JJ 142 Canon PIXMAISELPHY OS printers Resolve the error When printing does not resume automatically select CONTINUE and press the SET dial If CONTINUE cannot be selected select STOP press the SET...

Page 122: ... paper sizes vary depending on the printer model PAPER TYPE PHOTO FAST PHOTO DEFAULT PAGE LAYOUT BORDERLESS BORDERED 2 UP 4 UP 8 UP 9 UP 16 UP DEFAULT 3 date print ON OFF DEFAULT print effect ON OFF VIVID NR VIVID NR DEFAULT o Print setting options and DEFAULT settings vary depending on the printer model For details refer to the instruction manual of your printer o BORDERED The image area remains ...

Page 123: ...SET dial to select a date print option and press the SET dial 2 Turn the SET dial to select the paper size and press the SET dial Select the paper size of the paper set in your printer Paper Settings 1 In the print setting menu turn the SET dial to select PAPER and press the SET dial Including the Date in the Print 1 In the print setting menu turn the SET dial to select o date and press the SET di...

Page 124: ...r details on paper type refer to the Printer User Guide BORDERS IBORDERLESS Prints right to the edges of the page IBORDERED Prints with a border Recommended paper size _ BORDERED The image area remains relatively unchanged from the recorded image when it is printed BORDERLESS The center portion of the recorded image is printed at an enlarged size The image s top bottom and sides may be cropped sli...

Page 125: ...a remains relatively unchanged from the recorded image when it is printed BORDERLESS MULTIPLE The center portion of a the recorded image is printed at an enlarged size The image s top bottom and sides may be cropped slightly o MULTIPLE can only be selected when printing on card size paper o The date print function is not supported by the CP Printers CP 10 and CP 100 IMAGE STANDARD Prints 1 still i...

Page 126: ...ting the Borders 2 Turn the SET dial to select Ff BORDERS and press the SET dial 3 Turn the SET dial to select a borders option and press the SET dial Pressing the MENU button brings you back to the print settings menu Including the Date 2 Turn the SET Dial to select e DATE and press the SET dial 3 Turn the SET dial to select a date option and press the SET dial Pressing the MENU button brings you...

Page 127: ... the directions up down or right left and the orientation of the frame vertical horizontal Pressing the MENU button brings you back to the print settings menu o About the color of the trimming frame Canon CP printers only White No trimming settings Green Recommended trimming size The trimming frame may not appear in green depending on the image size paper size or borders settings Red The image is ...

Page 128: ...rders I CARD PL AY FUNCJ IJdP PRINT ORDER I Q 57 _ 1 Press the FUNC button 2 Select O PRINT ORDER and press the SET dial 3 Select the number of copies and press the SET dial 4 Press the FUNC button To cancel the print order set the number of copies to 0 in step 2 CARD PLAY MENU Q 71 I_C_A_RD_O_PE_R_A_TI_O_N_S I I Q PRINT ORDER 128 1 Move the zoom lever toward W Up to 6 images appear Select the ima...

Page 129: ...rint function and select PRINT without having set the print order 3 Make sure that PRINT is selected and press the SET dial Printing starts The print setting menu disappears when printing is complete o Depending on the connected printer you can select style or paper settings before step 3 o Cancel Printing Printing Errors CO 121 o Restarting Printing Open the CARD PLAY menu and select 0 PRINT Sele...

Page 130: ...l l b lQIL I 1 Ir I Commercially available DV cable 6 Pin 1J4 pjn o Operation may not work correctly depending on the software and the specifications settings of your computer o If the computer freezes while you have connected the camcorder disconnect and reconnect the DV cable If the problem persists disconnect the interface cable turn off camcorder and computer turn camcorder and computer back o...

Page 131: ...tware Instruction Manual I 1 Install the Canon USB Video Driver 2 Connect the power adapter to the camcorder 3 Set the camcorder to PLAY VCR mode When transferring video recordings from to a tape make sure that AV DV is not displayed When using the analog digital converter make sure that AV DV is displayed Change the settings as necessary OJ 73 4 Connect the camcorder to the computer using the USB...

Page 132: ...the specifications settings of your computer o The image files on your memory card and the image files saved on the hard disk drive of your computer are valuable original data files If you wish to use image files on your computer make copies of them first and use the copied file retaining the original o Make sure that camcorder and computer are not connected with a DV cable before connecting the c...

Page 133: ... The first time you connect the camcorder to the computer you need to install the software and set the auto launch setting From the second time on you only need to connect the camcorder to the computer to transfer images I 1 Install the supplied Digital Video Software See Installing the Software in the Digital Video Software Instruction Manual 2 Set the camcorder to CARD PLAY mode 3 Connect the ca...

Page 134: ...computer and displayed in the Main Window of ZoomBrowser EX To continue transferring select another image with the CARD button WALLPAPER The selected image is transferred to the computer and displayed on the desktop Pressing the MENU button brings you back to the transfer menu o You can press the SET dial in place of the oN button With lBt ALL IMAGES rf NEW IMAGES or l2 TRANSFER ORDERS a confirmat...

Page 135: ...tton To cancel the transfer order select OFF in step 2 I I ai TRANSFER ORDER o o J J 1 5 u l 8 III t1 o CA RD PL AY CA RD elLA MENU I OJ 71 CARD OPERATIONS TRANS ORDERS ALL ERASE 1 Press the MENU button and select CARD OPERATIONS 2 SELECT TRANS ORDERS ALL ERASE ERASE ALL TRANSFER ORDERS NO and YES appears 3 Select YES AII disappear 4 Press the MENU button MENU I OJ 71 CARD OPERATIONS 1 Move the zo...

Page 136: ... connect the camcorder using a USB cable you also need to install the Canon USB Video Driver OJ 131 3 Connect the power adapter to the camcorder 4 Press the UNLOCK button and turn the POWER switch to NETWORK 5 Connect the camcorder to the computer using a USB cable or DV cable NETWORK MODE appears on the camcorder screen 6 Start DV Messenger o In NETWORK mode the camcorder can only be operated fro...

Page 137: ...and 40 C Battery packs become hot with use and may not charge Wait until the battery pack temperature is below 104 of 40 C and retry charging The battery pack is damaged Use a different battery pack Recording Playback Problem Solution CO Buttons will not work Turn on the camcorder 30 Load a cassette 21 Abnormal characters appear This camcorder uses a microcomputer External noise or static on the s...

Page 138: ...ed When recording near loud sounds such as fireworks drums 78 or concerts sound may become distorted Sound may be recorded properly when you set MIC ATT to ON in the menu or when you adjust the audio recording level manually Sound is recorded in a lower When recording near loud sounds such as fireworks drums 78 level than the actual level or concerts sound may be recorded not in the actual sound l...

Page 139: ...ted Change the position of the 22 protect switch Memory card cannot be Set the camcorder to CARD PLAY mode 41 played back Insert a memory card 22 Image cannot be erased Image is protected Cancel the protection 103 SD memory card is protected Change the position of the 22 protect switch QI flashes red Card error occurred Turn off the camcorder Remove and 105 reinsert the memory card Format the memo...

Page 140: ... place the camcorder in an airtight plastic bag and let it adjust to temperature changes slowly before removing it from the bag When condensation is detected o The camcorder stops operating and the warning message CONDENSATION HAS BEEN DETECTED appears for approx 4 seconds and il starts flashing o If a cassette is loaded the warning message REMOVE THE CASSETTE appears and starts flashing Remove th...

Page 141: ...g on a tape recorded in WRONG FORMAT HDVformat WRONG FORMAT You attempted to play back a tape recorded in HDV format PLAYBACK NOT POSSIBLE CHECK THE CASSETTE You attempted to perform audio dubbing on a tape recorded in a 114 REC MODE mode other than the SP mode CHECK THE CASSETTE You attempted to perform audio dUbbing on a tape recorded in 16 114 AUDIO MODE bit or 12 bit 4 channel sound CHECK THE ...

Page 142: ... the memory card to less than 1800 If a dialog appeared on the USB CABLE computer screen close it Reconnect the USB cable Following messages may appear on the camcorder screen On printers equipped with an operation panel or printer that can be connected to a TV an error number or message displays on the panel or TV monitor Refer to the printer manual for the remedies corresponding to the error num...

Page 143: ... the printer After a while turn the printer back on and reconnect the USB cable Check the printer status If the error persists consult your dealer or a Canon Service Center listed in the Contact List provided with the printer or the printer manual When you are printing using the i dJ N button check the print settings HARDWARE ERROR Cancel printing Turn off the printer and turn it back on Check the...

Page 144: ...camcorder rapidly between hot and cold temperatures may cause condensation to form on its internal surfaces III 140 DANGER Treat the battery pack with care Keep it away from fire or it might explode Do not expose the battery pack to temperature higher than 140 OF 60 C Do not leave it near a heater or inside a car in hot weather Do not try to disassemble or modify it Do not drop or knock it Do not ...

Page 145: ...the cassette in the camcorder after use o Do not use spliced tapes or nonstandard cassettes as they may damage the camcorder o Do not use tapes that have been jammed as video heads may become dirty o Do not insert anything into the small holes of the cassette or cover them with cellophane tape o Handle cassettes with care Do not drop or subject them to severe impact as this may damage the cassette...

Page 146: ...kwards into the slot may damage the memory card or the camcorder o Do not remove the label from the memory card or affix other labels on the memory card WARNING The battery used in this device may present a fire or chemical burn hazard if mistreated Do not recharge disassemble heat above 212 of 100 C or incinerate the battery Replace the battery with a CR2025 made by Panasonic Hitachi Maxell Sony ...

Page 147: ...n the pointed tool with the dent on the battery and move the battery to the right and left while you pull the battery o Do not remove the cover for any other purpose than removing the battery for recycling when disposing the camcorder o When you have removed the battery keep it out of reach of children If it is swallowed seek medical assistance immediately The battery case may break and the batter...

Page 148: ...aintain the best picture quality we recommend cleaning the video heads frequently with the Canon DVM CL Digital Video Head Cleaning Cassette or a commercially available dry cleaning cassette 148 o Do not use wet type cleaning cassettes as this may damage the camcorder o Tapes already recorded with dirty video heads may not be played back correctly even when you clean the video heads ...

Page 149: ...sing blower brush or a commercially available cleaning cloth for glasses U sipgv tb C aJn C lrqer Abr Qi g Power Sources You can use the compact power adapter to operate the camcorder and to charge battery packs in any country with power supply between 100 and 240 V AC 50 60 Hz Consult the Canon Service Center for information on plug adapters for overseas use Playback on a TV Screen You can only p...

Page 150: ...H D BP 2L12 BP 2L14 Battery Pack 150S Video ab CleIII II c e t c TV STV 250N w I Stereo Video Cable VCR I CA 570 Compact Power Adapter Il cO ill MUltiMedia J card PC Card Adapter h USB Reader Writer I E t J SDC 128M I II SD Memory Card IFC 300pclf Computer USB Cable VL 10Li Battery Video Light Stereo Microphone commercially D BP 900 Series Battery Pack TL H34 Tele converter o0 FS 34U Filter Set SC...

Page 151: ...y pack Please note that this warranty does not apply to repairs arising out of the malfunction of non genuine Canon accessories although you may request such repairs on a chargeable basis Battery Packs I When you need extra battery packs select from the following NB 2L NB 2LH BP 2L12 BP 2L14 CB 2LT Battery Charger Use the battery charger for charging the battery packs It plugs directly into a powe...

Page 152: ...r indoor shots or panoramic views When the Wide converter is attached a shadow may appear in the picture when you _ record with flash or assist lamp OPTURA60 FS 34U Filter Set Neutral density and MC protector filters help you to control difficult lighting conditions VL 10Li Battery Video Light This compact yet powerful video light can be used for both indoor and outdoor shooting It attaches to the...

Page 153: ...mcorder s advanced accessory shoe for cable free operation L _ iIi19 1I i l 1 VL 3 Video Light I I This video light enables you to record brightly in color even in dark places It attaches to the camcorder s advanced accessory shoe for cable free operation i lIl1if 1 OM 50 Directional Stereo Microphone This highly sensitive super directional microphone attaches to the camcorder s advanced accessory...

Page 154: ...hone OPTURA60 f 4 6 64 4 mm f 1 8 3 0 14x power zoom 35mm equivalent Tape 4 3 recording 47 8 669 mm 16 9 recording 40 9 573 mm Card 37 6 526 mm OPTURA50 f 4 6 46 mm f 1 3 2 8 10x power zoom 35mm equivalent Tape 4 3 recording 47 8 478 mm 16 9 recording 40 9 409 mm Card 37 6 376 mm 11 elements in 9 groups 34mm TTL autofocus manual focusing possible 3 3 ft 1 m 0 39 in 1 cm on maximum wide angle Auto ...

Page 155: ... DC 3 5 W using viewfinder 3 6 W using LCD screen in normal brightness 32 104 of 0 40 C 2 8 x 3 2 x 5 2 in 70 x 82 x 133 mm excluding protrusions 1 2 lb 530 g Power supply Power consumption Rated output Operating temperature Dimensions Weight 100 240 V AC 50160 Hz 17W 8 4 V DC 1 5 A 32 D 104 of 0 40 C 2 1 x 3 5 x 1 1 in 52 x 90 x 29 mm 4 8 oz 135 g Battery type Rated voltage Operating temperature ...

Page 156: ...t VL 3 Video Light OM 50 Directional Stereo Microphone WS 20 Wrist Strap SC 2000 Soft Carrying Case SC 1000 Soft Carrying Case SC A50 Soft Carrying Case VL 10Li Battery Video Light JR 7 2V 10WF Halogen Bulb OVM CL OV Cleaning Cassette 052 0260 000 081 1470 000 8468A002AA 9612A001AA 3067A002AA 082 0590 201 083 0712 000 6906A001AA 7871 A002AA 9582A002AA 7302A001AA 7303A001AA 7873A002AA 3062A002AA 08...

Page 157: ... 146 0 3 LP mode 0 o 0 0 o 0 77 o J 12bit audio 116 m Data code 0 0 0 0 85 Date and time 28 Date search 88 Daylight saving time 0 28 Digital effect 0 62 Digital zoom o 0 0 0 37 Direct printing 0 0 0 0 119 Drive mode 96 DV IEEE1394 terminal 106 130 D Beach SCN mode 0 0 0 0 0 48 Beep o 0 75 B CAMERA mode 0 0 0 0 30 CARD CAMERA mode 33 Card jump 102 Card mix 68 CARD PLAY mode 0 0 0 0 41 Cassette 0 0 ...

Page 158: ...25 RESET 137 Review 100 D S1 video terminal 44 Sample images 70 SCN mode recording program 48 Screen display 15 Screen messages 141 SO memory card 22 Self timer 55 Serial number 12 Shoulder strap 24 Shutter speed 50 Slide show 101 Slow Shutter recording program 45 Snow SCN mode 48 SP mode 77 Speaker 42 Special Scene recording program 45 Sports recording program 45 Spotlight SCN mode 48 Start up im...

Page 159: ...re to follow operating instructions B If the equipment is defective as a result of leaking batteries sand dirt or water damage C If defects or damages are caused by the use of unauthorized parts or by service other than our authorized agent D If the equipment is used for commercial or industrial use This Limited Warranty does not cover cabinet exterior finish video cassette tape head cleanings nor...

Page 160: ...al video equipment is used for commercial professional or industrial purposes This limited warranty does not cover the cabinet exterior finish of the digital video equipment video cassette tapes head cleanings nor does it apply to digital video equipment purchased outside Canada TO OBTAIN WARRANTY SERVICE Ship your Canon digital video equipment in its original carton box or equivalent properly pac...

Page 161: ... INC MONTREAL 5990 Cote de Liesse Quebec H4T 1V7 If you have any questions call the Canon Canada Information Center toll free at 1 800 828 4040 CANADA only Si vous avez des questions veuillez telephoner sand frais au Canada 1 800 828 4040 CANADA seulement CANON MEXICANA S DE R L DE C V Periferico Sur No 4124 Col Ex Rancho de Anzaldo C P 01900 Mexico D F Mexico CANON U S A INC NEW JERSEY OFFICE 100...

Page 162: ...computer and download images from a memory card to a computer Ce manuel d instruction explique comment installer Ie logiciel et Ie pilote Canon USB Video Driver Windows XP uniquement connecter Ie camescope aI ordinateur et transferer des images apartir d une carte memoire sur un ordinateur En este manual de instrucciones se explica como instalar el software y el controlador Canon USB Video Driver ...

Page 163: ...CONVEY OR OTHERWISE USE TRANSFER COPY TRANSLATE CONVERT TO ANOTHER PROGRAMMING LANGUAGE ALTER MODIFY DECOMPILE OR DISASSEMBLE THE SOFTWARE IN WHOLE OR IN PART EXCEPT AS EXPRESSLY PROVIDED IN THIS AGREEMENT 2 BACK UP COpy You may make one copy of the SOFTWARE solely for back up purposes or copy the SOFTWARE onto the permanent storage device e g a hard disk of your computer and retain the original f...

Page 164: ...iration of all copyright interests in the SOFTWARE unless earlier terminated You may terminate this Agreement by destroying the SOFTWARE This Agreement will also terminate without notice to you if you fail to comply with any of the terms of this Agreement and you must then promptly return the SOFTWARE In addition Canon may enforce its other legal rights 6 U S GOVERNMENT RESTRICTED RIGHTS NOTICE Th...

Page 165: ...ctual property of Canon Nothing contained in Paragraph 1 shall be construed to give Canon any ownership rights in any images graphics or textual material that you save in connection with the Software You may not modify remove or delete any or all copyright notices i which are contained in the Software including any copy thereof and ii which are on the original CD ROM and on the medium of a back up...

Page 166: ...wnload Images Direct Transfer Function 25 Setting the Direct Transfer Function 26 Using a PC Card Reader Writer 28 Functions and System Requirements of Canon USB Video Driver 29 Functions 29 Camcorder Categories 29 System Requirements 29 Installing the Canon USB Video Driver OPTURA 60 30 IMacintosh I System Requirements for Macintosh 34 What is Digital Video Software 35 Installing the Digital Vide...

Page 167: ...ws 1 1 Set the DIGITAL VIDEO SOLUTION DISK in the computer s CD ROM drive If the installer panel opens click Exit to close it 2 Select My Computer from the start menu 3 Right Click the CD ROM icon and select Open from the displayed menu 4 Double click the MANUAL folder followed by the ENGLISH and DIGITAL VIDEO SOFTWARE folders 5 Double click DIGITAL VIDEOV15_16WENG N PDF The PDF manual opens IMaci...

Page 168: ...vices or due to use of a memory card not formatted by a Canon camcorder Trademark Acknowledgments Macintosh and Mac OS are trademarks of Apple Computer Inc registered in the United States and other countries iPhoto and QuickTime are trademarks of Apple Computer Inc Microsoft and Windows are either registered trademarks or trademarks of Microsoft Corporation in the United States and or other countr...

Page 169: ...rded images from a memory card to your computer IFC 300PCU USB Cable DIGITAL VIDEO SOLUTION DISK Windows users Move on to p g Macintosh users Move on to p 34 The explanations in this manual use mainly Windows XP and Mac OS X version 10 3 screen shots ...

Page 170: ... that come with above OS preinstalled and have built in USB ports Pentium 500 MHz or better Windows 98 Windows Me 128 MB or more Windows 2000 Windows XP 256 MB or more USB only preinstalled Windows 98 Windows Me Windows 2000IWindows XP systems with built in USB ports Canon Utilities ZoomBrowser EX 250 MB or more Including the PhotoRecord printing program PhotoStitch 40 MB or more Canon DV TWAIN Dr...

Page 171: ... on a memory card OJ 24 Applying DPOF Digital Print Order Format settings Uploading My Camera settings to the camcorder 0 The Remote Capture function is not supported by your camcorder 0 The slide show function of the camcorder cannot be used PhotoStitch Merging a series of overlapping still images into a single seamless panorama PhotoRecord Printing still images with background frame title and co...

Page 172: ...omputer Recording movies that have been edited on a computer to the tape Converting analog signals from a connected VCR or 8mm camcorder to digital signals and transferring them to the computer For details refer to the camcorder instruction manual This instruction manual explains how to install the software and Canon USB Video Driver Windows XP only connect the camcorder to a computer and download...

Page 173: ...mages protected on the camcorder may lose this setting once they are downloaded to the computer 1 Check a camcorder is not connected to the computer While a camcorder is connected to the computer the software cannot be installed normally If a camcorder is connected detach the USB cable from the computer 2 Close any programs that are running 3 Set the DIGITAL VIDEO SOLUTION DISK in the computer s C...

Page 174: ...lick Digital Video Software Install Installer Panel DIGITAL VIDEO Solution Disk QUiCkTime E If the following dialog appears click Restart to restart the computer After restarting the computer installation automatically continues ...

Page 175: ...ally select Custom Installation When you select Custom Installation select a USB driver Windows XP The USB driver supplied with the Windows operating system is used You do not need to install a USB driver Windows 98 Windows 2000 Canon DV TWAIN Driver Windows Me Canon DV WIA Driver SelupType Choose the setup t pe that best suits your needs Click the t pe of Setup ou prefer 8 Select your country reg...

Page 176: ...uter has restarted and the regular desktop screen is displayed remove the DIGITAL VIDEO SOLUTION DISK from the CD ROM drive When installation is complete remove the DIGITAL VIDEO SOLUTION DISK before you connect the camcorder to the computer Windows 98 Windows Me Windows 2000 At this point the files for the TWAIN Driver or WIA Driver have only been copied to your computer To download images via US...

Page 177: ... for the location of the computer s USB ports o See your camcorder instruction manual for connecting instructions 1 Insert a memory card containing images into the camcorder 2 Connect the power adapter to the camcorder 3 Turn the POWER switch to PLAY VCR and move the TAPEI CARD switch to CARD Wait until the card access indicator stops flashing 4 Attach the supplied USB cable to the computer s USB ...

Page 178: ...to start ZoomBrowser EX and download images to the computer see Downloading Images ZoomBrowser EX lJ 18 USB Terminal on the Camcorder USB Cable Camcorder End Computer End USB Port on the Computer E CalmCI rdler to a Computer 1 ...

Page 179: ...s XP Users Do not rotate the image in the Windows Picture and Fax Viewer or in the explorer view The data for the original image will be changed and the image can no longer be displayed in ZoomBrowser EX or on the camcorder A movie file exceeding 210MB cannot be downloaded If the Server Busy window appears when you connect the camcorder to the computer click Retry Thi s lCtion cannot be completed ...

Page 180: ...OK Select the progr 3m to launch for this action o 6 1W 3YS use this program for this action Windows XP If the window does not appear or if PC CONNECT does not appear on the camcorder screen click the Windows start menu and select All Programs Canon Utilities CameraWindow and CameraWindow Camera Control window Press the camera s button Starts to download images Lets you select and download images ...

Page 181: ...ils please refer to the instruction manual of your camcorder o If the camcorder is already connected to the computer you can start the CameraWindow and display the Camera Control window by clicking Acquire Camera Settings followed by Acquire Images in the ZoomBrowser EX Main Window o To start ZoomBrowser EX click the Windows start menu and select All Programs CanonVtilities ZoomBrowser EX and Zoom...

Page 182: ...the image type and the destination folder 1 In the Camera Control window click the Acquire Images tab and click Preferences 2 Select Change auto download settings and click Next Which download method do you want to perform setup for Change direct transfer download dedination folder Change auto download settings ...

Page 183: ...ing selected New images and downloaded Select the image type to be downloaded New images 0 6 11 images Images hose print order settings Nere specified ith the camera Images Nhose transfer settings ere specified Nith the camera 4 Specify the destination folder settings and click Next _ Destination Folder Select thl ll configuration of the subfolder Specify the location at which to save the image ...

Page 184: ...er at the save destination Perform selected processes consecutively Below window will be displayed when you select Perform selected processes consecutively You can redisplay the window by clicking Select Select a process to perform after the image is downloaded and click OK Vie 1J a a Slide Shol l Layout Print Cont lct Sheet Print ...

Page 185: ...ages automatically to the computer when you connect the camcorder Enable or disable the image auto download function oImages are automatically downloaded to computer I Ihile camera is connected Downloading the Selected Images from the CameraWindow 1 Click Lets you select and download images in the Camera Control window The CameraWindow opens ...

Page 186: ...appears around the selected image 3 Confirm the settings and click Starts Download ZoomBrowser EX starts and the downloaded images appear in the Main Window Click Finish to close the Camera Control window If your camcorder supports the Direct Transfer Function you can use the camcorder to download images ...

Page 187: ...er to transfer images For instructions on how to change the destination folder and the folder name see step 3 in Auto Downloading Settings OJ 21 The tV button cannot be used when it is not lighted You can set the action that is carried out for direct transfer Right click the CameraWindow Launcher icon on the taskbar and select an action from the displayed menu Show image s in fullscreen mode ttl S...

Page 188: ...form setup for i Change direct trander dOINnload destination folder Change auto download settings Specify the location at which to save the image Destination Folder Select the II configuration of the subfolder 3 Specify the destination folder settings and click Finish Click Finish to close the Camera Control window ...

Page 189: ...ams Canon Utilities CameraWindow and CameraWindow Windows XP When a window appears allowing you to select an application program to start select Download View Images using Canon CameraWindow and click OK The Camera Control window opens 3 Select a downloading method Starts to download images The progress bar will be displayed and images will be downloaded to the computer and ZoomBrowser EX starts F...

Page 190: ...e Supplied USB Cable o Proper operation is not guaranteed on a dual CPU PC or on a user built PC o Proper operation is not guaranteed on any particular system even if it meets the requirements outlined above o Do not connect two or more camcorders to the computer at the same time The connection may not work correctly o Connect the USB cable directly to one of the computer s main USB ports The inte...

Page 191: ... the start menu 2 Right click the CD ROM icon and select Open from the displayed menu 3 Double click the Setup exe icon Depending on the setting of your computer the file extension exe may not appear 2 Select your language 3 Click Canon USB Video Driver Install Installer Panel 4 Select your language and click OK DIGITAL VIDEO Solution Disk Digital Video Software Canon USB Video Driver Windows XP o...

Page 192: ...eements and click Yes 7 When the confirmation window appears click Yes Plea e di connect allDV Camcorder before continuing with the etup Areyousuretocontlnue Setupwillio laIiCANONUSBVideoDriveriolhelollo Nioglolder Choose Destination location Select folder INhere Setup will install files 8 Confirm the target folder and click Next C F rogram Files Canon USBVideo Drivel ...

Page 193: ...tupha cornpleledin ldliingC6JJOr JUSBVideoDriver 10Connect the power adapter to the camcorder 11 Set the camcorder to PLAY VCR mode 1 Connect the camcorder to the computer using the USB cable 13Select Install the software automatically Recommended and click Next II your hardware came wilh an inslallalion CD or floppy disk inserl ilnow_ ...

Page 194: ...non USB Video Record will be installed automatically 15Check if the driver has been installed correctly From the start menu select My Computer and check if the Canon USB Video icon appears If the icon does not appear the installation has not been completed properly Uninstall and reinstall the driver ...

Page 195: ...owser 200 MB or more PhotoStitch 40 MB or more 1024 x 768 pixels 32 OOO colors or better a Proper operation is not guaranteed on a user built PC a Proper operation is not guaranteed on any particular system even if it meets the requirements outlined above a ImageBrowser and PhotoStitch do not operate on disks formatted with the Unix File System UFS a A CD ROM drive is required to install the softw...

Page 196: ...g indexes CameraWindow Selecting a method to download images in the Camera Control window 0 42 Viewing images recorded in a memory card OJ 46 Applying DPOF Digital Print Order Format settings Uploading My Camera settings to the camcorder 0 The Remote Capture function is not supported by your camcorder 0 The slide show function of the camcorder cannot be used PhotoStitch Merging a series of overlap...

Page 197: ...mcorder for example MVI_0001 AVI and MVI_0001 THM MVI_0001 THM files cannot be downloaded but movies can still be played back on the computer o Mac OS X version 10 2 The Exif version may change to 2 1 and image information may be modified when downloading images with Image Capture To download images without any information changes use the following procedures 1 Connect the camcorder to the compute...

Page 198: ...SeleClaninSlallationlYpe and dick Next Custom Installation LHs you select the programs you want to install We recommend thi option for users familiar with the installation 6 Read the license agreement and click Agree 7 Review the installation settings and click Next Installation starts In taiiationwill begin using the settings listed beiow Click Nextlto start copying Ales ...

Page 199: ...8 When the Installation has finished message appears click OK Installation has finished 9 After the installation is complete restart the computer as prompted ...

Page 200: ...Do not connect two or more camcorders to the same computer via the USB interface The connections may not operate correctly o Never allow the computer to go into standby sleep mode while a camcorder is connected via the USB interface o Refer to your computer manual for the location of the computer s USB ports o See your camcorder instruction manual for connecting instructions 1 Insert a memory card...

Page 201: ... to the memory card Failure to do so may cause memory card data to become corrupted Do not open the memory card cover remove the memory card or detach the USB cable Do not turn off the camcorder or the computer Do not change the position of the POWER switch or the TAPE CARD switch o Images recorded onto the memory card or downloaded to the hard disk are important original data files Create a copy ...

Page 202: ...3 Select Other from When a camera is connected open 4 Select CameraWindow and click Open CameraWindow is normally installed in Applications Canon Utilities CameraWindow 5 Click OK ...

Page 203: ...p I I I aatl i g i I II l 1g tQ ftl q 911 l p t JI Auto downloading 1 Connect the camcorder to the computer OJ 39 2 Click Starts to download images ImageBrowser starts To start ImageBrowser manually double click the folder in which you installed the program followed by the Canon Utilities and lmageBrowser folders and the lmageBrowser file or double click the ImageBrowser icon on the Desktop DO Nnl...

Page 204: ...ect and download images Applying Auto downloading Settings This task allows you to apply auto downloading settings You can specify the types of images and the destination folder 1 In the Camera Control window click the Acquire Images tab and click Preferences select and download images ...

Page 205: ... settings were specified with the camera C Images whose transfer settings were specified with the camera 3 Specify the destination folder settings and click Next Specify the loeat ion at lh icfl to save the image Destination FolderLA new folder will be cr eated for each of the images shooting d a t es in the f O loWing folder and the images will be saved there tAaclntosh HD Users video Pictures i ...

Page 206: ...erform after the image is downloaded and click OK Select the process to be performed after downloading the image 5 Click Finish ImageBrowser starts To start ImageBrowser manually double click the folder in which you installed the program followed by the Canon Utilities and lmageBrowser folders and the lmageBrowser file or double click the ImageBrowser icon on the Desktop Placing a check mark next ...

Page 207: ... auto do vn load funet ion Downloading the Selected Images 1 Connect the camcorder to the computer OJ 39 2 Click Lets you select and download images CameraWindow appears Starts to download images Lets you select and download images ...

Page 208: ...different images while holding down the Shift key selects multiple images E 4 Confirm the settings and click Start Download ImageBrowser starts and Browser Window appears Assign Sequence I Jo I Jumberof Saveto Folderl Jame XXX Extention tvpe of image file is unchanged J Click this button to browse where you want to save the images Destination Folder l i i 11 11 16 u id pi t r Select to specify the...

Page 209: ...CameraWindow appears and the images in the memory card are downloaded To apply auto downloading settings refer to Applying Auto downloading Settings OJ 43 _ Lets you select and download images CameraWindow appears and the images in the memory card are shown as thumbnails Lets you select and download Images ...

Page 210: ...ANON 1 800 652 2666 Canon Hongkong Co Ltd 19 F The Metropolis Tower 10 Metropolis Drive Hunghom Kowloon Hong Kong Phone 852 2170 2828 Fax 852 2723 9684 printed on 100 reused paper Document realise avec du papier recycle a100 EI papel aqui utilizado es 100 recicJado I PUB DIM 674 0105Ni28 0 CANON INC 2005 DY8 9120 465 000 PRINTED IN JAPAN IMPRIME AU JAPON IMPRESO EN JAPON ...

Page 211: ...you may request such repairs on a chargeable basis Dieses Produkt ist so konzipiert dass es eine ausgezeichnete Leistung erbringt wenn es mit Canon Originalzubehor verwendet wird Canon ist fOr Schaden am Produkt bzw Unfalle wie beispielsweise Brande o A die durch eine Fehlfunktion von nicht originalen Zubehorteilen wie beispielsweise ein Leck oder die Explosion eines Akkus entstehen nicht haftbar ...

Page 212: ... be defective Stop using the cassette Availability differs from area to area Video heads may become dirty under the following conditions When using the camcorder in humid or hot places When using cassettes with damaged or dirty tape When using the camcorder in dusty places When using the video heads without cleaning them for a long time Note a Before you make important recordings clean the video h...

Page 213: ...g 2 0 Family Activities 5 0 School Educational Training 3 0 Recreational Sports 6 0 Other _ Spouse 1 0 2 0 3 0 4 0 5 0 6 0 Spouse 1 0 2 0 3 0 4 0 5 0 6 0 7 0 21 Which group describes your annual family income 01 0 Under 15 000 08 0 75 000 99 999 02 0 15 000 19 999 09 0 100 000 124 999 03 0 20 000 29 999 10 0 125 000 149 999 04 0 30 000 39 999 11 0 150 000 174 999 05 0 40 000 49 999 12 0 175 000 19...

Page 214: ...s DietinglWeight Control Science New Technology Self Improvement Walking for Health Watching Sports on TV Community Civic Activities Home Video Games Motorcycles Watch Cable TV Home Video Recording Moneymaking Opportunities Current Affairs Politics 41 D 42 D 43 D 44 D 45 D 46 D 47 D 48 D 49 D 50 D 51 D 52 D 53 D 54 D 55 D 56 D 57 D 58 D 59 D 60 D Automotive Work Electronics Home Workshop Do It You...

Page 215: ......

Reviews: