background image

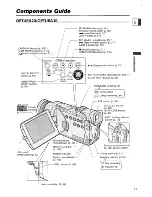
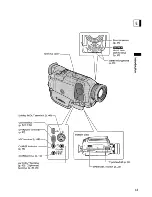
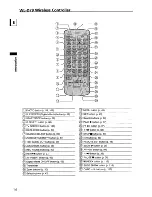
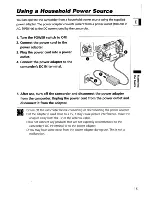
Summary of Contents for opture 10

Page 1: ... instruction manual covers the OPTURA20 and OPTURA10 Please note that illustrations and explanation in this manual are based on the OPTURA20 Ce manuel d instruction traite des modeles OPTURA20 et OPTURA10 Veuillez noter que les illustrations et les explications contenues dans ce manuel sont basees sur Ie OPTURA20 Este manual de instrucciones cubre la OPTURA20 y la OPTURA10 Tenga en cuenta que las ...

Page 2: ...h can be determined by turning the equipment off and on the user is encouraged to try to correct the interference by one or more of the following measures Reorient or relocate the receiving antenna Increase the separation between the equipment and receiver Connect the equipment into an outlet on a circuit different from that to which the receiver is connected Consult the dealer or an experienced r...

Page 3: ... may cause the product and cart combination to overturn 10 Power Sources The CA 570 Compact Power Adapter should be operated only from the type of power source indicated on the marking label If you are not sure of the type of power supply to your home consult your product dealer or local power company Regarding other power sources such as battery power refer to instructions in this manual 11 Polar...

Page 4: ... the product has been exposed to rain or water d If the product does not operate normally even if you follow the operating instructions Adjust only those controls that are covered by the operation instructions Improper adjustment of other controls may result in damage and will often require extensive work by a qualified technician to restore the product to its normal operation e If the product has...

Page 5: ...sers Only DV NETWORK SOLUTION DISK Software Instruction Manual This manual explains how to download upload images fromfto the memory card using aDV IEEE1394 cable You can also perform videoconference and file transfer over the Internet using the provided software Available functions depend upon the camcorder model of your contact and networking environment Trademark Acknowledgements Canon and Bubb...

Page 6: ...32 Searching and Reviewing when Recording 35 Tips for Making Better Videos 36 Basic Playback Playing Back a Tape 37 Playing Back on a TV Screen 40 Using the Full Range of Features General Menus and Settings 43 Changing the Remote Sensor Mode 48 Customizing the Camcorder 49 Other Camcorder Settings 50 Recording Changing the Recording Mode SP LP 52 Recording Still Images on the Tape 53 Using the Rec...

Page 7: ...DV IEEE1394 Cable 100 Using a Memory Card Inserting and Removing the Memory Card 101 Selecting the Image QualitylSize 102 Recording Still Images on a Memory Card 105 Recording Panoramic Images Stitch Assist Mode 111 Recording Motion JPEG Movies on a Memory Card l13 Playing Back a Memory Card 115 Protecting Images 118 Erasing Images 119 Selecting Still Images for Printing Print Order 120 Printing w...

Page 8: ...roller Om Additional topics that complement the basic operating procedures o II Precautions related to the camcorder operation o Capital letters are used to refer to buttons on the camcorder or the wireless controller o are used to refer to menu items displayed on the screen o Screen refers to the LCD and the viewfinder screen The serial number of this product can be found at the battery attachmen...

Page 9: ... operate it properly We suggest that you master the basic operations of the camcorder first before moving on to its full range of features 55 800 Shoulder Strap Lens Cap and Lens Cap Cord iIi1 ff3e BP 512 Battery Pack BP 508 Battery Pack Two AA Batteries Lithium Button Battery CR2025 WL D79 Wireless Controller IFC 300PCU USB Cable SDC 8M SD Memory Case for SD Memory Card containing Card sample ima...

Page 10: ...c scene with the supplied software With the OPTURA20 s Super Night mode in CAMERA mode and Low Light Plus mode in CARD CAMERA mode you can keep on shooting without turning the lights on The assist lamp White LED lights up to illuminate the subject You can print still images by connecting to a Canon printer with Direct Print function Allows transfer of memory card data to a computer with built in U...

Page 11: ...5 I record review button p 35 I i rewind button p 37 CARD button p 115 I REC SEARCH button p 35 I r fast forward button p 37 I I CARD button p 115 CARD MIX button p 128 I stop button p 37 SLIDE SHOW button p 116 INDEX SCREEN button p 116 stitchaSSiS s _ iJEN 1 I 0 e I 11 play pause button p 37 DIGITAL EFF ECTS cQa e REC PAUSE LINE IN button p 90 91 button p 59 I self timer button p 68 ON OFF Digit...

Page 12: ...R switch p 8 Start stop button p 28 Focus ring p 76 Built in speaker p 39 Cassette compartment p 22 Cassette compartment cover p 22 r Diopter adjustment I lever p 20 ti Zoom lever p 30 CAMERA Y vCR PHOTO button p 53 105 12 ...

Page 13: ... 1 __4_0 _ _ _ DV IN OUTterminal I rminal p 69 DV I MIC H E indicator DC IN terminal p 15 __ AV IN OUT terminal p 40 0 phones terminal p 39 70 Bottom view Stereo microphone p 69 13 ...

Page 14: ...IO DUB button p 98 REC PAUSE button p 90 REW button p 37 AV INSERT button p 96 Q1l Digital effects O OFF button p 59 Transmitter Zoom buttons p 30 Select buttons p 43 MENU button p 43 SET button p 43 Search buttons p 86 PLAY button p 37 FF button p 37 I button p 38 STOP button p 37 x 2 button p 38 REMOTE SET button p 48 SLOW I button p 38 AV DV button p 94 I button p 38 PAUSE button p 38 INDEX but...

Page 15: ...der s DC IN terminal 5 After use turn off the camcorder and disconnect the power adapter from the camcorder Unplug the power cord from the power outlet and disconnect it from the adapter o Turn off the camcorder before connecting or disconnecting the power adapter o If the adapter is used close to a T it may cause picture interference Move the adapter away from the TV or the antenna cable o Do not...

Page 16: ... camcorder s DC IN terminal 7 When charging is complete disconnect the power adapter from the camcorder Unplug the power cord from the power outlet and disconnect it from the adapter 8 Remove the battery pack after use Press the BAD button to remove the battery o The battery pack may be defective when the CHARGE indicator flashes rapidly o The CHARGE indicator informs you about the charge status 0...

Page 17: ...l 520 min 370 min 280 min 200 min L L L a BP 508 Supplied 80 min 65 min 45 min 35 min BP 512 Optional 150 min 115 min 80 min 65 min BP 511 Optional 150 min 115 min 80 min 65 min BP 522 Optional 320 min 235 min 175 min 130 min BP 535 Optional 520 min 375 min 280 min 205 min Battery Pack Maximum Recording Time Typical Recording Time Using the viewfinder Using the LCD Using the viewfinder Using the L...

Page 18: ...ever a battery pack is not in use Contact to metallic objects may cause a short circuit and damage the battery pack o Dirty terminals may cause a poor contact between the battery pack and the camcorder Wipe the terminals with a soft cloth o Since storing a charged battery pack for a long time about 1 year can shorten its lifecycle or affect performance we recommend to discharge the battery pack fu...

Page 19: ... 1000 C or incinerate the battery Replace the battery with a CR202S made by Panasonic Hitachi Maxell Sony Sanyo or with Duracell202S Use of other batteries may present a risk of fire or explosion o Do not pick up the battery using tweezers or other metal tools as this will cause a short circuit o Wipe the battery with a clean dry cloth to ensure proper contact o Keep the battery out of reach of ch...

Page 20: ...taching the I ens Cap _3 mr_mn GJUi GJUltmJl1Jt_ _tl l _ _ _ a l l m 1 Attach the cord to the lens cap_ III cu 2 Pass the grip belt through the loop on the cord Press the buttons on the lens cap when attaching removing it Hook the lens cap on the grip belt while you are recording and place it over the lens when you have finished fastening the Grip Relt Hold the camcorder with your right hand and a...

Page 21: ... the length of the strap RemOKing and Attaching the AcreSsoQl Shoe oyer Remove the accessory shoe cover when attaching an accessory to the advanced accessory shoe 1 Lift the cover with your nail and remove the cover Hook the cover on the lens cap cord or grip belt while using the accessory shoe 2 Insert the end into the accessory shoe and attach it onto the shoe 21 ...

Page 22: ... is inserted when turning on the power in CAMERA and PLAY VCR mode o With some types of tapes the remaining tape display may not be accurate Lo aiYd iun g alillnLYddLdllIuJnidll jo a OlldWdinLQjg I IlJii t fll i1iil _ 1 Slide and hold the OPEN EJECT switch and open the cassette compartment cover The cassette compartment opens automatically 2 Load unload the cassette Load the cassette with the wind...

Page 23: ...ettes in the case and store them upright o Do not leave the cassette in the camcorder after use o Do not use spliced tapes or nonstandard cassettes as they may damage the camcorder o Do not use tapes that have been jammed as video heads may become dirty o Do not insert al ything into the small holes of the cassette or cover them with cellophane tape o Handle cassettes with care Do not drop or subj...

Page 24: ...mote sensor modes jJ 48 If the wireless controller does not work check if camcorder and wireless controller are set to the same mode a The wireless controller may not work properly in bright places such as outdoors under direct sunlight or when used too close to the camcorder a The operable range of the wireless controller may shorten when the camcorder s remote sensor is exposed to strong light a...

Page 25: ...n to open the menu LL 2 Turn the selector dial to select SYSTEM and press the selector dial 3 Turn the selector dial to select T ZONE DSn and press the selector dial The time zone setting appears The default setting is New York Select your time zone and daylight saving time DST setting if necessary 4 Turn the selector dial to select the setting option that represents your time zone To adjust for d...

Page 26: ...Rio de Janeiro TI SYDNEY FERNAN Fernando de Noronha SOLOMON AZORES o Once you have set time zone date and time you do not need to reset the clock each time you travel to another time zone Just set the time zone to the one of your destination and the camcorder automatically adjusts the clock o Days per month and leap years will be automatically adjusted A R A MERA MENU CD 43 I_S_V_ST_E_M I DITIME S...

Page 27: ...of the display starts flashing Set the month day hours and minutes in the same way 5 Press the MENU button to close the menu and to start the clock You can display time zone date and time in the lower left corner of the screen the time zone disappears after 4 seconds The 4 second display will no longer appear when you turn the power on The date and time display will not be superimposed on your rec...

Page 28: ...lens cap 2 Set the camcorder to CAMERA mode rrn Jg1 8 If you have not set the time zone date and CJ mJ s time SET THE TIME ZONE DATE AND TIME appears See Setting the Time Zone Date and Time CD 25 28 3 Open the LCD panel CD 32 To use the viewfinder keep the LCD panel closed or rotate it so that the screen faces in the same direction of the lens CD 33 4 Press the start stop button to begin recording...

Page 29: ...and video heads II AUTO POWER OFF appears 20 seconds before shutoff To continue recording turn the POWER switch to OFF and then back to CAMERA o For when to use the 0 Easy Recording or program AE mode see Using the Recording Programs aJ 55 o When you do not remove the cassette you can record the next scene without producing any noise or blank sections between the recordings even if you turn the ca...

Page 30: ... angle Move it toward T to zoom in telephoto _ Press the zoom lever slightly for a slow zoom Press harder for a faster zoom S You can also use the T and W buttons on the wireless controller s However you cannot control the zoom speed MENU CARD CAMERA CAMERA Aw4 l 2Q Z LCarD 1in tW tk M Wf fW1 WW i JWEW _tWL 1 1 I MENU ICAMERA SET UP CD 43 1 Press the MENU button to open the menu 2 Turn the selecto...

Page 31: ... when the digital zoom is set to 64x and extends further in dark blue when set to 320x a Digital zoom cannot be used in the Night mode and Super Night OPTURA20 mode a Digital zoom cannot be used when the multi image screen is selected a Because the image stabilizer cannot be used in CARD CAMERA mode we recommend mounting the camcorder on a tripod at large magnifications 31 ...

Page 32: ... clicks The LC0 screen switches off and the viewfinder switches on 32 o Make sure to open the LCD panel at 90 degrees before rotating it o Rotate the LCD panel in the vertical position before closing the LCD panel o When recording outdoors or through a window do not leave the LCD screen viewfinder or lens exposed to direct sunlight as it may cause damage o Do not hold the camcorder by the LCD pane...

Page 33: ...button to close the menu MENU I Changing the brightness of the LCD screen does not affect that of the viewfinder or the recordings JWgjwigg 1bewSuhje t lQ t ll QDW ltm1be LCDp t W r 4 1 rwqawp_ rCP 1 You can rotate the LCD panel so that the screen faces in the same direction as the lens The viewfinder switches on allowing you to use the viewfinder while the subject can monitor the screen When you ...

Page 34: ...elector dial to select DISPLAY SET UP and press the selector dial 3 Turn the selector dial to select LCD MIRROR and press the selector dial 4 Turn the selector dial to select OFF 5 Press the MENU button to close the menu MENU MENU 34 _ When LCD MIRROR is set to ON most screen displays appear mirror reversed ...

Page 35: ...e last few seconds and returns to record pause mode RecOrd Search CAMERA PLAY H CARD CAMERA CARD PLAY VCR In record pause mode this function allows you to play back the tape forward or reverse to locate the point where you wish to begin recording Press and hold the REC SEARCH button forward or button reverse Release the button at the point you wish to begin recording The camcorder returns to recor...

Page 36: ...microphone or lens High angle Recording low angle Recording o When using a tripod do not leave the viewfinder exposed to direct sunlight as it may melt due to concentration of the light by the lens o Do not use tripods with fastening screws longer than 0 2 inch 5 5 mm as it may damage the camcorder 36 Lean against a wall Lie on your elbow When recording outdoors we recommend recording with the sun...

Page 37: ...utward 3 Press the button to rewind the tape To fast forward the tape press the button To stop playback press the button 4 Press the II button to begin playback 5 Press the button to stop playback o If the playback picture is distorted clean the video heads using a Canon Head Cleaning Cassette or a commercially available digital video head cleaning cassette OJ 148 o To use the viewfinder close the...

Page 38: ...atedly during playback pause Press and hold it to play back continuous frame advancelframe reverse SLOW I Slow Forward Slow Reverse Plays back t about 1 3 normal speed For slow forward playback press the SLOW I button For slow reverse playback press the button followed by the SLOW I button Press the play button to return to normal playback I Reverse Playback Plays back in reverse at normal speed P...

Page 39: ...mode Make sure to change the setting when you have change the operating mode Adjusting the Volume Turn the selector dial up to increase the volume and down to lower the volume A volume bar appears for 4 seconds You can turn off the volume completely by turning the selector dial down until OFF appears Turn the selector dial up to increase the volume again II 0 Sound may become distorted when the vo...

Page 40: ...be produced if sound from the TV speakers is picked up by the microphone o For high picture quality we recommend using a TV with an 5 51 terminal OTVs with 51 terminal or Video ID 1 system Recordings made in the 16 9 mode JJ 50 will be automatically played back in wide screen mode 150 video Cable optional INPUT S S1 VIDEO Signal flow c Signal flow c STV 250N Stereo Video Cable supplied Dls with S ...

Page 41: ...den TermipalS Refer also to the TV or VCR instruction manual VIDEO E f O a liDDJ Signal flow q J SlV 250N Stereo Video Cable supplied 1 Turn off all devices before starting the connections 2 Connect the STV 250N Stereo Video Cable to the camcorder s AV terminal and the audio video terminals on the TVNCR Connect the white plug to the white audio terminal L left the red plug to the red audio termina...

Page 42: ...DIO SET UP and press the selector dial 3 Turn the selector dial to select OUTPUT CH and press the selector dial 4 Turn the selector dial to select a setting option UR Stereo L R channels Bilingual Main Sub UL Stereo L channel Bilingual Main R R Stereo Rchannel Bilingual Sub 5 Press the MENU button to close the menu MENU r fV MENU r fV 42 _ The setting resets to the UR setting when you turn the cam...

Page 43: ... to close the menu When setting the white balance or shutter speed press the selector dial first before pressing the MENU button MENU o Pressing the MENU button at any time closes the menu o Selecting RETURN takes you back one level o When the submenu consists of 2 pages select NEXT PAGE to move to the second page and PREV PAGE to return to the first page o Items that are not available appear in p...

Page 44: ... FLASH ON FLASH OFF 73 AF AST LAMP AUTO OFF 77 16 9 ON OFF 50 PHOTO REC TAPE CARDOd 110 VCR SET UP REC MODE SPO LP 52 AV PHONES AV PHONESO 39 AUDIO SET UP WIND SCREEN ON OFF 69 AUDIO MODE 16bit 12bit 69 OVOLUME 70 DISPLAY SET UP BRIGHTNESS 33 LCD MIRROR ON OFF 34 TV SCREEN ON OFF 140 DIT DISPLAY ON OFF 27 DEMO MODE ON OFF 51 SYSTEM WL REMOTE l ITD1 1 D2 OFF l 48 BEEP ON OFF 50 T ZONE DST See list ...

Page 45: ... NORMAL 102 MOVIE SIZE 320 x 240 160 x 120 103 FILE NOS RESET CONTINUOUS 104 CARD COPY Od CANCEL EXECUTE 132 OPERATIONS DISPLAY SET UP BRIGHTNESS 33 DISPLAYS ON OFF PLAYBK 140 6SEC DATE ON OFF 85 DATA CODE DATEITIME CAMERA DATA CAM Drr 85 DrrlME SEL DATE TIME DATE TIME 85 SYSTEM WL REMOTE IGID1 H TID2 OFF l 48 BEEP ON OFF 50 T ZONE DST See list of time zones j 25 DrrlME SET 26 MY CAMERA SHTR SOUND...

Page 46: ...0 x 240 160 x 120 103 FILE NOS RESET CONTINUOUS 104 VCR SET UP AV PHONES AV PHONESO 39 AUDIO SET UP WIND SCREEN ON OFF 69 U VOLUME 70 DISPLAY SET UP BRIGHTNESS 33 LCD MIRROR ON OFF 34 TV SCREEN ON OFF 140 DIT DISPLAY ON OFF 27 DEMO MODE ON OFF 51 SYSTEM WL REMOTE 1G 1 2 OFF I D 48 BEEP ON OFF 50 T ZONE DST See list of time zones 25 DITIME SET 26 MY CAMERA SHTR SOUND PATTERN1 PATTERN2 PATTERN3 49 S...

Page 47: ...HONES 39 DISPLAY SET UP BRIGHTNESS 33 DISPLAYS ON OFF PlAYBK 140 DITIME SEL DATE TIME DATE TIME 85 SYSTEM WI REMOTE HillJ1 lill 2 OFF lill 48 BEEP ON OFF 50 T ZONE DST See list of time zones 25 DITIME SET 26 MY CAMERA CREATE START UP IMAGE 136 SEL S UP IMG NO IMAGE CANON lOGO MY IMAGE1 49 MY IMAGE2 SHTR SOUND PATTERN1 PATTERN2 PATTERN3 49 S UP SOUND PATTERN1 PATTERN2 PATTERN3 49 S STOP SOUND PATTE...

Page 48: ...n for mode 2 Keep the button pressed for over 2 seconds If you have set the camcorder to mode 1 press the ZOOM W button for mode 1 MENU IS VSTEM 1 lwL REMOTE illD1 1Il 43 1 On the camcorder open the menu and select o SYSTEM Select WL REMOTE set it to illI 2 and close the menu c Vi o The wireless controller returns to mode 1 when you replace the batteries Change the mode if necessary o Make sure th...

Page 49: ... 136 Olen in tbe MV Camera settings CAMERA PLAY VCR CARD CAMERA CARD PLAY VCR Ji 3 I_M_V_C_A_M_ER_A I ISHTR SOUND PATTERN1 Is up SOUND PATTERN1 SISTOP SOUND PATTERN1 SELF T SOUND PATTERN1 1 Open the menu and select MY CAMERA 2 Select the menu item you wish to change When selecting a start up image only in CARD PLAY VCR mode NO IMAGE CANON LOGO MY IMAGE1 and MY IMAGE2 appears When selecting a sound...

Page 50: ...EP ON To turn the beep off open the menu and select SYSTEM Select BEEP set it to OFF and close the menu ICAMERA SET UP 1 116 9 OFF To switch 16 9 on open the menu and select CAMERA SET UP Select 16 9 set it to ON and dose the menu 16 9 appears a The 16 9 mode is an electronically processed effect a The 16 9 mode cannot be selected in the Easy Recording mode a The multi image screen cannot be used ...

Page 51: ... memory card for more than 5 minutes You can also start the demonstration mode through the menu CAMERA CARD CAMERA MENU OISPLAY SET UP I IDEMO MODE ON CD 43 With no cassette and memory card inserted open the menu and select DISPLAY SET UP Select DEMO MODE set it to OFF and close the menu To cancel the demo mode press any button turn off the camcorder load a cassette or insert a memory card 51 ...

Page 52: ...recommend recording in SP mode if you plan to transfer the images to a computer o If you record in both SP and LP modes on the same tape the playback picture may become distorted and the time code may not be written correctly o If you play back a tape that has been recorded in LP mode with another digital device on this camcorder or vice versa picture and sound may become distorted CARD PLAY VCR P...

Page 53: ...u PHOTO button U 1 bf lf PHOTO button A MERA 1 Press the PHOTO button halfway 0 appears in green If it does not appear in green adjust the focus with the focus ring Exposure is locked Focus can be adjusted manually with the focus ring when the PHOTO button is pressed halfway When you press the PHOTO button on the wireless controller recording starts immediately 2 Press the PHOTO button fully 0 dis...

Page 54: ... the camcorder displays the still image and keeps recording the sound The camcorder returns to record pause mode 0 When you turn the POWER switch to OFF while the camcorder is recording the still image it will not turn off until recording is complete o Record still images under sufficient lighting condition in which you can identify the subject on the screen ...

Page 55: ...x 16 9 x Card Mix x A Auto setting 0 Available x Not available IIIIIIJIIIII Can be used only when the TAPE CARD switch is set to 2 1 OPTURA20 only 2 Only Black and White can be used in CARD CAMERA mode Eas ecQrdll1gn gi g Ql tlmmH3iJmw tilllmwg wZWE f ii W lW Eg1tdKti11i 0 1it i Wlli1f lW fiW WiZW T IBi lNXlITWlZDZ0 lill MX 2lli2i1l The camcorder adjusts focus exposure and other settings automatic...

Page 56: ...The picture may not appear smooth when played back rflI i g iii g Q Use this mode in bright places such as a sunny beach or ski resort It prevents the subject from being underexposed o The subject may become overexposed in dark surroundings Check the image on the screen o This mode is set at a higher shutter speed The picture may not appear smooth when played back _ m gQ lilgg J II Use this mode t...

Page 57: ...omatically The White LED lights up automatically illuminating the subject in the center of the screen allowing you to record brightly in color Q biigla lEg ljY iE ig M ii BilQg i j In CARD CAMERA mode use this mode to record in dark places The shutter is fixed at a slow shutter speed The White LED lights up illuminating the subject in the center of the screen allowing you to record brightly in col...

Page 58: ...s on the upper left corner of the screen A Auto disappears after 4 seconds II 0 Do not change the mode during recording as the brightness of the image may _ change abruptly OJ VI 0 The setting resets to the Auto mode when you switch the program selector to D cr ttS _ cv 0 Bright light in a dark scene may cause a vertical light bar to appear This is not u 15 a malfunction OJ s r iii 58 ...

Page 59: ...used in Night and Super Night OPTURA20 mode a Turn off the digital effect when you do not use it Press the DIGITAL EFFECTS button to open the menu Select D EFFECTS l and press the ON OFF button a The camcorder retains the setting even if you turn it off or change the program AE mode a The digital effect turns off jf you switch the program selector to D a Digital effects can be selected but not act...

Page 60: ... from the sides of the screen The image appears from the _ corners until it fills the 3 whole screen lii 0 III _ Gl 1 1 o CIJ A JY 4rd l A small image appears from the left jumps into the center and enlarges until it fills the whole screen The image shrinks jumps from the center to the left and disappears 60 ...

Page 61: ...ar in zigzag from the bottom of the screen until they cover the whole image The image appears in zigzag from the top of the screen The screen turns yellow forms h c e ii6 appears c t _ A yellow beam appears in the center of the screen and expands until it covers the whole image The image appears from both sides like tides The image disappears from both sides like tides 61 ...

Page 62: ...ng the start stop button The fader can be activated deactivated by pressing the ON OFF button 3 Select FADER 4 Select the fader option 5 Press the DIGITAL EFFECTS button The name of the selected fader flashes PLAY VCR mode 6 Fade in In playback pause mode press the ON OFF button and begin playback by pressing the II button Fade out During playback press the ON OFF button and pause playback by pres...

Page 63: ...jJ bl The image becomes like a ball lU The image becomes a cube and rotates TLWA L l Both ends of the image sway in waves pJQf JMW kiQg il q L Q tM The image becomes a rhombus surrounded by a masking frame that changes the colors Mi bJMliBQB Creates a symmetrical image as if there would be a mirror in the center of the screen Only Black and White can be used in CARD CAMERA mode 1 x n L I j i i o o...

Page 64: ...TAL EFFECTS button The name of the selected effect flashes 6 Press the ON OFF button The name of the selected effect stops flashing The effect can be activated deactivated by pressing the ON OFF button EFFECTS EFFECTS 64 1 Press the DIGITAL EFFECTS button JJ BLK WHT flashes 2 Press the ON OFF button BLK WHT stops flashing The effect can be activated deactivated by pressing the ON OFF button d EFFE...

Page 65: ...ry 6 frames or slow every 8 frames In Low Light mode moderate every 8 frames slow every 12 frames Selecting the Multi Image Screen 1 In CAMERA mode set the program selector to 2 Press the DIGITAL EFFECTS button D EFFECTS 00 FADER EFFECT and MULTI S appear 3 Select MULTI S S SPEED and S SPLlT appears 4 Select S SPEED MANUAL FAST MOD and SLOW appear 5 Select the transition speed 6 Select MULTI Slaga...

Page 66: ... the start stop button begin recording The multi image screen is recorded on the tape a The multi image screen can be operated in record or record pause mode a You can operate the multi image screen only in the following playback modes When S SPEED is set to MANUAL Playback pause slow forward reverse playback When S SPEED is set to FAST MOD or SLOW Playback pause o The multi image screen cannot be...

Page 67: ...r r l r ijl to III Tl l Q to CAMERA a We recommend turning off the image stabilizer when you mount the camcorder on a tripod a The image stabilizer is designed to compensate a normal degree of camcorder shake a The image stabilizer cannot be used in CARD CAMERA mode a The image stabilizer cannot be used in Low Light mode a The image stabilizer might not be as effective when recording in dark place...

Page 68: ...he PHOTO button The camcorder starts recording after a 10 second countdown 2 seconds when using the wireless controller The count down appears on the screen 0 appears in green when recording begins The camcorder records the still image for approx 6 seconds and returns to record pause mode in CARD CAMERA mode it displays the till image when recording is complete II 0 To cancel the self timer press ...

Page 69: ...h 3 5 mm can be connected to the MIC terminal Use a microphone with a built in power supply condenser microphone CAI I E Ji IAU 0 I 0 SET UP I IAUO 10 MODE 12b Open the menu and select AUDIO SET UP Select AUDIO MODE set it to 16bit and close the menu 1 16bit appears for approximately 4 seconds rail 0 The audio level differs from that of the built in microphone 0 Be careful with long microphones as...

Page 70: ...dphones to monitor the sound during recording When using headphones make sure that 0 is displayed If 0 is not displayed change the setting following the procedure below Adjusting the Headphone Volume CARD PLAY VCR CARD CAMERA CARD CAMERA PLAY VCR CAMERA CAMERA IVCR SET UP I IAV PHONES AV Open the menu and select VCR SET UP Select AV PHONES set it to AV or PHONES 0 and close the menu Switching the ...

Page 71: ...al or plastic close to the lamp or th e surrounding parts during or immediately after use they become very hot a Do not look directly at the lamp while the video light is on a Do not carry the camcorder by the video light 1 Remove the accessory shoe cover 2 Slide the video light into the accessory shoe until it clicks 3 Tighten the shoe lock Be careful that the video light does not come off when t...

Page 72: ... the brightness of the subject and the settings of the camcorder or to fire a pre flash to reduce the red eye effect Refer also to the VFL 1 Video Flash Light instruction manual III 0 Always turn off the camcorder before attaching removing the video flash light 0 Do not carry the camcorder by the video flash light A tt mj M0 iJ iJiWnWWilf0iYil ETyarf f lii Wf JlmNe1 tifXV dillWill MiiilJiWNWfElWWi...

Page 73: ...pears in green 2 Press the PHOTO button fully The flash fires and the still image shown on the screen will be recorded o Do not fire the flash close to people s eyes o Do not fire the flash at persons while they are driving o Do not fire the flash with the flash bulb covered with your hand o The practical range of the flash is approx 3 3 to 18 ft 1 to 5 5 m The range depends upon the recording con...

Page 74: ...onto a tape no flash mark appears When the flash mark does not appear in green when you press the PHOTO button Set it to FLASH ON if necessary a When the flash is fired with an accessory such as an optional tele converter attached to the camcorder its shadow may be recorded a An image recorded with flash may flicker when played back on a different device CA MERA 1J lDQJ1 u 2 LiJ1e J J49 J lL Qiifu...

Page 75: ... MIC terminal when the OM 50 Microphone is connected o Do not carry the camcorder by the microphone 1 Remove the accessory shoe cover 2 Slide the microphone into the accessory shoe until it clicks 3 Tighten the shoe lock Be careful that the microphone does not come off when tightening the shoe lock 4 Set the camcorder to CAMERA or CARD CAMERA mode J Connection appears 5 Set the microphone s direct...

Page 76: ... the program selector to fl cv II _ cv LL 15 2 Adjust the zoom cv s When you operate the zoom after adjusting the focus the subject may not stay in focus Adjust the zoom before the focus 3 Press the FOCUS button MF appears 4 Turn the focus ring to adjust the focus Turn the focus ring up or down until the image appears focused 5 Press the FOCUS button to return to autofocus FOCUS 00 Vi1 FOCUS 00 YI...

Page 77: ...When you press the PHOTO button halfway the AF assist lamp turns on automatically responding to the surrounding brightness FOCUS PRI set to OFF When you press the PHOTO button halfway and turn the focus ring the AF assist lamp turns on responding to the surrounding brightness o The camcorder may not be able to focus even though the AF assist lamp is lighting In such case adjust the focus manually ...

Page 78: ...ector dial to adjust the brightness of the image To make the image brighter turn the selector dial up to a maximum of 11 To make the image darker turn the selector dial down to a minimum of 11 _ E ewAd tmWi YieliirJ Db ji I i i i WEi I i i i jj it Th Ef1 M W j b d f WQj 3 1Thm i Mli CV When the exposure is locked you can adjust it manually to handle difficult lighting cv a conditions The camcorder...

Page 79: ...to the auto setting when you switch the program selector to 0 or change the program AE mode a If the shutter speed is set to 1 500 or higher in CAMERA mode and you switch to CARD CAMERA mode it automatically changes to 1 250 o Recording under fluorescent lights When the camcorder is set to 0 Easy Recording or when the program AE mode is set to Auto Night or Super Night OPTURA20 mode it automatical...

Page 80: ...elines for Recording with High Shutter Speeds Outdoor sports such as golf or tennis 1 8000 1 4000 112000 Moving objects such as cars or roller coasters 1 1000 1 500 or 1 250 Indoor sports such as basketball 1 100 ...

Page 81: ...rn it off o When you have set the custom white balance Reset the white balance when the lighting condition changes Turn off the digital zoom 0 Setting the white balance manually may provide better results in the following cases Changing lighting conditions Close ups Subjects in a single color sky sea or forest Under mercury lamps or certain types of fluorescent lights o Use the Q Indoor or Outdoor...

Page 82: ... White Balance 1 Set the program selector to lEI 2 Open the menu and select CAMERA SET UP 3 Select WHITE BAL 4 Point the camcorder at a white object such as a sheet of paper zoom in untiHt fills the whole screen and select SET r Ll L1 flashes and stops flashing when settings is complete Depending on the light source L1 may keep flashing The result will still be better than with the auto setting 5 ...

Page 83: ...low 2 times magnification move the zoom lever toward W A frame appears indicating the position of the enlarged part 2 Move the image Turn the selector dial to move the image to the right and left or up and down Pressing the selector dial switches between the directions To cancel the magnification move the zoom lever toward W until the frame disappears II Movies played back from a memory card canno...

Page 84: ...ot be displayed if a recording made with this camcorder is played back on a different digital camcorder o The data code cannot be displayed in frame advance reverse playback Camera data may not appear in some special playback modes o When the TV screen displays are hidden CD 140 the displays still appear on the LCD screen If you turn on the data code displays other than the data code will disappea...

Page 85: ...it to CAMERA DATA or CAM D T and close the menu I IDATA CODE DATEITIME I DISPLAY SET UP Press the DATA CODE button Only date and time appear in CARD PLAY VCR mode MENU lJ 43 Date and time appear for 6 seconds when you begin playback or to indicate that date or time zone has changed IDISPLAY SET UP 1 16SEC DATE OFF Open the menu and select DISPLAY SET UP Select 6SEC DATE set it to ON and close the ...

Page 86: ...he button to search forward and the button to search backward Press more than once to search for further still images or date changes up to 10 times Press the or button to change the search direction Press the stop button stop searching 86 o Photo search A still image recorded very close to the point you start the search may not be detected o Date search A recording of longer than a minute per dat...

Page 87: ...oint you wish to return to later 110 00 00 III appears To cancel press the ZERO SET MEMORY button again 2 When you have finished playback fast forward or rewind the tape IIRTN II or II RTN II appears The tape stops automatically at 110 00 00 11 The tape counter changes to time code _ 0 Time code and tape counter display may not match accurately f I h bl k 0 The zero set memory may not unction corr...

Page 88: ...e device to the camcorder with the DV cable o Blank sections may be recorded as anomalous picture o If the picture does not appear reconnect the DV cable or turn the camcorder off and back on again pJe gs Qcdj ill lQ1t a f l lt ii f c L f i fl t 8 iif orr T t 0 I 1 Connect the camcorder to the VCR See Playing Back on a N Screen IJ 40 2 Set the camcorder to PLAY VCR mode and load a recorded cassett...

Page 89: ... i y Refer also to the instruction manual of the digital video device Signal flow Commercially available DV cable m c 5 I C 89 ...

Page 90: ...lheadphones terminal set to PHONES 0 it will automatically switch to AV PLAY VCR 1 Connect the camcorder to the analog video device See Playing Back on a TV Screen CD 40 2 Set the camcorder to PLAY VCR mode and load a blank cassette 3 Connected device load the recorded cassette 4 Press the REC PAUSE button In record pause mode and during recording you can check the picture on the screen _ 5 Connec...

Page 91: ... appear reconnect the DV cable or turn the camcorder off and back on again a You can connect only one device with the DV cable a You can use the camcorder for playback and recording without reconnecting the DV cable m C i I Q 7 Press the button to stop recording Press the l1 button to pause recording Press the l1 button again to restart recording 8 Connected Device Stop playback 1 Connect the camc...

Page 92: ...ch tape COPYRIGHT PROTECTED PLAYBACK IS RESTRICTED appears and you will not be able to view the contents of the tape If you attempt to record from such tape via the DV terminal COPYRIGHT PROTECTED DUBBING RESTRICTED appears and you will not be able to record the contents of the tape ...

Page 93: ...ng the connections o Depending on the signal sent from the connected device the conversion from analog to digital signals might not work properly e g signals that include copyright protective signals or anomalous signals such as ghost signals We recommend powering the camcorder from a household power source This illustration shows how to connect using a S video cable You can also connect the yello...

Page 94: ...FF Open the menu and select VCR SET UP Select AV DV OUT set it to ION and close the menu 94 o For normal use set AV DV OUT to OFF so that AV DV does not appear on the screen If it is set to ON digital signals cannot be input via the camcorder s DV terminal o Depending on the software and the specifications of your computer you may not be able to transfer converted signals via the DV terminal ...

Page 95: ...when the synchronized signals are distorted Camcorder a Use only tapes recorded in SP mode a AV insert will stop if the camcorder detects a blank section or a section not recorded in SP mode on the tape Connected device a Use only tapes without blank sections a AV insert may not work correctly if the tape has a blank section or changes in the recording mode a AV insert cannot be performed when the...

Page 96: ...e You can use the play ack buttons on the camcorder or the special playback buttons on the wireless controller 5 Press the AV INSERT button on the wireless controller II AV INSERTII and lIellll appear 6 VCR Play back the tape 7 Press the PAUSE II button on the wireless controller when the scene you wish to insert appears S Press the STOP button on the wireless controller to stop inserting w Press ...

Page 97: ...io sound using the analog line in function o Do not connecVdisconnect any cable to from the camcorder while dubbing o You cannot use the DV terminal for audio dubbing o If you add sound to a tape not recorded with this camcorder sound quality may decrease o Sound quality may decrease when you add sound to the same scene for more than 3 times CQPoertjng ap Idig Device i Signal flow STV 250N Stereo ...

Page 98: ...th headphones 11 I folIlI STOP 11 ooo I AllIIO I IRIWSE11SWII IO X2 ICiliD 0 0 Il liJOOO Citn n I_A_U_D_IO_S_E_T_U_p__I IAUDIO DUB AUDIO IN I MENU Q 43 1 Set the camcorder to PLAY VCR mode and load a recorded cassette C 2 Open the menu and select AUDIO SET UP Select AUDIO DUB set it c w to AUDIO IN or MIC IN and close the menu 3 Locate the scene you wish audio dubbing to start 4 Press the PAUSE II...

Page 99: ...TERE01 Plays back the original sound STERE02 Plays back the added sound MIx FIXED Plays back stereo 1 and stereo 2 in the same level MIXNARI Plays back stereo 1 and stereo 2 The mix balance can be adjusted 2 If you have selected MIX VARI adjust the mix level Open the menu and select AUDIO SET UP Select MIX BALANCE adjust the balance with the selector dial and close the menu Turn the selector dial ...

Page 100: ...p 135 c i i c wO E I QR K SQ L U IIQ D I SKn W ig d g S X2 U 5ie 5 Windows XP users can use the software on the supplied DV NE1WORK SOLUTION DISK to perform videoconference and file transfer over the Internet or upload files from the computer to the memory card and use the camcorder as card reader writer The available functions depend upon the camcorder model and the networking environment For det...

Page 101: ...r instructions on how to connect the camcorder to the computer see Connecting to a Computer Using a USB Cable CD 135 aez n I W1lJMw arMLlMw0S WMlf i NHBWMi ftJm WJrtf 1Z1 W JZ2J illWiillttUrgiWJiliiWWitlZ il1tm1 illl1illWlli t ummrrZillnK iWNx 1tWKiW 1btMf bfifififfZffif 00 not forcefully remove the memory card without first pushing it in 1 Turn off the camcorder 2 Open the cover 3 Insert the memo...

Page 102: ...displayed correctly in a camcorder not supporting this size o Still images are compressed and recorded in the JPEG Joint Photographic Experts Group format a Depending on subject and recording condition changing the image quality may not show a significant difference o Estimated Capacity of a 8 MB Memory Card and File Size per Image 1280 x 960 640 x 480 No of Images File Size No of Images File Size...

Page 103: ...90 KB sec Images are automatically assigned file numbers from 0101 to 9900 and stored in folders containing up to 100 images Folders are assigned numbers from 101 to 998 The sample images on the supplied memory card are saved in the 100canon folder You can choose to use consecutive file numbers CONTINUOUS or to reset the file number each time a different memory card is inserted RESET We recommend ...

Page 104: ... card I 101 0103 CONTINUOUS When you replace the memory card and record an image o 101 0104 CA RD CA MERA ICARD SET UP 1 IFILE NOS CONTINuousl To change the setting open the menu and select CARD SET UP Select FILE NOS set it to RESET and close the menu 104 ...

Page 105: ...even more accurate focus In Focus Priority mode you can choose between three focusing points OJ 106 However you can turn off the Focus Priority mode if you wish to put timing ahead of focusing OJ 107 When the program selector is set to 0 the Focus Priority mode is set to ON only the center focusing point available c lC OJ CD 3 o n OJ a 1 Set the camcorder to CARD CAMERA mode A white focusing frame...

Page 106: ...rts flashing If you have turned off the built in ND filter we recommend changing the setting back to AUTO Open the menu and select CAMERA SET UP Select ND FILTER set it to AUTO and close the menu o OVEREXP does not appear when you press the EXP button 1 Set the camcorder to CARD CAMERA mode A white focusing frame appears in the center of the screen 2 Set the program selector to reJ 3 Turn the sele...

Page 107: ...e selected when focusing manually o The focusing point cannot be selected when recording movies on a memory card MENU OJ 43 ICAMERA SET UP CARD CA IVIERA I IFOCUS PRI ON Open the menu and select CAMERA SET UP Select FOCUS PRI set it to OFF and close the menu CQl lti lly gJJS CcShg QtiQ gj j 1 r j j i g ill lli ill QCc 0 ff k ff m gdf You can capture a quick series of still images with the continuo...

Page 108: ...exposures dark normal light allowing you to choose the perfect exposed shot CARD CAMERA CAMERA MENU ICAMERA SET UP I IDRIVE MODE SINGLE CO 43 1 Set the camcorder to CARD CAMERA mode 2 Open the menu and select CAMERA SET UP Select DRIVE MODE set it to AEB and close the menu 3 Press the PHOTO button Three still images in different exposures are recorded to the memory card ell The setting resets to S...

Page 109: ...e DV terminal make sure that II AV DV is not displayed Change the setting as necessary CD 94 1 Connect the camcorder to the video device S video AV terminal See Playing Back on a TV Screen CD 40 DV terminal See Connecting a Digital Video Device OJ 89 2 Set the camcorder to PLAY VCR mode If a cassette is loaded make sure the tape is stopped 3 Connected device load a recorded cassette and play back ...

Page 110: ...orded in CARD CAMERA mode a Card mix cannot be used when PHOTO RECl is set to CARD a l a The still image cannot be recorded on a memory card when a fader effect or the multi image screen is activated a The beep does not sound when you press the PHOTO button while recording a movie on the tape CAMERA ICAMERA SET UP I IPHOTO REC TAPE 1 Set the camcorder to CAMERA mode 2 Open the menu and select CAME...

Page 111: ...mage OJ Minor discrepancies in the overlapped area can be corrected with the software a You can retake an image by pressing the CARD button to return to the previous image A maximum of 26 images can be recorded 7 Press the d I button after the last image For details on how to merge these images refer to the DIGITAL VIDEO SOLUTION DISK Software Instruction Manual 3 Select the direction with the CAR...

Page 112: ... to keep the vertical misalignment within 10 o Do not include moving subject in the overlapping portion o Do not try to stitch images that include both distant and close subjects They may appear warped or doubled up o The continuous shooting mode cannot be used in Stitch Assist mode ...

Page 113: ...ke sure that the protect switch is set to allow recording o Do not load unload a cassette during recording riB 0 Make sure to insert a memory card with enough remaining capacity 0 The sound of a movie recorded on a memory card will be monaural BJle Dl d i t tui fLam Ql d eriSJDE Cf_if 5w TITI15 5 JS TTI V TX f TfcT r G t t T I 1 Set the camcorder to CARD CAMERA mode 2 Press the start stop button t...

Page 114: ...ideo terminal or AV terminal analog line in function or via the DV terminal on a memory card CAMERA PLAY VCR CARD CAMERA 1 Connect the camcorder to the video device S video AV terminal See Playing Back on a V Screen ill 40 DV terminal See Connecting a Digital Video Device CD 89 2 Set the camcorder to PLAY VCR mode If a cassette is loaded make sure the tape is stopped 3 Connected device Load a reco...

Page 115: ... power source or remove the memory card while the card access display in the upper right of corner of the screen or the card access indicator is flashing Doing so could result in data damage 0 Make sure to insert a memory card that contains images 0 Only date and time will be displayed when pressing the DATA CODE button o You can enlarge still images up to 5 times during playback OJ 83 CARD PIlAY ...

Page 116: ...e previous index screen 4 Press the INDEX SCREEN button The index screen is canceled and the selected image appears in singJe image display 1 In single image display press the INDEX SCREEN button Up to 6 images appear Movies are displayed with the first scene as a still image indicated by I 1 2 Press the CARD button to change the image selection E a 1 In single image display press the SLIDE SHOW b...

Page 117: ...cates the image number of the current image by the total number of images CAiRo R Y tCR i In single image display press and hold the CARD or CARD button Press the CARD button to jump forward and the CARD button to jump backward When you release the button the still image movie of the displayed image number appears 117 ...

Page 118: ...ss the selector dial to open the FILE OPERATION menu 3 Select PROTECT Ow Ow appears and now the image cannot be erased To cancel the protection press the selector dial 4 Select RETURN to close the menu CARD PLAY VCR ICARD OP ERATI ONS 1 1 _P_RO_T_E_C_T_On _ 1 In single image display press the INDEX SCREEN button Up to 6 images appear 2 Open the menu and select CARD OPERATIONS 3 Select PROTECT Ow i...

Page 119: ...cted YES appears in purple 4 Select YES The image is erased and the previous image appears 5 Select RETURN to close the menu dS I CARD OPERATIONS I I_IM_A_G_E_ER_A_S_E 1 Open the menu and select CARD OPERATIONS 2 Select IMAGE ERASE 3 Select SINGLE or ALL When erasing a single image ERASE THIS IMAGE NO and YES appears If an image is protected YES appears in purple When erasing all images ERASE ALL ...

Page 120: ...ORDER 4 Select the number of copies I I appears on the image To cancel the print order set the number of copies to O 5 Select RETURN to close the menu CARD PLAY VCR ORDER ICARD OPERATIONS ilil_ ii k Jl11 m w_ _ _ _ _ ffIL_C J MENU OJ 43 1 In single image display press the INDEX SCREEN button up to 6 images appear 2 Open the menu and select CARD OPERATIONS o ffi 3 Select PRINT ORDER 4 Select the st...

Page 121: ...r NT ORDERS ALL ERASE I 1 In single image display open the menu and select CARD OPERATIONS 2 Select PRINT ORDERS ALL ERASE ERASE ALL PRINT ORDERS NO and YES appears 3 Select YES All disappear 4 Select RETURN to close the menu 121 ...

Page 122: ...non Card Photo Printers with the logo and Canon Bubble Jet Printers with the tJ logo o Refer to the instruction manual of each printer for information on which interface cable to use with the camcorder The Card Photo Printers CP 1 0 and CP 1 00 are supplied with two direct interface cables Use the cable with the USB logo on the connector DIF 1 00 o We recommend powering the camcorder from a househ...

Page 123: ...still image you wish to print and press the selector dial The print setting menu appears 2 Set the number of copies the print style and the trimming settings Selecting the Number of Copies Setting the Print Style eQ 124 Trimming Settings Q 126 3 Select Print and press the selector dial Printing starts The print setting menu disappears when printing is complete A maximum of 9 copies can be selected...

Page 124: ... Card 1 Card 2 Card 3 LTR A4 For details on paper type refer to the Bubble Jet Printer User Guide Borders IBorderless Prints right to the edges of the page IBordered Prints with a border Recommended paper size r 1 Dh D in o Colo 1 0 11 n 1 I0 C ulo _ W Q w _ 1 In the print setting menu turn the selector dial to select Style and press the selector dial 2 Make sure that is selected and press the sel...

Page 125: ...d press the selector dial 3 Turn the selector dial to select a borders option and press the selector dial 4 Press the MENU button You return to the print setting menu Gli igQ1 Ia iM Q Qi i 1 In the print setting menu turn the selector dial to select Style and press the selector dial _ 0 Bordered The image area remains relatively unchanged from the recorded image when it is printed o Borderless Mul...

Page 126: ... and left or up and down Pressing the selector dial switches between the directions 4 Press the MENU button You return to the print setting menu o About the color of the trimming frame White No trimming settings Green Recommended trimming size Red The image is magnified beyond recommended size The image may print out coarsely o The trimming frame may not appear depending on the image size paper si...

Page 127: ...g is displayed A confirmation dialog appears Select OK and press the selector dial Printing stops even if it is incomplete and the paper is fed through o Restarting Printing with print order only Open the CARD PLAY VCR menu and select PRINT Select Restart in the print setting menu and press the selector dial The remaining images will be printed Printing cannot be restarted in the following cases W...

Page 128: ...ied DIGITAL VIDEO SOLUTION DISK For instructions on how to upload them to the memory card refer to Adding Still mages from Your Computer to the Memory Card in the DIGITAL VIDEO SOLUTION DISK Software Instruction Manual o Reselect the card mix image when you have turned off the camcorder changed the position of the program selector or removed the memory card You can select from the following 4 type...

Page 129: ...our subject in front of a blue curtain and the subject not blue will be superimposed on the card mix image Mix level adjustment blue area of the live video recording Live video recording Card mix image Card Animation C ANIMATION Combines animations with your recordings You can choose from 3 types of card animation effects Corner Animation appears on the upper left and the lower right corner of the...

Page 130: ...he mix type matching the image you have selected OJ 138 The screen shows the combined image When you have selected C ANIMATION select ANIMAT TYPE and select between CORNER STRAIGHT and RANDOM 6 To adjust the mix level select MIX LEVEL and adjust it with the selector dial 7 Close the menu CARD MIX flashes i u 1 Press the CARD MIX button SLIDE SHOW m ds a s c You can activate and deactivate the card...

Page 131: ...ng Still Image 1 Press the PHOTO button halfway o flashes in white and turns green when focus is adjusted 2 Press the PHOTO button fully The camcorder records the still image on the tape for approx 6 seconds During this time the camcorder displays the still image and keeps recording the sound The camcorder returns to record pause mode c VI i QJ s to 3 o n QJ a 131 ...

Page 132: ...nough remaining capacity and load a recorded cassette ICARD ePERAT I eNS 1 lcepy Od 1 1 Locate the still image you wish to copy on the tape and stop the tape shortly before the still image RiD You can also use the photo search function to easily locate the still image To copy all still images from the tape rewind the tape to the beginning 2 Open the menu and select CARD OPERATIONS 3 Select COpy rn...

Page 133: ...ill E 1 Select the first still image you wish to copy with the CARD buttons To copy all still images from the memory card select the first still image 2 Open the menu and select CARD OPERATIONS 3 Select COpy m CANCEL and EXECUTE appears 4 Select EXECUTE NOW COPYING appears It takes about 6 seconds per still image to be copied to the tape Copying stops when all still images are copied or the tape i...

Page 134: ...ed images o Images erased by formatting cannot be recovered o If you use a memory card other than the supplied one format it with the camcorder o Makes sure to insert the memory card you wish to format into the camcorder CARD PLAY VCR MENU ICARD OPERAT I ONS I I FORMAT ClJ 43 _ 1 Open the menu and select CARD OPERATIONS 2 Select FORMAT CANCEL and EXECUTE appears 3 Select EXECUTE FORMAT THIS CARD N...

Page 135: ...ER switch or turn off the camcorder and computer while data is being transferred to the computer while the camcorder s card access indicator is flashing Doing so may damage the memory card s data o Operation may not work correctly depending on the software and the specifications settings of your computer s o The image file on your memory card and the image files saved on the hard disk drive of you...

Page 136: ...g the software in the DIGITAL VIDEO SOLUTION DISK For instruction on how to upload a still image to the memory card refer to Adding Still Images from Your Computer to the Memory Card in the DIGITAL VIDEO SOLUTION DISK Software Instruction Manual p MENU OJ 43 MY CAMERA START UP IMAGE I CARD PLAY VCR 1 Open the menu _ 2 Select MY CAMERA E 3 Select CREATE START UP IMAGE a SET THIS AS START UP IMAGE1 ...

Page 137: ...s hard drive or other external memory device Image data may be corrupted or lost due to memory card defects or exposure to static electricity Canon Inc makes no warranties for corrupted or lost data o Do not turn off the camcorder disconnect the power source or remove the memory card while the card access indicator is flashing o Do not use memory cards in places subject to strong magnetic fields o...

Page 138: ...e recorded on the supplied SO Memory Card 8 card chroma key images 5 card luminance key images 2 camera chroma key images and 12 card animation images Card Chroma Key Card Luminance Key Camera Chroma Key _ Card Animation 138 ...

Page 139: ...from Your Computer to the Memory Card in the DIGITAL VIDEO SOLUTION DISK Software Instruction Manual If you cannot use the USB cable to connect the camcorder to a computer you will need a PC Card Adapter to upload the images to a memory card PhotoEssentials Royalty Free Stock Photography The PhotoEssentials suite of royalty free images on CD ROM features premium quality assignment photography and ...

Page 140: ...J 40 CAMERA PLA lCR CARD CAMERA Press the TV SCREEN button on the wireless controller When the POWER switch is set to CAMERA The displays disappear from the 1V screen and appear when you press the button again When the POWER switch is set to PLAY VCR The displays appear on the connected 1V screen and disappear when you press the button again The setting resets to the OFF setting when you turn the ...

Page 141: ... 5min O I I TID 1 mIIIIlJU REC PAUSE STOP EJECT PLAY FF llIlREW I Fast forward playback rewind playback CO 38 x2 I x2 x2 playback forward and reverse C038 x1 I x1 x1 playback forward and reverse CO 38 I Slow playback forward and reverse CO 38 II I Ill II Frame advance playback frame reverse playback C038 11 11 Playback pause forward and reverse CO 38 I Ill Date search photo search CO 86 RTN RTN Ze...

Page 142: ...I IIWind screen CD 69 CD r t m iX ff CD t 12 8 59 ft mUlx WS hAUdiO mode IJJ 69 Igi a e ec s CD 12 bit I 12 00 PM 16 9 16 9m d CD 50 Dateandtime CD84 IJAN 1 2003 O ij PHOTO b 0 e II J L Photo mode IJJ 53 AF AE locked in l _ Accessory attached to Photo mode CD 53 the Advanced Accessory shoe CD71 x y I Photo search 12b t d t CD 99 r M IX I V AR I 1iJ 1 Date search CD 86 1 au 10 ou I 1 1 0 1 1 o Phot...

Page 143: ...j I L Movie size CIJ 103 CIJ 76 I i I Shutter speed j I I Self timer CIJ 68 1 CIJ 79 nll U o3 ij cto j1 eMovie recording CIJ 113 White balance i LStitch assist CIJ 111 CIJ 81 I I Date and time CIJ 84 J AF AE locked in Accessory attached to Photo mode CIJ 105 the Advanced Accessory shoe CIJ71 CARD PLAY VCR Mode Print order CIJ 120 Protect mark CIJ 118 I I I I Folder number I 1_ _1 File number CIJ 1...

Page 144: ... in the camcorder 148 BEEN DETECTED TAPE END Tape reached the end Rewind the tape or replace the 22 cassette CHECK THE CASSETTE You attempted to perform audio dubbing or AV insert on a 52 REC MODE tape recorded in a mode other than the SP mode CHECK THE CASSETTE You attempted to perform audio dubbing on a tape 97 AUDIO MODE recorded in 16 bit or 12 bit 4 channel sound CHECK THE CASSETTE You attemp...

Page 145: ...n the camcorder off remove the card and reinsert the card IfCQ changes to green you can continue recording playback CARD FULL No remaining capacity on the memory card Replace with 119 another card or erase images NAMING ERROR File or folder number has reached the maximum value 103 UNIDENTIFIABLE Image is recorded in a not compatible JPEG format or 115 IMAGE another format not compatible with the c...

Page 146: ... print on paper that cannot be used with size the camcorder Paper and ink do not The ink cannot be used with the selected paper type match Printer in use The printer is printing from a computer or a memory card inserted into the printer It automatically starts printing from the camcorder when current prints are complete Printer warming up Printer is warming up The printer automatically starts prin...

Page 147: ...t disassemble the camcorder If the camcorder does not function properly consult qualified service personnel o Handle the camcorder with care Do not subject the camcorder to shocks or vibration as this may cause damage o Avoid sudden changes in temperature Moving the camcorder rapidly between hot and cold temperatures may cause condensation to form on its internal surfaces IJ 148 o If you do not in...

Page 148: ...assettes as this may damage the camcorder Moving the camcorder rapidly between hot and cold temperature may cause condensation water droplets to form on its internal surfaces Stop using the camcorder if condensation is detected Continued use may damage the camcorder Condensation may form in the following cases 2 o n s E C 11 C 0 When the camcorder is moved from an air conditioned room to a warm hu...

Page 149: ...brr r JL L t2fL F Fdfili i1 t j iiliiil r k Power Sources You can use the compact power adapter to operate the camcorder and to charge battery packs in any country with power supply between 100 and 240 V AC 50 60 Hz Consult the Canon Service Center for information on plug adapters for overseas use Playback on a TV Screen You can only play back your recordings on TVs with NTSC system The NTSC syste...

Page 150: ... cover fully Cassette compartment Battery pack is exhausted Replace or charge the 16 stopped during loading battery pack unloading The camcorder Consult a Canon Service malfunctions Center LCD viewfinder switches Battery pack is exhausted Replace or charge the 16 on and off battery pack Recording Playback Buttons will not work Camcorder is not turned on Turn on the camcorder 28 Cassette is not loa...

Page 151: ...n may cause a vertical light bar smear to appear This is not a malfunction Sound is distorted or When recording near loud recorded in a lower sound such as fireworks volume than the actual drums or concerts sound volume may become distorted or may not be recorded in the actual sound level This is not a malfunction Viewfinder picture is Viewfinder is not adjusted Adjust the viewfinder with 20 blurr...

Page 152: ...et FILE NUMBERS to 103 maximum value RESET and insert a new memory card SD Memory Card is Change the position of the 101 protected protect switch Memory card cannot be Camcorder is not set to Set the camcorder to CARD 115 played back CARD PLAY VCR mode PLAY VCR mode Memory card is not inserted Insert a memory card 101 Image cannot be erased Image is protected Cancel the protection 118 SD memory ca...

Page 153: ...rter WD H37 Wide converter Computer Canon printers with direct print function IFC 300PCU USB Cable l O S 150S video ab III III C L TV STV 250N Stereo Video Cable VCR Commercially available Digital Device DV Cable ill I C Card Adapt l SD M o BF e r MultiMediaCard SC A50 Soft Carrying Case DM 50 Directional Stereo Microphone VL 3 Video Light VFL 1 Video Flash Light SC 1000 Soft Carrying Case D BP 90...

Page 154: ...Pack BP 508 OPTURA10 BP 512 OPTURA20 optional BP 511 Optional BP 522 Optional BP 535 Optional Charging Time 55 min 95 min 95 min 140 min 205 min c g 2 o l1J E C C 0 l s 154 CB 570 Car Battery Cable Use the car battery cable with the CG 570 Battery Charger to charge battery packs on the move The car battery cable plugs into your car s cigarette lighter and runs off a 12 24 V DC negative ground batt...

Page 155: ...are charged with the CA 920 Compact Power Adapter VFl 1 Video Flash light I This video flash light allows you to record still images and movies even at night or in dark D places It attaches to the camcorder s advanced accessory shoe for cable free operation Vl 3 Video light I I This video light enables you to record brightly in color even in dark places It attaches to the camcorder s advanced acce...

Page 156: ...eo Video Cable IFC 300PCU USB Cable Optional Accessories BP 511 Battery Pack BP 522 Battery Pack BP 535 Battery Pack SC 1000 Soft Carrying Case SC A50 Soft Carrying Case WO H37 Wide converter TL H37 Tele converter FS H37U Filter Set OM 50 Oirectional Stereo Microphone VFL 1 Video Flash Light VL 3 Video Light VL 10Li Battery Video Light JR 7 2V 10WF Halogen Bulb WS 20 Wrist Strap OVM CL OV Cleaning...

Page 157: ... recording time 80 min cassette Fast forward rewind time Lens Focusing system Minimum focusing distance Maximum shutter speed Minimum illumination Recommended illumination Filter diameter Viewfinder LCD screen Microphone Recording media Number of recording pixels Image format Tape peM digital sound 16 bit 48 kHz 2 ch 12 bit 32 kHz 4 ch Card ADPCM digital sound 16 bit 16 kHz 1 ch 4 bit 1 4 CCD char...

Page 158: ...URA20 1 4 lb 625 g OPTURA10 1 4 lb 620 g Power supply 100 240 V AC 50 60 Hz Power consumption 17W Rated output 8 4 V DC 1 5 A Operating temperature 32 104 F 0 40 C Dimensions 2 1 x 3 5 x 1 1 in 52 x 90 x 29 mm Weight 4 8 oz 135 g Battery type Rechargeable Lithium Ion Battery Rated voltage 7 4 V DC Operating temperature 32 104 F 0 40 C Battery capacity BP 512 1100 mAh BP 508 800 mAh Dimensions 1 5 ...

Page 159: ...0 Connections VCR 40 Continuous Shooting 107 Copyright signals 92 Copying still images 132 I l Data code 84 Date and time 25 Date search 86 Demo mode 51 OPTURA20 only Digital effects 59 Digital zoom 30 Direct print function 122 DV dubbing 91 DV terminal 89 100 U Easy recording 55 Effects 63 Erasing still images 119 Exposure 78 iii Faders 60 Fast forward 37 File numbers 103 Focusing 76 Focusing poi...

Page 160: ... mode 57 U Tape protection 23 Telephoto 30 Time code 141 Time zone 25 Tripod 36 Troubleshooting 150 TV Screen 40 140 I I USB terminal 135 l g S o f1J E 0 0 0 5 iii Record pause mode 28 Record review 35 Record search 35 Recording Movies memory card 113 Recording Movies tape 28 Recording programs 55 Recording Still Images memory card 105 Recording Still Images tape 53 Recording to a VCR 88 Remote se...

Page 161: ...ects encountered in normal use of the DV Camcorder and does not apply in the following cases a Loss of or damage to the DV Camcorder due to abuse mishandling improper packaging by you alteration accident leaking batteries exterior nicks scratches or dents electrical current fluctuations failure to follow operating instructions maintenance and environmental instructions prescribed in CUSA s instruc...

Page 162: ...eet N E Calgar y Alberta T2E 7K7 CANON CANADA INC MONTREAL 5990 Cote de Liesse Quebec H4T 1V7 f you have any questions ali the Canon Canada information Center toll free at 1 800 828 4040 Canada only Si vous avez des questions veuiliez telephoner sans frais au Canada 1 800 828 4040 Canada seulement CANON MEXICANA S DE R l DE c v Periferico Sur No 4124 Col Ex Rancho de AllZaldo CPO 1900 Mexico D F M...

Page 163: ...Canon DIGITAL VIDEO SOLUTION DISK Software Instruction Manual Mode d emploi du logiciel Manual de Instrucciones del software Please select yOU language PUB DIM 538 Version 6 Canon ...

Page 164: ... subsidiaries dealers or distributors will be responsible for providing maintenance or support for use of the SOFTWARE No updates fixes or support will be made available for the SOFTWARE 4 LIMITED WARRANTY AND LIMITATION OF LIABILITY It is your responsibility to choose maintain and match the hardware and software components of your computer system Thus Canon does not guarantee uninterrupted servic...

Page 165: ...n in full force and effect 9 CONTROLLING LAW The terms of this Agreement as it relates to purchases of the Software in the United States of America shall be governed and construed in all respects in accordance with the laws and regulations of the State of New York without reference to choice of law principles The terms of this Agreement as it relates to purchases of the Software in Canada shall be...

Page 166: ...emory Card 27 Running a Slide Show 28 Attaching Still Images to E mail Messages 30 Printing Still Images PhotoRecord 33 Selecting the Print Layout and Album Design 36 The PhotoRecord Window 37 Adjusting Image Quality and Printing Exif 2 2 Compliant 39 Selecting the Print Mode and Number of Copies DPOF Print Settings 40 Merging Panoramic Images PhotoStitch 41 Adding Still Images from Your Computer ...

Page 167: ...unnel 78 Playing Back Movies From a Memory Card 79 Running a Slide Show 80 Attaching Still Images to E mail Messages 81 Printing Still Images ImageBrowser 83 The Print Window 85 Adjusting Image Quality and Printing Exif 2 2 Compliant 86 Selecting the Print Mode and Number of Copies DPOF Print Settings 88 Merging Panoramic Images PhotoStitch 89 Adding Still Images from Your Computer to the Memory C...

Page 168: ...f the camcorder the software memory cards MultiMediaCards or SO Memory Cards personal computers or peripheral devices or due to use of a memory card not formatted by a Canon camcorder Trademark Acknowledgments Canon is a registered trademark of Canon Inc Macintosh is a trademark of Apple Computer Inc registered in the United States and other countries Quicklime is a trademark of Apple Computer Inc...

Page 169: ...ecorded images from a memory card to your computer IFC 300PCU USB Cable DIGITAL VIDEO SOLUTION DISK Windows users Move on to p 8 Macintosh users Move on to p 60 The explanations in this manual use mainly Windows 98 and Mac OS 9 2 screen shots 7 ...

Page 170: ...e Display 800 x 600 pixels High Color 16 bit or better 1 024 x 768 pixels or better is recommended 0 The USB interface is only supported for those computers that come with Windows 98J Nindows MeJ Nindows 2000 Windows XP preinstalled and have built in USB ports o Proper operation is not guaranteed on a dual CPU PC or on a user built Pc o Proper operation is not guaranteed on any particular system e...

Page 171: ... a memory card to a computer ZoomBrowser EX CO 17 Downloading still images movies from a memory card to your computer Categorizing and organizing large volumes of images Creating mail attachments from images Your e mail program needs to be enabled as MAPI client PhotoRecord OJ 33 Laying out and printing still images Printing indexes Creating still image albums PhotoStitch CO 41 Merging Panoramic I...

Page 172: ... computer s CD ROM drive The installer panel opens automatically If the installer panel does not appear automatically use the following procedures to display it Windows 98 Windows Me Windows 2000 1 Double click the My Computer icon 2 Right click the CD ROM icon and select Open from the displayed menu 3 Double click the Setup exe icon WindowsXP 1 Select My Computer from the Start menu 2 Right click...

Page 173: ...our computer To continue click Next 6 Read the license agreement and click Yes 7 Confirm the installation destination and click Next Normally select C Program Files Canon 8 Select the programs you wish to install and click Next Confirm that there is a check mark beside the name of the program you wish to install 11 ...

Page 174: ...k Next Place a check mark beside your camcorder model name 10 Review the installation settings and click Next Installation starts 11 When the following window appears click OK This window only appears if you installed the TWAIN Driver or the WIA Driver ...

Page 175: ... lwilirestarlmycomputerlater 13 When the computer has restarted and the regular desktop screen is displayed remove the DIGITAL VIDEO SOLUTION DISK from the CD ROM drive 0 When installation is complete remove the DIGITAL VIDEO SOLUTION DISK before you connect the camcorder to the computer o At this point the files for the TWAIN Driver or WIA Driver have only been copied to your computer To download...

Page 176: ...es into the camcorder 2 Connect the Power Adapter to the camcorder 3 Turn the POWER switch to PLAY VCR and move the TAPE CARD switch to CARD Wait until the card access indicator stops flashing 4 Connect the camcorder to the computer using the supplied USB cable CIJ 16 After a few momentsl a message such as Ii New Hardware Found I appears and the TWAIN driver will be installed automatically If you ...

Page 177: ...l images movies to the computer Windows XP When installation is complete a window appears allowing you to select an application program to start See Downloading Still mages Movies IJ 17 for how to start ZoomBrowser EX and download still images movies to the computer II Windows XP If a window appears prompting you to select an application program to start select ZoomBrowser EX or Scanners and Camer...

Page 178: ...f it does happen never disconnect the USB cable Try to awaken the computer with the camcorder in the connected state Some computers will not awaken properly if you disconnect the camcorder while they are in standby mode Please refer to your computer manual for instructions regarding its standby mode 1 Insert a memory card into the camcorder 2 Connect the power adapter to the camcorder 3 Turn the P...

Page 179: ...rd or downloaded to the hard disk are important original data files Create a copy of the file first before working on it on your computer o When an enormous volume of still images movies such as 500 or more is recorded onto one memory card transferring them to a computer may take w ry long o For Windows XP Users Do not rotate the image in the Windows Picture and Fax Viewer or in the explorer view ...

Page 180: ...rd reader are connected at the same time a window appears allowing you to select the camcorder model Confirm that your camcorder model name is displayed and click OK Windows Me 1 Insert a memory card containing still images movies into the camcorder 2 Connect the Power Adapter to the camcorder 3 Turn the POWER switch to PLAY VCR and move the TAPE CARD switch to CARD Wait until the card access indi...

Page 181: ...he memory card images as thumbnails small images 1 In the Camera Window select the still image movie you wish to download and click Download image An orange frame appears around the selected still image movie You can select multiple images by continuously clicking on the images Click on the image again to deselect 19 ...

Page 182: ...20 2 In the Download Settings window confirm the settings and click OK CD 23 The Camera Window closes and the Main Window opens The downloaded images appear in the Main Window ...

Page 183: ...EX icon on the desktop Windows XP When a window appears allowing you to select an application program to start select ZoomBrowser EX and click OK ZoomBrowser EX starts 3 Click Camera Memory Card 4 Click Browse Download Images The Camera Window opens displaying the memory card images as thumbnails small images If multiple PC card readers loaded with memory cards are connected or if a camcorder and ...

Page 184: ...as slideshow Starts a slide show after downloading the selected still images movies to the computer Connect to Internet Attaches selected still images to an e mail message Toolbar 22 Set Select Deselect Rotate Delete Properties Help Adjusts the connection settings and camcorder settings Menu options Reconnect Camera Settings Slide DPOF Add Image s and My Camera The SLIDE My Camera OJ 47 function c...

Page 185: ...efix 0001 JPG Camera Settin s Window You can adjust the date time and owner settings in the Camera Settings window using the computer when the camcorder is connected You can also check the battery charge and remaining memory card capacity 1 In the Camera Window click the Set button and select Camera Settings from the displayed menu 2 Check or change the settings Click OK to close the window Input ...

Page 186: ...t image folders here As in Windows Explorer you can view the contents of the folders Browser Area Displays the images contained in the selected folder 24 Task Area Main Menu Camera Memory Card Displays the Camera Window Print Prints selected still images Menu options Layout Print and Index Print View Modify Use this to view or edit images Menu options View as a Slide Show Edit Image and Stitch Pho...

Page 187: ...u can also zoom up by double clicking an empty part of the Browser Area or the tab of a folder name Thumbnail Size Selects the size at which images are displayed in the Browser Area Menu options 80 x 80 160 x 160 and Column Number It can only be selected in Scroll Mode View Image Displays a still image in the Image Viewer window or opens a window for playing back a movie Properties Displays image ...

Page 188: ... zoom ratio Color Brightness and Contrast You can adjust the color brightness and contrast by dragging the respective slide 26 Crop You can extract a part of the image 1 Click on the image and drag to form a rectangular frame You can move or change the size of the frame 2 Click this button to extract the area within the frame The extracted part of the image appears ...

Page 189: ...from the DIGITAL VIDEO SOLUTION DISK Place the disk in the CD ROM drive and click QuickTime 5 0 Installation in the installer panel o Do not double click a movie file AVI extension in Windows Explorer That will start Windows Media Player which may not support this file type To play back movies double click the thumbnail with a movie icon in the Main Window s Browser Area 1 In the Main Window doubl...

Page 190: ... can view selected still images in a slide show Movies cannot be selected for a slide show 1 Click View Modify in the Main Window 2 Click View as a Slide Show 3 Select the images and select Setup Slide Shawl ...

Page 191: ...ou select IJ Every 3 secondsIJ you can select the interval in the control below from 1 to 120 seconds Loop Select to stop the slide show after the last image or to continuously run it in a loop Effect Select the transition effect to be used when moving from one slide to another When you click an effect you can check the effect in the preview window 5 Click Start Slide Show Click in the lower right...

Page 192: ...ill images to an E mail message n To use this function the e mail program must be enabled as MAPI n client For details refer to the instruction manual of the e mail software 1 Click Internet in the Main Window 2 Click Email Images ...

Page 193: ...ve If you wish to send the image without changes select Send images unchanged Normally select Resize and compress images into JPEG format Resize Image Select the red ction ratio to the original image Image quality The lower the quality the coarser becomes the image and smaller the file size Pressing Apply displays the file size after the compression as Total size of changed images You can check th...

Page 194: ... an attachment in the message window Input address subject and your comments and send the message E mail programs not supporting MAPI do not start automatically In this case go back to step 5 and select Save the images in a folder If you select Save the images in a folder click Browse and select the destination folder Startyour e mail program and attach the saved image to a message ...

Page 195: ...become corrupted o If you are using a network printer and the printer name including the network path exceeds 31 characters it may not be possible to print from PhotoRecord If this happens open Control Panel on the Start menu Click the Printers icon and change the name of the your printer limiting its length to within 31 characters Movies cannot be printed 1 Click Print in the Main Window 2 Click ...

Page 196: ...he image information you wish to include in the print and click Open Layout Print Place a check mark beside the items you wish include in the print If you wish to add a comment right click the mouse button on the still image select Properties from the displayed menu and type in a comment PhotoRecord starts and the PhotoRecord Print Modes window appears CO 36 5 Select a pri t mode and click Next ...

Page 197: ...dow appears If you wish to change the layout select the layout in this window 8 Click PRINT in the PhotoRecord window The Print window appears If you wish to save it as an album select Save As from the File menu select the destination folder and input the file name 9 Click Print in the Print window Printing starts 35 ...

Page 198: ...twork Layout album You can create a colorful and fun design Fixed photo size printing You can squeeze pictures into the paper size for printing Tiled photo printing The program lays out and prints the specified number of images with no gaps between images on the page Canon perforated paper printing 2 Select the paper size When you click Next a window for selecting the layout appears Use the previe...

Page 199: ... the menu that appears click Title and Edit Image caption To change the image caption right click the image and on the shortcut menu click Caption and Edit Then type a description about the image Text box To add text to the page click T on the left side of the window and on the menu that appears click Add Text and type what you want Also if you right click the text box you can click Change Text on...

Page 200: ...o Frame Click T and select Change Photo Frames from the displayed menu a Changing the size or rotation angle of an image Place your mouse pointer over the image that you want to change then use the following operations to change its size or angle iiIr i l ze eto You cannot alter the size or rotation angle if you selected Fixed photo size or Canon perforated paper as the print mode a Changing the n...

Page 201: ...ene mode along with the image data The Exif Print adjustment protocol uses this information to correct the image quality more accurately to reflect the recording settings 1 Right click an image you wish to print and select Clipl Correct Photo 2 Place a check mark beside Exif Print or Photo Optimizer Pro and click Close The selected image will be corrected 39 ...

Page 202: ...settings are limited to a maximum of 200 still images In that case all OPOF print settings on the 201 st still image and onward will be erased 1 Click Set in the Camera Window and select Slide DPOF in the displayed menu The Edit Slide OPOF window appears 2 Select the still image you wish to print and the number of copies Standard Print Prints selected images in the specified number of copies Use t...

Page 203: ...arn how to record in Stitch Assist mode The following instruction explains how to merge still images recorded in Stitch Assist mode with the camcorder n Still images recorded in Stitch Assist mode with Wide converter or Tele n converter attached cannot be merged correctly 1 Click the arrow in the Camera Window 2 In the confirmation window click OK PhotoStitch starts 3 Arrange the order of the imag...

Page 204: ...a 360 degrees cylinder In 1 Selection and Arrangement select Arrange and 360 degrees By saving this stitched image in QuickTime VR format you can then get a virtual view of the surroundings For this you need to have QuickTime installed on your computer If it is not already installed install it from the DIGITAL VIDEO SOLUTION DISK Place the disk in the CD ROM drive and click QuickTime 5 0 Installat...

Page 205: ...memory card You can also add sample images for card mix and card animation from the DIGITAL VIDEO SOLUTION DISK II Only still images in JPEG format can be added to the memory card 1 Click Camera Memory Card in the Main Window 2 Click Upload Images 43 ...

Page 206: ...t multiple images by continuously clicking on the images Click on the image again to deselect 4 In the Add Image window select the image size and click Add The selected images will be recorded to the memory card When recording is complete the images will appear in the Camera Window ...

Page 207: ...MATION are provided on the DIGITAL VIDEO SOLUTION DISK 1 Insert the DIGITAL VIDEO SOLUTION DISK to the computer s CD ROM drive 2 Click Camera Memory Card 3 Click Upload Images 4 In the Folders Area of the Main Window select the CD ROM icon followed by DVC CARD IMAGE Sample images or folders for CARD CHROMA CARD LUMINANCE CAMERA CHROMA or CARD ANIMATION appear in the Browser Area 45 ...

Page 208: ...You can select multiple images by continuously clicking on the images Click on the image again to deselect 6 In the Add Image window click Add The seOlected images will be recorded to the memory card When recording is complete the sample images will appear in the Camera Window ...

Page 209: ...ower off or disconnect the camcorder from the computer while the start up image is being saved to the memory card 1 Click Camera Memory Card in the Main Window 2 Click My Camera Settings The Select My Camera window appears 3 Select My Camera for Digital Video Cameras and click OK The DVC My Camera window appears displaying the start up images saved on the computer 47 ...

Page 210: ...y card from the Computer list and click the button The selected start up image is displayed in the preview area to the right The file name of the saved start up image appears in the Camera list Start up images will be saved to the Dcim folder in the memory card ANIMAL023_VIOl JPG BAR21_VIOlJPG BASEBALL21_VI01 JPG CHIMPAN21 VI01 JPG ETHDANCE21 VI01JPG ETHTECHN2 VI01JPG FUN21_VI01JPG FUN22_VI01JPG F...

Page 211: ...e following procedures to add it to the DVC My Camera window 1 Open the DVC My Camera window and click Add 2 Select the file you created in the Open file dialog and click Open The selected file appears in the Computer list You can save the newly created file to the memory card using the procedures described in Adding a Start up Image to the Memory Card OJ 47 To delete a start up image select it an...

Page 212: ...e supplied USB cable CD 16 When a window appears allowing you to select an application program to start click Cancel 5 Click the Windows Start menu and select Settings and Control Panel 6 Double click the Scanners and Cameras icon If you cannot find the Scanners and Cameras icon see Troubleshooting the TWAIN Driver WIA Driver Uninstall l 55 7 Make sure that your camcorder model is selected and cli...

Page 213: ...Cameras Wizard opens click Cancel 5 Click the Windows Start menu and select Settings and Control Panel 6 Double click the Scanners and Cameras icon If you cannot find the Scanners and Cameras icon see Troubleshooting the TWAIN Driver WIA Driver Uninstall CO 55 7 Double click the icon of your camcorder model 8 Click the Events tab 9 In the Actions section select Start this program set it to Canon Z...

Page 214: ...o the camcorder 3 Turn the POWER switch to PLAY VCR and move the TAPE CARD switch to CARD Wait until the card access indicator stops flashing 4 Connect the camcorder to the computer using the supplied USB cable CD 16 A window appears allowing you to select an application program to start 5 Select Canon ZoomBrowser EX place a check mark next to II Always use this program for this action and click O...

Page 215: ...omBrowser EX Uninstall the Camera Window with the same procedure II 0 If you have uninstalled ZoomBrowser EX because of a corrupt database file or other problem please also delete the Database folder which can be found within the C Program Files Canon ZoomBrowser EX folder o PhotoRecord and PhotoStitch can be removed with the same procedure Uninstallin the TWAIN Driver WIA Driver 1 Insert a memory...

Page 216: ...as icon see Troubleshooting the TWAIN Driver WIA Driver Uninstall OJ 55 8 Windows 98 Windows 2000 1 Delete the camcorder model name from the Scanners and Cameras Properties list 2 Click OK to close the window 3 Click the Windows Start menu and select Programsl Canon Utilitiesl TWAIN Driver and TWAIN Driver Uninstall The model name of your camcorder appears in place of the asterisks Windows Me Wind...

Page 217: ...stem icon The System Properties dialog appears 3 Click the Device Manager tab 4 If your camcorder model name appears under the Other Devices and or Imaging Devices categories use the following procedures to delete it 1 Select the name of the camcorder model and click Remove 2 In the confirmation dialog click OK 3 Click OK to close the System Properties dialog 5 Double click the My Computer icon on...

Page 218: ... unable to restart Windows Leave the camcorder connected to the computer 1 Windows 2000 Click the Windows Start menu and select Settings and Control Panel Windows XP Click the Windows Start menu and select Control Panel and Performance and Maintenance 2 Double click the System icon 3 Click the Hardware tab 4 Click the Device Manager button 5 If your camcorder model name appears under the Other Dev...

Page 219: ...s visible 7 look for the file starting with OEM A number such as 0 or 1 will appear in place of the asterisk above You will also find another file called Oem pnfl which will have the same number as the Oem l file The two constitute one set There may be many file sets starting with Oem If you double click the Oem file the Windows Notepad program will start and show the file contents Click each Oem ...

Page 220: ...s detach the USB cable from the camcorder and computer and terminate the connection Restart the computer and then reconnect the camcorder TWAIN Driver or WIA Driver is not installed properly First uninstall the TWAIN Driver WIA Driver then reinstall the driver from the DIGITAL VIDEO SOLUTION DISK remove the check marks from the other programs when prompted to select the programs to be installed Fo...

Page 221: ...les Canon ZoomBrowser EX Program 2 Double click Qbconverter exe 3 Select the database you were using until now C Program Files Canon ZoomBrowser EX Program and click the Start button Please note that with ZoomBrowser EX 4 0 both titles and comments appear in the comment list Cannot find the image folders saved on the prior version of ZoomBrowser EX 4 0 Image folders saved under the Program Files f...

Page 222: ...s the requirements outlined above a ImageBrowser and PhotoStitch do not operate on disks formatted with the Unix File System UFS o A CD ROM drive is required to install the software a Connect the USB cable directly to one of the computer s main USB ports The interface may not function correctly if the camcorder is connected via a USB hub a The connection may not operate correctly if you are using ...

Page 223: ...ownloading still images movies recorded onto a memory card to your computer Categorizing and organizing large volumes of still images movies Searching and organizing images chronologically Creating mail attachments from still images Laying out and printing still images Printing indexes PhotoStitch CO 89 Merging panoramic images 61 ...

Page 224: ...le click the CD ROM icon followed by the Mac OS 9 and Canon Digital Video Installer icons Mac OS X 10 1 10 2 Double click the CD ROM icon followed by the Mac OS X and Canon Digital Video Installer icons The installer panel appears 4 Select your language S Click Digital Video Software Installation Installer Panel 6 Select the programs you wish to install and click Install Confirm that there is a ch...

Page 225: ...t and click Agree 8 Select the installation destination and click Choose Installation starts 9 When the message Installation has finished appears click OK 1O After the installation is complete restart the computer as prompted 63 ...

Page 226: ...order is connected via the USB interface If it does happen never disconnect the USB cable Try to awaken the computer with the camcorder in the connected state Some computers will not awaken properly if you disconnect the camcorder while they are in standby mode Please refer to your computer manual for instructions regarding its standby mode 1 Insert a memory card containing still images movies int...

Page 227: ...ot turn off the camcorder or the computer Do not change the position of the POWER switch or the TAPE CARD switch o Format the memory card with the camcorder or from the Camera Window OJ 73 o Still images movies recorded onto the memory card or downloaded to the hard disk are important original data files Create a copy of the file first before working on it on your computer Starting ImageBrowser 1 ...

Page 228: ...xt time you start ImageBrowser 1 To use these settings unchanged click the Start button 2 To do nothing click Cancel 3 To change the settings click Settings Change select the action and click OK 5 Select Display Images and click OK The Communications Settings window appears This window only appears the first time the camcorder is connected 6 Confirm that USB port and your camcorder model name are ...

Page 229: ...Browser will cease to start automatically thereafter n Do not connect the camcorder while the Classic environment is started n Likewise do not start the Classic environment while the camcorder is connected 1 Insert a memory card containing still images movies into the camcorder 2 Connect the Power Adapter to the camcorder 3 Turn the POWER switch to PLAY VCR and move the TAPE CARD switch to CARD Wa...

Page 230: ...d followed by the lmageBrowser folder and lmageBrowser icon 6 Click Canon Camera in the Explorer View section The Communications Settings window appears This window only appears the first time the camcorder is connected 7 Confirm that USB port and your camcorder model name are selected and click Set The Camera Window opens displaying the camcorder images as thumbnails small images 68 Port Detected...

Page 231: ...h HD in the explorer view section Mac OS X 10 1 10 2 Select the user name subfolder of the Users folder in Macintosh HD I Explorer View Section 2 Create a new folder for saving images from the memory card in the camcorder Click the File menu and select New Folder A folder with the name Untitled will be created Click it to change the folder name as you wish In this example we will input ZOO 3 In th...

Page 232: ...ll image movie Downloaded still images movies are saved to the computer and appear in the Browser area Thumbnail Browser area Explorer View Section To disconnect the camcorder click the close box Mac OS 9 0 9 2 or the red close box Mac OS X 10 1 10 2 at the upper left of the Camera Window The Camera Window will close ...

Page 233: ...er instead of the camcorder For instruction on how to connect the PC Card ReaderlWriter please refer to the PC Card Reader Manual 1 Insert a memory card into the reader Mac as x 10 1 10 2 If a dialog appears click the red close box 2 Double click the Canon ImageBrowser icon on the desktop ImageBrowser starts If the icon does not appear on the desktop double click the folder in which you installed ...

Page 234: ...MERA Reconnects the camcorder to the computer SELECT Selects still images movies Menu options Select All and Deselect All Deletes selected still images movies Downloads selected image to the computer Prints selected still images Menu options Layout printing and Index printing Rotates still images Menu options 90 degrees right 90 degrees left and 180 degrees Adds selected still images to the memory...

Page 235: ...he Setup Options button and select Camera Settings from the displayed menu 2 Check or change the settings Click OK to close the window Input a camcorder owner name here up to 31 characters Set the date and time here Click this button to synchronize the camcorder to the computer s date and time settings Check the battery status here Click this to format the memory card in the camcorder Check the re...

Page 236: ...con You can drag this line to change the position of the boundary between the Explorer View Section and the Browser Area Control Panel This area contains buttons that allow you to perform a variety of functions You can drag this part of the frame to change the size of the Browser Window 74 CANON CAMERA Displays the Camera Window SELECT ALL Selects all still images movies in a folder SEND TO TRASH ...

Page 237: ...ou can extract a part of the image 1 Click on the image and drag to form a rectangular frame You can move or change the size of the frame 2 Click this button to extract the area within the frame The extracted part of the image appears ADJUST COLOR Click here to display the Adjust Color window to adjust hue saturation and lightness of the image by dragging the respective slide 75 ...

Page 238: ...he Comment area Click OK to close the window II1 i LI l ton Gnl1 il 00 1 I05t H g gp OO D3 c Print QUit OOQ FileName 100 000I_AUT JPG Camera Model Name Canon OPTURA20 Shooting DatefTime 11 09 0216 15 04 Image Size 64OX480 File Size 132KB File Number 100 0001 Owner s Name 76 0 It depends on your camcorder model which image information will be displayed o When you modify and save an image using anot...

Page 239: ...erating panel displayed below the Browser Area Allows you to enlarge and reduce the size of the thumbnails Allows you to enlarge or reduce the size of the thumbnails If you select View Mode followed by Preview from the View menu you can display a preview of a still image in the Browser Area To stop displaying the preview image select View Mode followed by List in the View menu 77 ...

Page 240: ...lick to display the control panel Display Tool Panel Select to display or hide the tool panel Auto Cruise Enables or disables Auto Cruise When Auto Cruise is active the time movement continues even after you have moved and released the bar Switch to Browser View Exit TimeTunnel and returns to the previous screen o Find and Show Item Double click a thumbnail to display it in another window 00 Enlal...

Page 241: ...mage with a movie icon When you double click the thumbnail in the Browser Area QuickTime Player starts and plays back the movie 1 In the Browser Area double click a thumbnail with a movie icon QuickTime Player starts 2 Click the play button in QuickTime Player The movie will be played back 79 ...

Page 242: ...eypad Advances the slide show manually with the mouse or keyboard Repeat Continuously Runs the slide show in a loop Hide buttons Hides the buttons during the slide show Transition Effect Select the transition effect to be used when moving from one slide to another When you select an effect you can check the effect in the preview window 3 Select the images and select Slide Show from the View menu C...

Page 243: ... sl 11fithllIJtcoll1lpreSsion Normally select this option ResizeandCoIJ1PI SsiIlHIge S JntoJPEGJclrmat 4 Specify the reduction ratio and image quality and click Next Resize Select the reduction ratio relative to the original size of the image Quality Select the image quality The lower the quality the rougher the image becomes but the size of the file also becomes smaller Compress Use it to check t...

Page 244: ...age to your email message 1 Start email application after closing Explorer View Section 1m o You can set the e mail program to start automatically in step 5 Note that some e mail programs may not start automatically Mac OS 9 0 9 2 From the Apple menu select Control Panel followed by Internet and click the Email tab Change the setting in the displayed window Mac OS X 10 1 10 2 From the Apple menu s...

Page 245: ...rd access indicator is flashing Doing so may cause memory card data to become corrupted 1 Select the still image s you wish to print in the Browser Window Movies cannot be printed 2 Click PRINT and select Layout printing from the displayed menu The Layout Options window and Print window appears If the Layout Options window does not appear display it by clicking LAYOUT OPTIONS in the Print window 8...

Page 246: ... Custornlayoutprinting Index printing Axed photo size printing oTiled photo printing OCanon perforated paper printing Prints each imageatthe individually specified size and position Layout Options Window 84 4 Select a paper size and click OK The Print window opens allowing you to change the layout and printing settings The settings available will vary according to the type of layout selected in St...

Page 247: ...isplay H ImaQ esPerPaQel the Print dialog Change the Image Size Drag the border to resize the still image i i r nil Add Text Open the Edit menu and select Add Text _ i 11ir Add Captions to Still Change the default Images number of still Click the still image images printed per and then the Edit page menu and select Click this to rotate Edit Caption the selected still CIick this to reset the layout...

Page 248: ...Browser the image quality adjustment settings are active for all images 1 Click the Edit menu in ImageBrowser and select Preferences 2 In the Preferences window select Print set the image quality settings and click OK See Printing Still Images for the next steps OIl 83 A check mark must be placed here to E2lU ielmllg eCorre tion automatically correct the image quality Select this option to automat...

Page 249: ...g Still Images for the next steps lJ 83 A check mark must be placed here to automatically correct the image C Use i hoto Optimizer PRO alf1d ExiflPrlnt quality Select this option to automatically correct images shot with Exif 2 2 compliant camcorders and other images Select this option to automatically correct only images shot with Exif 2 2 compliant camcorders 87 ...

Page 250: ...ders DPOF print settings are limited to a maximum of 200 still images In that case all DPOF print settings on the 201 st still image and onward will be erased 1 Click SlIDE DPOF in the Camera Window The Edit Slide DPOF window appears 2 Select the still image you wish to print and the number of copies Standard Print Prints selected images in the specified number of copies Use the arrows next to the...

Page 251: ...he following instruction explains how to merge still images recorded in Stitch Assist mode with the camcorder n Still images recorded in Stitch Assist mode with Wide converter or Tele n converter attached cannot be merged correctly 1 Click the green stitch mark in the Camera Window 2 In the confirmation window click Yes PhotoStitch starts Thisimagewasshotin Stitch As sistlnode Would you nice to me...

Page 252: ...s and displays the merged image o You can record the surroundings in 360 degrees and stitch them together later to form a 360 degrees cylinder In 1 Selection and Arrangement select Arrange and 360 degrees By saving this stitched image in QuickTime VR format you can then get a virtual view of the surroundings o For more details please refer to the ImageBrowser and PhotoStitch Help menu ...

Page 253: ...mat on the memory card a You can also add still images to a memory card by using drag and drop to move it from the browser area to the Camera window 1 In the camera window click UPLOAD Today Today 11 13 02 11 13 02 11 13 02 iiI 100 0002 AUT JPG 100 0003 AUT JPG L1EQl1 00 0004 AUT JPG v 11acintoshHD v _TRAVEL II m I Z Ii m W inlljj lll I I n 2 Select the still image you wish to add and click Open Y...

Page 254: ...elected When Adjust Height and Adjust Width are both selected the aspect ratio of the still image the ratio between the height and width of the image may change when the still image is resized When you have selected multiple images in step 2 Save subsequent images with the same settings will be activated Click this button to apply the current settings to subsequent images 4 Click Save to Camera Th...

Page 255: ...RA CHROMA and 4 images for CARD ANIMATION are provided on the DIGITAL VIDEO SOLUTION DISK 1 In the camera window click UPLOAD 2 Insert the DIGITAL VIDEO SOLUTION DISK to the computer s CD ROM drive 3 Double click the CD ROM icon followed by the DVC CARD IMAGE folder The folders CARD CHROMAL CARD LUMINANCEL CAMERA CHROMA or CARD ANIMATION appear 93 ...

Page 256: ...our camcorder model name is displayed under Camera model When you have selected multiple images in step 2 Save subsequent images with the same settings will be activated Click this button to apply the current settings to subsequent images 6 Click Save to Camera The selected images will be recorded to the memory card When recording is complete the images will appear in the Camera Window ...

Page 257: ...rder o Do not detach the USB cable turn the camcorder power off or disconnect the camcorder from the computer while the My Camera Settings is being saved to the camcorder 1 From the Edit menu in the Browser Window select My Camera for Digital Video Cameras The DVC My Camera window appears 2 Click View Camera 95 ...

Page 258: ...ars in the Camera list Start up images will be saved to the Dcim folder in the memory card Computer 22 V irii ipg j321_vi01Jpg IANlMAL022 VI01 JPG IANIf tA L023 VI01 JPG IBAR21_VI01 JPG IBASEBAII 1 V llll IPr P N3 _VIOl JP iETHDANI _ IUI JrU IETHTECHN21_VI01 JPG FUN21_VI01 JPG Bcamera I i 1 96 4 Click Close Follow the instructions in Customizing the Camcorder in the Camcorder Instruction Manual an...

Page 259: ...g procedures to add it to the DVC My Camera window 1 Open the DVC My Camera window and click Add 2 Select the file you created in the Open file dialog and click Open The selected file appears in the Computer list You can save the newly created file to the memory card using the procedures described in Adding a Start up Image to the Memory Card CO 95 To delete a start up image select it and click th...

Page 260: ...to fix corrupted files Uninstalling ImageBrowser and PhotoStitch Move the program s folder into the Trash to uninstall programs such as ImageBrowser and PhotoStitch If the program folders contain subfolders into which still images movies have been saved be careful not to accidentally delete those subfolders ...

Page 261: ... camcorder Insert a memory card into the camcorder The camcorder is not set to the correct mode Slide the POWER switch to PLAY VCR and the TAPE CARD switch to CARD Camcorder is not correctly connected to the computer Read Connecting the Camcorder to a Computer IJ 64 and check the connection Ensure that you are using the correct cable and that its connectors are in good shape If you are experiencin...

Page 262: ...NON 1 800 652 2666 ASIA Canon Hong Kong Co Ltd 9 F The Hong Kong Club Building 3A Chater Road Central Hong Kong Phone 852 2739 0802 Fax 852 2369 7701 Printed on 100 reused paper Document realise avec du papier recycle a 100 EI papel aqui utilizado es 100 reciclado PUB DIM 538 0203Ni2 0 CANON INC 2003 DY8 9120 375 000 PRINTED IN JAPAN IMPRIME AU JAPON IMPRESO EN JAPON ...

Page 263: ...Instruction Manual Mode d emploi du logiciel Manual de Instrucciones del software caU01l This software is for use with Windows XP only Ce logiciel ne peut etre employe que sous Windows XP Este software solamente es compatible con Windows XP PUB DIM 540 ...

Page 264: ... medium if any on which the SOFTWARE delivered 3 OWNERSHIP All rights including but not limited to copyrights and trade secret rights to the SOFTWARE belong to Canon its affiliated corporations and third party licensors Your use of the SOFTWARE is subject to the laws of the United States and Canada and other applicable copyright and trademark laws and nothing in this Agreement constitutes a waiver...

Page 265: ... hereof by clicking YES below and remains in effect until expiration of all copyright interests in the SOFTWARE unless earlier terminated You may terminate this Agreement by destroying the SOFTWARE including any and all copies thereof This Agreement shall also terminate without notice to you if you fail to comply with any of the terms of this Agreement In the event that this Agreement terminates f...

Page 266: ...WIADriver I Downloading Still Images Movies to a Computer 23 Downloading with the Scanner and Camera Wizard 24 Downloading with Windows Explorer 26 Uploading Files from the Computer to the Memory Card 28 DV Messen er Preparations for the DV Messenger 29 Checking the Camcorder Connection 29 Disabling the Firewall 30 Videoconferencing 33 Starting the DV Messenger 33 Preparing the Camcorder for Commu...

Page 267: ...s Other names and products not mentioned above may be registered trademarks or trademarks of their respective companies AV C Camera Storage Subunit is a standard for downloading and uploading files using an AV device equipped with the IEEE1394 The driver complies with the II AV C Camera Storage Subunit Version 1 0 by the IEEE1394 Trade Association WIA stands for Windows Image Acquisition WIA is a ...

Page 268: ...igital video camcorder 3 If you are using a router for Internet connection your router is UPnP Universal Plug and Play compatible Some modems are equipped with a router function For details refer to the manual of the modem This software is compatible with Windows XP only It cannot be used with other Operating Systems Furthermore Windows Messenger 4 5 or higher is required Establish an environment ...

Page 269: ...adband connection to the Internet A Cautions Proper operation is not guaranteed on a dual CPU PC or on a user built PC Proper operation is not guaranteed for all computers that meet the above requirements A CD ROM drive is required to install the software Connect the camcorder directly to the computer using a DV IEEE1394 cable The connection may not operate correctly jf the camcorder is connected ...

Page 270: ...can use following operations with your digital camcorder via the Internet Real Time Video Communication Videoconference IJ 33 You can use your camcorder and computer for real time video and voice communication Sending Movies IJ 33 You can send video and sound recorded with the camcorder via the Internet Camcorder Operation CD 43 ICanon camcorders only refer to the table on the next page I You can ...

Page 271: ...RA10 ZR65 MC ELURA2 MC ZR50 MC ZR60 ELURA2 ZR45 MC OPTURA20 ZR30 MC ZR47 MC KR OPTURA10 ZR25 MC ZR40 ZR20 ELURA40 MC Availability differs from area to area Please refer to the Canon homepage for latest camcorder models Free Download If the person you wish to communicate with does not have DV Messenger it can be downloaded from the Canon Homepage http www canondv com IRead Carefully If you leave th...

Page 272: ...uter when installing from the DV NETWORK SOLUTION DISK Close all programs that are running before copying the driver files Users of Windows XP Professional must first log in as an Administrator to install programs 1 S t th DV NE i woRK s oLu ioN DisK i th p t i D ROM drive If the version of your Windows Messenger is older than 4 5 a dialog appears indicating that DV Messenger cannot be installed I...

Page 273: ...Next Read the license agreements and click Yes Enter your information and click Next Confirm the target folder and click Next If a dialog appears asking you whether you wish to create a shortcut of the DV Messenger on the desktop click Yes 11 ...

Page 274: ... in as an Administrator to install programs 1 2 3 4 5 12 Start the computer O GO lIiIO lIiIO O lIiIO Connect the power adapter to the camcorder 0 0 0 0 OllilO 0 0 0 0 OOllilOO 0 0 G 0 III 0 0 0 0 G 0 III 0 0 III 0 lIiI 0 0 G 0 III 0 0 0 0 Set the camcorder to CARD PLAY VCR mode Connect the camcorder to the computer using the DV cable C022 The driver installation starts automatically Depending on t...

Page 275: ...he camcorder the Scanner and Camera Wizard opens automatically Proceed to step 5 Downloading Still images Movies to a Computer CO 23 If no memory card inserted in the camcorder following dialog appears Click OK to close the dialog If a WIA compliant application software is already installed a dialog for selecting an application appears We recommend selecting the Scanner and Camera Wizard Click OK ...

Page 276: ...4 5 6 Connect the power adapter to the camcorder Set the camcorder to CARD PLAY VCR mode Connect the camcorder to the computer using the DV cable OJ22 From the start menu select My Computer Right click the mouse button on the camera icon and select Properties Shared pments r Create Shortcut I Click the Events tab 7 14 Select Take no action and click OK Now the application will not start automatica...

Page 277: ...pplication automatically select Start this program and click OK If the started application displays a message such as TWAIN data source not found Reinstall the scanner software select WIA Canon Camera Storage and use the WIA TWAIN Driver 15 ...

Page 278: ...ilities DV Messenger and DV Messenger Uninstall in succession 2 1 2 If a confirmation dialog appears click Yes The uninstall utility starts and removes DV Messenger Are yOU sure yOU want to uninstallthis product Connect the power adapter to the camcorder Set the camcorder to CARD PLAY VCR mode 0 0 0 0 Ill Ill 3 Connect the camcorder to the computer using the DV cable OJ22 If Scanner and Camera Wiz...

Page 279: ...t menu select Control panel 1 5N Plorer eWindoWSMedi PIJver fibWindows Movie lYlaker TOUrWindOWS P 1 01 lI I 1 O 0 1 01 0 e 0 0 5 Click Printers and Other Hardware 0000000 O OOOOOOO 0 00000000 00 OOO 0 0 00 0 0 0 O O OOOO OO O O OO OO O O O O 6 Click Scanners and Cameras 17 ...

Page 280: ...nstall process The uninstall process is complete II Troubleshooting the Driver Uninstall If you had problems uninstalling the driver use the following procedures to remove it UffiU Notes Use the procedures below for the following circumstances too If you do not find the Scanners and Cameras icon in the Printers and Other Hardware If the Camera icon does not appear in the Scanners and Cameras folde...

Page 281: ...n the System Properties 1lII 0 e 0 e 5 Click the Device Manager button e e o if e 0 0 0 if 6 If Canon Camera Storage Device appears under Imaging devices and or Other devices categories use the following procedures to delete it 1 Right click the mouse button on Canon Camera Storage Device and select Uninstall 19 ...

Page 282: ...click the C WINDOWS and lNF folders in succession Local Disk c WINDOWS INF If the INF Folder Is Not Visible in the WINDOWS Folder Use the following procedures to show all files and folders 1 Click the Tools menu and select Folder Options 2 Click the View tab 3 In the Advanced setting section set the Hidden files and folders category to the Show hidden files and folders options I Map Network Drive ...

Page 283: ... correct file delete the file set 1 Close the Notepad window 2 Right click the mouse button and select Delete I e 1 CIt 8 Double click the Oem inf file A number such as 11011 or 111 II appears in place of the asterisk above You will also find another file called Oem pnf which will have the same number as the Oem file The two constitute one set There may be many file sets starting with 1I0em ll e 9...

Page 284: ...e camera icon or Canon DV Camcorder camcorder icon appears in the explorer view If the driver is not installed only the camcorder icon appears Camera icon You can download still images movies from a memory card to the computer Camcorder icon You can playback still images movies recorded on a tape on the computer 1 Att h ih Dv bi t t h p t iEE E1394 t i i d the camcorder s DV terminal You do not ne...

Page 285: ...tton on the folder and select Refresh Still images cannot be uploaded to the memory card using the Scanner and Camera Wizard Do not rotate the still images recorded on a memory card in Windows Picture and Fax Viewer or Scanner and Camera Wizard or in Windows Explorer The file format of the original image will be changed and the recording information of the still image may be lost The still image c...

Page 286: ...t My computer on the start menu right click the mouse button in the camera icon and click Get pictures 4 This wizard helps you copy piclures from your camera scanner or other device 10your compuler your nelWOlk or lheWeb Click Next Thumbnail versions of the camcorder file appear 5 6 Confirm that a check mark is on the still image movie you wish to download and click the Next button 24 ...

Page 287: ...ownload is complete a dialog confirming to finish appears If you wish to end the program select Nothing I m finished working with these pictures and click Next Completing the Scanner and Camera Wizard 9 Click Finish e You can also check the still images you have copied by clicking on the link to the destination folder 25 ...

Page 288: ...e of the asterisk The still jmages movies recorded on the memory card will be displayed If you select Thumbnails on the View menu thumbnail versions of the still images movies appear With images not recorded with Canon digital camcorders their thumbnails may not be displayed correctly Double clicking a still image on Windows Explorer displays it in bigger size Double clicking a file other than a s...

Page 289: ... Keep the mouse clicked on the thumbnail and move it to the desired folder drag and drop Right click the mouse on the image and select Copy Open a folder right click the mouse in the folder and select Paste 27 ...

Page 290: ... memory card may not be played back on the camcorder depending on file type and size If you download a still image movie from the camcorder to the computer and upload it again to the camcorder The still image movies may not be played back on the camcorder The DPOF setting before downloading is cancelled d I liilt AUT_II73 Send To 1 eSMrtrut si Delete ReMme 2 28 On the explorer view open a folder w...

Page 291: ...V cable do not connect any other devices to the camcorde s USB terminal Do not connect two or more camcorders to the same computer The DV Messenger may not operate correctly 1 2 3 4 5 Connect the power adapter to the camcorder Set the camcorder to TAPE CAMERA mode Connect the camcorder to the computer using the DV cable CIJ22 From the start menu select All Programs and Windows Messenger Windows Me...

Page 292: ... About the Firewall The firewall is an important security system that protects your computer by limiting or preventing access by other computers on the Internet If you disable the function other computers may be able to access the files on your computer or write files onto your hard disk Disable the firewall before using the DV Messenger and enable the firewall after use A Caution If an anti virus...

Page 293: ...1 2 3 From the start menu select Control Panel Click Network and Internet Connections Click Network Connections 31 ...

Page 294: ...is Enabled If 1394 Connection is listed select a connection other than 1394 Connection If Status is not shown select Details from the View menu 5 cii k th Ad di t b th h k k f th Internet Connection Firewall section and click OK UfftJ Note To enable the firewall after using DV Messenger repeat steps 1 to 4 and place the checkmark back to the checkbox 32 ...

Page 295: ...E CAMERA mode 2 3 4 Connect to the Internet Double click the DV Messenger icon on the desktop or select DV Messenger from the start menu If a dialog appears prompting you to sign out of Windows Messenger click OK The computer signs out of Windows Messenger and starts DV Messenger DV Messenger starts The DVM panel DV Messenger panel and Windows Messenger sign in window appears In the Windows Messen...

Page 296: ...your contact signs in when you are already online A message appears automatically notifying you that your contact has signed in IMessage on Your Computer Screen I When you have signed in set the camcorder and adjust the volume of the speaker and microphone 1 S t ih d t TAPE CAMERA d TAP E Pi AY R mode When you have set the camcorder to TAPE PLAY VCR mode play back the tape 2 34 Open the Tools menu...

Page 297: ...ake sure your camera speakers and microphone are plugged in and lurned on To conlinue click Nexl 4 Select your camcorder and click Next If you are using a Canon camcorder select Canon DV Device 5 When the video picture appears click Next The live video recording of the camcorder appears in TAPE CAMERA mode In TAPE PLAY VCR mode the playback video appears Select the camera you wanl 10 use 35 ...

Page 298: ...ith the setting unchanged 4 4 4 4 4 C 4 4 C C C 0 4 C 4 C 4 0 Q Q 4 C 4 0 0 4 Q 0 0 Q 0 0 0 4 Read the explanation for speaker and microphone settings and click Next 7 6 8 Connect speakers or headphones to the computer Click Click to Test Speakers adjust the volume and click Next Move the volume lever with the mouse to adjust the speaker volume ...

Page 299: ...cator will not operate when the camcorder is in CARD CAMERA mode 9 1O Click Finish The settings for speaker and microphone are complete You have now compleled the Audio and Video Tuning Wizard If you havelrouble with your camera speakers and microphone in lhe fulure or if you change your audio 01 video setlings in another program run this wizard again Tociosethis wizard c1ick Finish There are two ...

Page 300: ... response If you click Cancel the request will be cancelled Waiting response from Jriend messenger canon com If your contact accepts the request the above dialog disappears The communication between your and your contact s DV Messenger starts and you can now operate the camcorder of your contact from the DVM panel An invitation message will be sent to your contact If your contact clicks on the mes...

Page 301: ...ts and you can now operate the camcorder of your contact from the DVM panel Connectiong reoues t from friend messenger canon com is received Would you like to connect If you checked AiiolN remote control DV connected 1 ith your PC may be controllio d by remote user C yes J _ J 2 When the invitation message appears click on the message s The Conversation window appears on your computer screen If it...

Page 302: ...de of your camcorder is highlighted only if a Canon camcorder is connected 4 Remote Section The mode of the camcorder of your contact is highlighted only if your contact is using DV Messenger or Canon camcorder 5 Allow Remote Control This selects whether you allow your contact to operate your camcorder Appears when the operating panel of your camcorder is displayed by clicking Local The default se...

Page 303: ...e DV Messenger CD 50 When DV Messenger is started the DV Messenger task and DV Messenger icon appear on the taskbar 2 1 DV Messenger task Appears when the DV Messenger panel is displayed or minimized If it is minimized it appears when you click this task 2 DV Messenger icon A list of menus appears when you click this icon If the DVM panel is not displayed on the screen it appears when you double c...

Page 304: ...nnect 4 Exit 5 1 About DV Messenger Displays the version of the DV Messenger 2 Help Topics Displays the DV Messenger s help topics 3 Control Panel Open Displays the DV Messenger panel on the screen 4 Disconnect Disconnects the communication between you and your contact The Conversation window disappears 5 Exit Exits the DV Messenger 42 ...

Page 305: ...You can only operate your Camcorder camcorder Non Canon Digital Canon Digital Camcorder You can only operate the Camcorder camcorder of your contact Non Canon Digital You cannot operate either Camcorder camcorder A Caution Depending on the condition of the communication line during videoconference video picture and sound may appear interrupted or sound may be delayed Gi Note If the camcorder is se...

Page 306: ... DVM panel To operate your contact s camcorder when set to TAPE CAMERA mode Click the Remote button on the DVM panel II The CAMERA Operating Buttons 2 3 4 5 1 Zoom W wide angle The subject becomes smaller 2 Zoom T telephoto The subject becomes bigger 3 Focus Mode Selects autofocus or manual focus Click the D checkbox to change to manual focus Manual focus cannot be selected if the camcorder is set...

Page 307: ... modes the picture in the Conversation window may be distorted The buttons on the DVM pane cannot be operated if no tape is inserted into the camcorder If your contact fast forwards rewinds or stops the tape during playback Windows Messenger will continue to show the last picture If the tape is played back again the playback picture appears Depending on the camcorder Windows Messenger may produce ...

Page 308: ...inds the tape Fast forwards the tape Plays back the tape frame by frame Can only be used during playback pause Plays back the tape frame by frame in reverse Can only be used during playback pause Controls the playback speed of the tape Move the lever with the mouse to set the speed no sound will be played back The positions are as follows a Fast Reverse Playback b Reverse x2 Playback c Reverse Pla...

Page 309: ...depending on the Internet connection file type or file size When files are being transferred from your camcorder to the computer of your contact the DVM panel shows that file transfer is in progress with moving graphics Make sure that the graphics are not moving when changing the camcorder from CARD PLAY VCR mode to another mode If your contact has started an application using the file transfer fu...

Page 310: ...ed with the camcorder of your contact When you have selected the files you wish to transfer click Fetch 6 S I t th d ti t i f id t t h fii d li k Save The selected file s will be trans ferred to your computer The transferred file will be saved to the selected folder Numbers will be assigned to the entered file name e g image01 jpg The transfer status will be displayed on the DVM panel If you wish ...

Page 311: ... change the mode of your camcorder In such case reset with the Audio Tuning Wizard before clicking Start Camera 2 3 Change the mode of the camcorder Wait until the video picture and camcorder information such as the tape counter appear in the display and click Start Camera A message with the options Accept and Decline appears in the Conver sation window of your contact If your contact clicks Accep...

Page 312: ...cs Control Panel Open The communication with your contact ends and the Conversation win dow closes If you wish to communicate with another contact select the contact after clicking the Remote button 1 cii k th DV M g t th t kb d i t fE itY from the displayed menu DV Messenger closes About DV Messenger Help Topics Control Panel Open Disconnect 50 ...

Page 313: ...o the computer again ItJ The computer cannot read the images on the memory card Check if the memory card is correctly inserted into the camcorder When downloading still images movies from the memory card to the computer ItJ Canon Camera Storage Device is not recognized The memory card cover is open Disconnect the DV cable from the camcorder close the memory card cover and reconnect the camcorder t...

Page 314: ...essenger may not be able to receive video and sound if you have changed the operating mode of the camcorder during videoconference Click Stop Camera and then Start Camera to restart the videoconference Some Canon camcorders are equipped with a extended recording function IISPIIILP The extended recording modes are not supported by Windows Messenger If you are using the camcorder in TAPE CAMERA mode...

Page 315: ...n window Move the lever to the right until the volume indicator on the right operates Check if the sound device is set to Mute in the Control Panel 1 From the Start menu select Control Panel 2 Select Sounds Speech and Audio Devices 3 Click Adjust the System Volume 53 ...

Page 316: ...ight operates If you are using a Canon camcorder click Stop Camera and check whether Canon DV Device is selected in the Audio Tuning Wizard Click Start Camera to restart the videoconference Ask your contact to check the settings of th e speakers See 1 receive the video picture of my contact in the Conversation window but not the sound II for what your contact should do n There is an echo on the so...

Page 317: ...in TAPE CAMERA mode If the Canon camcorder is set to D Easy Recording program focus cannot be adjusted manually Set the program selector to IE program AE _ The camcorder turns off during use in TAPE CAMERA mode If the Canon camcorder set to TAPE CAMERA mode and a recordable tape is ins rted the camcorder automatically turns off after a certain time to protect the tape and video heads When using th...

Page 318: ... If you cannot operate the camcorder of your contact your contact may not have placed a tI checkmark to the 0 before Allow Remote Control Check if the camcorder is correctly connected to the computer The firewall is not disabled on your and or your contact s computer aBO If an anti virus software is installed on the computer the firewall function of the software may be active In such case deactiva...

Page 319: ...0K CANON 1 800 652 2666 Canon Hong Kong Co Ltd 9 F The Hong Kong Club Building 3A Chater Road Central Hong Kong Phone 852 2739 0802 Fax 852 2369 7701 Printed on 100 reused paper Document realise avec du papier recycle 6 100 EI papel aqui utilizado es 100 reciclado PUB DIM 540 0203Ni2 0 CANON INC 2003 DY8 9120 377 000 PRINTED IN JAPAN IMPRIME AU JAPON IMPRESO EN JAPON ...

Page 320: ...mcorder to your computer with this cable STOP Veillez ainstaller Ie logiciel apartir du CD fourni avant de brancher Ie cable de connexion du camescope aI ordinateur iATENCION Asegurese de haber instalado el software que contiane el CD ROM antes de conectar la videocamera al ordenador con este cable ...

Page 321: ......

Page 322: ...to the manual of the router ows Messenger can its nce function be igi video This software requires that Windows Messenger operates correctly Please establish an environment where VVindows Messenger operates Please consult Microsoft for details s XP and Messenger 4 5 nstalled This software is compatible with Windows XP only It cannot be used with other Operating Systems Furthermore Windows Messenge...

Page 323: ...e Bilder k6nnen dann nicht mehr im ZoomBrowser EX oder auf dem Camcorder wiedergegeben werden CD Avvertenza Per utenti Windows XP Evitate di ruotare Ie immagini in Visualizzatore immagini e fax per Windows 0 in Esplora risorse di Windows II formate originale del relativo file verrebbe modificato e Ie immagini stesse non potrebbero piu essere visualizzate ne ZoomBrowser EX ne sulla videocamera rID ...

Page 324: ...Purchase Should your camera get lostl stolen or damagedl we have your information recorded on a database Just call us to verify purchase for insurance purposes Product Innovation We like to hear from our customers Who you are and what you like about our products See details inside ...

Page 325: ... have comments or questions ab j l mu pnu lm i pJe21se cal 1 800 828 4040 FRN01 01 DWE 034 Canon VID O Product Registration Department POBOX 174022 DENVER CO 80217 4022 II 1 II 1 1 II III I I 111 I I I I I 11 ...

Page 326: ...e those needs to Canon The information you provide on this Product Registration Card will help us understand our customers better and will confirm the date of purchase of your new Canon Camcorder Thanks again for choosing Canon IMPORTANT Please complete and return this questionnaire in the next 10 days Please feel free to ignore any questions that you would prefer not to answer completion is not n...

Page 327: ... If you currently own or plan to buy a DV Image Capture Board which brand 1 Own Canon Brand 3 Plan to Buy Canon Brand 2 Own Another Brand 4 Plan to Buy Another Brand 5 Do Not Own or Plan to Buy a DV Image Capture Board 21 Your date 01 birth Slale 00 11 Samsung 12 l Sears 13 Sharp 14 Sony 15 U Other 3 PC Connectivity 4 Other _ Magnavox Minolta Panasonic RCA Ricoh Cily 7 Where did you buy Ihis Canon...

Page 328: ...ng 47 J Science Fiction 48 0 Wildlife Environmental Issues 49 0 DietinglWeight Control 50 U Science New Technology 51 LJ Self Improvement 52 I Walking for Health 53 I Watching Sports on TV 54 U Community Civic Activities 55 LJ Home Video Games 56 0 Motorcycles 57 0 Watch Cable TV 58 0 Home Video Recording 59 U Moneymaking Opportunities 60 0 Current Affairs Politics 33 Using the numbers in the abov...

Page 329: ...MCORDER Modele CAMESCOPE ET LECTEUR VIDEO DIGITAL OPTlfF A20 H I TT r 1 I 182633020452 Warranty coverage is subject to the country where the unit was purchased Please read all warranty information carefully Pub No DWI Q11 La garantie en vigueur dans Ie pays ou I achat a ete effectue s applique Veuillez lire les details de votre garantie avec soin ...

Page 330: ...p ease cal toH free in Canada 1 800 828 4040 Or wr ie to Canon Customer Relations 6390 Dixie Road Mississauga Ontario L5T 1P7 S VO ES Evez beso n de slJJpport techS1 qtne pour ce r oHchJ i2 jeUm9Z s 1ITla er notre numero sans frais au Canada i 800 828 4040 Ou ecrivez a Service ala cHentele Canon Canada Inc 6390 Dixie Road Mississauga Ontario L5T 1Pl ...

Page 331: ...Dealer Record of Canon Purchase MODEL NO SERIAL NO Purchaser s NAME ADDRESS CITY STATE ZIP CODE ...

Reviews: