background image

3

ENGLISH

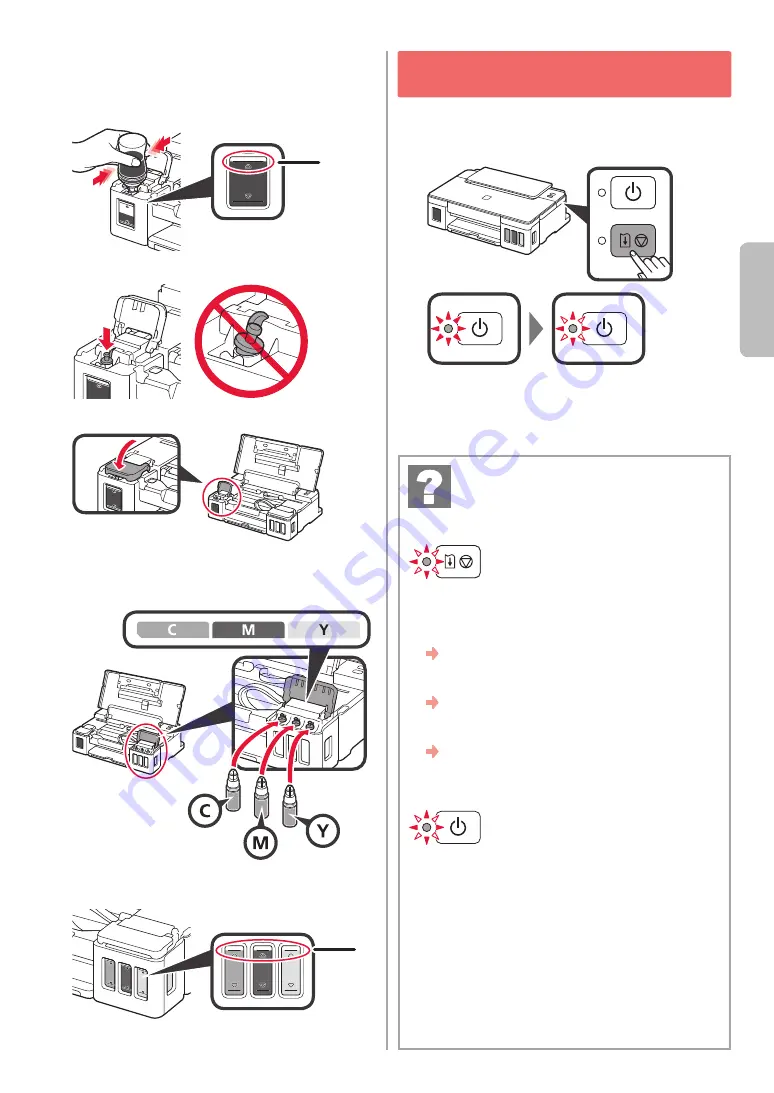
Pour all ink into the ink tank.
Confirm that the ink has been filled to the upper 

limit line

 (A)

.

(A)

Replace the tank cap securely.

Close the ink tank cover.

Repeat steps 2 to 8 to pour all ink into the 

corresponding ink tanks on the right according to 

the label.

Confirm that the ink has been filled to the upper 

limit line

 (A)

.

(A)

10 

Close the top cover.

6.  Preparing the Ink System 

Press the 

RESUME/CANCEL

 button, and then 

confirm that the 

ON

 lamp has changed from lit to 

flashing.

Ink preparation takes about 5 to 6 minutes. 

Proceed to the next page.

The Alarm

 lamp is flashing

Count the number of flashes to determine the cause 

of the problem.

• 

4 times

The cartridges are not installed correctly.

  "3. Installing the Cartridge" on page 1

• 

5 times

No 

cartridges are installed.

  "3. Installing the Cartridge" on page 1

• 

9 times

The protective materials are not removed.

  "2. Removing Packing Materials" on page 1

The ON

 lamp is flashing

Preparing the ink system. This may take about 5 to 6


minutes. Proceed to the next page.

The ON lamp and Alarm

 lamp flash alternately 

times

Ink is not prepared normally.
Press the 

ON

 button to restart the printer, and then 

redo the procedure from "5. Pouring Ink" on page 2.

For all other cases, refer to the 

Online Manual

.

When a lamp is flashing

Summary of Contents for Pixma G1010 Series

Page 1: ...Read Safety and Important Information addendum first Getting Started Baca Keamanan dan Informasi Penting lampiran terlebih dahulu Mari Memulai...

Page 2: ...stalling the Printer page 1 Connecting with Computer page 4 How to Hold Printer Explanatory Movies Memasang Pencetak halaman 1 Menghubungkan dengan Komputer halaman 4 Cara Memegang Pencetak Video Penj...

Page 3: ...tak 2 a Buka penutup atas b Lepaskan pita oranye dan material pelindung kemudian buang a b 3 Memasang Kartrij 1 Buka penutup pengunci kartrij 2 Keluarkan setiap kartrij dari dalam kemasan dan lepaskan...

Page 4: ...Berkedip 5 Menuang Tinta Produk ini membutuhkan penanganan tinta yang seksama Tinta mungkin terpercik ketika kotak tinta diisi Jika tinta menodai pakaian Anda atau benda lain mungkin tidak akan dapat...

Page 5: ...kitar 5 sampai 6 menit Lanjutkan ke halaman berikutnya Lampu Alarm berkedip Hitung jumlah kedipan untuk menentukan penyebab masalah 4 kali Kartrij tidak terpasang dengan benar 3 Memasang Kartrij pada...

Page 6: ...a menggunakan komputer dengan OS selain Windows lakukan pengesetan berdasarkan instruksi pada layar f Klik Unduh dan unduh berkas pengesetan g Jalankan berkas yang diunduh Lanjutkan ke langkah pada ha...

Page 7: ...dialog Kontrol Akun Pengguna User Account Control muncul klik Lanjutkan Continue Ketika Layar AutoMain AutoPlay Tidak Muncul 1 Klik Komputer Computer dari menu mulai 2 Klik dua kali ikon CD ROM pada s...

Page 8: ...s pencetak dalam kotak yang kokoh sehingga mesin ditempatkan dengan bagian alas menghadap ke bawah menggunakan material pelindung yang memadai untuk memastikan pemindahan aman Jangan miringkan penceta...

Page 9: ...top cover b Remove the orange tape and the protective material and discard them a b 3 Installing the Cartridge 1 Open the cartridge locking cover 2 Take out each cartridge from the package and remove...

Page 10: ...the error Flashing 5 Pouring Ink This product requires careful handling of ink Ink may splatter when the ink tanks are filled with ink If ink gets on your clothes or belongings it may not come off 1 O...

Page 11: ...Proceed to the next page The Alarm lamp is flashing Count the number of flashes to determine the cause of the problem 4 times The cartridges are not installed correctly 3 Installing the Cartridge on...

Page 12: ...mputer with an OS other than Windows do the setup according to the on screen instructions f Click Download and download the setup file g Execute the downloaded file Proceed to step on the next page to...

Page 13: ...dialog box appears click Continue When AutoPlay Screen Does Not Appear 1 Click Computer from the start menu 2 Double click the CD ROM icon on the right side of the opened window If the contents of the...

Page 14: ...k leaks Pack the printer in a sturdy box so that it is placed with its bottom facing down using sufficient protective material to ensure safe transport Do not tilt the printer Ink may leak Please hand...

Page 15: ...ang Blok B 15 Kav 9 Kompleks Kemayoran Jakarta 10610 Tel 62 21 6544515 Fax 62 21 6544811 13 Email info datascrip co id Website www canon co id Pendaftaran Petunjuk Penggunaan dan Kartu Jaminan Garansi...

Page 16: ...ON INC 2018 XXXXXXXX Windows 10 Access Online Manual From browser From desktop shortcut From browser Akses Petunjuk Daring Dari browser Dari pintasan desktop Dari browser PRINTED IN XXXXXXXX QT6 2282...

Reviews: