2
Setting Up the Printer
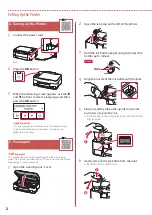
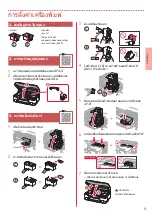
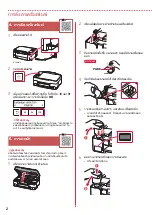
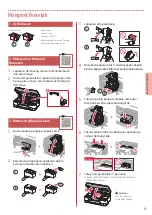
4. Turning on the Printer
1
Connect the power cord.
Back
2
Press the
ON
button.
3
When the following screen appears, use the
[
and
]
buttons to select a language, and then
press the
OK
button.
Important
If an error appears on the screen, see "If an error message
(support code) appears on the screen" on page 3 and
follow the instructions.
5. Pouring Ink
Important
This product requires careful handling of ink. Ink may splatter
when the ink tanks are filled with ink. If ink gets on your clothes or
belongings, it may not come off.
1
Open the scanning unit / cover.
2
Open the tank cap on the left of the printer.
3
Hold the ink bottle upright and gently twist the
bottle cap to remove.
Check!
PGBK
4
Align the nozzle of the ink bottle with the inlet.
5
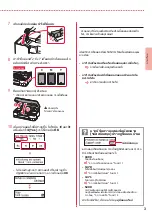
Slowly stand the ink bottle upside down and
push down to pour the ink.
•
If the ink does not pour, gently remove the ink bottle
and try again.
a
b
6
Gently remove the ink bottle from the inlet.
•
Be careful not to spill the ink.
a
b
Summary of Contents for Pixma G3020 Series
Page 9: ...1 1 Setup CD ROM 2 1 2 a b 3 1 2 3 4 C B 5 6 7 b a...
Page 10: ...2 4 1 2 3 OK 3 5 1 2 3 PGBK 4 5 a b 6 a b...
Page 11: ...3 7 8 2 7 C M Y 9 b a 10 Yes OK OK 1890 2 1 1470 3 1 1471 3 1 5200 5 2...
Page 14: ...6 1 2 a b 3 a b 4 5 Save the rear tray paper information OK 6 OK 7...
Page 27: ...1 1 2 1 2 a b 3 1 2 3 4 C B 5 6 7 b a...
Page 28: ...2 4 1 2 3 OK 3 5 1 2 3 PGBK 4 5 a b 6 a b...
Page 29: ...3 7 8 2 7 C M Y 9 b a 10 Yes OK OK 1890 1 2 1470 1 3 1471 1 3 5200 2 5...
Page 30: ...6 a 4 1 Canon 2 3 4 5 B Windows 6 7 5 6 b 6 a EasySetup exe 3 win SETUP exe...
Page 32: ...6 1 2 a b 3 a b 4 5 Save the rear tray paper information OK 6 OK 7...


